
Post Processing: Crystal Clear & Rubber Soft 3D Prints

Get the look and feel of injection-molded parts from your 3D printer with a few post processing techniques that deliver transparent or soft-grip parts in this step-by-step how-to.
Product prototypes that look nearly identical to the final thing is what industrial designers and engineers strive for. It is possible to 3D print parts that are crystal clear or soft and rubbery; it just takes a bit of post-processing to turn what comes off the bed into an impressive prototype. After all, the goal is to give stakeholders a glimpse into what the product will look like before it’s manufactured.
In my experience as a senior technologist and prototype engineer at a large UK firm, post-processing 3D printed parts has been exceptionally useful in creating high-quality, indistinguishable-from-injection-molded pieces for the designers at my organization.
I’ve used finishing techniques for product concepts where design teams were testing various color, material, finish options and for marketing materials. I’ve used post-processing techniques also on functional prototypes such as test rigs and proof of concepts for applications.
In this article, I’ll cover some of the options available to engineers who work with resin-based 3D prints from printers such as Formlabs SLA or Stratasys’ Polyjet technology.

Prepping for Post-Processing
For all the techniques below, I remove my resin parts from the printer and place them in an ultrasonic cleaner filled with isopropyl alcohol for five minutes. The parts are then rinsed with clean, room temperature water and left to dry. The parts are then placed under UV lighting to cure for about two minutes. Although this may vary depending on your printer and your resin, over exposure to UV light can make your clear prints yellow.
Once cleaned and cured, I sand off any remaining supports with 480 grit sandpaper, this ensures the surface is smooth to touch and allows any future sprays and adhesives to stick better.
If you’ve worked with FDM prints, you know sanding is a simple, but versatile tool in changing the surface roughness of a part. Sanding broadly refers to any abrasive removal of material to create a smoother or rougher finish and can be achieved using sandpaper or for larger and higher volume parts, save time with a sand blaster or bead blaster.

I prefer to use sandpaper instead of bead blasting because it allows for more control when smoothing the surface of the part, whereas bead blasting is more suited to creating a more uniform finish. Sanding typically takes between 5-10 minutes depending on part complexity and how smooth you would like the part to become. For most parts, 480-grit sandpaper removes supports well and is a good compromise between not needing too much time and properly preparing the surface for spray paints and coatings.
For larger parts, I like to use an orbital sander with high grit sandpaper to take the initial layering off the part and then use the same grit sandpaper to smooth out the finer, harder-to-reach areas.
In the past, I have worked with prototypes that come into contact with liquid and so when using abrasive finishing not only are you smoothing or roughing the surface, you are also changing the surface energy of the part. In other words, if the part comes into contact with liquid, it will interact with the liquid in a way that either repels (hydrophobic) or absorbs (hydrophilic) liquid via capillary action. When using low grit sandpaper that creates bigger scratches in a part you effectively create small channels that carry liquid in the same way that porous materials such as plaster, sponge, and paper etc. A part that has yet to be sanded will repel liquid more than a part that has been sanded with low grit sandpaper.
For Polyjet parts, this effect is most noticeable on the matte finish versus the glossy finish found on Polyjet parts – the matte regions will absorb and carry liquid while the glossy regions will repel it.
This should be taken into account when choosing which surfaces to sand if you are prototyping something that contains liquid or comes into contact with liquid.
Crystal Clear Resin Parts
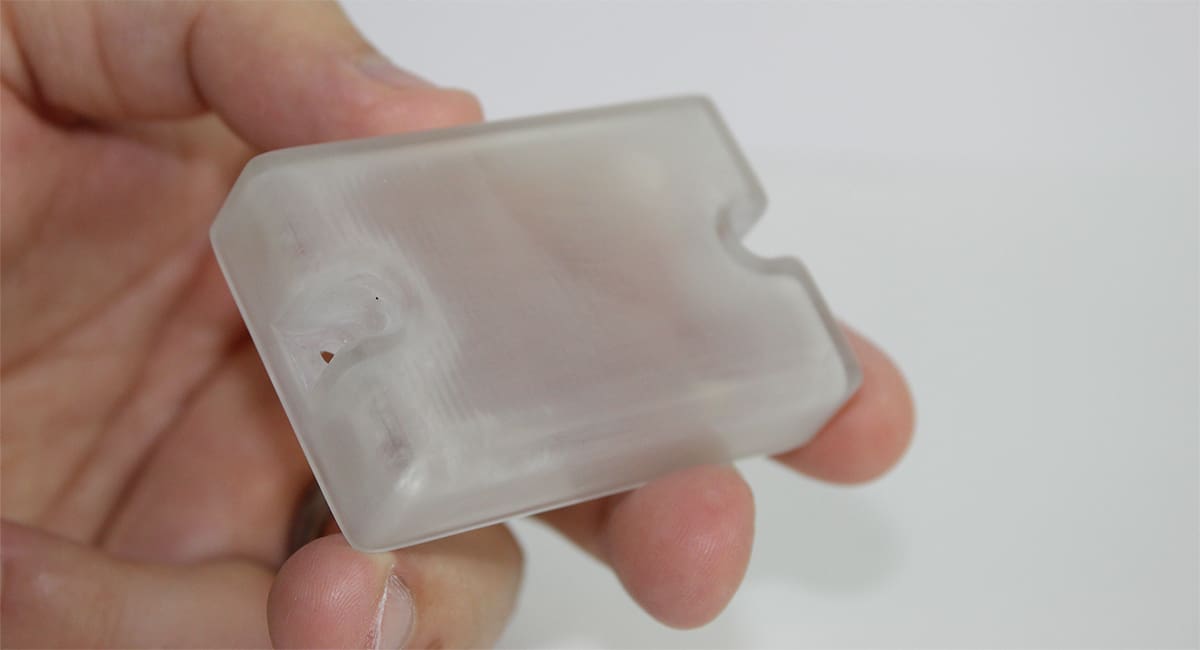
Below I have detailed my technique to achieve a crystal clear finish using common materials found even in the most basic of engineering workshops. The printing material for these parts was Anycubic plant-based UV Resin Clear, which retails for about $41 a 1-kg bottle.
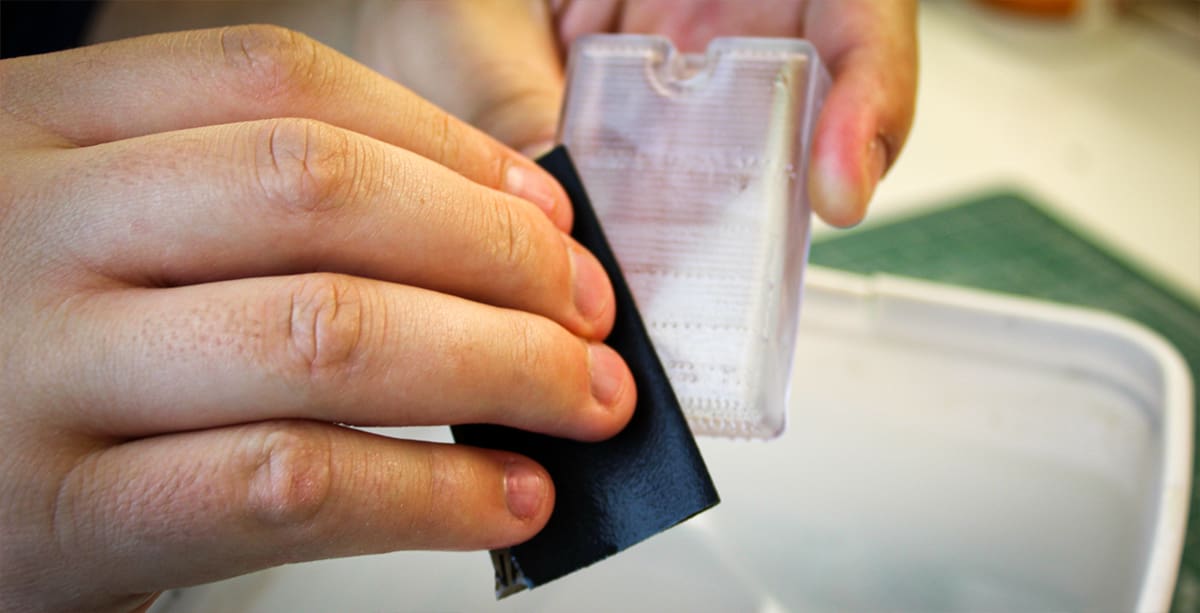
To mimic injection molded clear parts, I typically start off with 480-grit sandpaper, rubbing in a uniform, circular motion. Do this with the part in a tub of water to keep the sandpaper and part clean.
Once you have gone over the part with 480-grit sandpaper, sand with a 600- to 800-grit sandpaper to create an even smoother finish that feels smooth to touch, but still has the frosted glass visual effect.
Finally, I bring out the 1200-grit sandpaper, which brings the part to an almost polished state. At this point, the part is very smooth to touch.
Beyond this level of smoothness, I’d recommend using a buffing wheel (e.g. Dremel or rotary tool) at moderate speed with a buffing compound (e.g. T-Cut, if you’re in the UK) to achieve a polished finish.
Clear Coatings & Lacquers
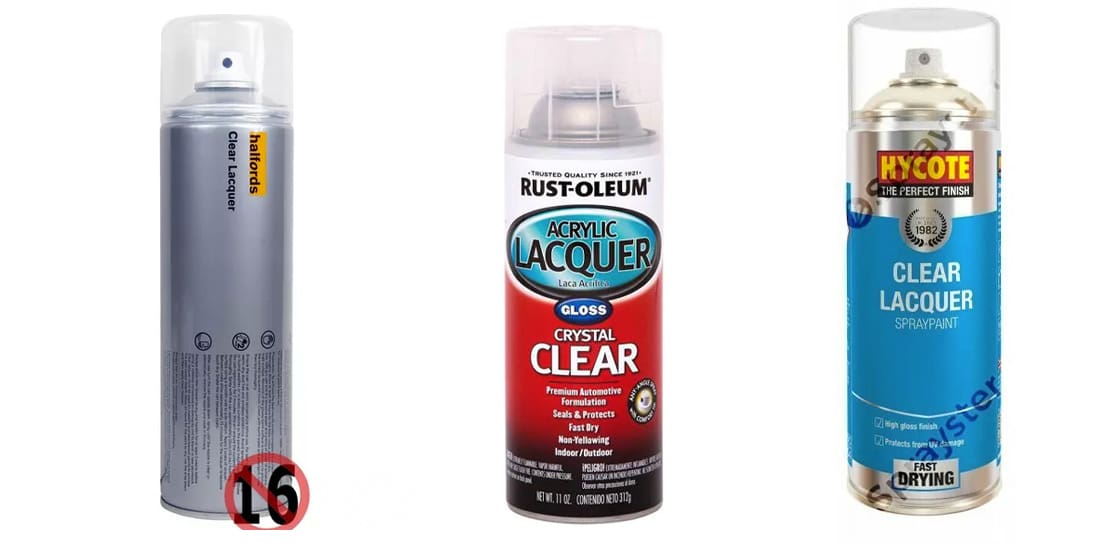
You’ve just spent some time removing surface material from your 3D printed parts so now it’s time to add material. Clear coating is often overlooked but remains a simple, effective, and quick way to smooth, fill imperfections and enhance the clarity of clear parts. I use the method described below quite often on Polyjet printed parts where you have a glossy and a matte region of the same part to create a more uniform appearance and improve the clarity of the matte finish.
Clear coats and lacquers come in different finishes from matte, satin to semi-gloss, and gloss. To match the glossy finish on the top of the part I have chosen a gloss lacquer.
As with any aerosol spray, I use a small desktop extractor that keeps mist and vapors from being released in the air during spraying. This not only improves the air quality but also the surface quality of the painted parts.
The lacquer I use is Halfords clear automotive lacquer because I’m in the UK, but any glossy lacquer will work. I have yet to experience any reaction between the resin print and the lacquer since resin prints are typically quite solvent resistant.
Spray the lacquer from around 30 cm away, moving side to side while spraying to ensure a consistent coat and to avoid overspray. Depending on the specific spray you may use, I recommend waiting at least 24 hours at room temperature before handling the part.
Once dry, sand again with a very high grit sandpaper (1000+) to remove any imperfections in the coat, such as stray dust particles, overspray, or “orange peeling”. Once sanded, rinse the part in clean water and ensure the part is dry and free from dust before applying another coat.
Depending on how coarse and rough the surface is, you may need to apply additional coats of lacquer. A word of caution though, do not be tempted to apply a thick, heavy coat of lacquer because this will result in a tacky surface that never seems to dry. Always apply thin, numerous coats over one thick one.
Rubber coating for a rubber finish

Rubber coating post-processing techniques offer engineers and designers the ability to create rubberized finishes on prototypes similar to over-molded finishes you find on common items like handles, handsets, and tools. I prefer this method over cleaning out my vat and changing materials to an elastomeric resin. In fact, the main advantage of rubber coating during post-processing is the ability to create a rubber finish, while printing all your parts in one material. This has saved me time and money in the past because I don’t need to print an “overmold” part in a rubber-like resin. However, this calculation changes with volume.
There are numerous products on the market that offer rubber coatings in a variety of colors and come in aerosol (for spray application) and pot (for dipping the part or brushing) form – I recommend applying this finish with spray because it creates a more uniform and controlled appearance.
Below is my technique for applying a rubber finish on a 3D printed screwdriver, printed in a general-purpose material. The process of application is essentially the same as applying spray paint and lacquers described above.
My prototype here is a screwdriver with a soft grip. Before spraying the rubber coating I mask off the shaft of the screwdriver to ensure only the handle is covered. I then begin spraying the rubber coating from 6- to 12-inches away until fully covered. As with other sprays, it is essential not to overspray and cause dripping of the coat. Luckily with the brand Plasti-Dip, if you make any mistakes, you simply wait until dry, peel it off, and try again.
After approximately four hours at room temperature, the screwdriver handle is dry and remains soft to touch, just like a rubber coating found on some consumer electronics.
So as you can see, there are a few options out there that allow you to take your prototypes and concepts and turn them into products with relative ease. The options shown in this article are just some of the methods I’ve used in the past professionally to produce realistic prototypes on a budget, while also providing a quick turnaround to clients.
Photos by Christopher Daniels.
License: The text of "Post Processing: Crystal Clear & Rubber Soft 3D Prints" by All3DP Pro is licensed under a Creative Commons Attribution 4.0 International License.