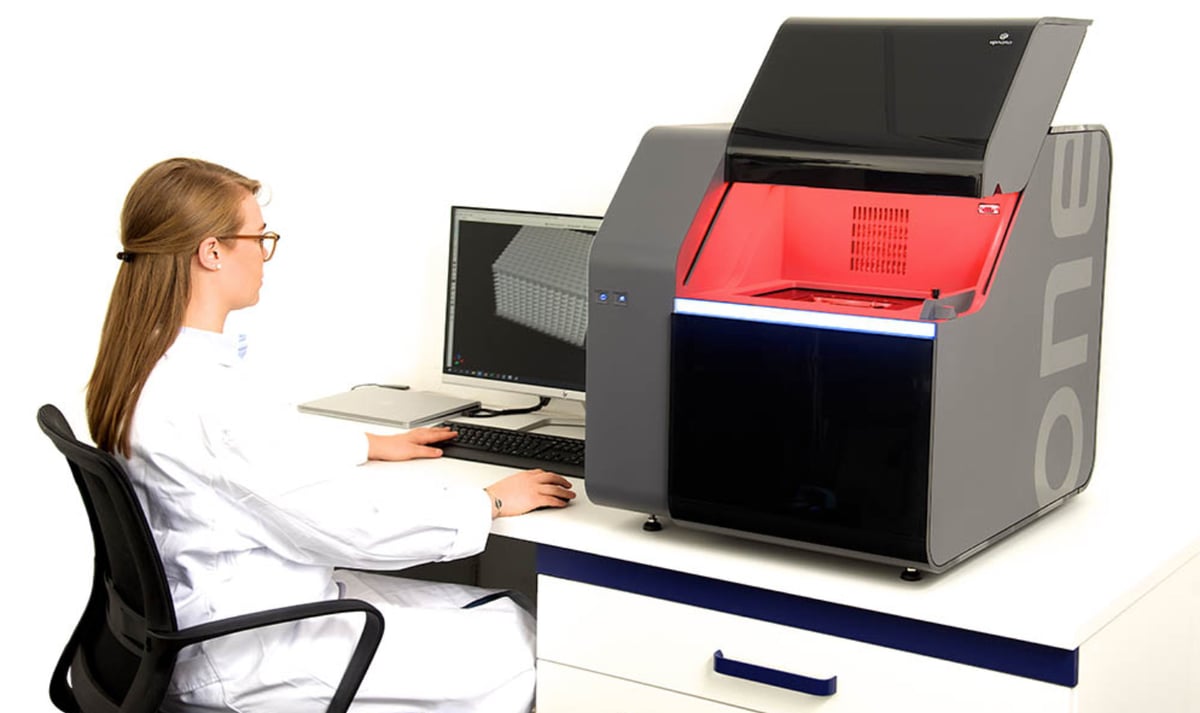
Microscale 3D Printing: TPP Tech Explained

Learn the science behind two-photon polymerization (TPP) and why it has the potential to usher in a new revolution in micro additive manufacturing.
If you’re familiar with stereolithography (SLA) then you’re halfway to understanding two-photon polymerization, abbreviated as TPP, 2PP, or TPA. These two 3D printing processes have a lot in common, but TPP enables you to print much, much smaller, and more finely detailed parts. It’s currently being used in research, medical applications, and manufacturing.
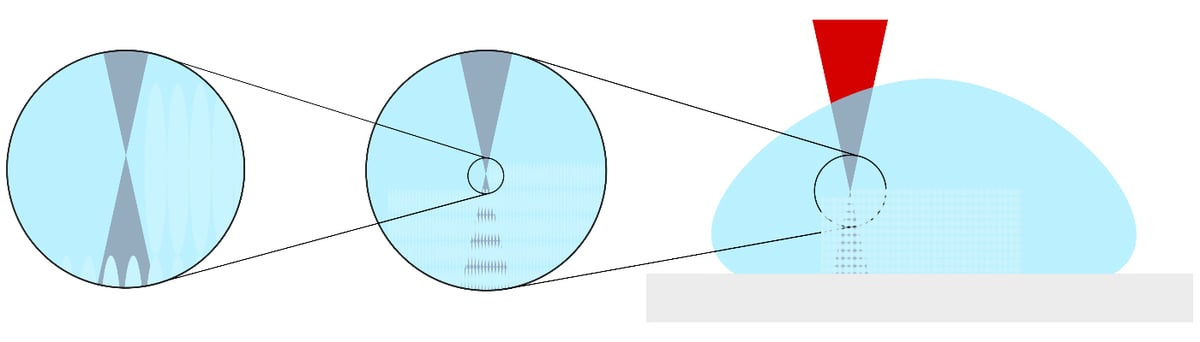
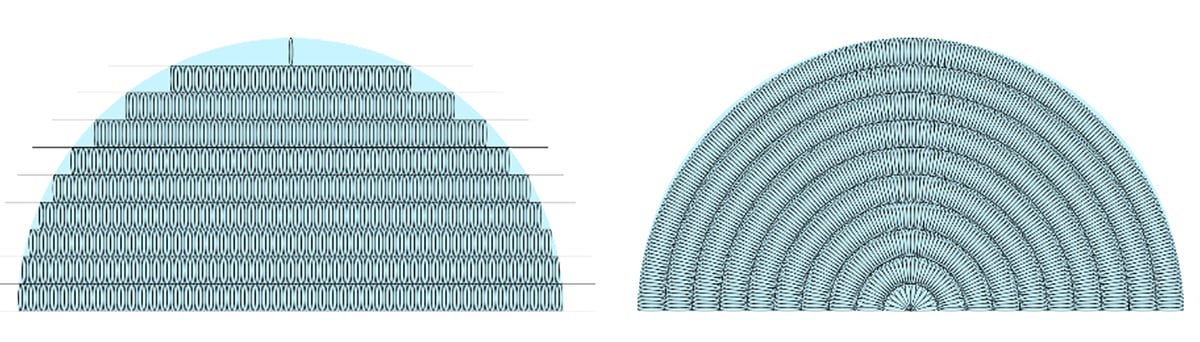
TPP is a laser-based 3D printing process, in which the laser is focused into a tight spot in a vat of special resin. This spot is then used to cure individual 3D pixels, also known as voxels, in the resin. By sequentially curing these nano- to micrometer-small voxels layer by layer, in a predefined path, you can create 3D objects. These can be several millimeters large while maintaining the nanometer resolution.
Why is this useful? One example is manufacturing optical multistage lens systems, directly onto the end of a tiny glass fiber. As a result, this tiny 3D printed lens can dramatically widen the viewing field of extremely small cameras used in healthcare, sensors, surveillance drones, or security.
Besides optical elements the TPP process is suited for the direct manufacturing of so-called micro electromechanical systems (MEMS). These are often just shrunk down versions of comparable larger counterparts and present in many everyday devices, such as mobile phones and medical devices.
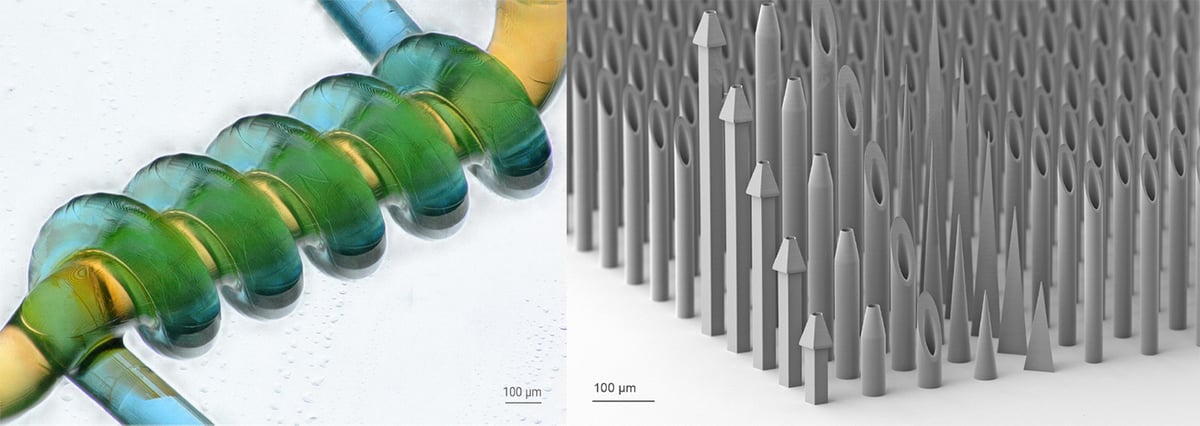
For example, the robotic micro gripper manufactured by researchers, with its three arms and three springs, is printed directly onto the end of a glass fiber. It’s just 300 x 300 µm and about 200 µm high and has myriad potential applications including microsurgery and drug delivery.
In fact, when it comes to micro additive manufacturing, the potential uses especially in medicine and electronics is limitless. Now, let’s take a deeper look at the technology.
TPP vs. SLA 3D Printing

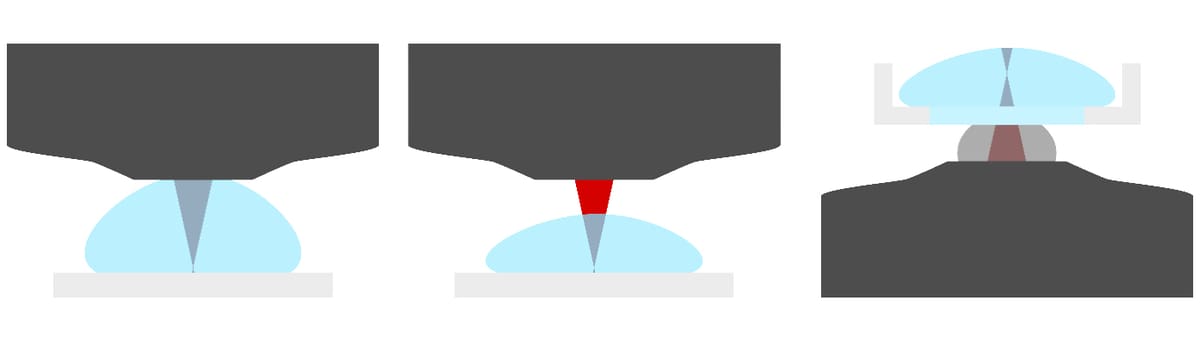
In SLA 3D printing, a UV laser with a wavelength of about 350 to 400 nm is scanned in x- and y-direction to harden points in a liquid resin. Here, the resin atoms only absorb a single photon from the laser to initiate the hardening or curing process.
In contrast, TPP printers typically use infrared lasers, which have wavelengths of about 760 nm. Due to this difference in wavelength, resin atoms need to absorb two photons to initiate the curing process. This is less trivial than it sounds. The atoms must absorb the two photons in very quick succession. For this reason, TPP printers use femtosecond lasers and pulse the laser beam in intervals of a few hundred quadrillionths of a second.
In addition to wavelength and pulsing, the light intensity of the laser must be significantly increased in order to reliably initiate the curing process. This is done by focusing the laser into a very tight spot, with a typical diameter of about 340 nm to 1600 nm.
This all sounds like a lot of added complexity. But due to the fact that resin is only cured in exactly the focus spot of the laser, TPP printers can selectively cure individual voxels along the z-axis. This is not possible in SLA or DLP 3D printing. A side effect of having to focus the laser beam this intensely is the resulting nanometer resolution.
As a comparison, typical SLA printers have a horizontal resolution of about 25 µm (Formlabs Form 3), DLP printers of about 50 µm (Prusa SL1S), and TPP printers of about 0.17µm (UpNano One).
Now that we’ve established a bit more background knowledge, we can have a look at what it takes to print with the TPP process.

TPP Design and Software
Just like any other additive manufacturing process, the object you want to print starts off as a digital file in 3D modeling or CAD software. If we stick to the example from the introduction, the design of an optical lens may be derived in a program specific to optical designs, its model however can then simply be created in the users CAD program of choice.
The 3D data is then imported into the slicing software. For TPP printers, however, this software is often specific to the individual printer. The slicing software is where you set print parameters, such as speed, laser intensity, and layer height. What parameters you select in part depends on the object you’re printing, its size, the laser focusing objective used, and the material you’re using.
To print a micro-optical lens, it is key that the entire body is clear and contains no artifacts. Print defects, such as bubbles, can happen if the laser power is set too high, the printing speed is too low, or the printing area is too small for the previous two parameters.
How TPP Printers Work
There are a handful of manufacturers for TPP print systems. What many of the machines have in common, is that they have a gantry system which allows them to manipulate the printing area in x-, y- and z-direction. This system alone would be sufficient for printing. However, manufactures often additionally employ galvanometer laser scanners. These are made up of two motor-controlled mirrors which can very quickly deflect the laser beam in the x- and y-direction. This is beneficial as the print itself can stay static while achieving high print speeds. As the scanning area of such galvanometers is limited, the two systems are usually used sequentially. Meaning the gantry is responsible for choosing the rough print location and the laser scanner is used for the actual print process. This lets you print many parts sequentially.
A key difference among printers is the shape of the print platform and how the laser light is coupled into the resin. The print platform can be a flat piece of metal or glass, onto which a drop of resin is placed. The resin usually has a viscosity similar to that of honey and thus stays in place. Due to the typically small part size, a drop of that resin is also sufficient for the entire print.
Alternatively, the resin can be stored in a small vat which may have a translucent floor. The laser light can then be coupled into the resin in at least three ways. One, the laser objective can make direct contact with the resin; two, focusing the laser through a translucent build plate; or three, focusing the laser through air and then into the resin. All of these options have their pros and cons, but we’re not going to dive into those details here.
Just like any 3D printing process, you need to prepare the vat or surface you are going to print on. The glass on which you print has to be very clean to ensure proper adhesion. One cleaning approach would be to sequentially clean the glass with acetone, isopropanol and distilled water before removing residual moisture. In a laboratory context, the glass may additionally be treated with oxygen or plasma to achieve even more reliable print adhesion.
You also need to house your printer in an environment that is not subject to vibration caused, for example, by trucks passing by on a nearby road. Also, a cleanroom environment would be ideal, but newer print systems are more enclosed and thus lessen the need for this.
Before we hit the “start print” button, let’s have a look at some of the special materials that can be used in the TPP print process.
TPP Materials

As with all 3D printing processes, the range of usable materials plays a significant role in the possible applications of the individual process. In theory, commercial resins used in SLA 3D printers would work for TPP but they are not optimized for the process. Many commercial UV resins contain color pigments that inhibit the laser from entering into the inner parts of a resin drop.
A variety of materials can be used in the TPP 3D printing, but vary depending on application. For example, a photoresin for optical elements would vary greatly from a biofabrication resin for tissue engineering.
Printer manufacturers usually offer a set of materials for which they supply machine-specific parameters, so that users need to do as little as possible trial and error work tuning in the right parameters like print speed, laser power, etc.
You’re not limited to the manufactures offerings and researchers have come up with a wide variety of materials which offer specific: optical-, mechanic-, electric-, chemical- and magnetic properties.
Postprocessing TPP
After printing, the build plate is removed from the printer and depending on the material one or more solvents (e.g. isopropanol or acetone) are used sequentially to wash off the residual uncured resin. To ensure that all of the resin is fully cured, the print may additionally be heat treated on a hot plate at around 70 °C or subjected to a UV treatment.
State of Research into TPP Applications
The TPP 3D printing process is a relative newcomer compared to other additive manufacturing methods. Research on the matter started appearing around the 1980s and the basics physics fundamental to the process were only established in the early 1900s.
At the Institute for Control Engineering of Machine Tools and Manufacturing Units (ISW) of the University Stuttgart in Germany, where I work, one area of research focuses on additive manufacturing processes.
The TPP process is of special interest, and, in one of our current research projects, we’re exploring multi-axis (5D) capabilities within the TPP process as these have received almost no attention. For example, in the case of printing optical lenses, it is unknown how the properties of a lens are affected if one creates the lens by stacking vertical layers as opposed to printing spherical layers. A 5D printing process would also allow users to vertically print onto free-form surfaces and would thus enable further research on this topic. However, as such machines currently don’t exist it is of interest to create such printers.
The ISW’s specific research project is motivated by the previous capability of printing onto free form shapes. The basic idea behind the project is increasing the productivity of the TPP process while printing aspheric lenses. These lenses are particularly interesting because they can eliminate or minimize optical distortions normally present when using mass produced spherical lenses. To achieve this increase in productivity, cheap spherical lenses are to be used as the starting point of the print process. The desired aspheric contour is then printed onto the spherical lens. This reduces the required print time and material.

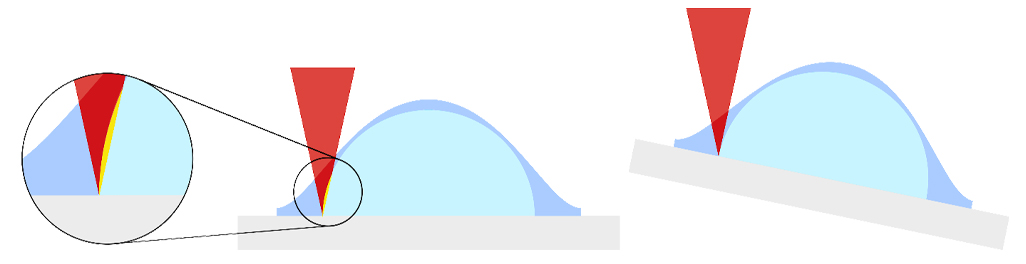
In this case, it is again interesting to examine how the optical properties of a such a lens are influenced by stacking voxels vertically relative to the build platform or by perpendicularly stacking these onto the spherical lens. Yet, printing on the glass lenses creates another necessity for the 5D printing process. When curing resin near the edge of the glass lens using the highly focused and thus conic laser beam, the beam will be refracted by the lens itself. This will impair the curing process. With a 5D printer one can simply tilt the lens and avoid refraction issues.
It is for these reasons why we are developing a 5D TPP print system. However, there are a couple of major challenges linked to this idea. One is that the position of the spherical lens blank has to be perfectly in line with the center of the to be printed aspheric contour. Second, the system has to be capable of nm precession, and third a TPP specific multi-axis slicing process has to be established to generate machine code which can take advantage of the 5D capabilities.
To help overcome these challenges, we are collaborating with the university of Stuttgart’s 4th Physical Institute, which has extensive experience in additive manufacturing micro optics. Our research is into TPP is ongoing and there’s no doubt you’ll be hearing more about 5D TPP and other TPP printers and applications in the future.
Daniel Kurth, M.Sc., is a Ph.D. candidate and a research assistant in mechatronic systems and processes at the Institute for Control Engineering of Machine Tools and Manufacturing Units (ISW) at the University of Stuttgart.
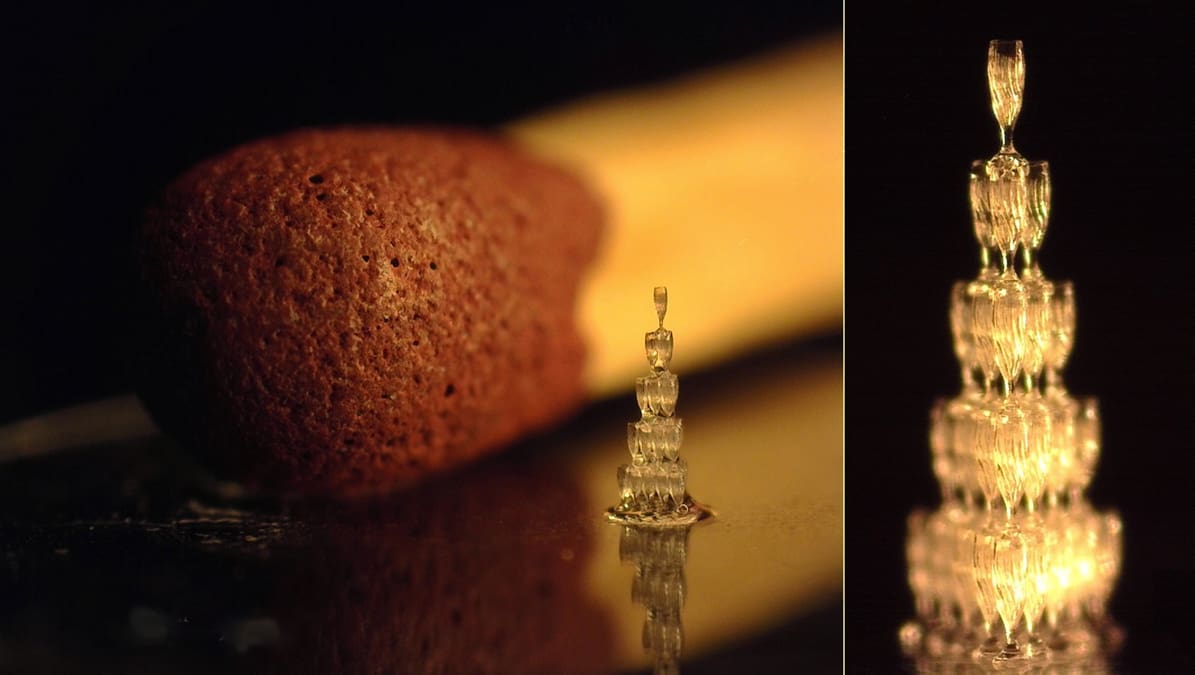
Lead image source: Parts made on microFAB-3D, an ultra-high resolution 3D printing system from Microlight3D, based on two-photon polymerization direct laser writing technology.
License: The text of "Microscale 3D Printing: TPP Tech Explained" by All3DP Pro is licensed under a Creative Commons Attribution 4.0 International License.