![Featured image of [Project] 3D Printed PiKon Telescope](https://i.stageall3dp.com/workers/images/fit=scale-down,w=1200,h=675,quality=79,gravity=0.5x0.5,format=auto/wp-content/uploads/2019/05/31143507/pikon.jpg)
[Project] 3D Printed PiKon Telescope

Explore the night sky with this (partly) 3D-printed telescope. Astronaut training sold separately.
The PiKon is a 3D printed ‘astro-cam’ powered by a Raspberry Pi. Designed to demonstrate what budding scientists can do with disruptive, accessible technology like 3D printing, this is a replica of a Newtonian reflecting telescope which uses a Raspberry Pi camera instead of a conventional lens.
The apparatus can be put together relatively quickly with the help of several 3D printed components and some basic telescope-ey things like a mirror. So without further ado, let’s put together your new sky-seer!
Getting Started
Parts List
- Telescope Tube
- Mirror
- 3.5 mm x 10 mm Self Tapping Screws (8)
- 8mm Nuts (3)
- 8mm x 25mm Bolts (3)
- Springs (3)
- Double Sided Tape Pad
- Raspberry Pi 2 Computer
- Raspberry Pi Camera
- Ribbon Cable
- Raspberry Pi Case
- M2 x 12mm Nylon Bolts (4)
- M2 Nylon Nuts Micro SD card (4)
- Tripod Mount
- Rubber Rack – T2.5 Timing belt
- Screw Threaded Shaft (5mm)
- 5mm Square Nuts (2)
- 5mm Dome Nut Cog
- Camera adaptor
- M4 Bolts 16mm (2)
- M4 Nuts 2.5mm (2)
- Drill 4 mm
- Drill 1.5 mm
- Allen Key
- these 3D printed parts
Let’s Build It
You can find the original, detailed PiKon guide here.
Physical Assembly
Mirror Assembly
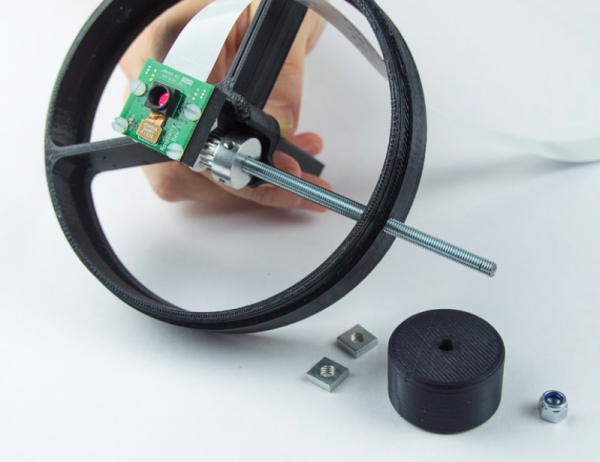
The guide recommends starting with the mirror assembly, which should be assembled before attaching the mirror itself.
The Mirror Mount and Base are first connected by placing three 8mm nuts through the Mirror Base, then through the springs. After that, the bolts go through the Mirror Mount and then into the 8mm nuts, secured in place buy the hexagonal holes in the Mirror Mount.
Spider (Camera)
First, the lens of the Raspberry Pi camera needs to be removed – but make sure that when you do, the ribbon cable remains attached to the PCB. After that, the camera can be attached to the Camera Mount with four 2mm nuts and bolts.
After that, we can assemble the focusing mechanism: it consists of a cog, a threaded shaft, and a Focus Knob. Place the cog in the middle fo the assembly to start, then secure it in place with the shaft, capped at the end with the Focus Knob. Then, the Threaded Shaft is placed through the hole in the center of the seemly, touching the circumference of the cog – it might be stiff at first, but it should loosen up after a few passes.
The Raspberry Pi Case
The Pi case is attached to the Spider by the Raspberry Pi mount and a single self-tapping screw after a hole is drilled to clear space. The hole should be drilled over one of the legs of the spider so that the self-tapping screw does not protrude. The two parts of the Raspberry Pi case then clip together, after the Pi is inside, and then insert into the Raspberry Pi Mount.
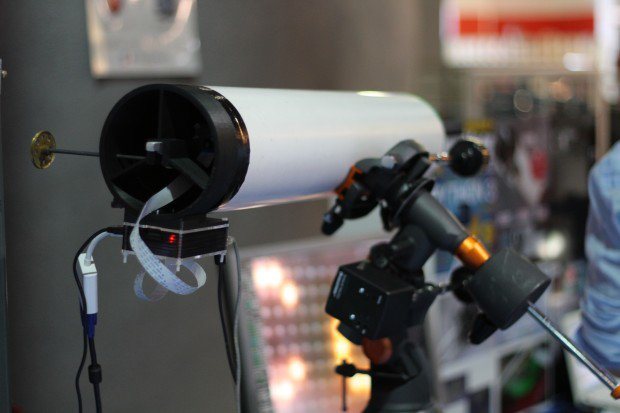
The Final Assembly
Before sealing it at the ends, you might want to paint the inside of the Tube black to improve performance. But once that’s done, you’ll want to add the tripod mount.
To do this, balance the tube in your hand to find its center of gravity, then mark the position of the two holes to drill using the Tripod Mount. After securing the tripod mount, you can replace the Mirror and Spider Assemblies – make sure not to fix the spider in place until you’ve tested the PiKon so that you can find the proper orientation of the camera.
Software Steps
Raspberry Pi Configuration
Set up your Raspberry Pi as you would normally – Raspbian is recommended as the operating system. If you need an in-depth guide to setting up a Raspberry Pi, check out the official documentation.
Pictures are taken through the command line, so it’s most convenient to choose to boot to the command line rather than the GUI. Taking pictures is simple:
Raspistill –o test.jpeg –t 30000 –hf
Raspistill –o test.jpeg takes an image in jpeg file format called “test” with a short default on-screen preview.
–t 30000 sets the on-screen preview time before the image is taken. Units are in milliseconds; therefore this command would use a 30-second preview.
–hf flips the image horizontally. The image at the camera sensor is a mirror image.
Setting It Up for Observations
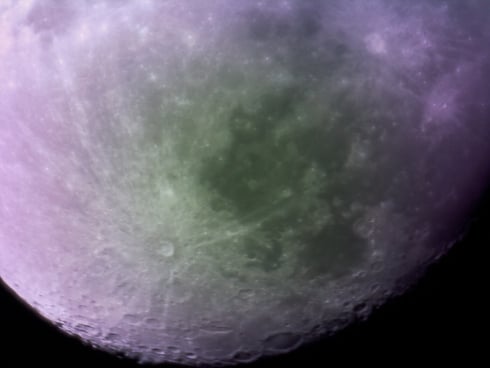
First, try Raspistill –o test.jpeg to make sure everything is working. Then, set the focus on a distant object. Extending the preview time can give you some time to get dialed in, for example with Raspistill –o test.jpeg –t 120000 –hf. Once you’re in focus, rotate the Spider in the tube until the image is upright. Then, you’re all set to chart the night sky with your new telescope!
To transfer images from the Raspberry Pi, the author of the project recommends using Dropbox from the Raspberry Pi.
Further Links
For a full build guide by PiKon creator Mark Wrigley himself, check out this Instructables post.
If you’d like to see other builds of the PiKon, check out the official Instagram account – you might also find exotic mods to draw inspiration from.
License: The text of " 3D Printed PiKon Telescope" by All3DP is licensed under a Creative Commons Attribution 4.0 International License.