![Featured image of [Project] 7-axis Hand-Cranked Radial Engine Model](https://i.stageall3dp.com/workers/images/fit=scale-down,w=1200,h=675,quality=79,gravity=0.5x0.5,format=auto/wp-content/uploads/2019/06/31175858/featureeee-1.jpg)
[Project] 7-axis Hand-Cranked Radial Engine Model

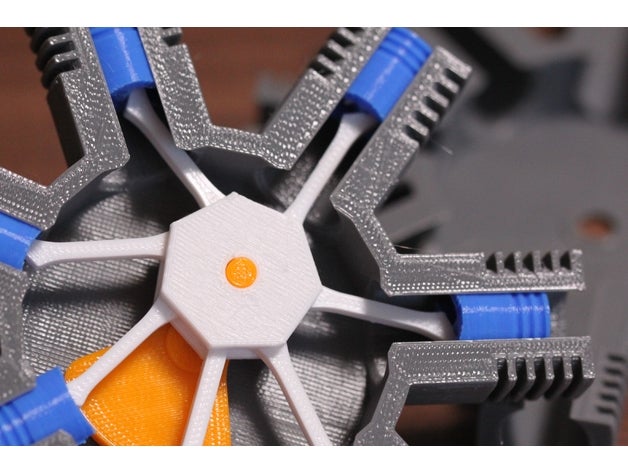
Take fidget spinning to the next level with this hand-cranked seven-axis radial engine model.
Hand-cranked and fully functional, this is a model of a seven-cylinder radial engine by plusalphaDesigns. It’s a “reciprocating type internal combustion engine configuration in which the cylinders ‘radiate’ outward from a central crankcase like the spokes of a wheel,” according to Wikipedia.
It’s a relatively painless model to assemble and print, requiring just a handful of plastic parts – you don’t even need any fasteners. So let’s jump right in!
Let's Build It
Parts List
You don’t need very many parts for this slick model:
- Cylinder Block
- Handle
- Rotor
- Pin
- Hub Bottom (Requires support)
- Hub Top
- Piston (x 7ea)
- Rod (x 6ea)
You’ll want to make sure all the parts fit together with sufficient clearance for smooth motion – whether that requires sanding or tolerance-tweaking, we have some guides to help make this experience as smooth as possible.
The Assembly
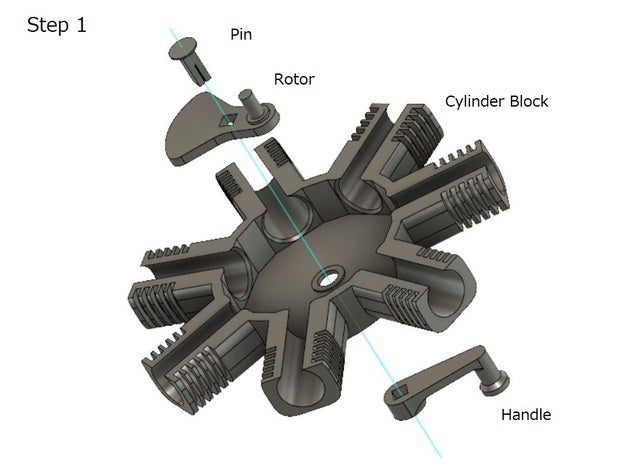
First, secure the rotor and handle in place on the cylinder block with the pin. Notice the square profile of the pin allows torque to transfer to the rotor without the use of a specialized shaft. For such a low-torque application, such a solution is perfectly functional.
Next, you’ll want to secure the hub bottom to the rotor and attach your first piston. The hub bottom contains seven pegs – mounting points for each cylinder which is rotated by the rotor. Before connecting a piston, you’ll want to check if the piston head travels smoothly in its spot in the cylinder block. Otherwise, you’ll end up with a vintage feel on your radial engine model.
Repeat this process and attach all seven pistons: first, slot the piston head into its groove in the cylinder block, then attach the piston rod to the hub bottom. After that, simply cap the hub bottom with the hub top, and you’re all set to get cranking!
License: The text of " 7-axis Hand-Cranked Radial Engine Model" by All3DP is licensed under a Creative Commons Attribution 4.0 International License.