The Best 3D Printers for Jigs, Fixtures & Shop Aides

Dozens of 3D printers produce great manufacturing tools, but which is best for you? Get buying advice from one of the industry's top 3D printer experts.
I remember it like it was yesterday. I was standing on stage about to receive the first place award in the Stratasys 3D printer sales contest. I had sold more 3D printers than anyone else, and my reward — a two-year lease on a Porsche 718 Boxster — showed just how serious this competition was. I sold printers to large companies, small companies, and the military. After the competition, I took what I knew and put it in a book: Phase Selling for Additive Manufacturing, the first sales methodology ever created for the 3D printing industry.
Soon other 3D printing companies were asking me to help them not just sell more 3D printers, but spread the word about the technology and how to apply it. I’ve worked with more than 200 additive manufacturing companies from about 60 countries.
More recently, a new type of client approached; companies looking to determine if 3D printing was the right technology for them and, if so, which 3D printer they should buy and why. I have no shortage of advice.
Below is the first in a series of articles at All3DP on how to select the right 3D printer, each focusing on a unique application. Let’s dive in!
Additive Manufacturing: Sink or Swim
Although I have experienced achievements in this highly competitive industry, it wasn’t always this way. Like many success stories, my journey began at square one, where the only way up was through hard work, one step at a time, one lesson at a time, like in the 1953 movie Hondo, where John Wayne picks up a six-year-old boy, Johnny, and throws him into the water to teach him to swim. Wildly flailing his arms, Johnny struggles to stay afloat but eventually begins to paddle and swims safely to shore.
When I decided to pivot my professional career toward 3D printer sales, I felt submerged and overwhelmed, just like many companies feel when exploring additive manufacturing for the first time. Sitting at my desk reading technical data about my new product line, I had no idea where to begin. As I tried to decipher the engineering jargon, I remember saying to myself: “Chris, this is exactly the job you wanted—you will figure it out!”
After reading a stack of trade show brochures, scouring manufacturers’ websites, and countless hours searching the internet, I made a bulleted list titled “Top 3D Printer Applications.” My motivation was simple; how could I sell a product if I wasn’t clear about the problems it solved?
Jigs and fixtures were one of the first applications on my list.
I dove into research on jigs and fixtures, and, like pulling a loose thread on an old sweater, what began as a brief inquiry to a simple question quickly unraveled into a heaping lesson on jigs, fixtures, and shop aides. I soon learned that although these manufacturing terms are frequently paired and used interchangeably, they are complex applications.
3D Printing vs. CNC Machining for Jigs, Fixtures & Shop Aides
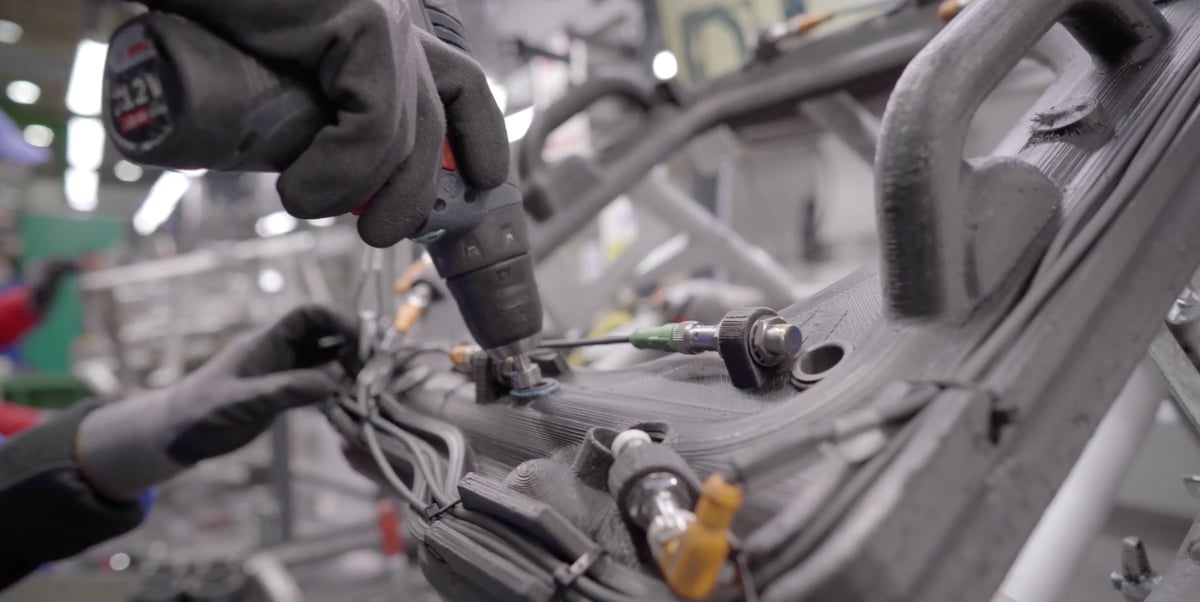
Adding the right jigs, fixtures, and shop aides to a manufacturing or fabricating process offers countless benefits, from automating workflows and lowering production costs and errors to improving consistency, safety, and quality. Any size manufacturing operation can improve its functions with a smartly designed, ample supply of these tools.
10 Key Advantages of 3D Printing Over Machining
- Create complex “single-body” geometries that don’t require assembly
- Lower-cost materials (plastics vs. metals)
- Faster production (hours vs. days)
- Print in-house and on-demand with no standing inventories
- Potentially no design or machining skills needed
- Not having to program a CNC machine with G-code for a short run
- Avoid the costly task of breaking down a profitable CNC production setup
- Up to 70% lighter weight parts compared to metal
- More customizable and ergonomic because printing can make shapes machining can’t
- Many material options, from rigid polymer to soft, flexible elastomer on the same machine
I remember standing on the GMC Yukon SUV assembly line at General Motors in Arlington, Texas. I was there to assess the effectiveness of a drill guide benchmark my applications engineer had designed and 3D printed on one of our production-grade FDM machines. The guide, a relatively uncomplicated instrument, was designed to keep workers from accidentally scratching the vehicle paint when the drill bit slipped or walked, resulting in the vehicle being pulled from the assembly line to undergo repair and negatively impacting production deadlines. This was a costly problem for the automotive juggernaut, and I was there to validate our solution to the problem; a 3D printed jig.
A smile swept across my face as I watched the line supervisor monitor the success of our proof of concept part, one luxury SUV at a time.
Yet, one of the most common objections I’d receive from potential buyers who are considering purchasing a 3D printer for making jigs, fixtures, and shop aides sounds something like this; “We already have a machine shop that can make these tools, so why do we need your product?” It’s a legitimate question that deserves a straightforward answer, which is why I always responded to this type of objection with Mark Bashor’s story.
Mark is an exceptional applications engineer who pivoted from a traditional manufacturing career in aerospace to the world of additive manufacturing:
“One day, I needed a fixture for a project I was assigned, so I spent 10 minutes modeling it in CAD. I then spent an hour creating a full 2D engineering drawing that I submitted through document control for review and approval, a process that took three days. I then spent two hours sourcing the best materials and creating a requisition to purchase them. This request was then sent to procurement for approval, which took about a week. Finally, I walked to our machine shop with the approved drawing and raw materials in hand. Unfortunately, the shop supervisor informed me that I couldn’t have the part until the end of the month. Why? Because he couldn’t break down a production setup until they achieved their quota. In summary, a critical fixture that could have been in my hand in less than one hour (had I had access to a 3D printer) took several weeks to attain while consuming hours of my time. At this moment, I chose to pursue a more efficient way; the additive manufacturing way.”
Mark’s story confirms the stark difference between having an asset vs. having immediate access to an asset.
As more companies install 3D printers on their shop floors, Mark’s story becomes even more impactful. 3D printing is not only a faster, easier, and cheaper method for producing jigs, fixtures, and shop aides than CNC machining, it’s vastly more accessible to the workers who need it most.
The ease of use inherent in many 3D printers enables workers to select a jig or tool file and hit print.
Regardless of the jig, fixture, or shop aide, they all aim to:
- Reduce Costs
- Minimize Errors
- Increase Accuracy
- Streamline Process
- Expose Inefficiencies
Let’s look at some successful 3D printed examples.
3D Printed Jigs, Fixtures, and Shop Aides in Action
Jigs are custom-made mounted or handheld tools fabricated to control and guide a specific task in a manufacturing process. They are widely used and, in their simplest form, provide a reusable template for achieving repeatable and accurate part quality.
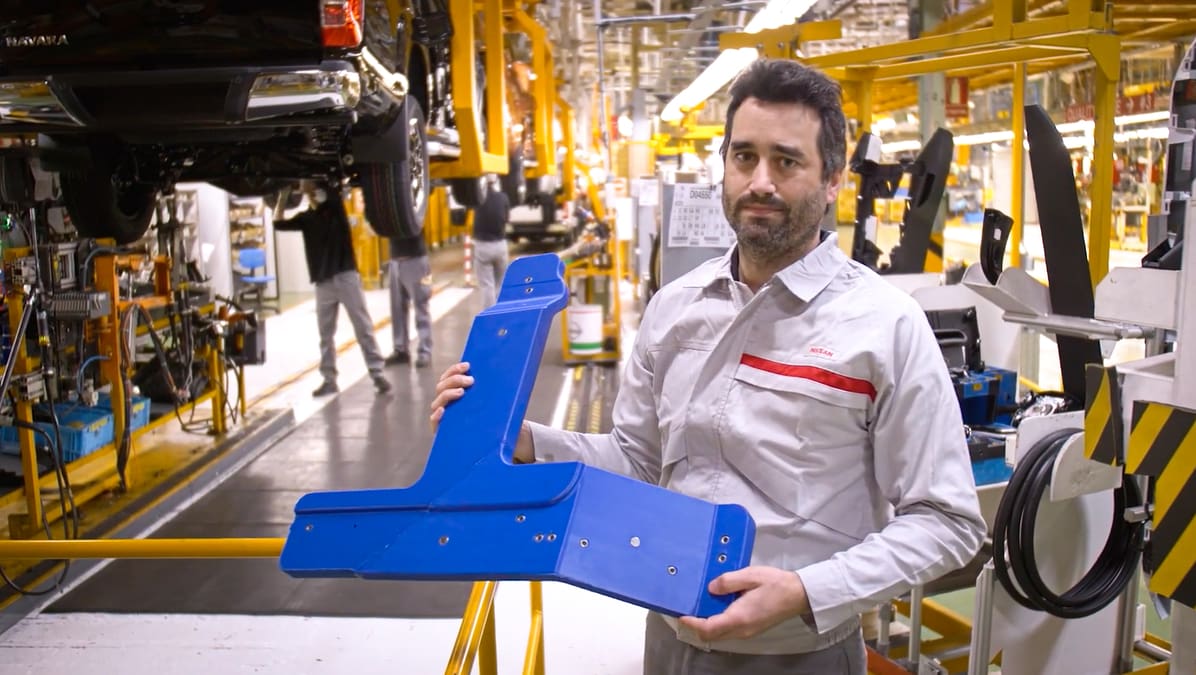
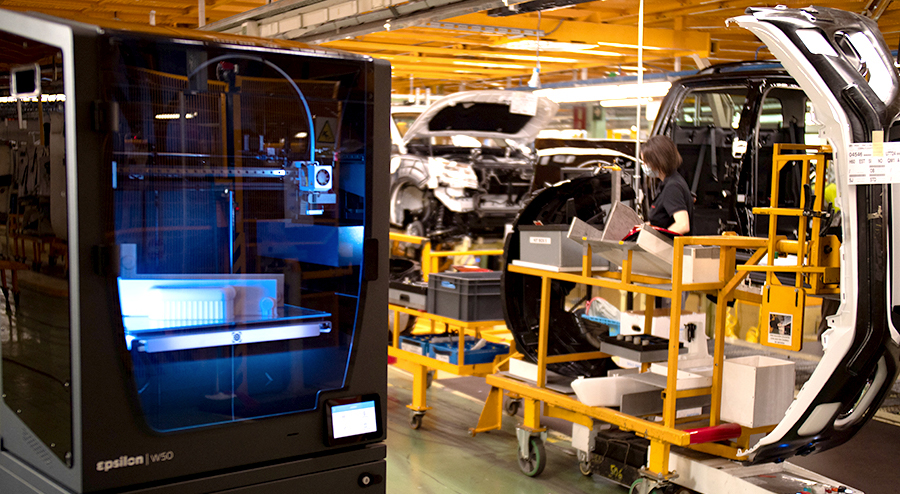
This jig pictured below at the Nissan assembly plant in Spain acts as a template enabling the operator to position the sticker of the vehicle’s name in the correct place. This template has an embedded magnet that allows the part to adhere firmly to the sheet metal. The jig, measuring 300 x 80 x 3 mm, was 3D printed in durable ABS plastic in 12 hours in a BCN3D brand FDM printer called Epsilon W50 at a total cost of less than $5.

Fixtures are mounted or clamped in a fixed position to securely hold a workpiece in place and at the proper orientation to increase uniformity and consistency during a production run. They can also assess work quality by holding a laser or optical scanner. While a jig remains stationary, a fixture moves relative to the piece. One of the essential functions of a fixture is to decrease labor costs and increase operator safety by mechanically and repeatedly holding something in place rather than using manpower. Milling, welding, and drilling fixtures are among the most commonly used.
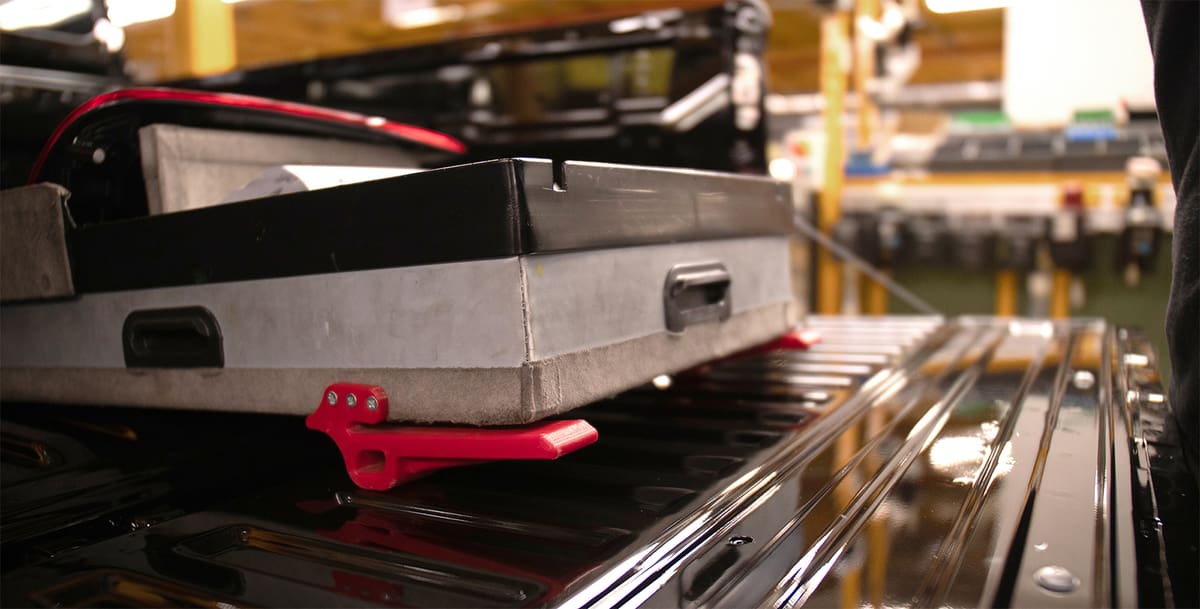
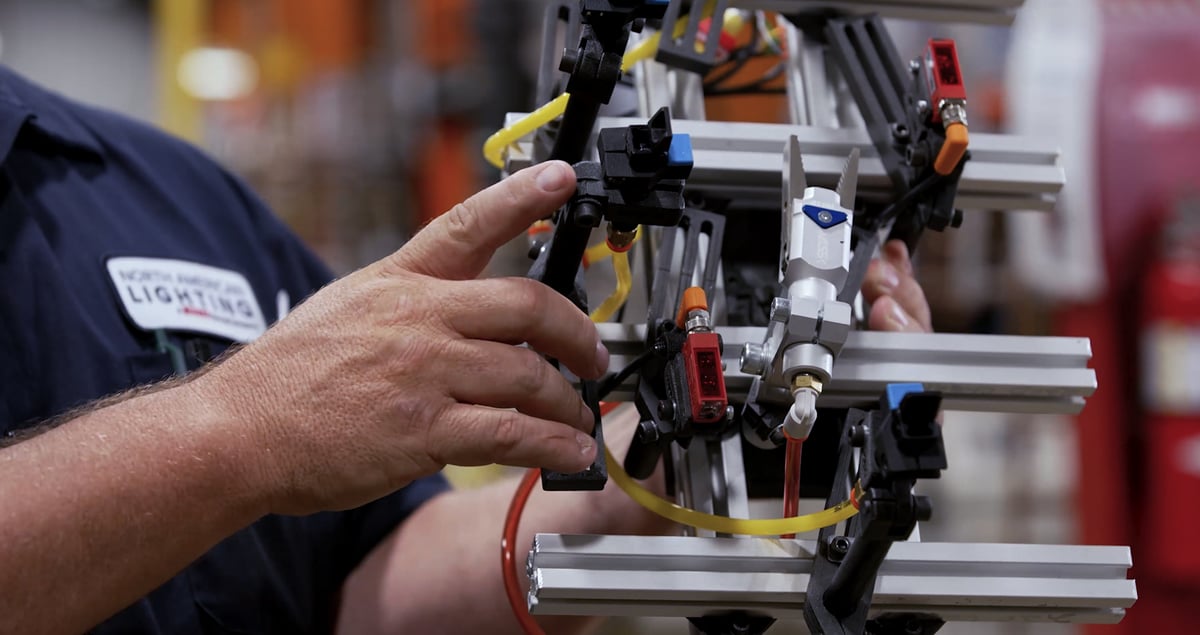
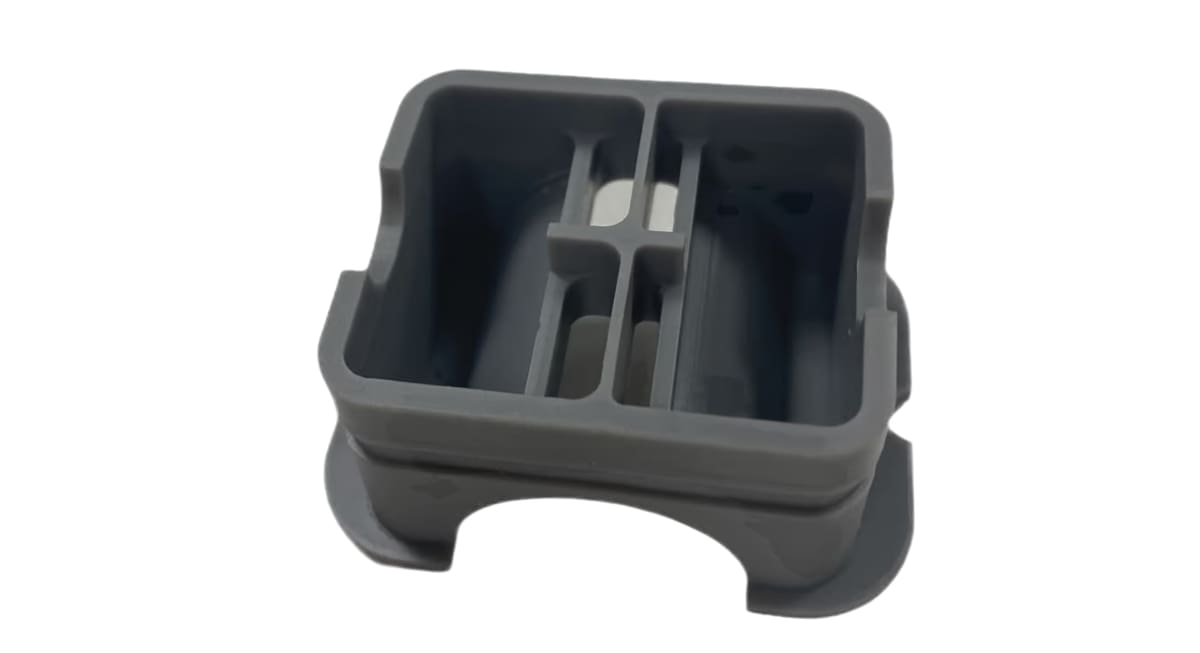
This fixture below is used at North American Lighting to manufacture automotive lighting systems. The company says it takes about 12 hours to print the parts in this 20-part assembly, but it used to take weeks with an outsourced service. The cost to 3D print a part in nylon carbon fiber using their in-house MakerBot Method 3D printers is one-third the price of what they were paying for outsourced aluminum parts.
Shop aides, for the sake of this article, are any plastic, rubber, or metal device or tool used to improve the fabrication, production, or assembly of a part or maintain shop organization and efficiency.
Shop aides include:
- Temporary mold tooling used to evaluate part and mold designs before investing in hard tooling by creating prototype molds in less than a day.
- Go-no-go gauges help achieve speed and efficiency when evaluating whether a component or final part has achieved the required dimensional accuracy before permitting it to move forward.
- Tool organizers have endless options, including shadow boards to help create a productive work environment and achieve the 5S (sort, set in order, shine, standardize, sustain) pillars.
- Marking tools are used for repeatable cutting accuracy as a part travels between different operators and workstations by clearly identifying the cut marks for each step of the operation.
- Maintenance tools are used for tightening hard-to-reach nuts and bolts for machine maintenance that can be left in each machine’s toolbox.
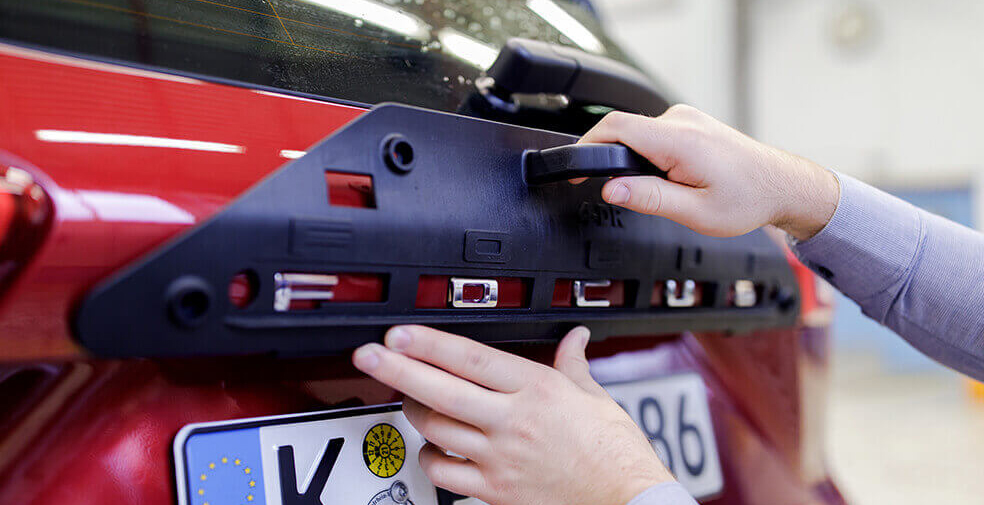
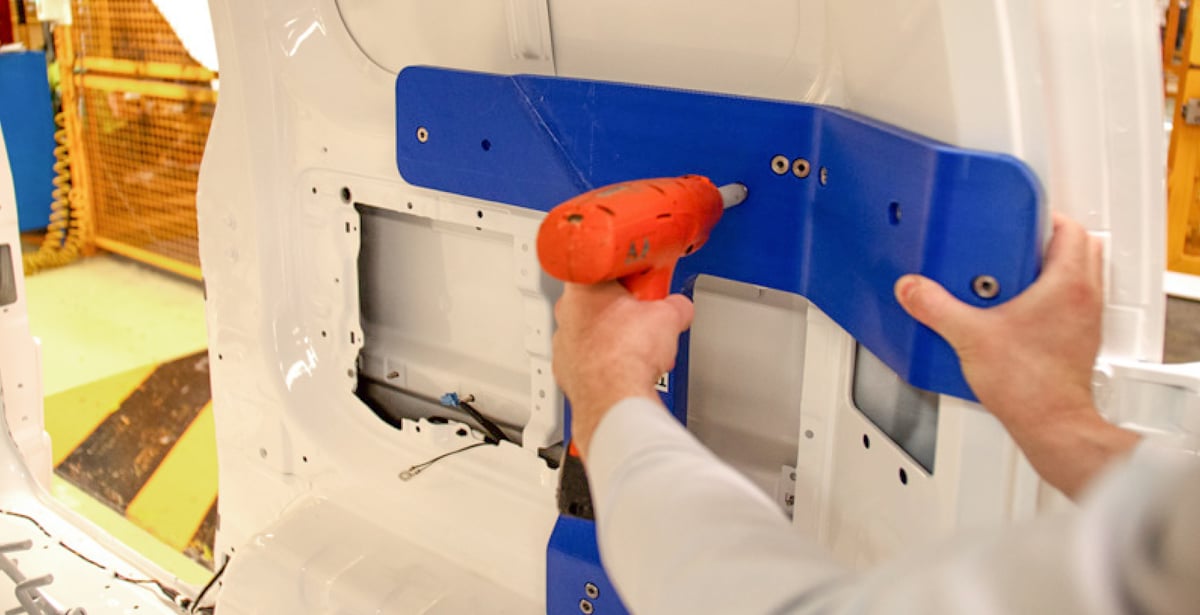
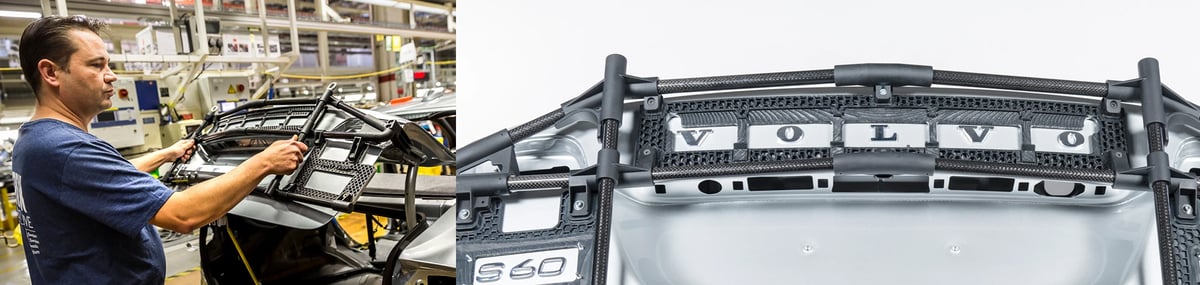
The 3D printed gluing aide pictured below was designed at the Volvo factory in Belgium to help operators affix various combinations of the Volvo logo, model number, and other information to the trunk of each new car. Volvo equipment engineers worked with Materialise, an on-demand 3D printing service, to produce the tool, which costs 48% less and is 64% lighter than the previous machined tool.
Buying Tips for Jig, Fixture, and Shop Aide 3D Printers
Deciding to buy a 3D printer is one thing; knowing which 3D printer to buy is a different story altogether, especially when you want a single system for multiple applications. Having sold my fair share of varying additive manufacturing solutions over the years, I learned that there is no such thing as the perfect technology — one that does it all.
Each additive manufacturing technology available today offers its unique strengths and weaknesses, and it’s essential that you learn what they are before investing, so check out the guide linked below:
Having sold professional and production AM solutions ranging in price from $30,000 to $3,000,000, experience has taught me that not all 3D printers are created equal. I would liken buying the wrong additive system for a specific application to using a butter knife to turn a screw or a shoe to drive a nail. These DIY hacks might get the job done, but better tools exist.
Prepare for Give and Take with Salespeople
When a 3D printer sales professional is touting a differentiator that makes their solution stand out from the crowd, ask them, “what is the tradeoff?”
For example, if a salesperson says their product can print in an ultrafine resolution that is unrivaled by the competition, ask how this exceptional characteristic affects the printer’s speed. More specifically, ask if the throughput rates referenced in their marketing materials can be achieved while maintaining the superior surface finish they are highlighting.
In my professional experience, finding a solution that can produce “really fast” and “super smooth” parts simultaneously is challenging and, if available, is typically accompanied by a significant increase in price. With AM technology, features that go above and beyond the industry norm often simultaneously reduce a capability in another area. When weighing benefits and features, look at it as if you’re trying to solve one side of a Rubik’s Cube puzzle without messing up another. Get in the habit of asking questions that uncover any hidden exchange of “give and take” anytime outlier attributes are boasted, and you’ll be glad you did.
What Makes a Good 3D Printer for Jigs, Fixtures, and Shop Aides
I’d love to be able to give you a list of the top printers for this niche, but the truth is, it depends on a wide range of variables that I walk you through in the five-step buying process outlined in the next section.
However, All3DP’s trusty and frequently updated guides, including the ones linked below, are a good starting point.
Five-Step Buying Process
Whether I am teaching a group how to sell additive manufacturing equipment or consulting with a client wanting to buy it — the core principles of my Phase Selling and Phase Buying process share these five foundational steps:
Step One: Select Primary Application
Although this article is specific to jigs, fixtures, and shop aides, it is common practice to purchase a 3D printer for one primary application but strengthen the ROI by adding secondary applications, such as:
- End-Use Parts
- Rapid Prototyping
- Patterns & Tooling
- Conceptual Models
- Mass Customization
- Repair & Maintenance
- Research & Development
As a best practice, select a primary application representing at least 70% of the proposed business case you are trying to justify. Otherwise, validating one 3D printing solution capable of equally producing multiple application types can prove challenging, so stay focused.
Step Two: Establish Desired Requirements
Now that you have a primary application, begin to establish your minimum desired requirements and capabilities by addressing the following ten questions:
- How many parts will be printed monthly?
- What will be the largest part size printed?
- What will be the smallest part size printed?
- What will be the average part size printed?
- How much can be spent on consumables?
- What are the desired materials/properties?
- What are the post-processing requirements?
- What is the desired part accuracy (x/y/z)?
- What is the desired part strength (x/y/z)?
- What is the desired part’s heat deflection?
The bottom line is this; What is the problem you are trying to solve or the benefit you are trying to gain by purchasing a 3D printer, and how will this be measured?
In addition to hardware capabilities, it’s essential to create a list of requirements related to delivery time, payment terms, warranty, training, waste disposal, and, most importantly—site preparation.
Step Three: Determine Timeline & Budget
After your primary application and desired requirements, determine budgetary parameters and an estimated buying timeline. Then, when you contact a manufacturer or reseller for the first time, ask them to informally disclose the price range of their products for your budgetary considerations. This professional courtesy shows consideration for everyone’s time and should be developed into a best practice. Inversely, be cautious of moving forward with sellers who refuse to provide approximate, estimated, or ballpark pricing for their published offerings—unless they can offer a legitimate and justifiable reason.
Step Four: Prioritize Buying Criteria
Collaborating with your team and known stakeholders, document the following five buying criteria in the order of most important to least important:
- ROI
- Price
- Quality
- Capability
- Service & Support
Each criterion on this list will likely be heavily considered when making a critical buying decision for a new 3D printer. However, these attributes must be ranked and weighted before vetting potential sellers. Adding this critical step to your buying process can streamline your purchasing experience while increasing your chances of selecting the right product from the right company. After all, if you don’t know what is most important to you, nobody will.
Step Five: Validate Capabilities
The fifth and final step of the 3D printer buying process is to validate the capabilities of the solutions you are most interested in procuring.
The most effective way to accomplish this is to provide a CAD or STL file to the seller that offers a fair representation of your primary application. Once the sales professional or applications engineer has confirmed the feasibility of your file, they should provide you with a time and cost study, which can be as elaborate as a multi-page PDF or as simple as a few sentences in the body of an email. Regardless, the study should include, at minimum, 1) How long it takes to print your part, and 2) How much it costs to print your part (if you own the printer). This would be the equivalent of looking at the window sticker of a new car to determine gas mileage, engine size, etc.
If the time and cost study is acceptable, the final step toward validating a solution’s capabilities is to request a physical benchmark part of the file you provided. Or, as a substitute, a sample part that offers a fair and acceptable substitution based on your stated criteria. The benchmark provides a physical proof of concept that helps you and your team effectively determine whether or not a 3D printer can produce a part that meets or exceeds the manufacturer’s published specifications.
Remember, people who purchase a ¼-inch drill bit are really buying a ¼-inch hole, so don’t place too much emphasis on the 3D printer, focus on the jigs, fixtures, and shop aids it can produce.
About the Author: Chris Harris serves as the vice president of defense for the Americas at Spee3D, concentrating on expeditionary “point-of-need” metal additive solutions for military readiness. He is the author of six books, including Phase Selling for Additive Manufacturing, the only sales methodology created explicitly for the 3D printing sector. He is the founder of SkillPrimed.com and has provided his proprietary sales training and consulting services to over 200 AM companies from more than 60 countries. In addition, Harris is a Martial Arts Hall of Fame Inductee, an award-winning patented inventor, and a US military veteran.
License: The text of "The Best 3D Printers for Jigs, Fixtures & Shop Aides" by All3DP Pro is licensed under a Creative Commons Attribution 4.0 International License.