![Featured image of [Project] What’s That Sound? A Fully 3D Printed Speaker](https://i.stageall3dp.com/workers/images/fit=scale-down,w=1200,h=675,quality=79,gravity=0.5x0.5,format=auto/wp-content/uploads/2019/04/13062141/3D-Printed-Speaker-0-3-screenshot.jpg)
[Project] What’s That Sound? A Fully 3D Printed Speaker

Instructables user Mattosx has created a fully 3D printed speaker that utilizes neodymium magnets to create crisp sound. Learn how to make your own.
We’ve seen a number of instances where 3D printed enclosures are made for speakers. But have you ever heard of a speaker that is actually 3D printed as well?
Thanks to Instructables user Mattosx, now you have! The maker recently shared his step-by-step process detailing how to build an entirely 3D printed speaker.
This simple speaker box design utilizes neodymium magnets to generate a permanent magnetic field. When the electric current is sent through the coil, a temporary magnetic field is created, attracting the magnetic field from the magnet. This interaction causes vibration that we interpret as sound.
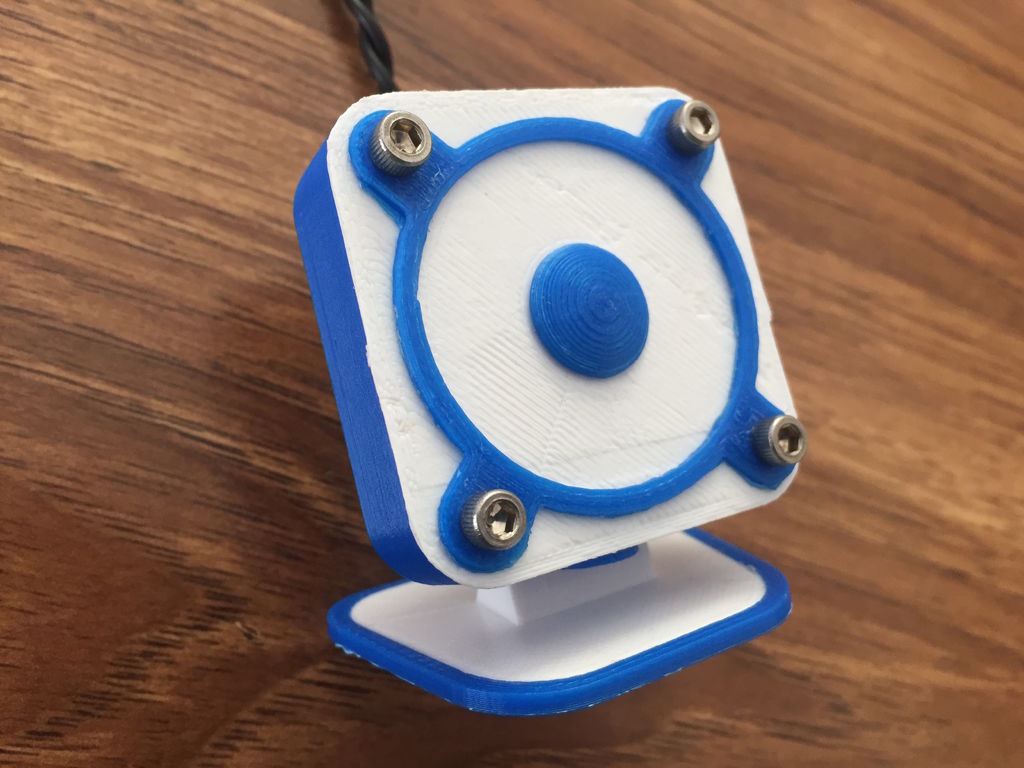
The creator of this project has shared a “Simple Version,” which consists of a lower and upper speaker box, as well as a “Cooler Version” that adds an aesthetic speaker grill and base stand.
Want to learn how to conjure up sound using 3D printed parts and magnetic magic? Let’s take a closer look at what you need and how to build this interesting, yet simple, 3D printing project.
What You Need & How to Build it
The STL files for the 3D printed speaker can be downloaded directly from the Instructables project page. Mattosx has divvied up the 3D models so that you can choose between the simple version and the version that has the speaker grill and base.
Now, while most of this speaker is truly comprised of 3D printed parts, you’ll still need a few additional components to bring sound to the device. Here’s what you’ll need:
Once you have the 3D printed parts prepared, it’s time to assemble the speaker box. The Simple Version consists of just two parts with the magnet wire routed outside of the box. The slightly more complex Cooler Version uses two machine screws and nuts to attach the speaker box to the base, while the wire is routed out of the back of the speaker box and through the white stand.
For both versions, you’ll still need to wrap the magnet wire around the upper speaker box. Leave about six inches of wire at the end of each coil and use masking tape to hold the wire taut to keep it from unraveling. In order to reach a total resistance above 10Ω, you’ll have to wrap the wire around the center a few hundred times.
Next, you’re going to fit the speaker wire into the lower speaker box. Sand off the enamel wire and connect it with the magnet wire (soldering is recommended here, but not necessary). Finally, add the top speaker cover, and, if you decided to go for the more complex version, mount the speaker grill with the machine screws.
Want proof it’ll work before you start making your own? Check out the video demonstration below. For more information on this project, visit the Instructables page.
https://youtu.be/3VsehOYY73M
License: The text of " What’s That Sound? A Fully 3D Printed Speaker" by All3DP is licensed under a Creative Commons Attribution 4.0 International License.