We’re always mesmerized by the endless ways that 3D printing technology is coupled with other components to create functional and fun projects. But even more impressive is when we find a useful design that is fully 3D printed – no electronics, LEDs, or other pricey parts required.
In today’s edition of Weekend Project, we’ll take a look at a fully 3D printed wind-up car by Belgium-based maker Brian Brocken. This particular 3D printing project is interesting for a variety of reasons.
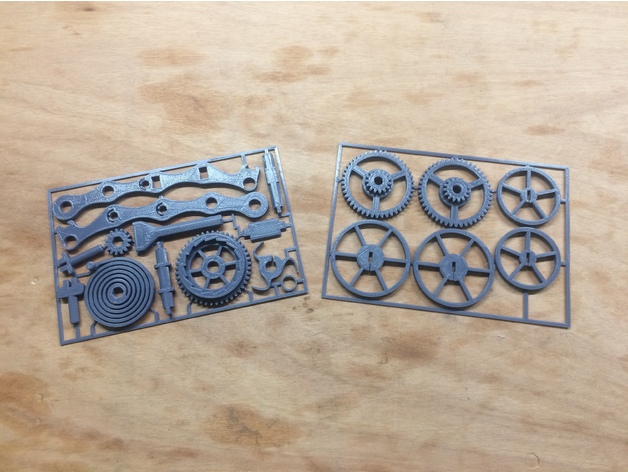
To start, you can set this car in motion without needing any sort of motor or power source. Everything is 3D printed, including the spring, shafts, gears, and wheels.
Secondly, all of the 3D printed parts come packaged within two gift cards, each of which can be popped out and assembled together. Beyond that, the 3D printed wind-up card is incredibly easy to 3D print and build, making it the perfect gift for kids, nostalgic seniors, or even for yourself.
Want to build your own? Let’s take a quick look at how you can get behind the steering wheel of your own 3D printed wind-up car.
What You Need & How to Build it
![Image of [Project] A Fully 3D Printed Wind-Up Car: What You Need & How to Build it](https://i.stageall3dp.com/workers/images/fit=scale-down,w=1200,quality=79,gravity=0.5x0.5,format=auto/wp-content/uploads/2019/01/05202020/wind-up-car1.jpg)
Since this wind-up car is a fully 3D printed project, all you need is your 3D printer and some filament. The maker does mention that a small hammer and knife could come in handy for the assembly process, but it isn’t a necessity.
The STL files for the 3D printed wind-up card are available to download from Thingiverse. Brocken suggests printing both cards with 100 percent infill, primarily to improve the performance of the spring.
The first card, which has the most parts packaged inside of it, takes about four hours to print, while the second takes just about two hours. Keep in mind that you’ll have to use support structures for the first card.
Once you have the two cards 3D printed, it’s time to move onto the assembly process. The maker has simplified the build into four steps that fit onto a single page. You can find the instruction manual on Thingiverse or the project’s page of Hackaday.io.
If you have a small knife, you can carefully snip out each 3D printed part from the card. It’s important that each component is removed as cleanly as possible, as this will impact the car’s mechanism once everything is put together.
After the 3D printed parts are detached from the gift card, it’s time to start connecting them. Taking a look at the visual instructions, this entire assembly process shouldn’t take more than a matter of minutes. You don’t need any glue or adhesive solution, it should all just snap right into place.
Now that you have built your tiny car, the final step is to use the wind-up tool and watch as your 3D printed vehicle zooms across your countertop. If you want to see the 3D printed wind-up car in action, check out the video below. Oh, and of course, don’t forget to wear your seatbelt!
License: The text of " A Fully 3D Printed Wind-Up Car" by All3DP is licensed under a Creative Commons Attribution 4.0 International License.