![Featured image of [Project] Create Captivating Patterns with a 3D Printed Greek Meander Lamp](https://i.stageall3dp.com/workers/images/fit=scale-down,w=1200,h=675,quality=79,gravity=0.5x0.5,format=auto/wp-content/uploads/2019/03/20190545/geo-lamp-e1553105194641.jpg)
[Project] Create Captivating Patterns with a 3D Printed Greek Meander Lamp

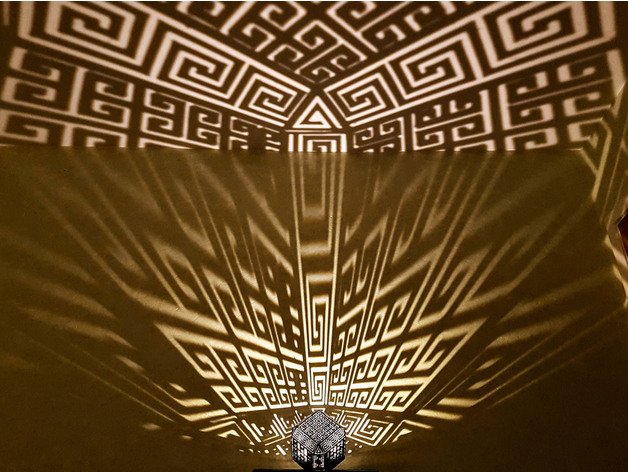
Want to project mesmerizing ancient patterns throughout your house? This 3D printed Greek Meander Lamp by designer Daniel Hultgren is an easy project that will leave you with your jaw on the floor.
Commonly found in ancient Greek and Roman art, meanders consist of a decorative border that is based on a continuous line that is shaped into a repeated motif. You’ve seen these lines featured in Greek architecture and pottery, oftentimes presented in intricate patterns that create the impression of a linear labyrinth.
Believe it or not, this historical style still persists throughout modern society, remaining a prominent theme in architecture. So, it’s no surprise that a Greek Meander Lamp would become one of the most popular projects to arise on Thingiverse over the last month.
Created by Swedish designer Daniel Hultgren, this 3D printed lamp utilizes an IKEA LED light and a meander-like design to project mesmerizing patterns throughout your house. But don’t be worried about the complex aesthetic, this lamp is actually surprisingly easy to print and assemble, making it the perfect project for the weekend!
Interested in making your own 3D printed Greek Meander Lamp? Let’s take a closer look at what you need and how to build one!
What You Need & How to Build it
The STL files for the 3D printed Greek Meander Lamp are available to download via Thingiverse. According to the designer, both part1 and part2 should be printed with two walls and solid infill. The first layer is the most crucial here, so you may want to reduce the print speed at the start.
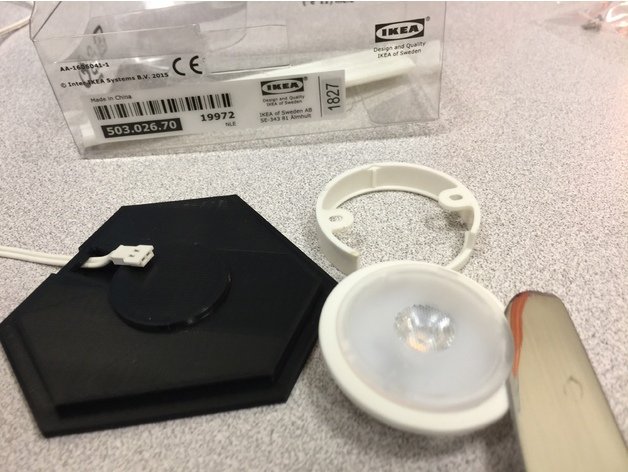
Aside from the 3D printed part, you’ll also need to get your hands on an IKEA Ledberg, a 3W single LED that comes connected with an inline switch that runs at 24V DC with included AC to DC power supply.
While Hultgren doesn’t share much more information on the printing process, one Thingiverse user named Andrew Ackerman went into more detail on his own Make. In his version, the maker set the first layer to 0.3mm and the subsequent layers to 0.2mm. He also notes that you’ll need a build volume that reaches or exceeds 300 mm on the X and Y-axis.
Once you’ve 3D printed the lamp part, it’s time to move onto the assembly. This is the easy part. Simply bend part1 and part2 and apply glue to connect them together. You’ll need to be gentle while bending the 3D printed parts back and forth, or else you’ll risk breakage. When gluing, ensure that the adhesive is applied outer edge of the joints, but not the actual hinges.
Next, taking the LED light, remove the ring and lens before running the wire through the 3D printed base. Finally, tape the LED into the base using double-sided tape, plug in the lamp, and you should have yourself some mesmerizing patterns creeping across your walls.

License: The text of " Create Captivating Patterns with a 3D Printed Greek Meander Lamp" by All3DP is licensed under a Creative Commons Attribution 4.0 International License.