![Featured image of [Project] Smooth the 3D Printed Layers Away with Polymer Clay](https://i.stageall3dp.com/workers/images/fit=scale-down,w=1200,h=675,quality=79,gravity=0.5x0.5,format=auto/wp-content/uploads/2019/04/06085042/FC9J1OIJTYNGUL2.LARGE_-e1554533489503.jpg)
[Project] Smooth the 3D Printed Layers Away with Polymer Clay

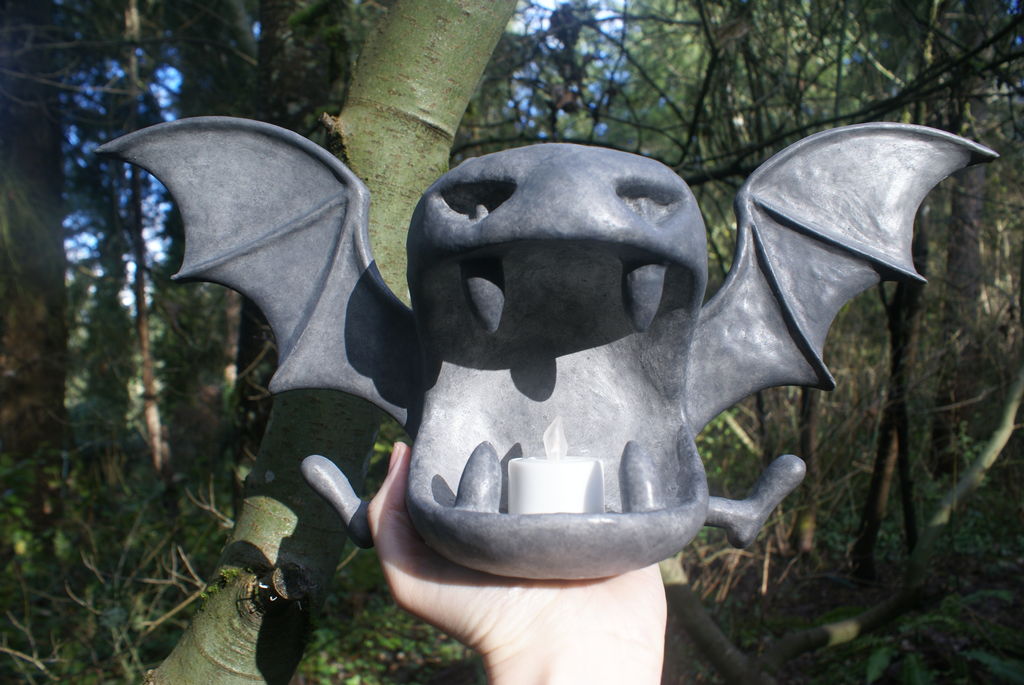
Tired of seeing layers on all of your prints? 3D designer Bethany Weeks demonstrates how you can use polymer clay to smoothen out your 3D prints and leave behind an easily paintable surface.
3D printing is a tremendous tool for expressing and bringing ideas to reality, but with Fused Deposition Modeling (FDM) technology, the results are usually plagued with noticeable layer lines that take away from the final product. Thankfully, there are a few ways to smoothen out a print.
But the usual methods have their flaws. Chemical smoothing involves toxic chemicals that are highly flammable, sanding requires a fair amount of time and physical effort. So what is the best way for a 3D printer enthusiast to eradicate layer lines? How about polymer clay?
In a new Instructables post by designer and 3D printing enthusiast Bethany Weeks, the maker shares an interesting post-processing technique that smoothens out the surface of your prints. By using polymer clay, you can coat your 3D print and bake it in an oven, giving the object a clay sculpture-like appearance.
There are a few pitfalls to keep in mind. For instance, the part will likely shrink during the baking process, but this can be accounted for during the early steps of 3D modeling. On the plus side, the clay can be used to attach parts, fix defects and can be easily painted to bring color to your 3D print.
Let’s take a closer look at this unique process that Weeks has developed and shared with the maker community.
What You Need & How to Build it
What do you need to start smoothing out those 3D printed layers? With this unique methodology, not much! Of course, you’ll need to acquire some polymer modeling clay and some sculpting tools. In Weeks example, she uses Polymer Clay by Craftsmart, along with makeshift sculpting tools like a metal spoon and toothpick.
You can utilize a spoon to smoothen out the clay, while the toothpick helps to carve out the more intricate details of your 3D print. While proper sculpting tools will likely fare better for this task, they’re not a complete necessity.
Once you have the polymer clay and tools prepped, it’s time to apply the clay to your 3D print. You should place a minimal amount of clay onto the print, just enough to feel a smooth touch when you slide your finger across the surface. You don’t have to engulf the entire print in clay, just the sections that you want to be smoothened.
The clay is also beneficial in covering up defects, missing sections or even in the gaps of joined parts. You can also add fresh touches to the print that weren’t featured in the 3D model. Before moving onto the baking process, check to make sure all the surfaces are smooth and the features are well-defined. If your clay is crumbly, add a little heat to make it more malleable.
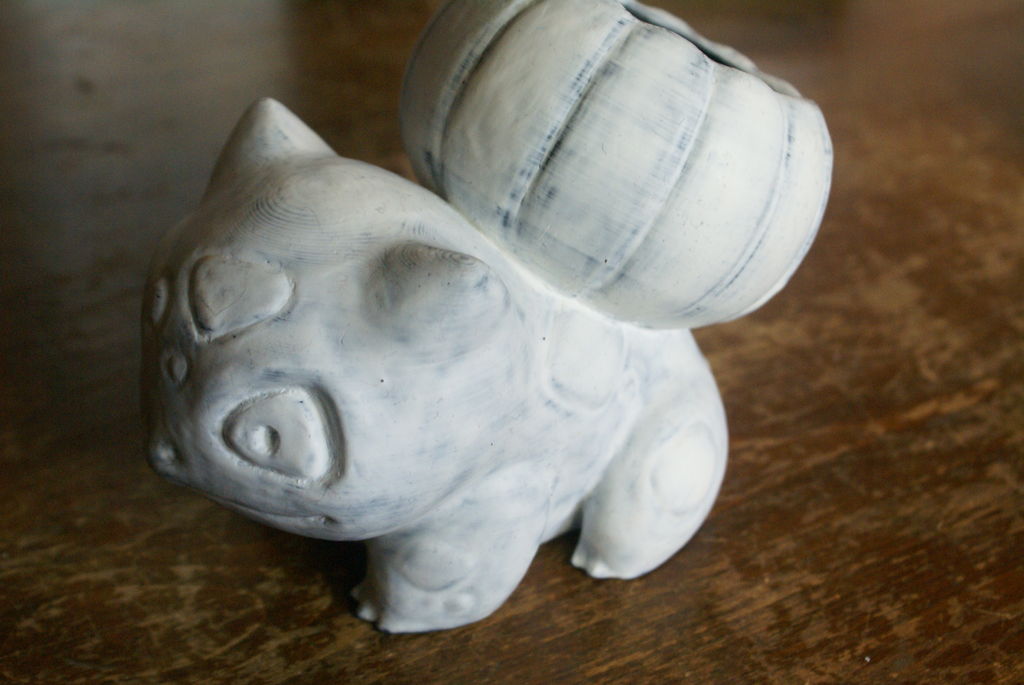
Using a baking sheet or aluminum foil, spread the clay-coated 3D prints so that they’re not touching one another. For PLA, set the temperature to 170˚F / 77˚C or less. For ABS, set the temperature a little high to about 190˚F / 87˚C. The clay material will likely suggest a higher range of heat, but this will likely be too much for the 3D printed material.
Bake the parts for around 30 minutes while periodically checking the surface. They’ll be ready to remove once they feel slightly hard.
Keep in mind that the parts will shrink in the over, more so when the parts have less infill. Once removed from the oven, the 3D printed part will now take on a stone-like aesthetic. You can also paint over the clay using acrylic paints. Weeks recommends adding an initial coat of primer before applying the paint. Finally, you can seal the painted print with a coat of clear satin spray paint.
And that’s about all you need to know in order to smoothen out your 3D printed layers with clay. For more information on this project, you can learn more on Instructables.
License: The text of " Smooth the 3D Printed Layers Away with Polymer Clay" by All3DP is licensed under a Creative Commons Attribution 4.0 International License.