The Best 3D Printed Bike Parts & Accessories

The 3D printing revolution has come for your bike. Discover the best 3D printed bike parts and accessories to enhance your riding experience!
It’s always a challenge to create a “best of” list, especially when biking is the subject because there’s such a huge selection of accessories and add-ons from designers (many of whom also happen to be avid bikers).
We’ve managed to sift through a lot of what’s out there and put together a great selection of ideas that can turn your bike into something even better than a sweet ride.
If you see something here that you’d like to have printed, or this list sparks an idea for another special accessory for your bike, but you don’t have the setup or time to do it yourself, we can suggest Craftcloud. It’s also quite handy if you want to source local manufacturers.
Without further ado, let’s get to the list!

Essentials
First up, we have some bicycle basics. If something on your bike has broken or could do with some customization, these are the prints for you!
Repair Stand
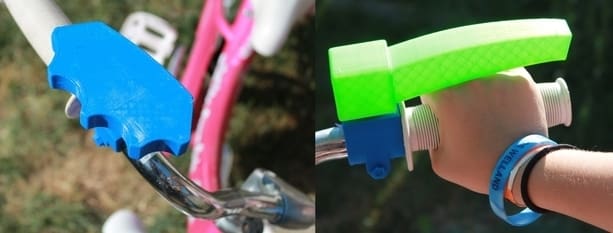
This is an accessory with which you can easily make the bike stand upside down for any repair work, adjustment, or cleaning. It can stay on your bike’s handlebar while on the go, causing no hindrance to your bike ride.
Although the creator intended for these to clip onto handlebars with a diameter of 23 mm, you can modify the printable file to fit your bike, similar to this maker.
If you want to print it as is, the recommended print settings are 4 perimeters, 0.2-mm layer height, 15% infill with a honeycomb pattern, and either PETG or ABS can be used as the material for a successful print.
- Who designed it? DusanMerta
- How printable/popular is it? With over 280 likes and more than 1,000 downloads, this stand has 19 posted makes.
- Where to find it? Printables
Pedals
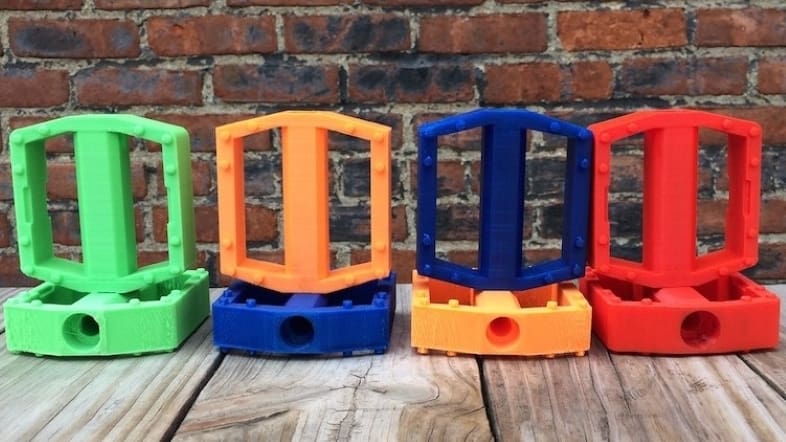
If you have bad pedals on your bike or want to spice up how your bike looks by adding some color, these 3D printable pedals are a great option. The design comes in a 35-mm and a 39-mm variation, and you should choose the size that works with the spindles on your bike. Not much other information was provided about the model, but, as seen in the image above, you can print the pedals in whatever color you want to make your bike look amazing.
As for printing, the designer recommends a 40% or higher infill density and a 50-mm/s print speed. They also stated that they didn’t use support structures for the model but did activate a raft for bed adhesion. Make sure to use the toughest filament that you can get your hands on for this print in order to ensure the longest life.
- Who designed it? 3DprinterOS
- How printable/popular is it? This gripped bike pedal design has thousands of downloads and one successful make and remix shared on Thingiverse.
- Where to find it? Thingiverse, Pinshape
Chain Guard
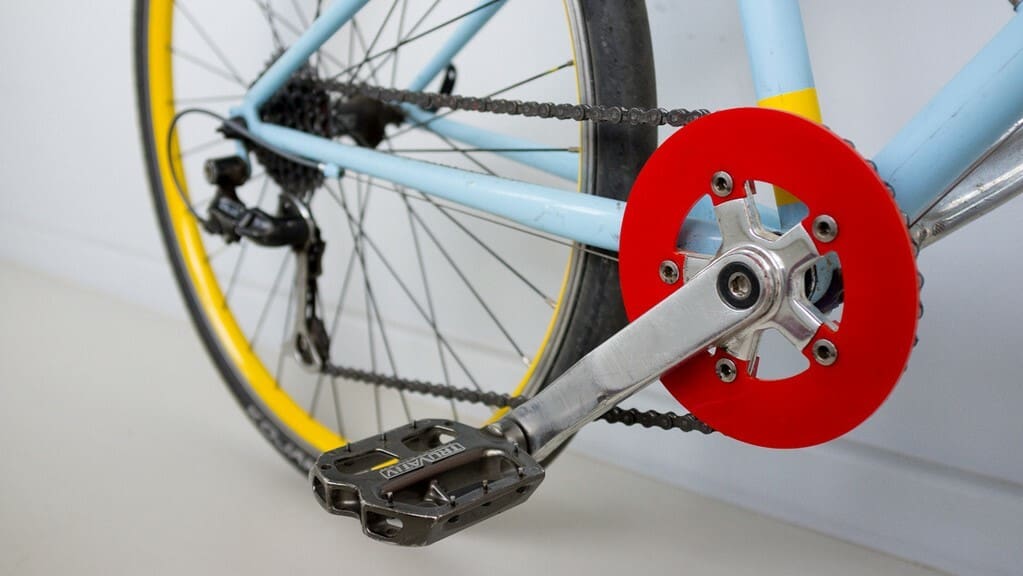
This chain guard is a replacement piece for the exterior chainring and can prevent the chain on your bike from accidentally going off the side of the sprocket. It’s a great way to keep your bike from breaking down, and the designer mentioned that the model fits the 94BCD crankset with 32 teeth.
The design is a 2D version meant to be cut with a CNC router or similar cutting machine, but you should be able to turn the SVG file into a 3D model file and 3D print it. The creator of this design stated that they used a 3-mm plexiglass sheet to cut the chain guard, so we suggest extruding the design to 3 mm tall if you want to 3D print it. On this note, it should be an easy print as the model is completely flat.
- Who designed it? gillespinault
- How printable/popular is it? This chain guard design has over 160 likes so far and 1,000 downloads!
- Where to find it? Thingiverse
Bell
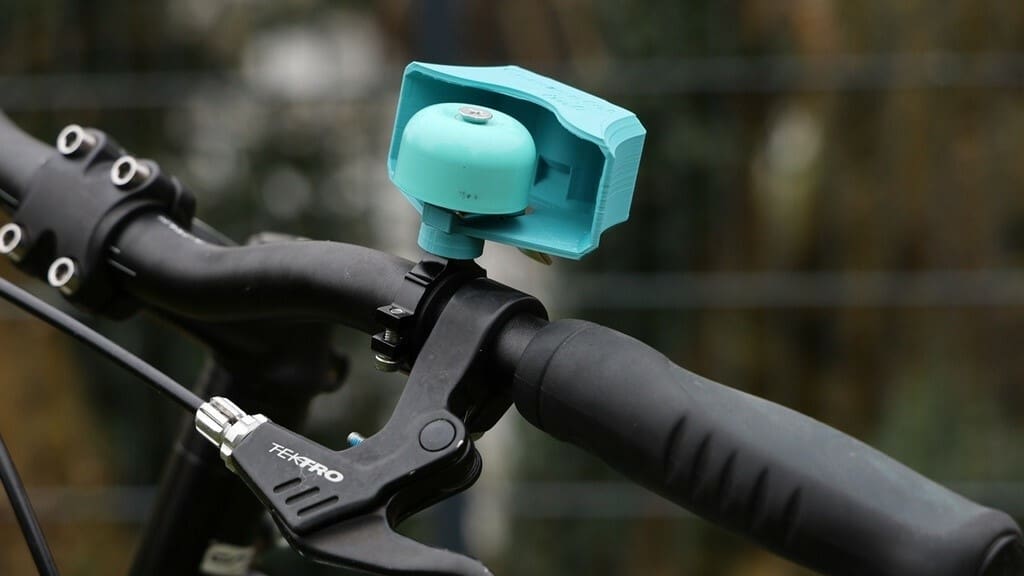
A bell is always a great idea for a bike to keep pedestrians and other cyclists aware of your presence. This bell attachment uses a few 3D printed parts and some other hardware, like a brass bell and screws, which should cost only around $10. The final product is a super loud bell that attaches to the handlebar of your bike.
The creator went above and beyond when it came to printing suggestions and provided many of the settings they used. They stated that they printed the pieces with seven walls and eight top and bottom layers with a 0.2-mm layer height. They also noted that they activated supports for the prints and used a 15-18% support infill density.
- Who designed it? SchlagRat
- How printable/popular is it? This bike bell project has over 10 likes so far.
- Where to find it? Thingiverse
Kickstand
If you ever need to take a break and want to leave your bike standing and ready to go, you’ll need a kickstand. If the kickstand of your bike isn’t doing it for you or it just broke, you can 3D print this three-part kickstand option and attach it to your bike with some screws. The maker of this project states that the kickstand was made to fit a 26-inch bike, but you can scale the models to fit other sizes.
The designer listed a few of the print settings they used to print the different components of this bike stand, stating that they activated supports for only the leg piece and used a 60% infill density for the models.
- Who designed it? GCodePrintr
- How printable/popular is it? This bike kickstand model has 1 shared make, over 100 downloads, and 32 likes.
- Where to find it? Printables
Chain Guide
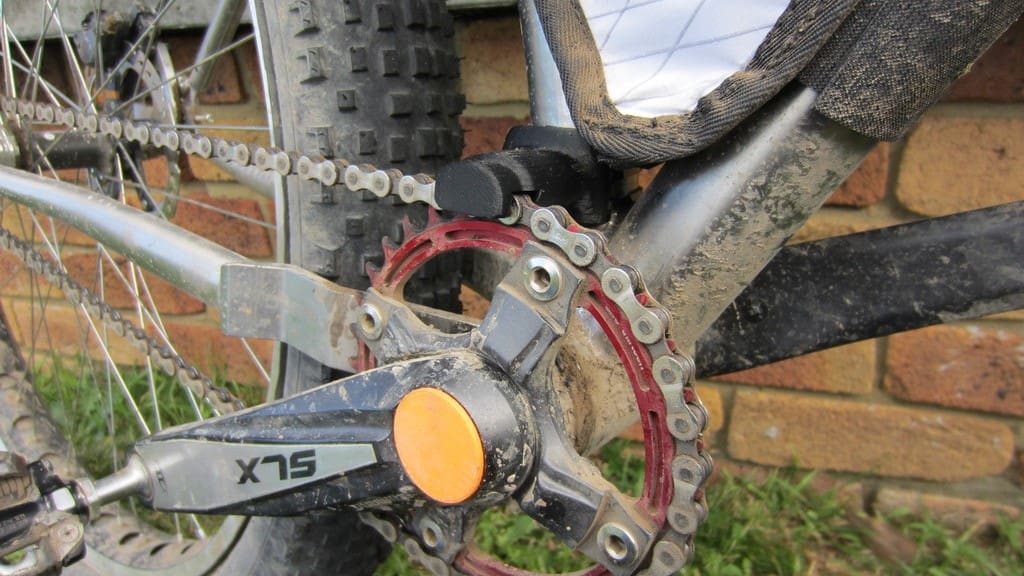
In life and in biking, it’s the small things that can make a huge difference. And what better example than this tiny piece that can fit on any bike (after some customization) that helps keep the chain on its intended route? If your chain frequently falls off, this one’s for you!
- Who designed it? Ktronik
- How printable/popular is it? At least two people have printed this simple model and shared pictures of their makes.
- Where to find it? Thingiverse
Grip Strength Assistant
This one’s by far the most heartfelt on our list because it enables people with hand disabilities to enjoy biking! Several models exist that can assist, depending on the needs of the user.
- Who designed it? kurt_boutilier
- How printable/popular is it? Though this has been viewed nearly 4,000 times, we don’t see any makers posting their prints. All of the parts are simply designed so that, under normal conditions, there shouldn’t be any printing issues.
- Where to find it? Pinshape
Holders & Mounts
Next up, we have some accessories to hold your stuff while you ride. From bumping tunes as you ride to attaching a GoPro to your chin, there’s really something for everyone!
Bottle Holder
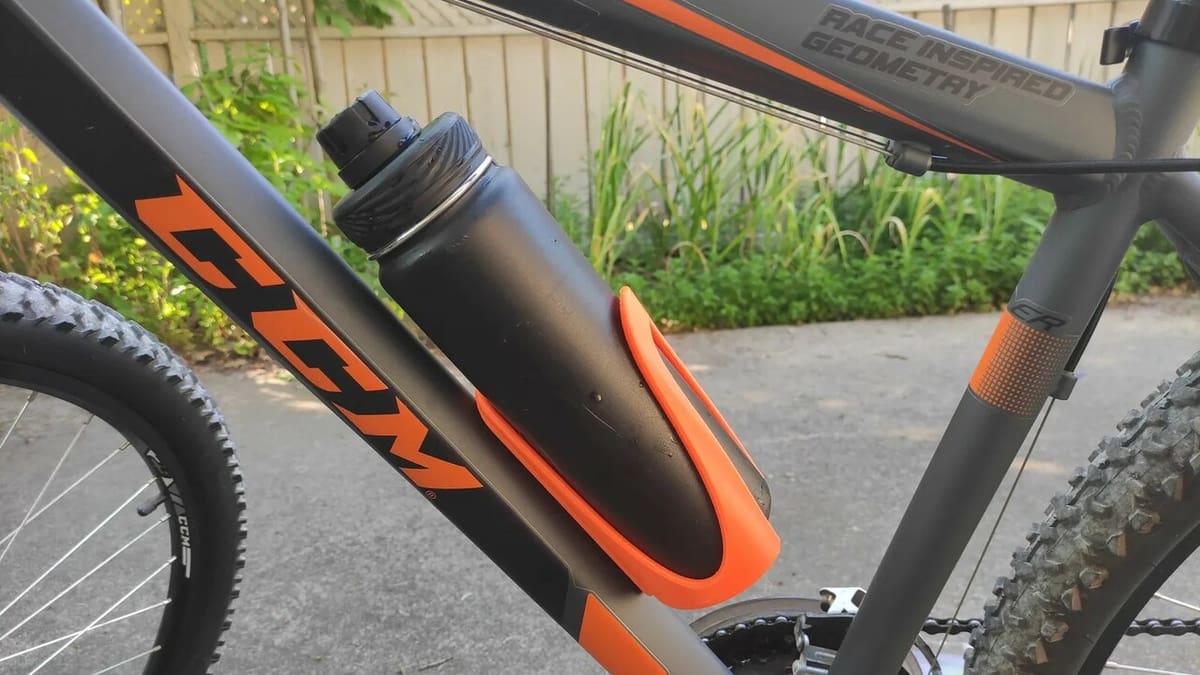
Hydration is always a good idea when biking, and having a special place on your bike to store a bottle, cup, or can is a handy addition. This holder can carry any of these containers as long as their diameter is 75 mm or less, and it’s quite easy to mount this on your bike’s mounting screws. These screw holes are very common in many modern bicycles, but if yours doesn’t have one, you can attach this printable using this universal bottle cage mount.
The designer recommends printing this bottle holder at 0.15-mm layer height with 15% infill. Apart from this, a few makers from the community who have printed this have mentioned in the comments that they used PETG for a solid and sturdy holder.
- Who designed it? Fx137
- How printable/popular is it? 26 other makers have printed this handy holder, and it’s a verified easy print that has over 840 downloads.
- Where to find it? Printables
Headlight Clip
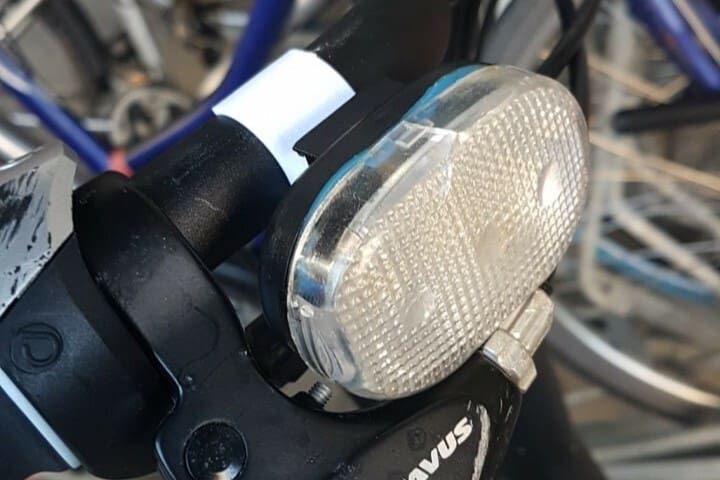
Some bikes don’t come with an included headlight mount, so this printable clip is a nice way to keep your headlight securely fastened to your bike.
The designer recommends printing with 50% infill and a layer height of 0.15 mm. It prints without supports and is categorized as an easy print, so you should be able to easily make this clip for yourself!
- Who designed it? Sharepair
- How printable/popular is it? At the moment, this print has 12 downloads and over 480 views.
- Where to find it? MyMiniFactory
Lock Holder
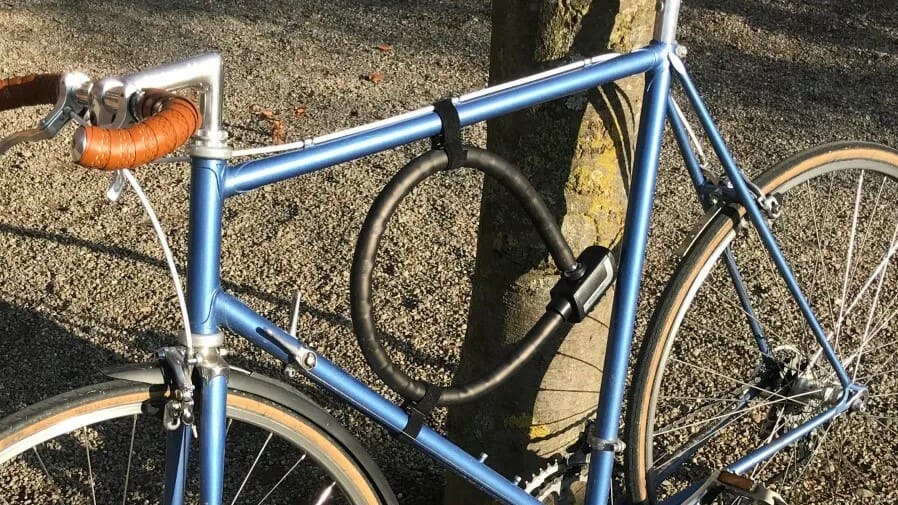
Riders usually keep their bike locks near the bike’s seat, wrap them around the frame, or store them inside their backpacks, but with this 3D printed lock holder, you can secure it on the bike’s frame. These lock holders use two 20-mm Velcro straps to secure the lock to the bike on one side of the frame. You can store any type of lock with these, including D-locks, U-locks, cable locks, and combination locks, but at least two of the 3D printed holders are required to secure the lock.
One thing to note is that the maker recommends printing them with ASA to make them more durable and tough for outdoor use. However, you can print these easily using any material of your choice, whether ABS or PETG. If you have it on hand, you could also consider printing these in TPE or TPU to give the holder a better grip on the frame and avoid any slipping while riding.
- Who designed it? NicolasStreit
- How printable/popular is it? Even though there’s only one make on Printables, the 3D model is quite simple, so it can be printed without any issues.
- Where to find it? Printables
Plastic Bag Cover Holder
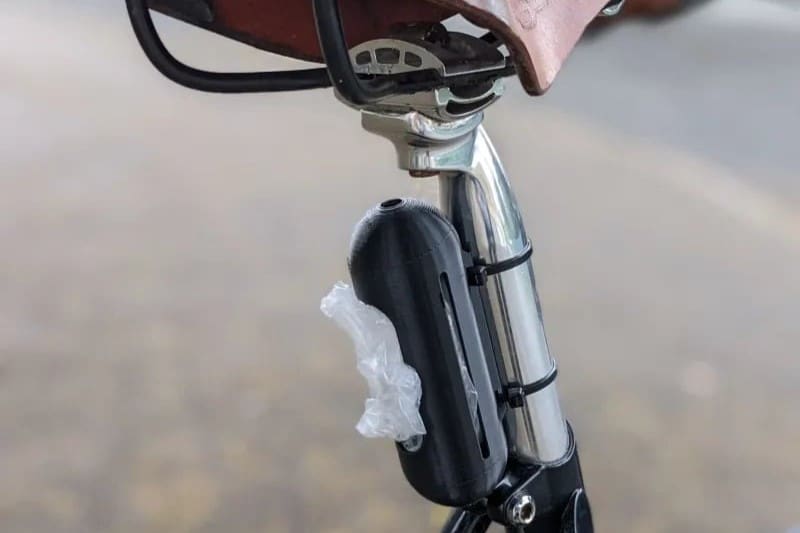
Bikers know the annoyance of going outside on a rainy day, only to find that their bike seat is soaked. It never makes for a pleasant ride home! Prevent wet seats with this thoughtful plastic bag holder, which allows you to conveniently store a plastic seat cover underneath your seat.
Designed for a 30-mm tube, you can mount this print onto your bike with cable ties. Additionally, there are drainage holes in the holder to let out as much water as possible. The designer notes they printed it using supports.
- Who designed it? petrepa
- How printable/popular is it? Currently, this item has around 15 downloads and 1 shared make.
- Where to find it? Printables
GoPro Helmet Chin Mount
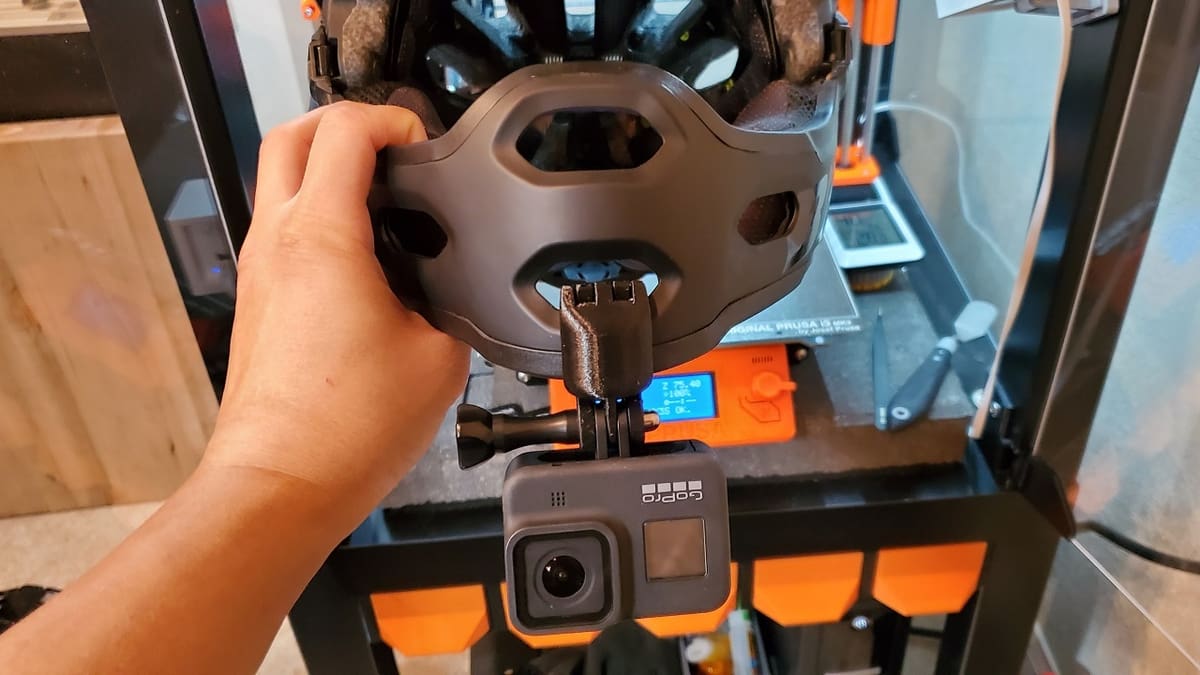
This 3D printable model attaches to the chin area of your bike helmet and can hold a GoPro camera so you can record all of your epic bike journeys. The design features an integrated hinge that clamps around the chin space of your helmet and has a standard GoPro mounting system on the bottom side. The designer states that the model definitely works with the Bell Super 3R mountain bike helmet, but you might be able to make the model work on other helmets.
The creator of this model suggests enabling tree supports in Cura to create the smallest mess for removing supports from the print. One recorded maker also lists using a 0.16-mm layer height with a 50% infill density to print the single-piece chin mount, with both supports and a raft activated.
- Who designed it? timangus
- How printable/popular is it? This GoPro mount has five makes posted so far.
- Where to find it? Thingiverse
AirTag Mount
This is a sleek and low-key AirTag mount that also acts as a reflector. With this, you can track your bike at all times while also keeping it theft- and loss-proof.
You can place it anywhere on your bike, but make sure it’s well-hidden. However, if you want to use it as a reflector, the best place for it is below the seat. All you’ll need is a zip tie to secure it onto your bike and also act as a hinge to secure the lid to the case and totally enclose the AirTag. You cannot open the case to remove your AirTag while it’s mounted without cutting the zip tie.
Alternatively, you can also purchase the complete mount and reflector, which comes with the zip ties, from the creator’s Etsy page. You can customize the reflector color and the case color; there are a total of six color combinations to choose from.
- Who designed it? devicetherapy
- How printable/popular is it? Printables records nearly 850 downloads, 176 likes, and 27 makes.
- Where to find it? Thingiverse, Printables
Mounted Stereo Speaker
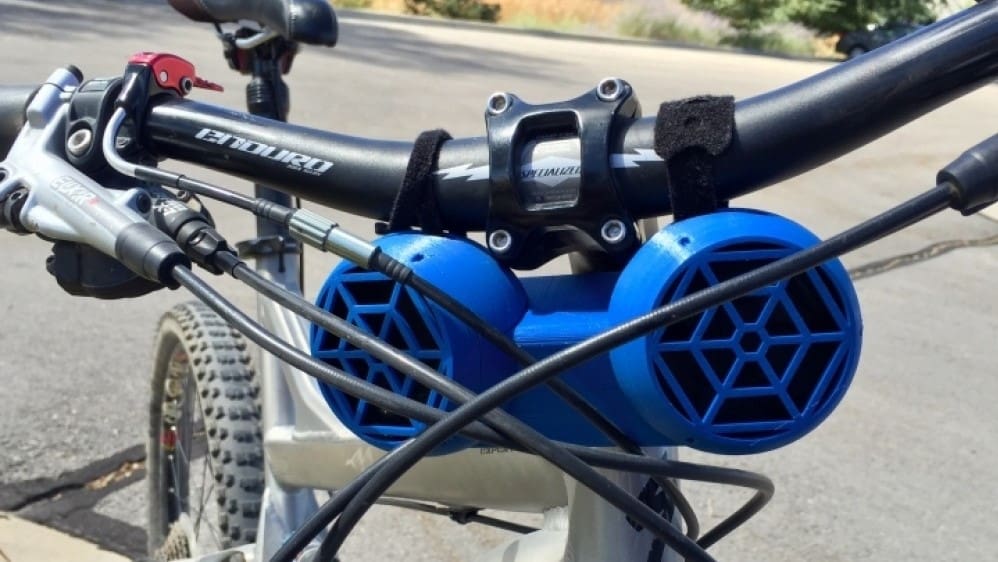
We all know biking and listening to some music is a great combination. This maker has designed a nice case for bike-mounted speakers, and they seem great for any ride. Let the neighborhood start dancing!
This print’s made up of several components and requires some supports in the front part. We suggest printing the components upside down.
- Who designed it? theBrad
- How printable/popular is it? It’s been downloaded by about 335 people. While no one has posted their print, there’s lots of detailed printing information from the designer.
- Where to find it? MyMiniFactory
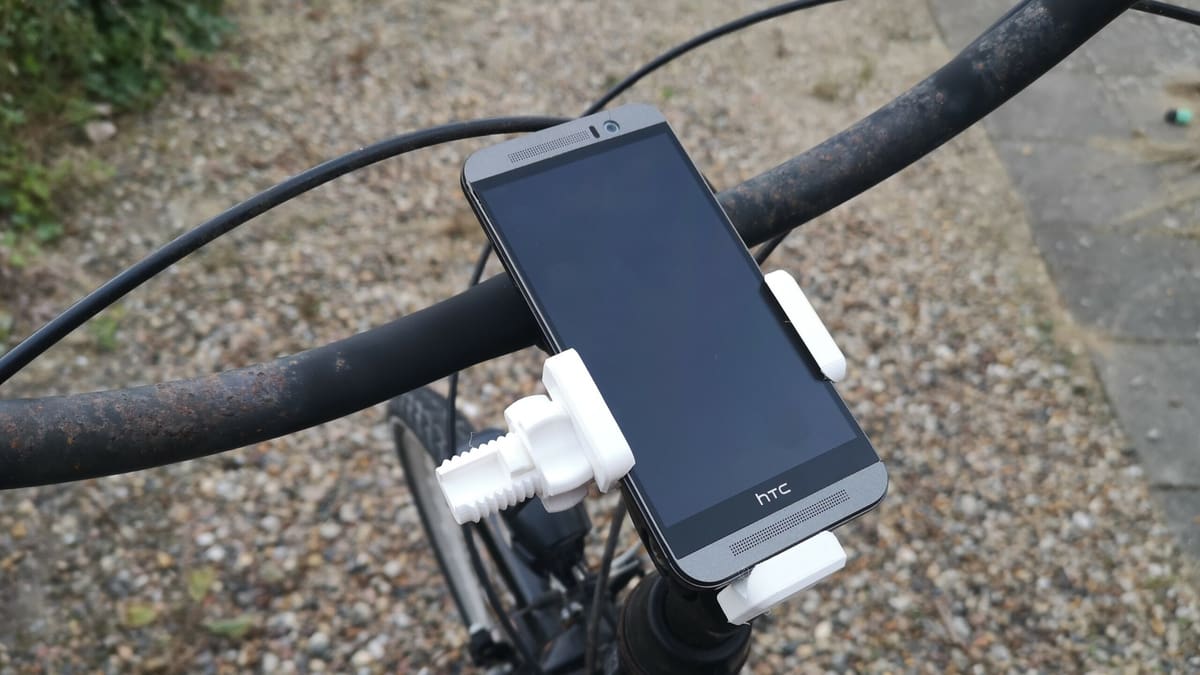
Phone Mount
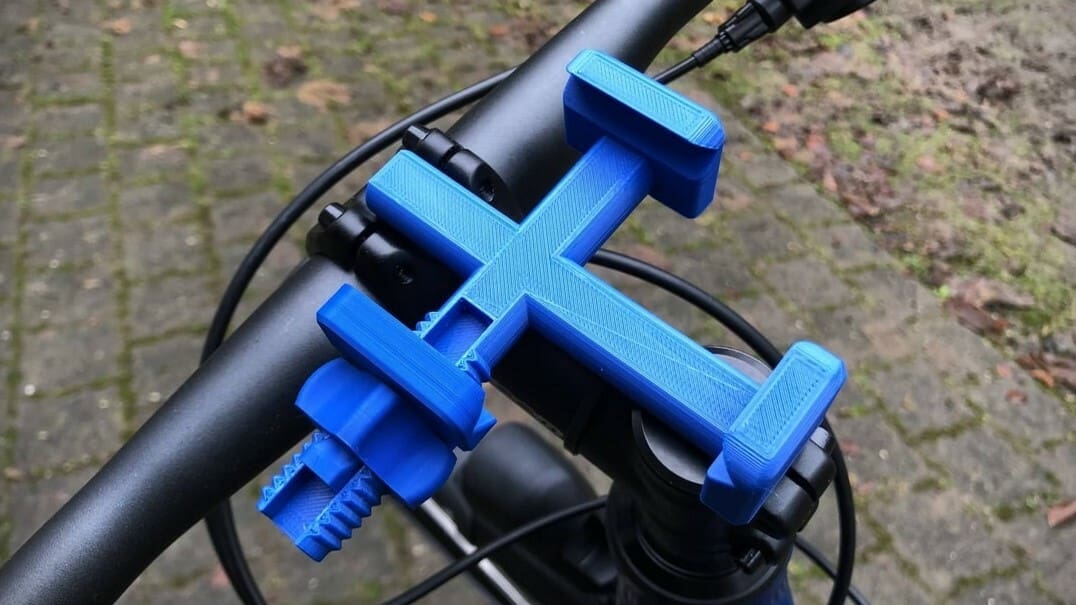
Riding your bike while having to frequently look for directions on your phone can become a hassle (and dangerous!), especially when you have to take the phone in and out of your pocket at every street corner.
To solve this, you can attach a phone mount accessory to the stem of your bike’s handlebar. This particular mount is a universal phone mount with a clamp-like mechanism to secure any phone. Once you place it, you can use it for navigation, quick access to calls, and other applications.
The maker recommends printing this mount at 0.15-mm layer height with 35% infill, but a few makers from the community have found that this infill is insufficient. So, printing your mount with a higher infill may be a good idea. Alternatively, you can try a remixed version, which claims to be sturdier even with a lower infill percentage.
Printing threads and screws can be tricky, though. If the threads are too snug, the creator suggests applying some wax or screwing and unscrewing the nut on the clamp a few times for a smooth movement of the mechanism.
- Who designed it? FirstDegreeBumbleBee
- How printable/popular is it? This mount has a total of 10 makes and 13 remixes.
- Where to find it? Thingiverse
Beach Umbrella Holder

Summertime’s on the horizon, and many people go to the beach by bike. Once you get there and find no good way to stabilize your umbrella, your bike’s got you covered (literally) with umbrella-holder clips. You’ll also need screws and some possible printing adjustments to make sure it fits perfectly with your bike frame.
Map Holder
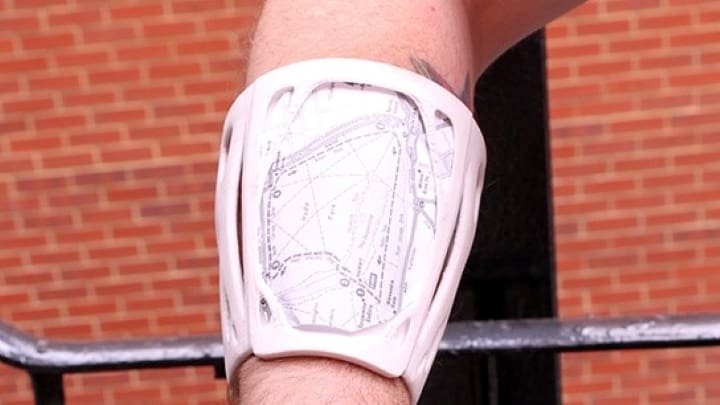
This intuitive design can be referred to as a “manual GPS” since you can securely attach a map of your bike route (or any other paper) onto your arm. It certainly looks cool as a wearable gadget!
- Who designed it? andrewforster
- How printable/popular is it? It’s been downloaded over 450 times and printed at least a couple of times, based on the different photos.
- Where to find it? MyMiniFactory
Tire Accessories
Your bike’s wheels are what gets you from A to B, so they deserve some special treatment. Here are the best wheel and tire accessories to add to your bike.
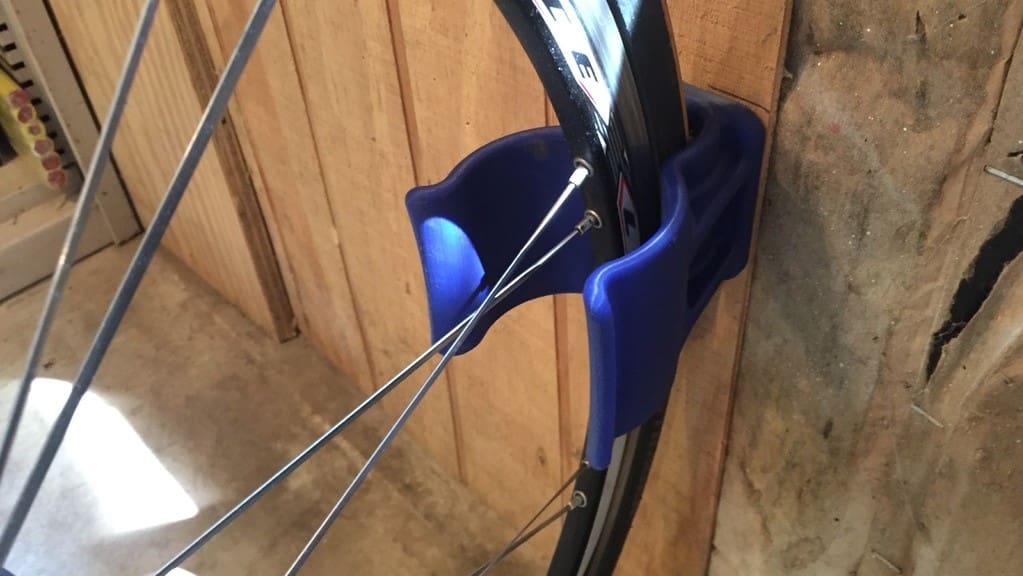
Freewheel Cleaning Tools
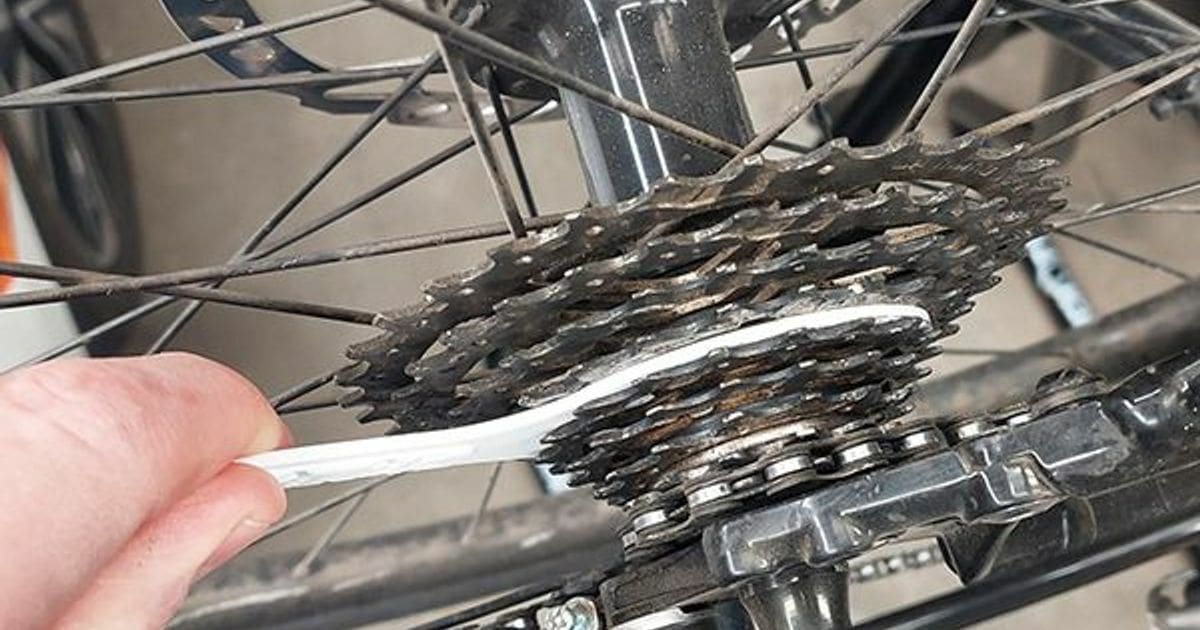
Simple but oh-so practical for bikers to have on hand, these cassette and freewheel cleaning tools allow you to get between the cogs and remove unwanted debris.
The creator suggests printing at a 0.16-mm layer height with 100% infill. There are several blade widths in terms of the files to choose from, with various width increments depending on your needs. The creator included a listing of the associated tool widths so that you can determine the appropriate print for your needs. You can also check out some helpful tips about how to position the tools depending on your bike’s cog size. For example, when dealing with larger cogs with star spacers, he recommends using the tool tip as a pick to clean debris without pedaling backward.
- Who designed it? SteveJohnsen
- How printable/popular is it? This design is quite popular, with 244 downloads and 10 posted makes.
- Where to find it? Printables
Pizza Valve Cap
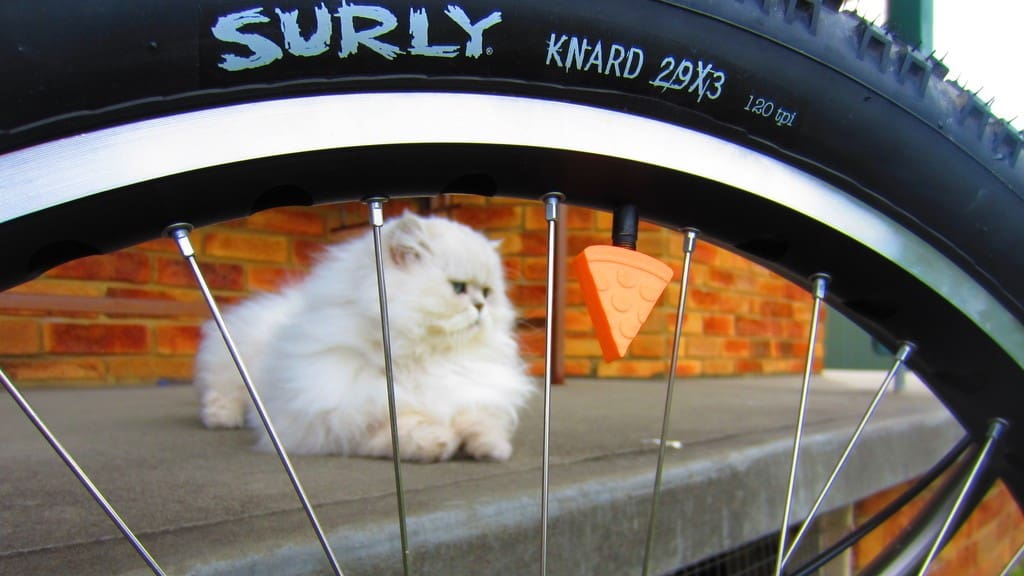
Valve caps are a category of makes where there’s a huge variety of options, and each one enables the bike owner to express their personal taste and style. It was tricky, but we managed to limit ourselves to choosing just two.
The first is a pizza slice, so everyone will know what your favorite food is as you bike around town. Note that this print is designed to fit Schrader valves.
- Who designed it? Ktronik
- How printable/popular is it? It’s been downloaded over 4,500 times. There’s nothing especially tricky about this model, and at least four makers have printed it.
- Where to find it? Thingiverse
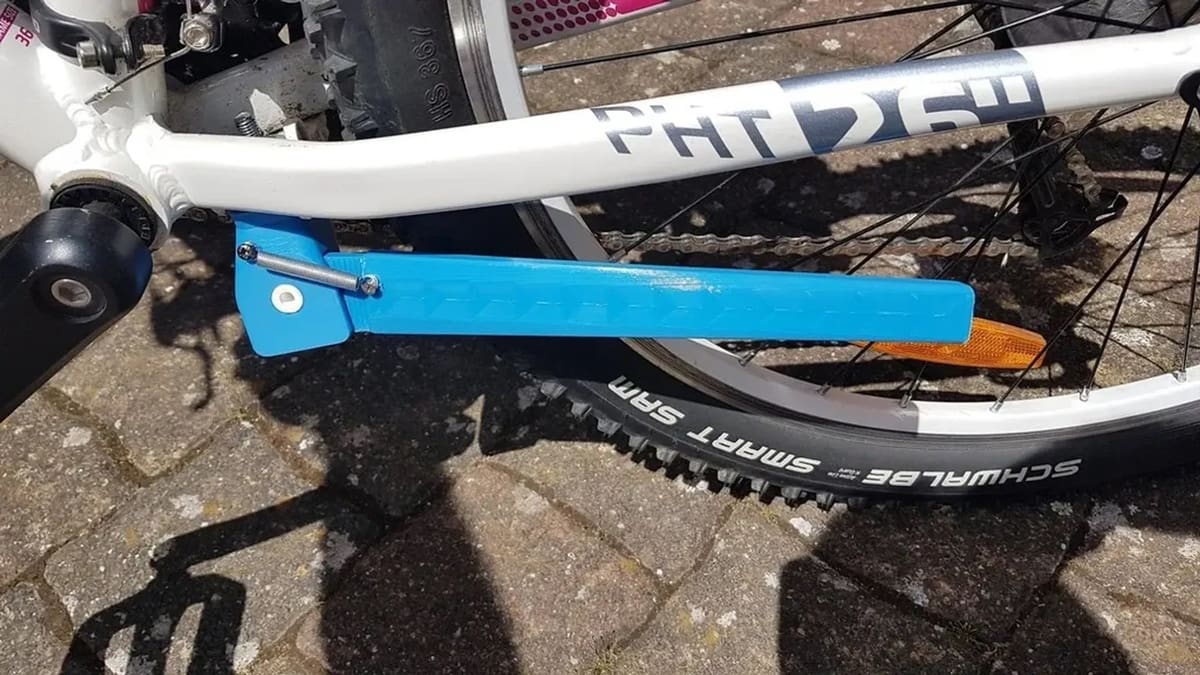
Open Mudguard
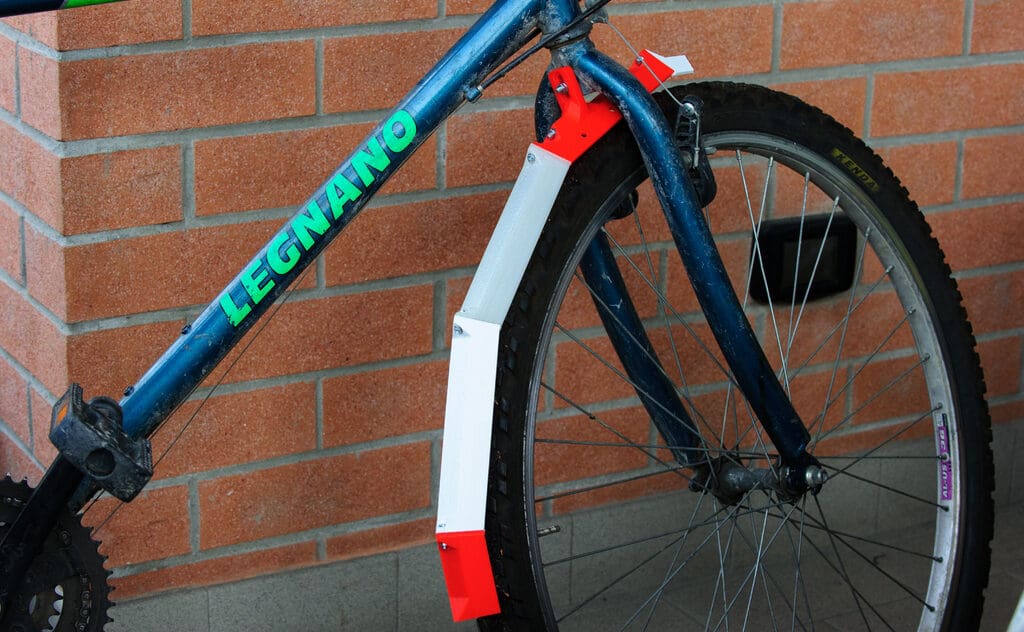
This articulated mudguard, according to its designer, can fit any wheel. Although its shape doesn’t exactly follow that of traditional mudguards, its unique look and ability to be printed in multiple colors give it our approval!
- Who designed it? caltadaniel
- How printable/popular is it? It’s been downloaded over 1,000 times with no maker-posted prints, but we’re not worried about your success because its design is quite simple.
- Where to find it? Thingiverse
Tire Lever

This tiny gadget will prove itself handy when you need to remove the tire from the rim. It’s the kind of tool that helps you do a “dirty job” without getting your hands dirty!
- Who designed it? gaarden
- How printable/popular is it? At least 10 makers have posted their prints, and there’s 1 remix. This is a super simple and straightforward design.
- Where to find it? Thingiverse
Stormtrooper Valve Cap

Show that you have a bit of the dark side in you when you ride with this tiny head of a Star Wars imperial soldier. You can download files to print a valve cap that fits either Presta or Schrader valves. The print is nice and straightforward, and the designer has also supplied the Tinkercad files if you want to make any tweaks.
- Who designed it? mih
- How printable/popular is it? With 22 makes and 3 remixes, this is a very popular model.
- Where to find it? Thingiverse
Other Accessories
Some of these are practical accessories, others are just a bit of fun, but all will be excellent additions to your cycling setup.
Children's Basket
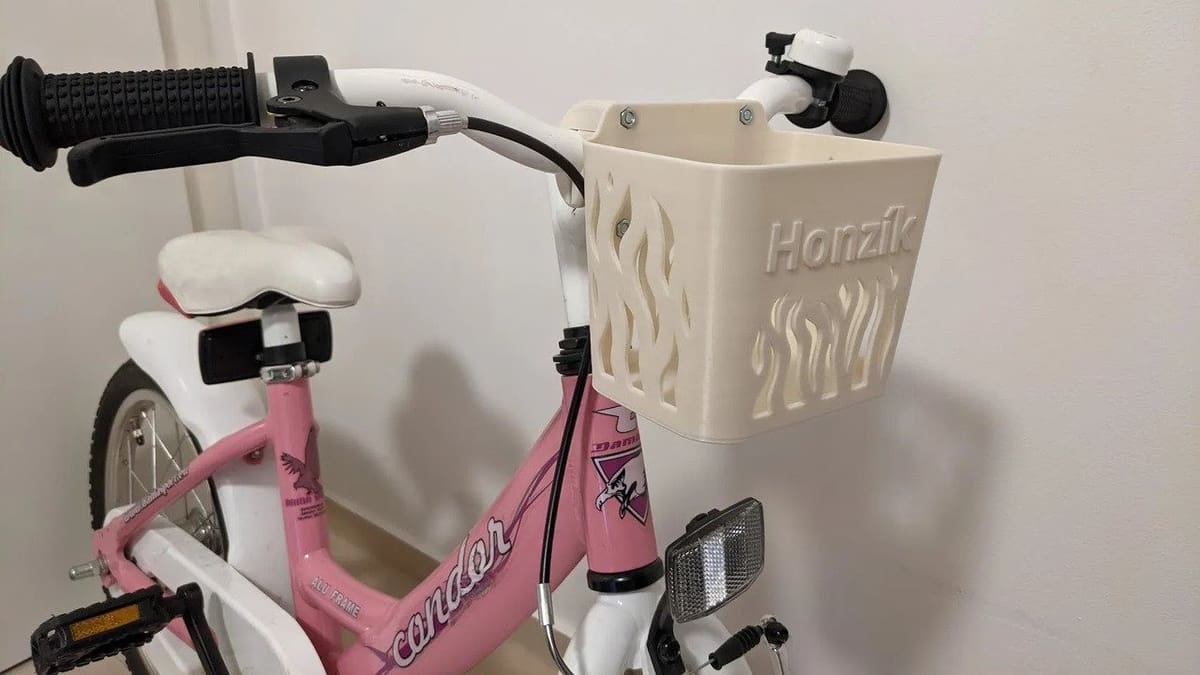
A child’s bike basket is fun, stylish, and practical. It will allow your kiddos to transport smaller items, such as a water bottle or a favorite toy. Less for mom or dad to carry!
This customizable print allows for personalization, which is a fun bonus. You can add the name directly in the slicer. The basket’s dimensions are roughly 13x10x11 cm, so this is a print best suited to a smaller bicycle. However, you can always scale it up, if needed.
- Who designed it? farin
- How printable/popular is it? Right now, this bike basket print has over 60 downloads and 2 posted makes.
- Where to find it? Printables
Flag Illumination
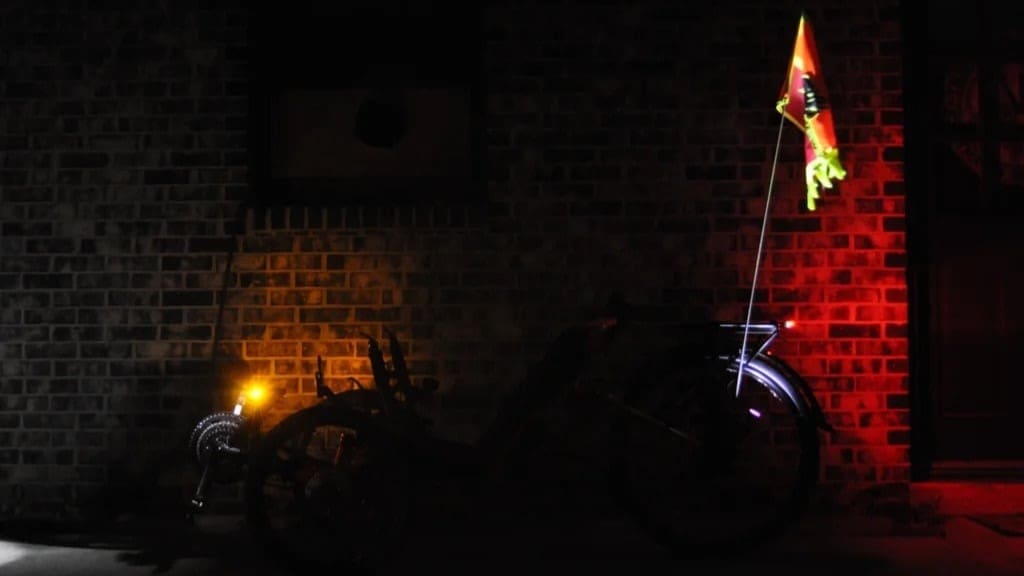
Safety is paramount when biking in the dark. This practical project helps make your nighttime rides safer by keeping your bike flag visible to cars and other people.
The creator was inspired to make this project after his wife started biking a lot in the dark. It involves attaching a flashlight to the bottom of your bike’s flagpole. You can print the provided STL file for your bike or create a custom one with the provided instructions. As for materials, you’ll need a round elastic cord and a 28-mm diameter flashlight. Your bike will also need to be equipped with a flag and flagpole. Check out the YouTube video to see the flag in action.
- Who designed it? ChrisR387
- How printable/popular is it? At the moment, this print has over 3,280 views and close to 20 likes.
- Where to find it? Instructables
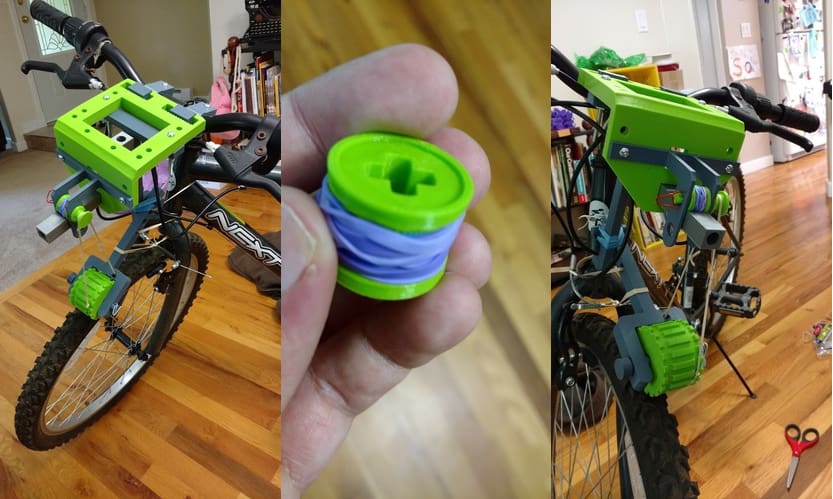
Chain Cleaner
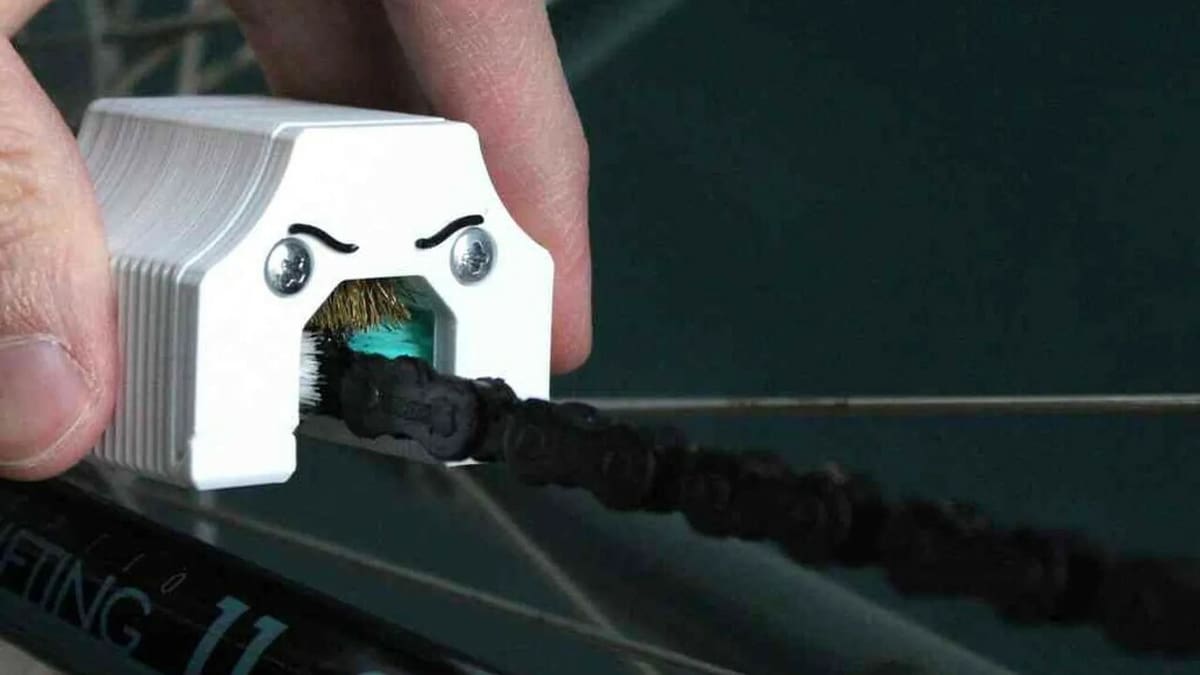
If your bike chain is dirty and muddy, it can easily rust, which slows down your bike and requires more energy from you to get those wheels turning. To the rescue is this chain cleaner accessory. As the name suggests, it cleans dirty bike chains with old toothbrush heads. All you have to do is hold this on your chain and rotate the pedal. (The repair stand above would be perfect to help with this task.)
If you feel like your old toothbrush’s bristles are too soft or not thoroughly cleaning the chains, you can use the original designer’s chain cleaner (which uses rougher brushes), or you could go for some brass brushes.
The assembly of this cleaner is quite intuitive, and for it, you’ll need a total of three toothbrushes, some screws, and your 3D printed parts. The creator recommends printing this at 0.2-mm layer height with 20% infill for a successful print.
- Who designed it? twothingies
- How printable/popular is it? This design has 420 downloads, 200 likes, and 26 makes on Printables plus another 5 on Thingiverse.
- Where to find it? Printables, Thingiverse
Wall-Mounted Stand
Wall-mounted stands are a popular gadget among bikers and come in different shapes and sizes. We found this particular one easy, simple, cheap, and practical, all at the same time. If you print it in a color that fits your place, it can double as a wall decoration.
- Who designed it? 3DPrintingWorld
- How printable/popular is it? At least three people have printed this design, though we believe there’s a lot more out there.
- Where to find it? Thingiverse
Storage Box
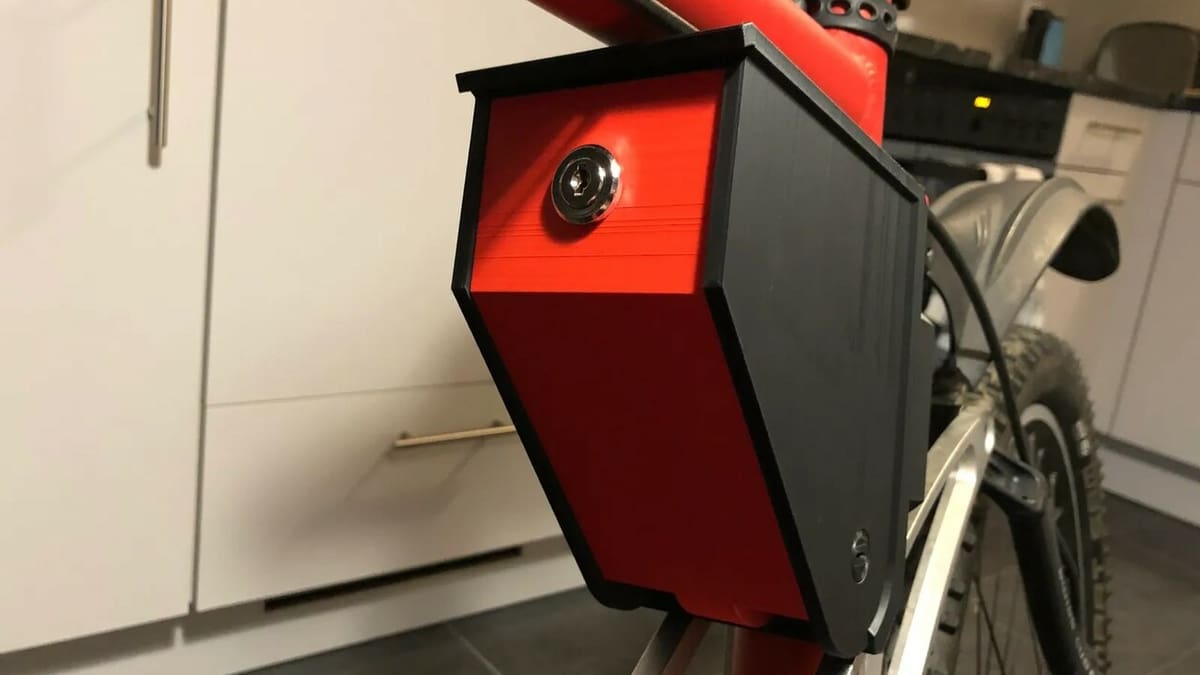
This is a storage box that can hold all your essentials while you ride around on your bike. However, the most interesting part about this is that you can secure it using a lock, and all of your things will stay safe inside. Additionally, when using the appropriate print settings, you can completely waterproof your box, making it the perfect accessory for all weather conditions.
The designer conceptualized this accessory when he didn’t want to carry a bike light and other accessories. So, to execute this design, he took three things into consideration: safety, versatility, and printability. Basically, the storage box should be safe and secure for the items kept in it, you should be able to easily mount it on any bike, and you should be able to print all the parts without difficulties.
For printing this, the designer recommends using a 0.2-mm layer height with infill ranging anywhere from 40% to 60%. Once you have the parts ready, all you need are some nuts and bolts, along with a universal cylinder lever lock. Follow the assembly video to put this thing together, and you’re good to go!
- Who designed it? Endorriar
- How printable/popular is it? So far, there’s just one make. The designer has taken great care in making the parts easily printable, so printing and putting this storage box together shouldn’t be difficult.
- Where to find it? Printables
Wheel-Powered Pea Shooter
This accessory isn’t exactly going to make your life easier, but it promises to add some laughs. You’ll need a few household materials in order to do the final assembly and start shooting some peas!
It seems a bit tricky to assemble and mount, but the printing itself is fairly straightforward.
- Who designed it? dan steele
- How printable/popular is it? This popular item 26 likes and has been viewed over 13,000 times, although no one has shared a print yet.
- Where to find it? Pinshape
Bubble Machine
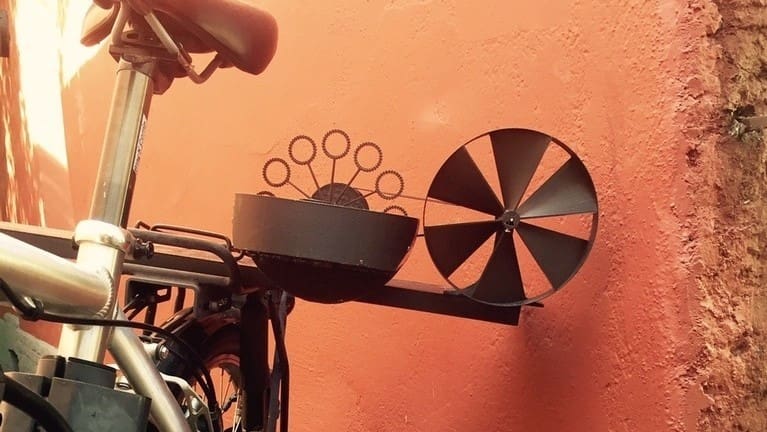
This design will create hours of fun and entertainment. The bubble machine is powered by your pedaling so that, while you’re riding, others can enjoy the spectacle of a moving cloud of bubbles!
This whimsical bike accessory takes quite a few parts to put together, but the designer’s printing instructions are detailed and aimed at helping you achieve success.
Folding Bike Carrying Handle
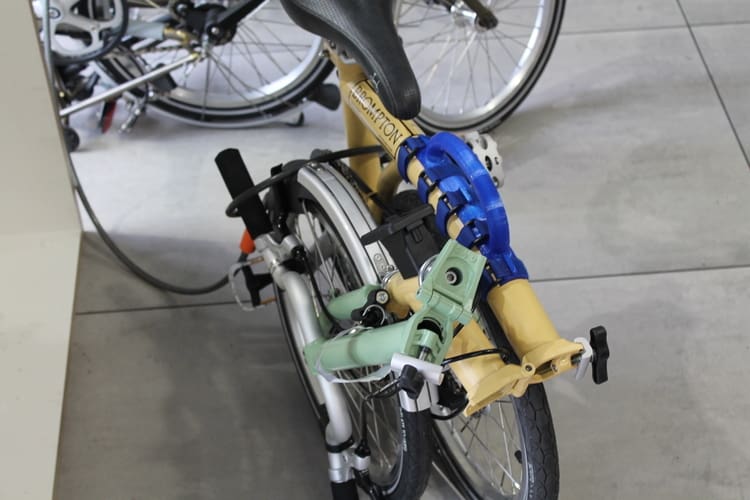
This handle lets you carry your folding bike in style (non-folding bikes may work, too). It can prove quite useful on staircases, walking through crowded places, or anywhere where bikes aren’t allowed. You’ll need Velcro straps or cable ties in order to attach this handle to your bike.
- Who designed it? Kirby Downey
- How printable/popular is it? It’s been downloaded over 480 times, though we can’t tell how many makers have actually printed it. Go ahead and grip onto this one!
- Where to find it? MyMiniFactory, Pinshape
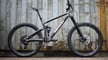
Bonus: Frame

This last item we include less as something to produce yourself (because it would be quite involved and potentially unsafe) and more as an interesting project: a 3D printed bike frame! As you can see, not all parts of the frame are printed. Instead, the printed components are mostly responsible for holding together the non-printed components, like the frame’s tubes.
It comes from Stephan Schürmann from ColorFabb. According to one Cults user, it took over 200 hours of printing and another 50 hours of testing and assembly for this bike to roll.
In addition to the standard bike frame that can be 3D printed above, check out these other innovative takes on the conventional bike frame:
- James Novak’s mesh texture design
- Moi Composite’s continuous fiber design
- Arevo’s carbon fiber design
- Omer Sagiv’s unique hexagonal design
License: The text of "The Best 3D Printed Bike Parts & Accessories" by All3DP is licensed under a Creative Commons Attribution 4.0 International License.