3D Printed Keyboard: 10 Great Designs & Projects

Custom DIY keyboards are all the rage these days. Read on for our 10 favorite 3D printed keyboard projects!
Typing: No Problem

Keyboards have been around for quite some time now, and over the years, there has been an incredible range of options to suit different people’s keyboard preferences. Some like membrane keyboards, and others prefer mechanical. Sizing can be different from person to person too, depending on how large your hands are.
Building your own keyboard can be a way to get it just the way you want. A number of custom keyboard manufacturers sell parts that can be used to assemble unique designs, but 3D printing gives makers even more control over the look and feel of their custom keyboards.
Fair warning, however, custom keyboards can be a pricey affair. The total cost varies quite a bit depending on the model, size, and the quality of the details you’d like to add. Some sources report a $200-to-$600 range, while others have managed to get satisfactory results in the $100-to-$200 range.
To get you started on this keyboard customizing adventure, we’ve compiled a list of our 10 favorite 3D printed keyboard projects, a couple of which are more complex for those of you looking for a challenge. For each, we’ll provide you with a brief overview as well as some printing tips used to make each one.
If you want a customized keyboard, but you’re not up for the challenge of 3D printing it on your own, head over to Craftcloud. You’ll benefit from professional printing expertise and save yourself a lot of time in the process.
Tap some keys, and let’s scroll down to our list!
Single-Handed Gaming
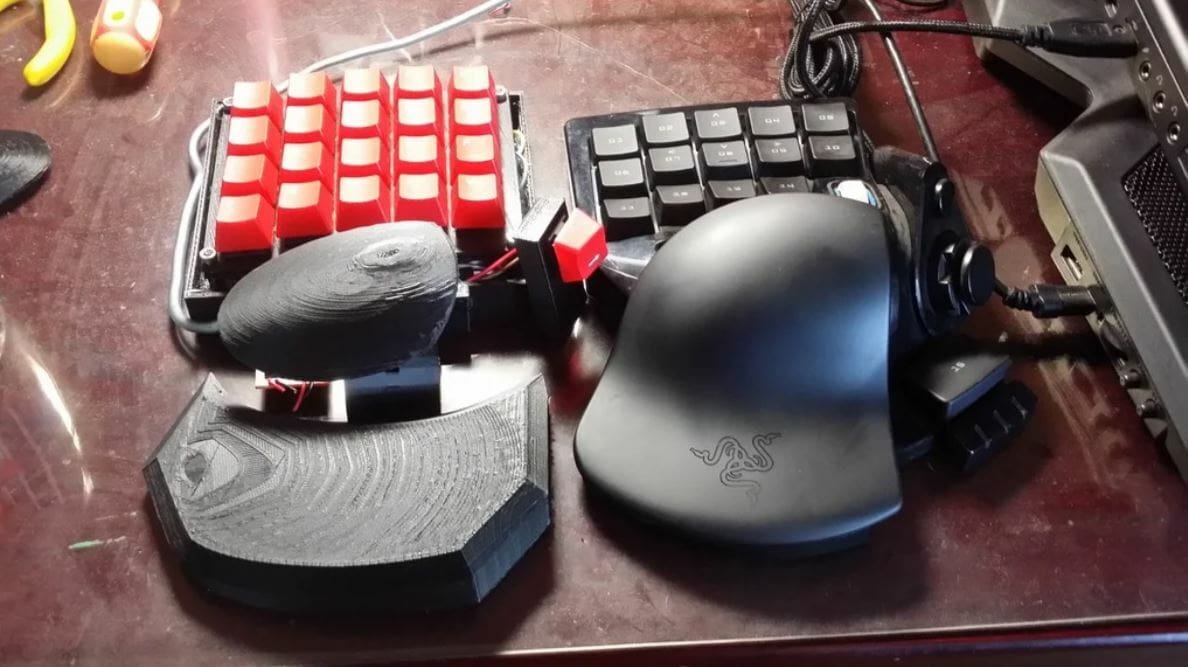
This one-handed keyboard was specifically designed for gaming. It lacks the majority of keys and only features those normally needed during gameplay. It does, however, have a side switch for your left hand’s thumb. This is beneficial because your thumb is closer to the key than it would normally be, allowing for faster clicking.
This project has a medium complexity and should be reasonably easy to print. There are five different parts that make up the keyboard and the wrist rest.
The designer used an old keyboard control board to make this version, so if you have all of the parts required and some knowledge of keyboard wiring, it should be a fun project.
- Who designed it? ivanricci
- How popular/printable is it? This project has few Makes and Remixes. There’s also over 5,000 downloads.
- Where to find it? Thingiverse
Pocket Chip
The Pocket Chip keyboard project was designed to work with the Pocket Chip, a single-board computer formerly from Next Thing Co. that’s equipped with an onboard keyboard, an LCD display, some ports, and more. With 52 keys in total, the keyboard has slightly fewer keys than a standard one. It also includes a D-pad, which is useful if you want to play a game or move something around.
This project consists of a faceplate for the Pocket Chip as well as all of the keys. In the build log, it states that the keys are held in place via straightened paper clips. Overall, the keyboard seems to work well.
- Who designed it? anthonysavatar
- How popular/printable is it? This project has 2 Makes, 2 Remixes, and over 7,500 downloads.
- Where to find it? Thingiverse
Mechagodzilla

This keyboard was designed as a mechanical keyboard and features the standard amount of keys. It also has a smaller form factor, as it doesn’t have a function key row, which reduces the width of the keyboard.
The project is pretty simple, and its Cults page includes a list of the required parts as well as a link to a tutorial page that shows you how to wire it. Some soldering skills are required.
- Who designed it? RobotDoctor
- How popular/printable is it? This keyboard has almost 2,000 views and has been downloaded 66 times.
- Where to find it? Cults
SICK Keypad
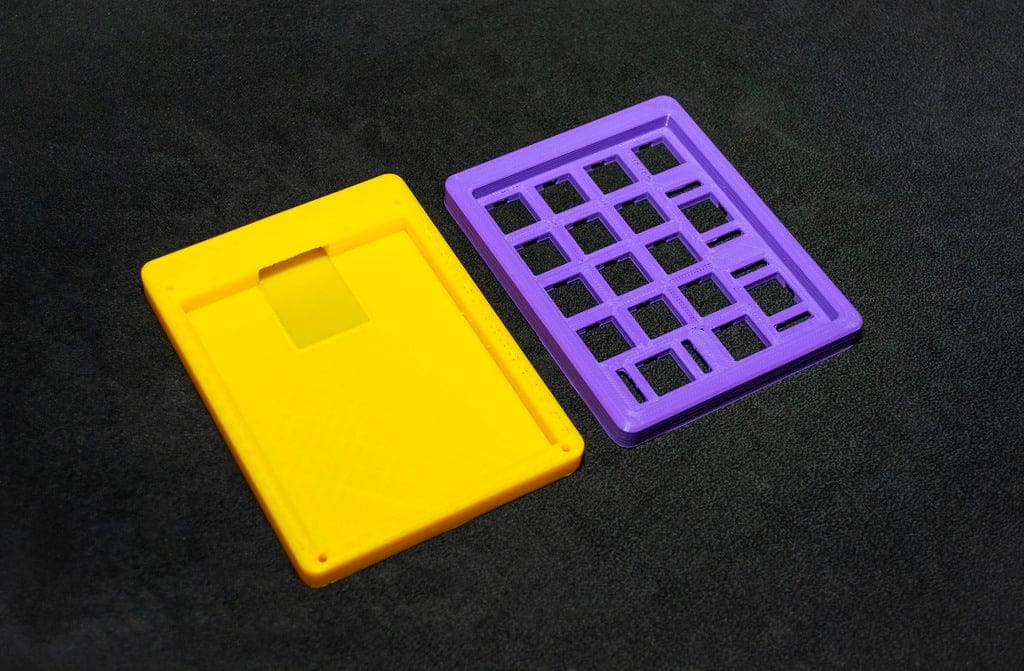
This SICK (super inexpensive, cheap keyboard) keypad was designed to go along with another 3D printable keyboard called the SICK-60. The creator uses this acronym followed by a number, which represents the version of the keyboard. (You’ll notice this in the other SICK keyboard on this list.)
This project is a small mechanical keyboard pad that has just enough keys (17) to function as a basic calculator. It was designed to be extremely small and is very portable. Given its size, this SICK keypad can be a fun way to start exploring how to make your own keyboard without taking on too big of a project.
The design has only two files: one for the top half and one for the bottom. This allows it to be fairly simple to set up and add keys.
- Who designed it? FedorSosnin
- How popular/printable is it? This keypad has 9 recorded Makes and over 5,000 downloads.
- Where to get it? Thingiverse
Split
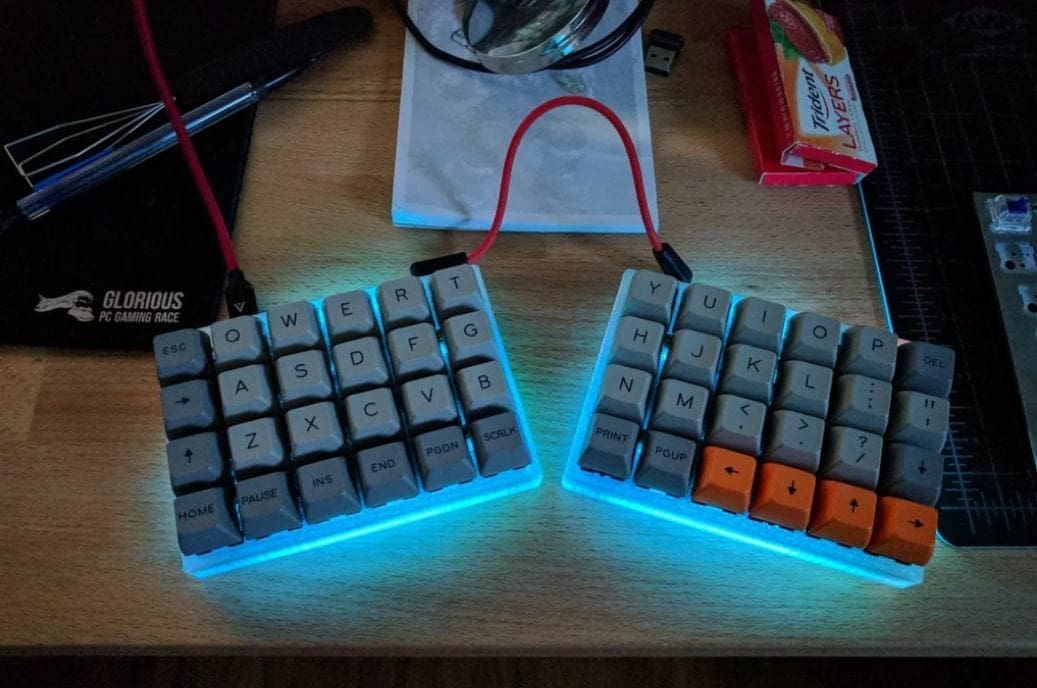
This keyboard differs from the other keyboards on this list so far because it has two different modules. It’s essentially two halves of a keyboard that have been wired together to work as one unit. Its unique design allows for a smaller size and adjustable angling to fit the needs of the user.
There are three printed files: one for the left bottom, one for the right bottom, and the file for the top case, which is the same for both. Additional electrical components are required. More information can be found on the keyboard’s project page.
- Who designed it? mesohuannny
- How popular/printable is it? This project has 4 Makes, 2 Remixes, and over 7,000 downloads.
- Where to get it? Thingiverse
Dactyl
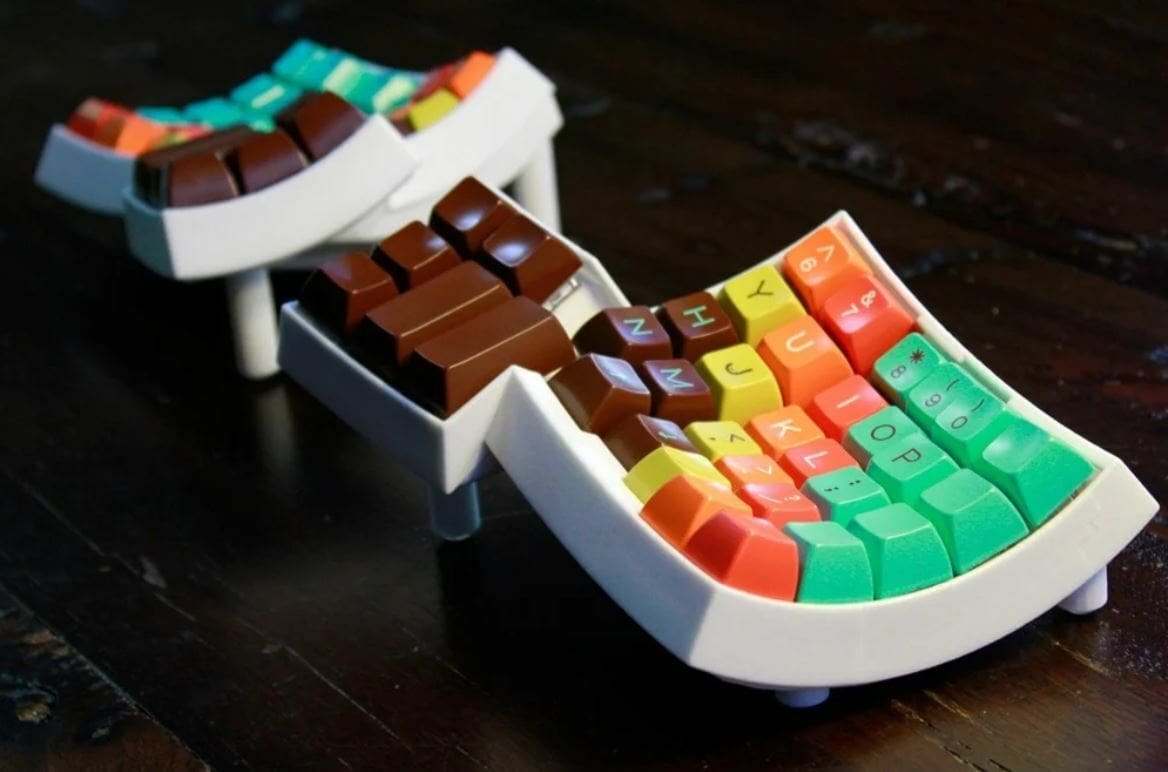
This keyboard design is quite distinct due to its curvy shape. It has a split keyboard layout broken into multiple modules. The surface is also concave for ergonomic purposes.
There are four different files: two for each module. This will likely make wiring it a bit easier, as you’ll only have to take off one part to be able to wire the keys. Another maker posted a great print and reported using a 0.4-mm layer height with supports activated.
- Who designed it? FrigginSharks
- How popular/printable is it? This project has 6 Makes, 4 Remixes, and over 12,000 downloads. You should definitely be able to print this one!
- Where to find it? Thingiverse, GitHub
SICK-68
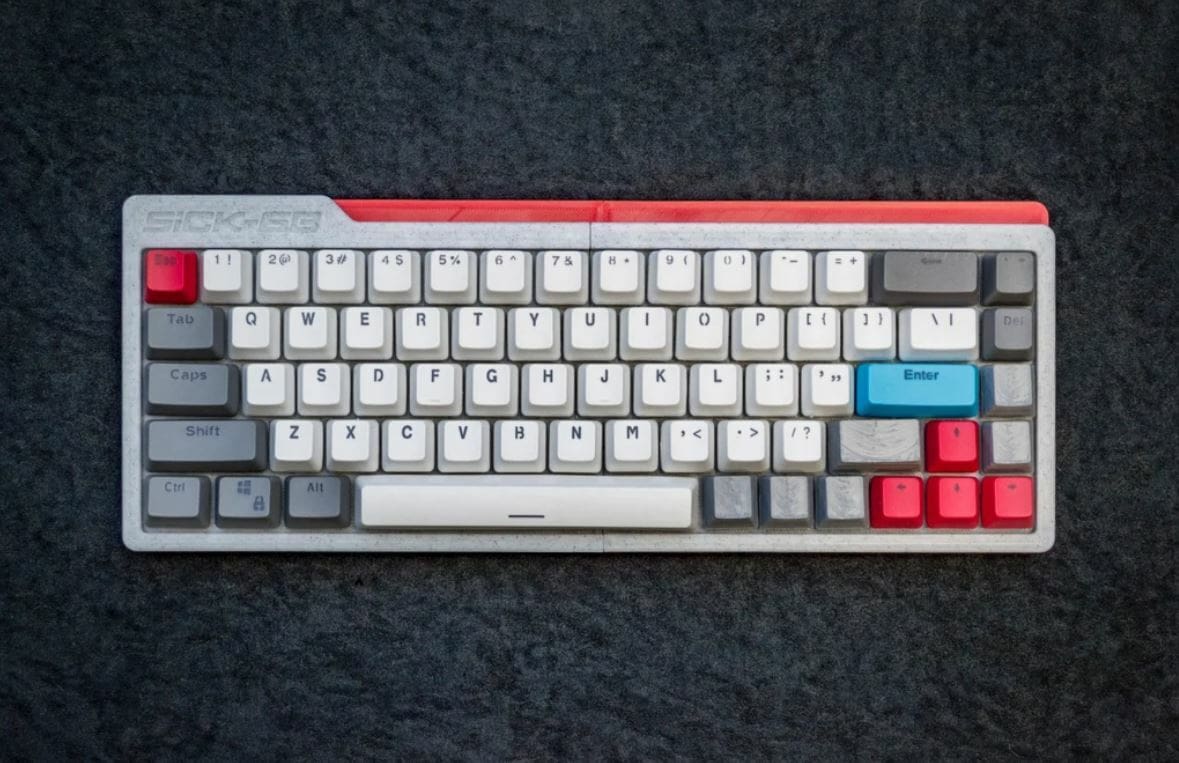
The SICK-68 is a full keyboard that can be used for anything from work to gaming. It’s medium sized and has all of the necessary keys except for a function key row, so it’s pretty portable.
The project’s files include the four-part keyboard frame as well as keycaps. There’s also a wiring diagram you can refer to if you don’t already know how to use it. And the best part: The whole project is estimated to cost around $50.
- Who designed it? FedorSosnin
- How popular/printable is it? The SICK-68 is incredibly popular. There are 55 Makes and 31 Remixes as well as over 1,000 comments to date.
- Where to find it? Thingiverse
Arduino with RGB Lighting
This keyboard is on the more difficult side of the spectrum, but it’s also quite impressive because it features controllable RGB lighting. It was designed as a mid-sized keyboard, and the finished model looks very nice and clean.
When building a keyboard with RGB, some additional parts are needed such as an Arduino and LEDs. Before taking on this project, you should probably have some basic electrical knowledge and know how to solder.
There’s a YouTube video with a more in-depth description of this project and links to the numerous files. You can also see the maker’s YouTube video about the first prototype.
- Who designed it? Datulab Tech
- Where to find it? YouTube
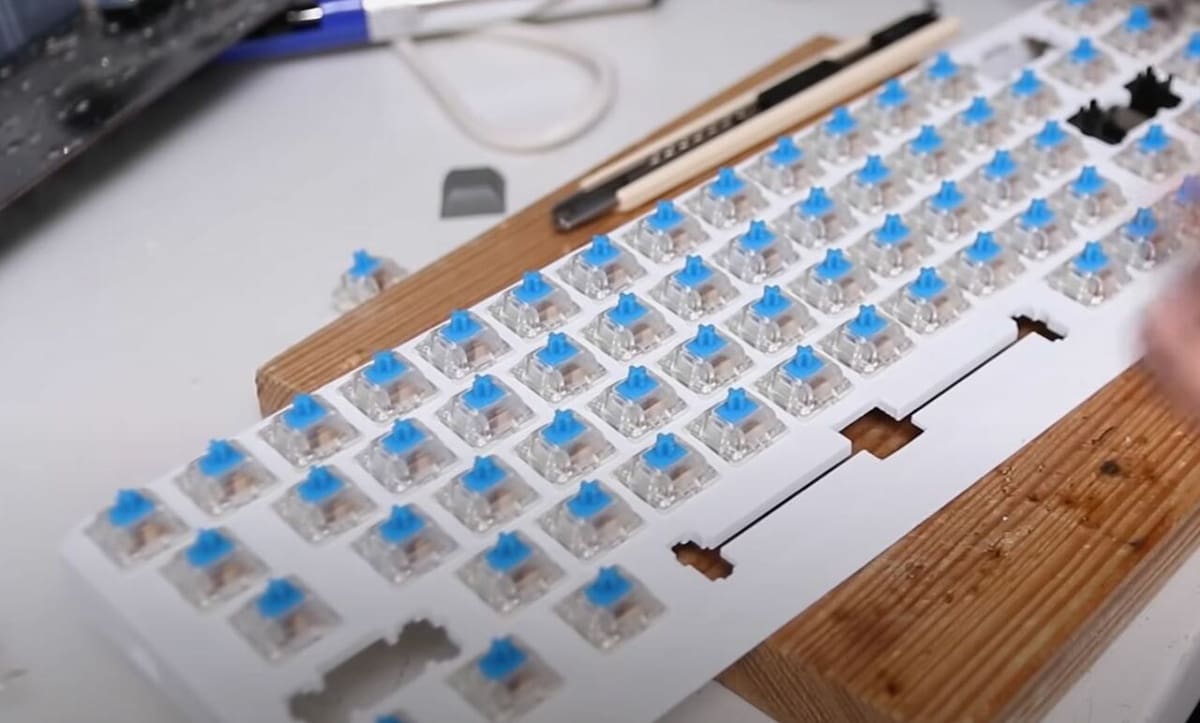
60% Mechanical
This mechanical keyboard is another project that may be hard for some due to its relatively small design, but there’s a lot of helpful information and documentation to guide you through the process. There are nine 3D printable parts for this project, and you’ll need other components such as keyboard diodes, a microcontroller, and PCBs.
All of the print files can be found on a DropBox that’s linked in the Reddit page comment section. Furthermore, there’s another Reddit page mentioned in the comments to show you how to wire the project. Although the price of everything including electronics isn’t provided, a commenter stated that ordering the 3D printable parts could be $30 to $45.
Bonus: Keycaps

This final design isn’t a keyboard but rather a library of keycaps that can be printed for any custom keyboard you choose! The library features a wide selection of shapes and styles, including slanted and curved keycap options. You can also edit them for further customization.
Because there are many options, it’ll depend on what type of key when you’re considering print settings. Still, keycaps can be printed using anywhere from 10% to 80% infill and with a resolution ranging from 0.2 mm to 0.5 mm.
- Who designed it? rsheldiii
- How popular/printable is it? With 12 Makes and over 360 Remixes, these keycaps are incredibly popular and you’ll have lots to choose from!
- Where to find it? Thingiverse
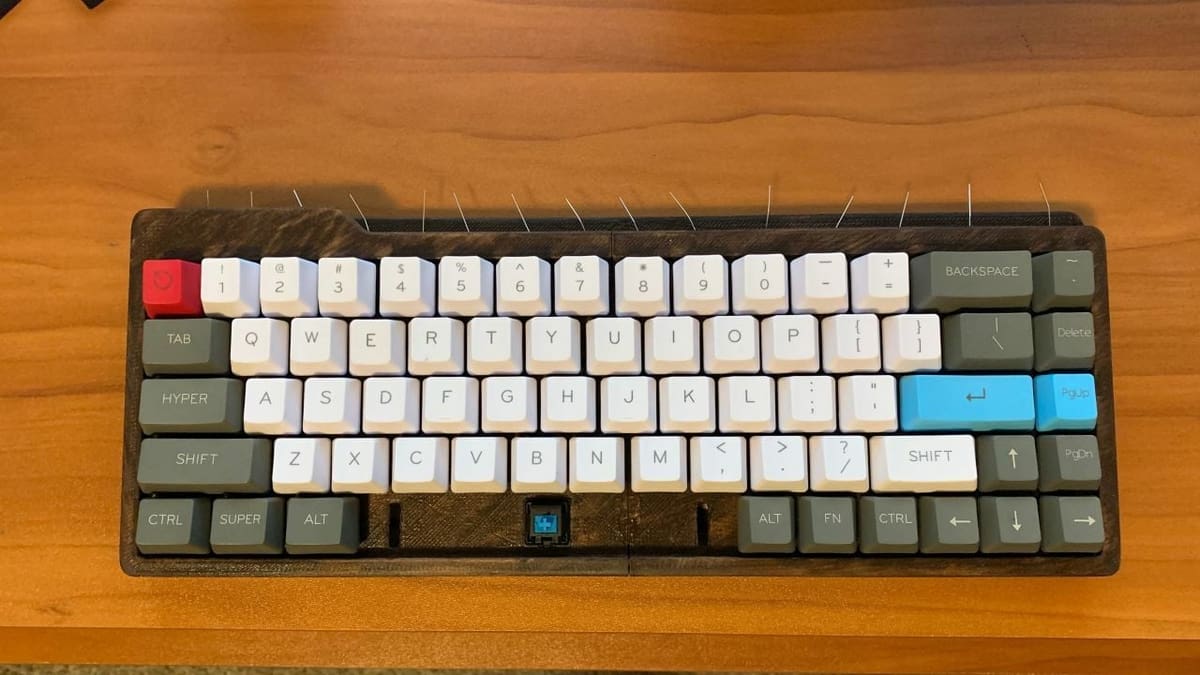
Lead image source: joshcurfman via Thingiverse
License: The text of "3D Printed Keyboard: 10 Great Designs & Projects" by All3DP is licensed under a Creative Commons Attribution 4.0 International License.