3D Printed Wall Art: All You Need to Know

With 3D printing, the possibilities for creating custom wall art are endless, enabling unique designs that stand out. Read all about it!
3D printing brings many new possibilities for decoration, like creating custom vases, lamps, and even furniture. Among the various decorative elements that can be made, wall art is gaining popularity and it’s easy to see why.
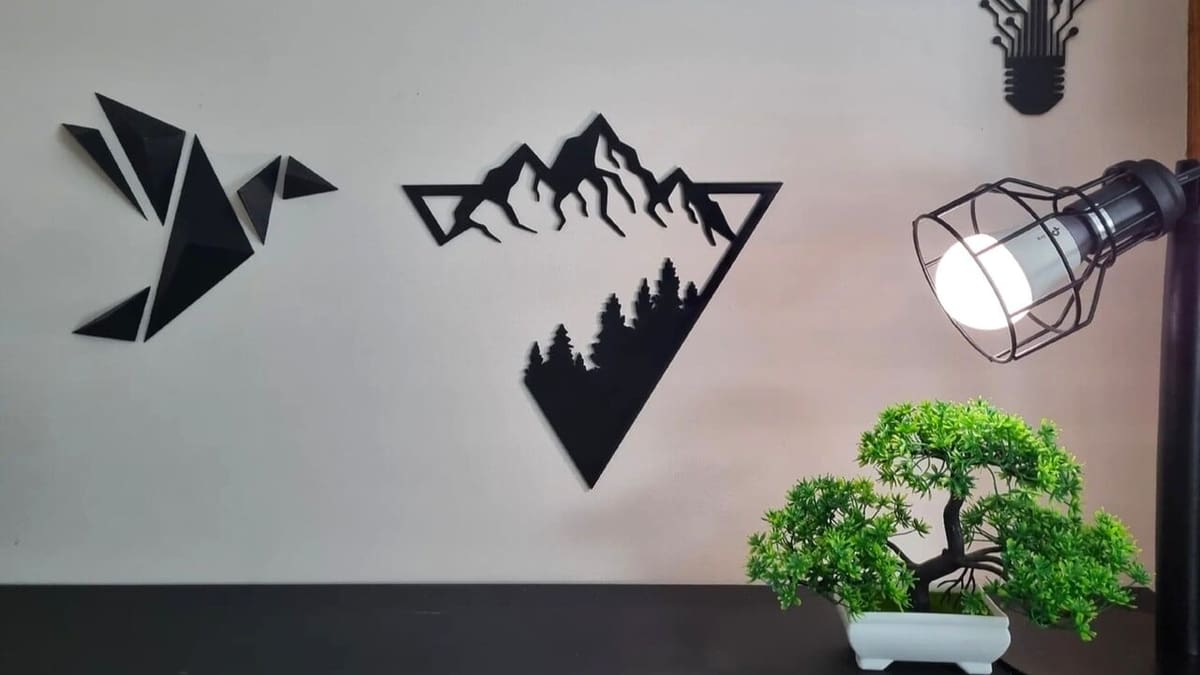
Wall art consists of a decorative element made to hang on a wall. Similarly to hanging pictures, wall art is meant to bring color, personality, and beauty to interiors, creating unique and cozy environments integrated with the theme and style of decoration.
In this article, we will cover a simple yet effective workflow to develop custom wall art using free software. We will start by selecting a 2D vector image that we will import into basic 3D modeling software to produce a printable 3D model. As you might imagine, there are many designers who’ve already shared wall art models, in case you want to head straight into the 3D printing part of the process.
If you don’t have access to a 3D printer or to the dazzling filament you’re looking for, and still would like to print your customized wall art, you can count on Craftcloud services. Craftcloud allows you to outsource the printing of your design, and receive the final object at your door.

Where to Find Images & Copyright
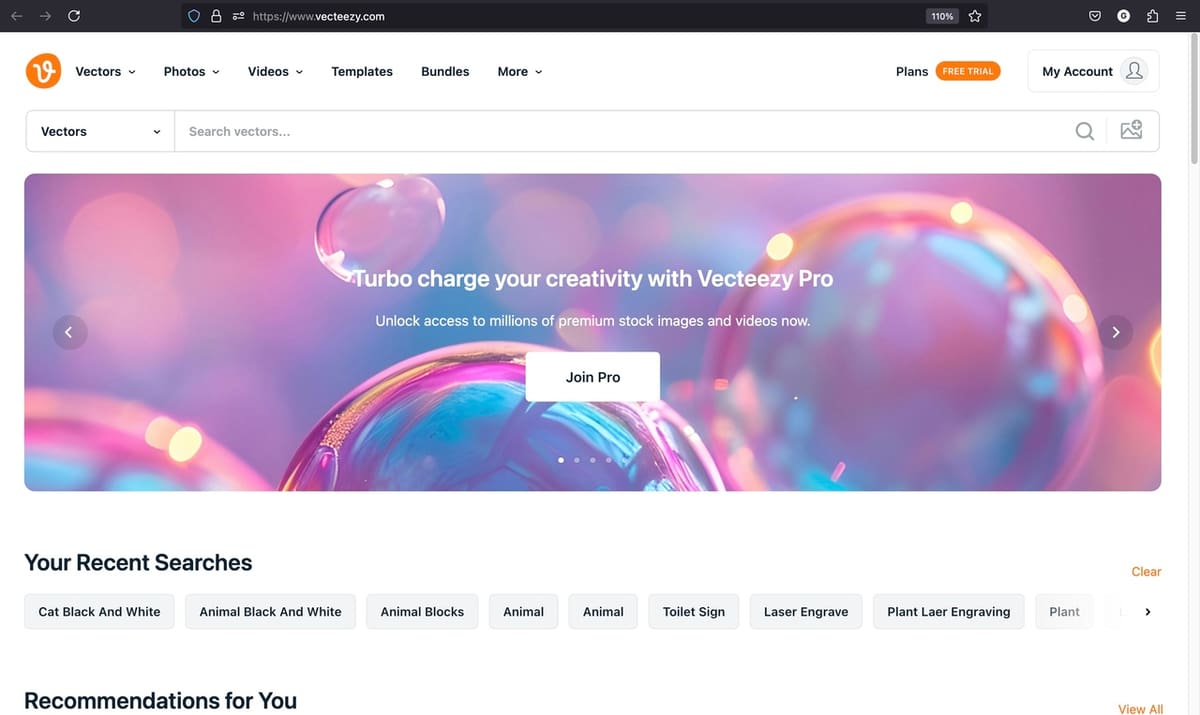
To start, we need to find a vector image. There are many vector image formats out there, like AI, CDR, and DXF, but this time, we will preferably work with the SVG format. You can browse image repositories such as Pixabay and Vecteezy.
If you have a general idea of what you’re after, search for a theme of your interest to see what’s available, using keywords or narrowing down results by selecting the relevant categories. It’s likely that many interesting images will show up but, besides the suggested file format, note that some images will work better for 3D printing than others.
As a general guide, keep in mind that the lines of the design should join to create closed shapes. With this, a surface will be made that can be later extruded. Also consider that designs with tiny details will create very thin elements that might not be printable. It’s usually best to use simple designs, at least on the initial attempts.
Another aspect to keep in mind is that many images provided in image repositories are copyrighted. It’s good practice to verify whether the image is so or royalty-free. This will affect how it can be used – i.e. to sell the 3D design or 3D prints, strictly for personal use – and whether attribution is required or not. For example, many websites allow the use of the images, even for professional use, simply requiring that you attribute the design to the original creator.
To offer a wider range of options for the kinds of images that can be used, we will present two complementary paths for creating wall art. We will begin with a single-part design, so you can have a feel for how to make a model. Then we move to a multi-part design, to broaden the range of possibilities of creation. Last but not least, we’ll go over a few tips and suggestions on materials, post-processing, and more.
Single-Part Design
In this part, we’ll make wall art from a drawing composed of a single, continuous shape. We selected GDJ’s tree design silhouette as the reference image to develop our first wall art.
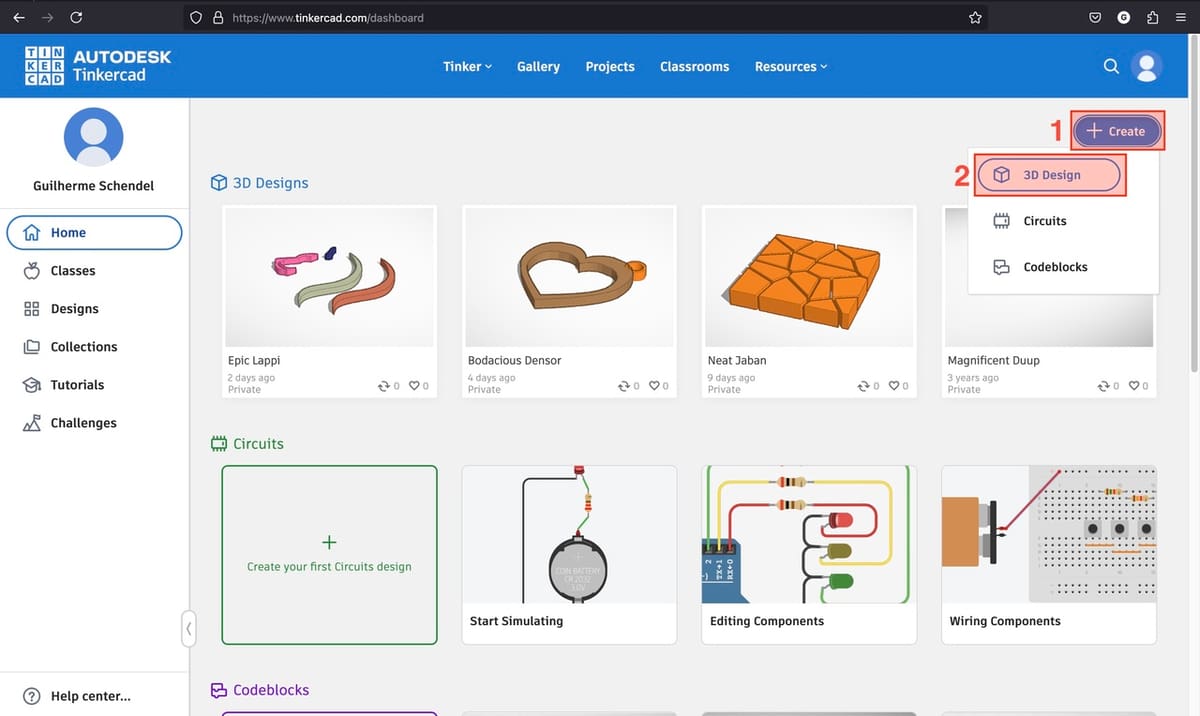
In a nutshell, we’ll import the SVG image into Tinkercad to extrude it.
Tinkercad is free, easy-to-use, and beginner-friendly 3D modeling online software, which you can read more about in our many articles.
- To get started, create an account in Tinkercad.
- On Home, click on Create (1) and then select 3D Design (2) from the drop-down options.
- Click on Import (1).
- On the pop-up window select “Choose a File”. Then find the the SVG file you will work with.
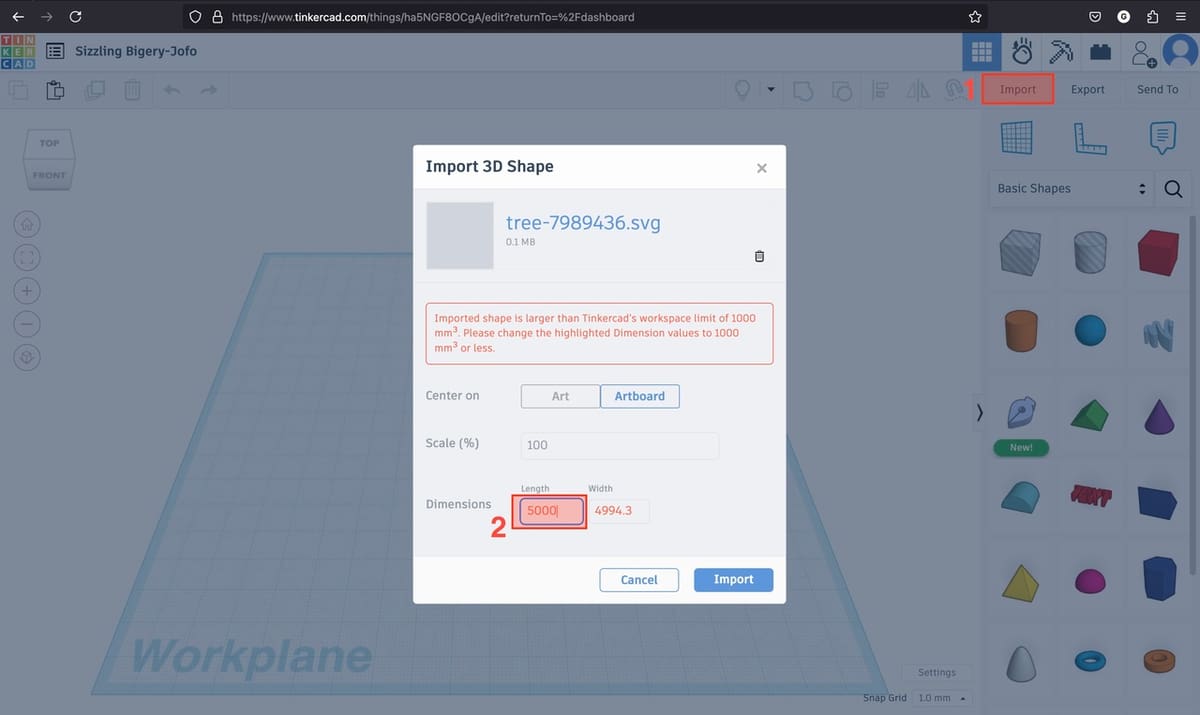
- After you select a file, you might get a warning that Tinkercad has a space limit of 1,000 cubic millimeters. If your design is bigger than what’s supported, simply scale the biggest dimension (2) to 1,000 mm in the pop-up window.
- The design will load and open on the design space, already with a standard thickness. You can use the mouse scroll to zoom in and out, to check out details of the model as needed.
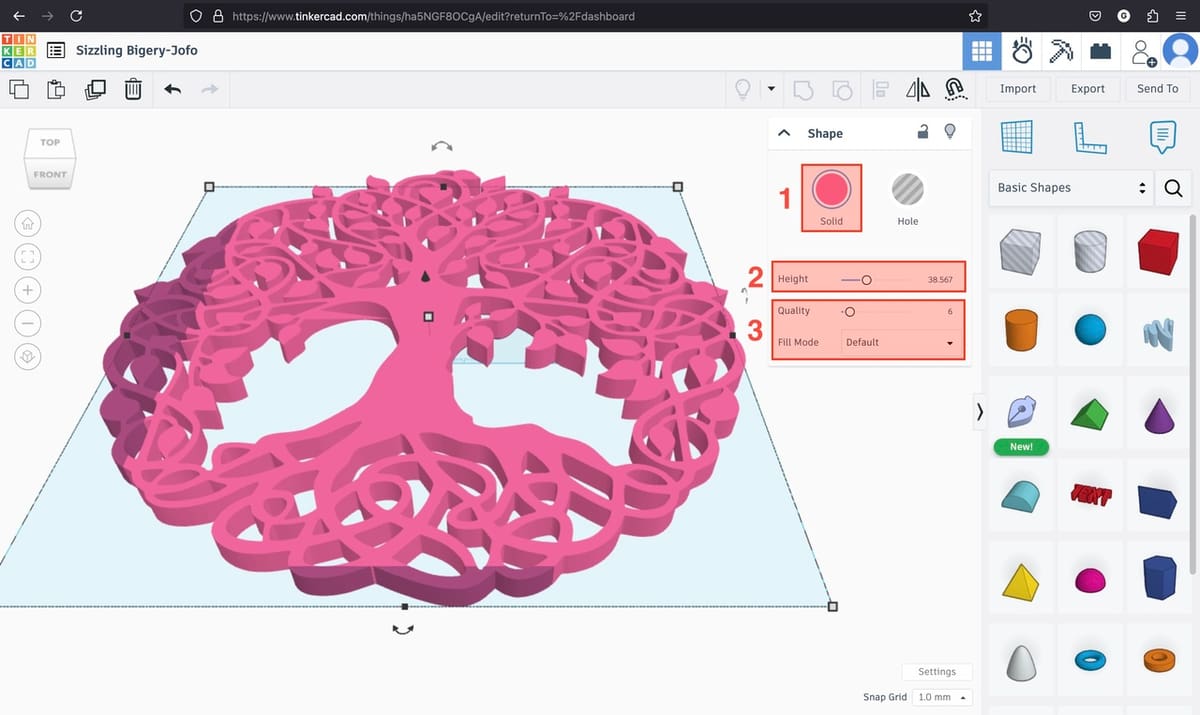
- Left-click the design, and a pop-up window will appear on the top right. Use this window to make any necessary adjustments. We’ll work with the Solid mode (1).
- Adjust the height (2) as desired, using either the slide toggle or typing a number.
- Note that, even if you select an arbitrary number as the height, you’ll probably have to scale the model down in the slicer. So, instead of concerning yourself too much over a fixed height number, try to look at the proportions of the model and find one that looks interesting to you.
- If you don’t want or need to make any additional changes to the design, you can also make this stylistic choice directly in the slicer by scaling the Z-axis independently from the X- and Y-axes.
- You can also play around with the Quality and Fill Mode (3).
- Quality will change how precise the extrusion adjusts to the uploaded 2D vector; i.e. the less quality, the lower the polygon count. The Fill Mode changes the area to be extruded. There are options for Default, Silhouette, Outer Line, and Inner Line. But for our example, we’ll use the default Quality and Fill Mode.
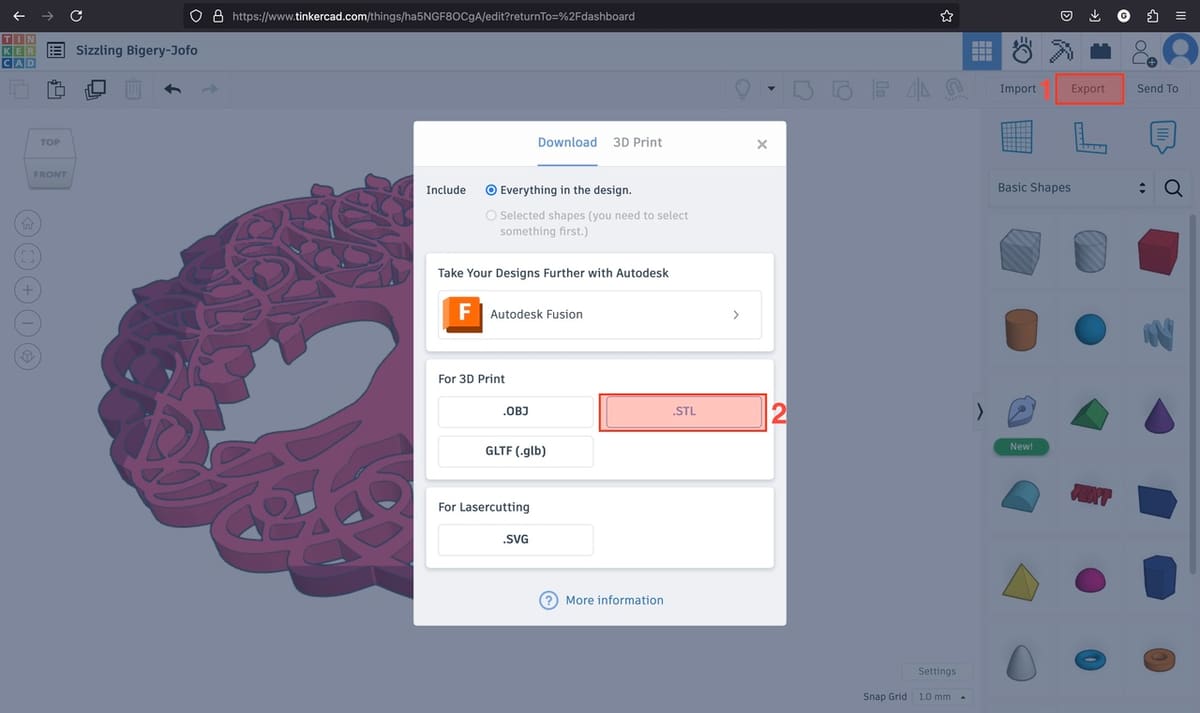
- Once finished, select the model and click Export (1).
- In the pop-up window, choose STL (2), and the model will download to your hard drive.
- From here, open the STL file in your preferred slicer and choose the printing settings that fit the design, material of choice, and intended use.
- If you scaled the model to 1,000 mm at the bigger dimension, you’ll probably need to scale it down to fit your printer. Otherwise, look at our article on splitting STL files to print your wall art in smaller parts.
- Slice, print, and set up your creation.
Multi-Part Design
Maybe you want to choose a design composed of several independent blocks for your wall art. Of course, you can follow the steps above to extrude it, but the independent blocks will be exported inside a single STL.
If the overall design is bigger than your printer’s build plate and you want to avoid splitting the parts themselves or tweaking things in the slicer, saving them individually will make it easier to slice as many build plates as you need. If you print segment by segment, you can scale up the design, making each one fit the printing area, getting larger wall art as a result. This option also makes it possible to print in different filament colors (if you don’t have a multicolor setup).
So, in the next steps, we’ll go over how to split the SVG file into as many files as the independent segments a design might have.
We’ll use Inkscape in this endeavor. Inkscape is a powerful open-source vector image editor. Unlike Tinkercad, which is browser-based, you have to download the software from its official website and install it on your machine.
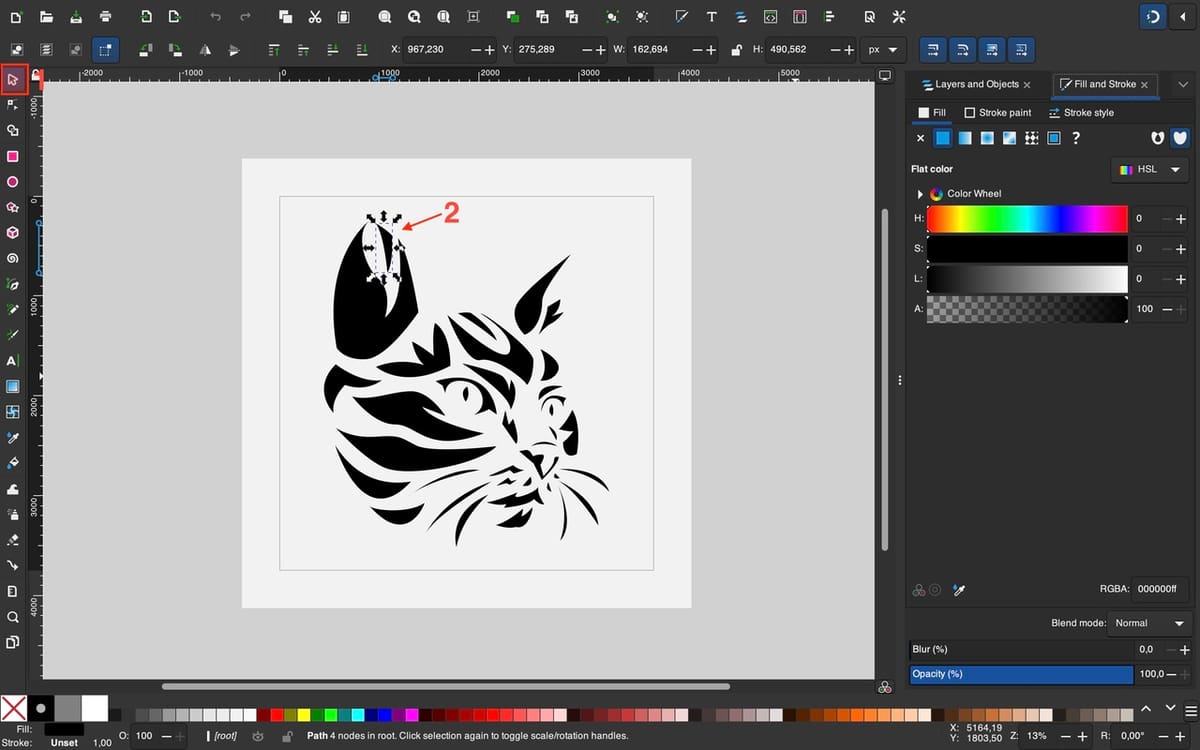
We selected irkhamsterstock’s portrait of a cat as the reference image for this step-by-step guide.
Our goal is to have one file for each block that composes the art. We achieve this by exporting each block, or smaller groups of blocks, in independent SVG blocks.
- With Inkscape installed, run it and open the desired SVG.
- Zoom in and out with “Control + scroll”. Also, click and drag with the mouse scroll to pan de view.
- With the Selector Tool (1), select a part of the design. When you click on a block, you’ll notice a dashed rectangle (2) showing around it. If this doesn’t happen, left-click the design and click “Ungroup”.
- Look at the design and consider the best way to optimize your work. For example, in the design we’re working on, each of the cat’s ears is composed of two blocks. Because of their size and shape, it’s better to export them together as, if split, they won’t optimize the printing area while creating another SVG file.
- Start by selecting one or more blocks, using the Selector Tool (shortcut ‘S’). To select more than one block, hold “Shift” while selecting them.
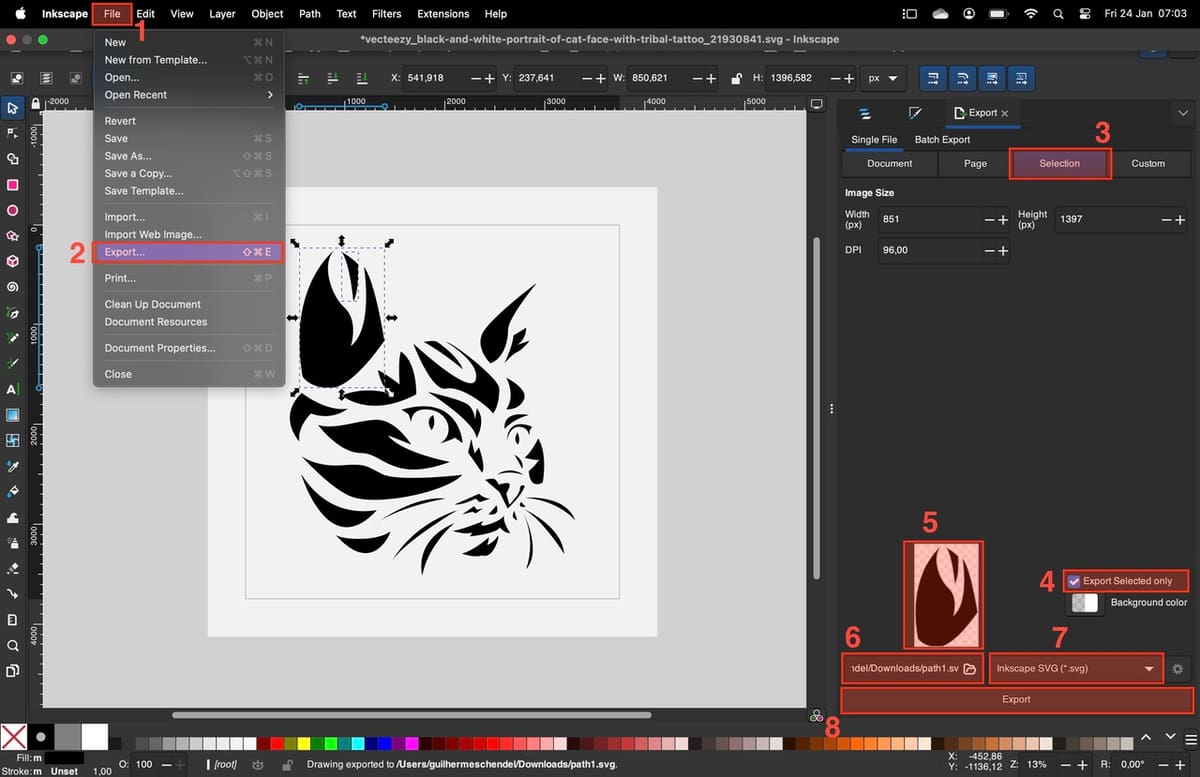
- After you select a block or group of blocks, click on “File (1) > Export (2)”. The Export tab will open on the right side of the screen.
- Click on Selection (3), and then check the box in Export Selected only (4). Notice that only the selected geometry appears on the preview (5). You can choose a file name (6) or leave it as the path name suggested.
- Select Inkscape SVG (*.svg) (7) as the file format for the output.
- Click Export (8) and a file with only the selection will be created in the same folder where the original file is located.
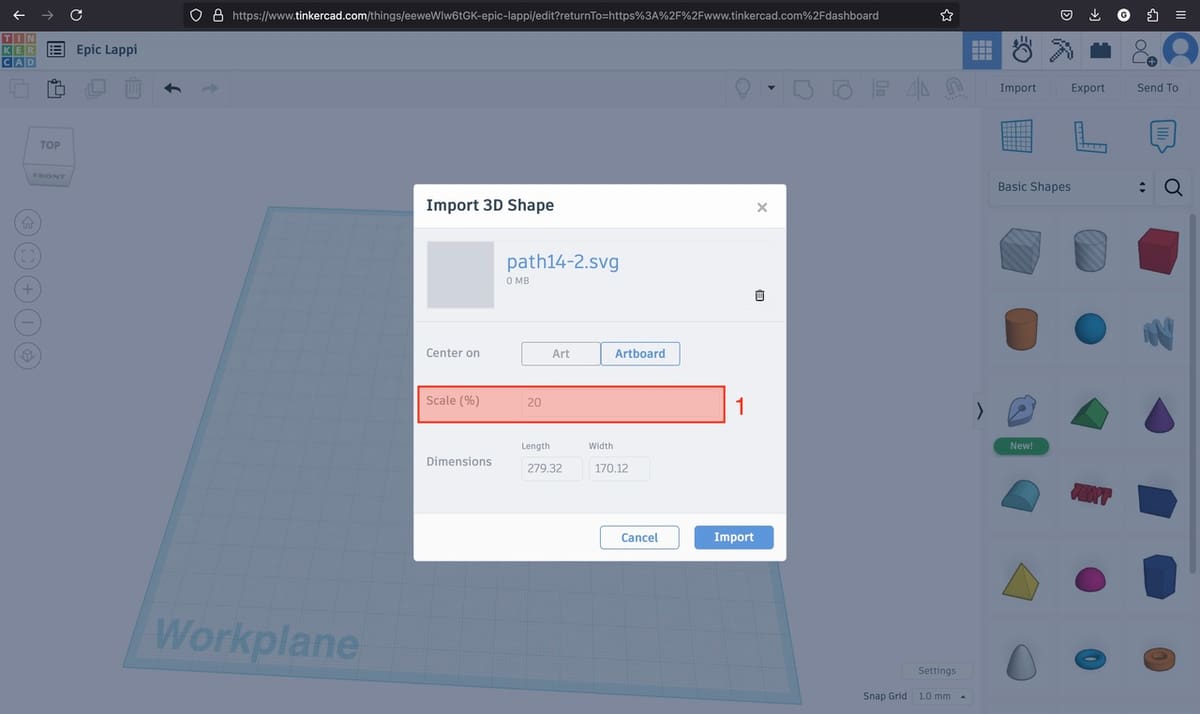
- After we break all blocks into individual SVG files, we have to import them to Tinkercad so that we can extrude them. As we do this, to adjust the scale of the object, we have to maintain the ratio between the blocks. To do this, instead of just making the largest dimension 1,000 mm, we need to use the Scale (%) (1).
- Begin with the largest block and try to find a scale factor that works for your piece. This can vary a lot depending on the SVG you are working with and the size you want the print to have. Try numbers such as 50%, 20%, or 10%. In the case of our file, the biggest block was scaled to 20%.
- Note down that factor and use the same for all the blocks as you import them.
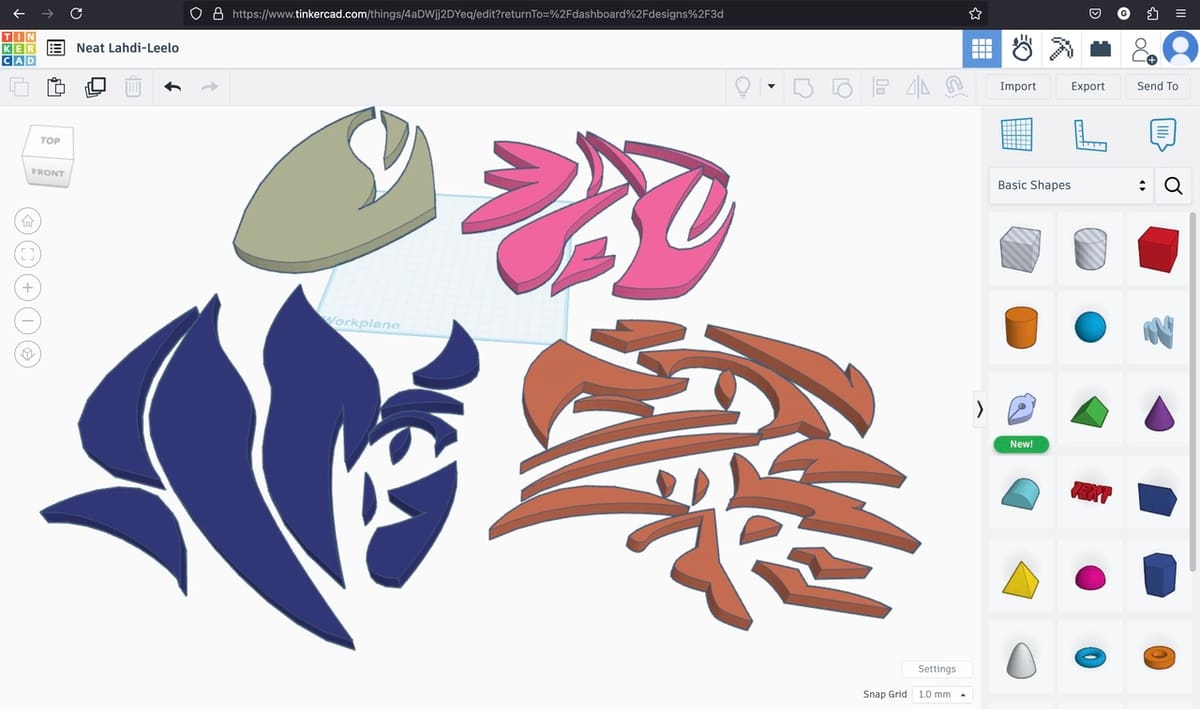
- Adjust the block extrusion as in the single-part step, ensuring that all parts have the same extrusion value (unless different parts are meant to have different heights), and export each block as one STL.
- When opening the STL file in your slicer, you might need to follow a similar process of scaling the blocks in a defined scale factor, if the size isn’t the value you intended.
- Slice, print, and set up your creation. For many parts, it might be useful to print the SVG and have it at hand to measure the proportionate distance of the segments.
General Considerations
As for materials to be used for wall art, PLA is the usual choice for decorative pieces because of the ease of printing it affords. That said, as there are no special requirements regarding the performance of the model – any material should do. So this is a case in which you could choose the material simply by the color and your 3D printer’s possibilities.
Regarding printing parameters, as we are working with flat-extruded parts, try to use a thicker layer height, such as 0.2 mm to 0.24 mm, so you can print faster. Mind that the top layers have to look good, as they are the finishing of the model. So at least three top layers are needed (you’ll want to avoid pillowing). You can opt for a lower infill, such as 5% to 15%, to make the parts light for hanging. For bed adhesion, try not to use a brim to avoid the risk of ruining the part when removing it, although this will depend on how well the material adheres to the build plate.
As you let your artistic skills flow, you can feel the need to apply a special color and an awesome finish to your creation. Our article on how to paint 3D prints will be handy for it.
And let’s not forget that we need to fix the art on the wall! The easiest and cleanest way to do it is by using double-sided tape. Just be sure you get one that can hold the 3D print well. With that, no other tool will be required, except perhaps scissors.
License: The text of "3D Printed Wall Art: All You Need to Know" by All3DP is licensed under a Creative Commons Attribution 4.0 International License.