The Best 3D Printer Firmware of 2024

Choosing 3D printer firmware can be challenging. Read on to find out the best options and how to install them on your 3D printer.
Firmware is the link between software and hardware: It converts inputs from software to an output that computer hardware can understand.
In 3D printing, that process happens whenever you send a G-code file from your slicing software to the 3D printer: The firmware “works out” the code and accordingly gives an output to the stepper motors, heaters, display, and so on.
For example, let’s consider the G-code command “G1 X10 Y20”. The firmware understands this command and then determines the output to be given to the stepper motor so that the extruder reaches X=10 and Y=20. Without firmware, the 3D printer wouldn’t understand the G-code input.
In this article, we’ll look at why you would want to change your 3D printer’s firmware, and then go over the process of how to change it. After that, we’ll look at some of the popular 3D printer firmware options to choose from. Let’s get to it!
Reasons to Change
Let’s understand some reasons behind wanting to change your firmware.
Faster Calculations
Calculation speed will depend on the 3D printing technology you’re working with. For example, the design of delta and CoreXY printers is such that a complex set of instructions is needed for precise control of movement. If the firmware isn’t optimized to perform these instructions quickly, it may lead to stuttering or printer crashing at high speeds. This issue is also partially influenced by the choice of your controller board.
Controller Board Compatibility
Firmware is generally designed for specific hardware. For example, Marlin firmware can run on a RAMPS or a RUMBA board, but not on a Smoothieboard or a Duet. So, if you’re switching out your controller board for more features, you might also have to change your 3D printer firmware.
More Advanced Features
Firmware can offer specific features that make one option stand out from the crowd. You might need firmware for a certain feature, or you might be more comfortable with a solid all-around option. In such cases, changing firmware lets you accomplish whatever you need for your 3D printer.
Compatibility
As mentioned, compatibility can be a significant reason to change the 3D printer’s firmware, so let’s take a closer look at what we mean.
The Controller Board
The controller board is like the motherboard in a PC or smartphone. So, just as an Apple device can’t run Android OS, similarly, a controller board can’t run every firmware. Some controller boards are limited by their hardware capabilities, others because of their proprietary design.
If you’re going to change the firmware of your 3D printer, it’s crucial to know the exact specifications of your controller board. Often, they’re printed on the controller board itself. Otherwise, you can look at the manufacturer’s specifications sheet for more detailed information.
Some printers, especially high-grade professional ones, have proprietary controller boards. In such cases, it’s more difficult or even impossible to make any firmware changes.
The Firmware
Just as controller boards aren’t designed to run every firmware, similarly, firmware isn’t designed to be universally supported. When you’re choosing firmware, you need to look at whether your chosen option is compatible with your controller board specifications.
You should check the websites of your firmware and controller board to see if one mentions the other. If you have any doubts, you can always contact the manufacturers to be sure.
It also helps to know the current firmware running on your 3D printer. If you’re using the stock firmware, 3D printer manufacturers often upload updated versions to their websites.
What You'll Need
To change your 3D printer’s firmware you’ll need the following things:
- A computer: It can be the same machine you’re using for your 3D printing workflow.
- Arduino IDE: You can download this for free from Arduino’s website. It’s required to view, edit, and upload firmware.
- Visual Studio Code (optional): VSC is an alternative to Arduino IDE, which you can download for free from the Visual Studio Code website.
- USB cable: Depending upon your 3D printer port, you’ll need a USB cable to connect your PC to your 3D printer.
- Firmware file: Depending on your preferences, download the 3D printer firmware file from the respective sources. In this article, we’ll be using Marlin as an example of firmware when updating.
- Printer-specific information: Once you’ve chosen the compatible firmware, navigate to where the machine-specific configurations are stored. You should make a note of the default settings that are specific to your 3D printer. These might include:
- Steps (mm) for your extruder and X-, Y-, and Z-axis motors
- Maximum travel distances of your three axes
- Maximum feed rates (or speed) and acceleration for your axes and extruder motors
- Any other custom settings in your original firmware
The Steps
Arduino IDE is a good choice for beginners, but there are some compatibility issues when trying to flash more modern STM32 microcontroller based mainboards. Arduino IDE works best with “Arduino-type” mainboards that use ATMega 2560 chips and similar.
Those running STM32-based mainboards may want to use Microsoft’s Visual Studio Code (VSC) as an alternative. Besides the differing compatibility, VSC has more advanced debugging features that can help you track down exactly which errors are causing the firmware to not compile. Let’s go over how to work with each, using Marlin as an example firmware.
Arduino IDE
Below are the major steps you need to take in order to edit, compile, and flash Marlin firmware to your 3D printer.
- Download the main Marlin release (not to be confused with the configurations files). Extract this zip file and try not to place it somewhere where the file path will be too long, as this can cause issues later on.
- Download and install the Arduino IDE if you don’t have it already.
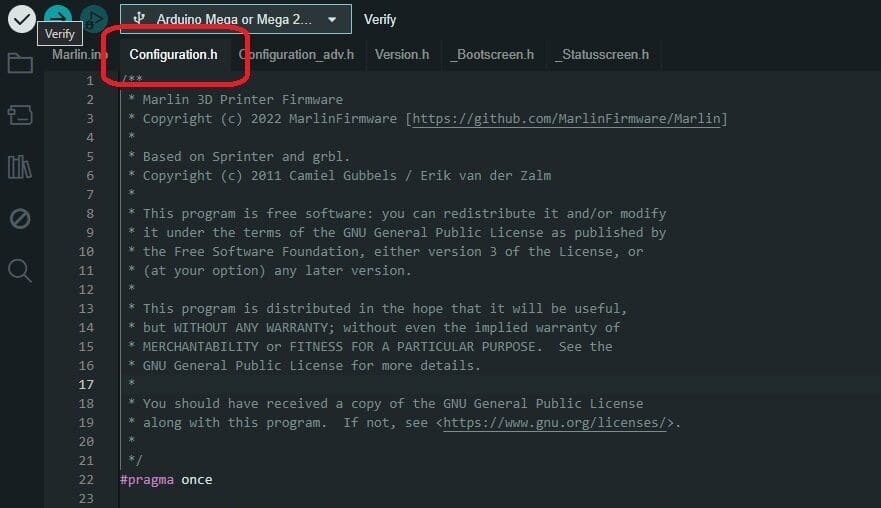
- Download the Marlin configurations releases (making sure they’re for the same version of Marlin you downloaded in step 1) and find the configuration that matches your mainboard and/or 3D printer in the “examples” folder. Copy the “Configuration.h” and “Configuration_adv.h” files and paste them into the innermost folder labelled just “Marlin” (not “Marlin2.x”) and overwrite the default files contained within. You may also have “Bootscreen.h” and “Statusscreen.h” in your example config; you’ll need to copy these over as well if your printer has an LCD screen.
- Open the “Marlin.ino” file in Arduino IDE. It should now show the correct configuration files that you copied into the “Marlin” folder before in tabs at the top of the Arduino IDE.
- If you wish to make any changes, you can make them now in the “Configuration.h” and “Configuration_adv.h” files. You can find many helpful instructions on how to make any changes you need in the commented sections of the configuration files.
- Once you’re done, click on the “tick” icon in the top left corner. This will initiate the compiling process.
- After the firmware is compiled, you’ll get a message that says “Done Compiling”. If there are errors, make any necessary changes based on the output of the serial monitor (text box at the bottom of the Arduino IDE window). The serial monitor may also prompt you to download necessary libraries, which can be done through the library manager. Click on the book icon on the left and search for and install any necessary libraries in the tab it opens up.
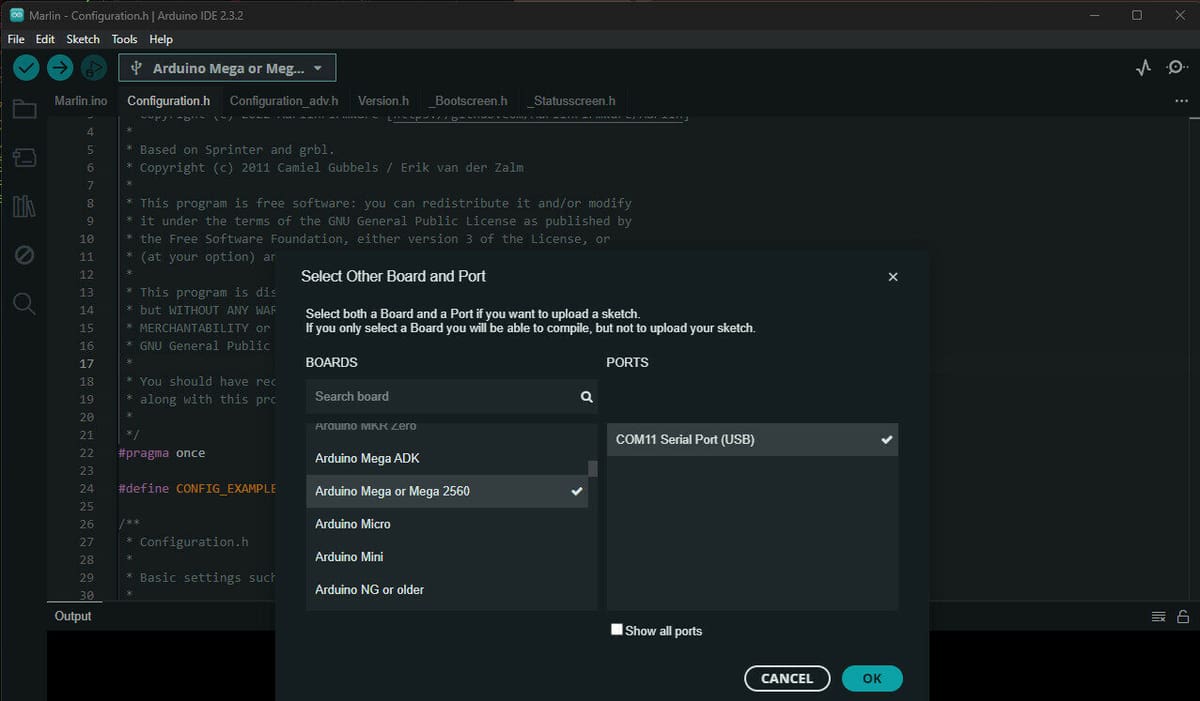
- Connect your board (via USB) and select the board type and the port that the USB is plugged into in the “Select other board and port…” drop-down menu at the top. For most older “Ender 3-style” mainboards, this will be “Arduino Mega or Mega 2560”. If you see multiple COM ports, unplug and re-plug your board and note which COM port appears (e.g. COM11, COM5, etc.).
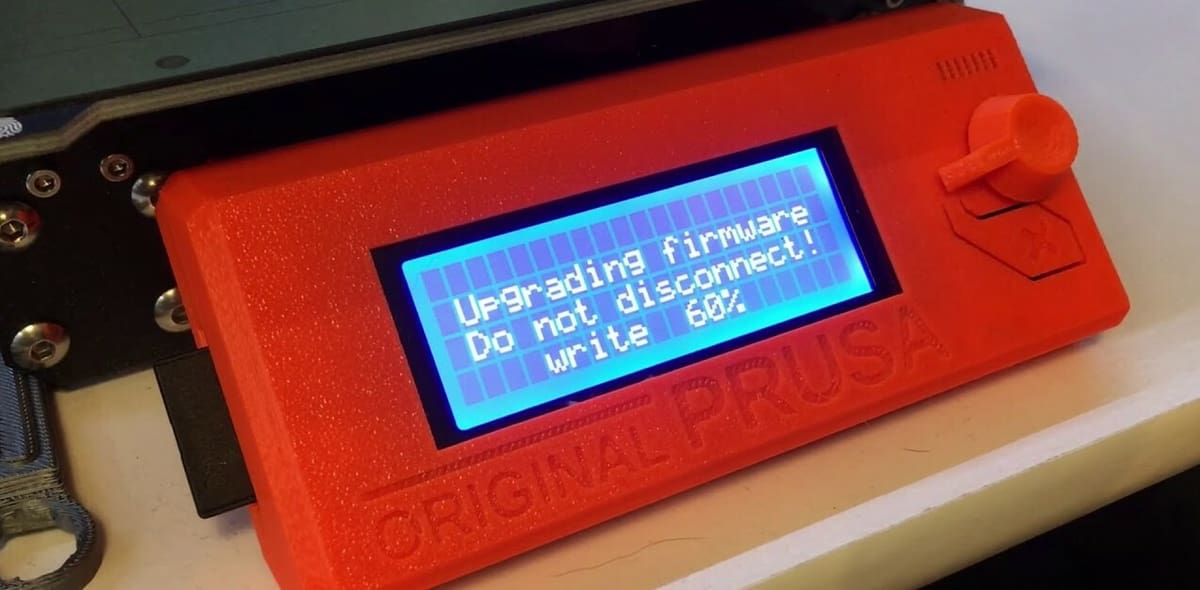
- Finally, click the arrow button next to the “tick” icon; this will compile again and flash the firmware to your mainboard. Be patient as it may take a while, and unplugging at this point can “brick” your board.
That’s it! In just nine steps, you’ve changed your 3D printer’s firmware. If you’re more of a visual learner or want more detailed step-by-step instructions for various configurations, there’s a great tutorial by Teaching Tech.
Visual Studio Code
Should you be up to the challenge or if you run into issue with your particular mainboard with Arduino IDE, we’ll take a look at how to go ahead with VSC.
The process of compiling firmware in VSC is similar to Arduino IDE, but also involve installing a couple of plug-ins for VSC, namely Platform IO and Auto Build Marlin. Marlin provides thorough instructions for building firmware with VSC if you choose to go this route, but here’s a synopsis of the steps involved:
- Download the main Marlin release (not to be confused with the configuration files). Extract this zip file and try not to place it somewhere where the file path will be too long, as this can cause issues later on.
- Download and open VSC, then click on the “Extensions” tab. Make a search for Platform IO and Auto Build Marlin and install both of them.
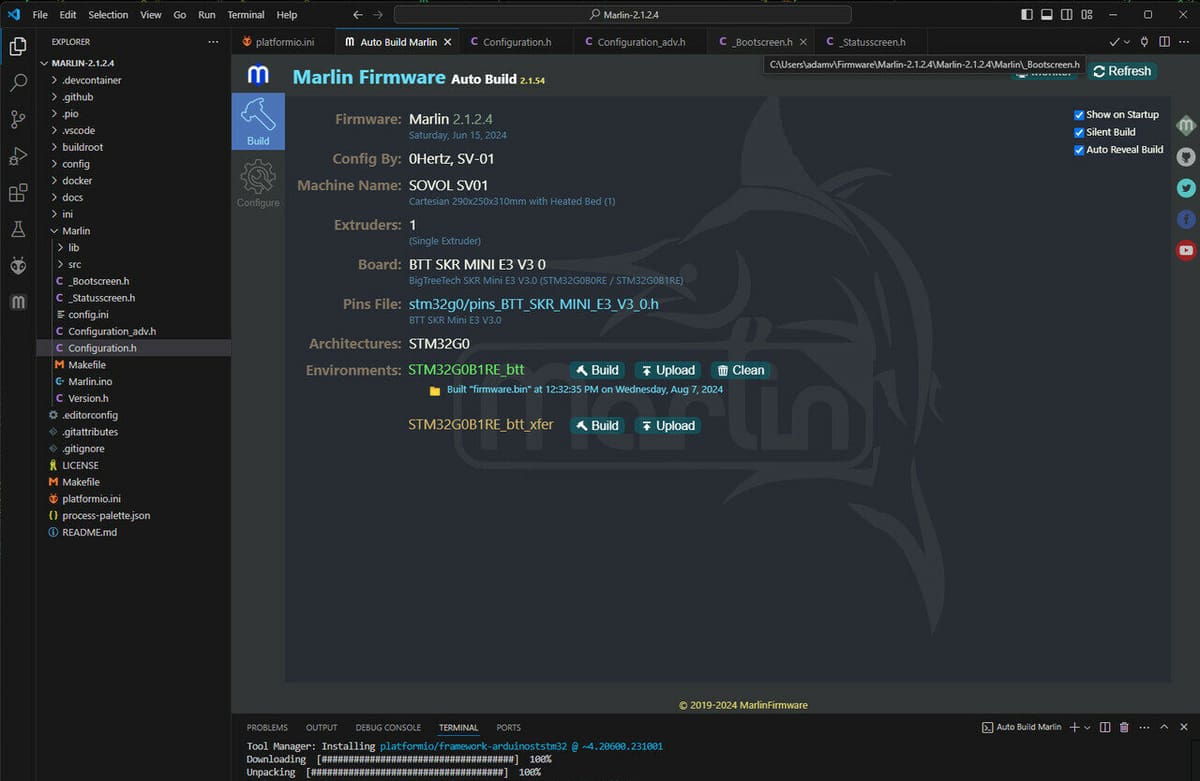
- Select the “Auto Build Marlin” tab and select the “open Marlin 2.x” option. Find the “Marlin 2.x” folder you downloaded earlier and make sure to select the inner “Marlin 2.x” folder or it won’t recognize it as a valid Marlin 2.x project.
- Download the Marlin configuration releases (making sure it is for the same version of Marlin you downloaded earlier) and find the configuration that matches your mainboard and/or 3D printer in the “examples” folder. Copy the “Configuration.h” and “Configuration_adv.h” files and paste them into the innermost folder labelled just “Marlin” (not “Marlin2.x”) and overwrite the default files contained within. You may also have “Bootscreen.h” and “Statusscreen.h” in your example config; you’ll need to copy these over as well if your printer has an LCD screen.
- Open the “Configuration.h” and “Configuration_adv.h” files in VSC and make any changes needed according to how you have your printer set up (for example, defining stepper motor driver types or enabling BLTouch if it’s used), commenting and uncommenting options as needed.
- Go to the “Auto Build Marlin” tab and select “Build” to compile the firmware. You may need to change the default environment based on the specific board you are using. If it’s not correct, the debug terminal will tell you what environment to use. Simply copy this from the debug terminal and paste it into the “default_envs” section of the “platformio.ini” file (located in the “Marlin” folder). Be patient, it may take a while to build!
- Click on the folder icon in the “Auto Build Marlin” tab to open up the location of the “firmware.bin” file that you just created. Follow your 3D printer or mainboard’s instructions in order to flash the firmware, and your done!
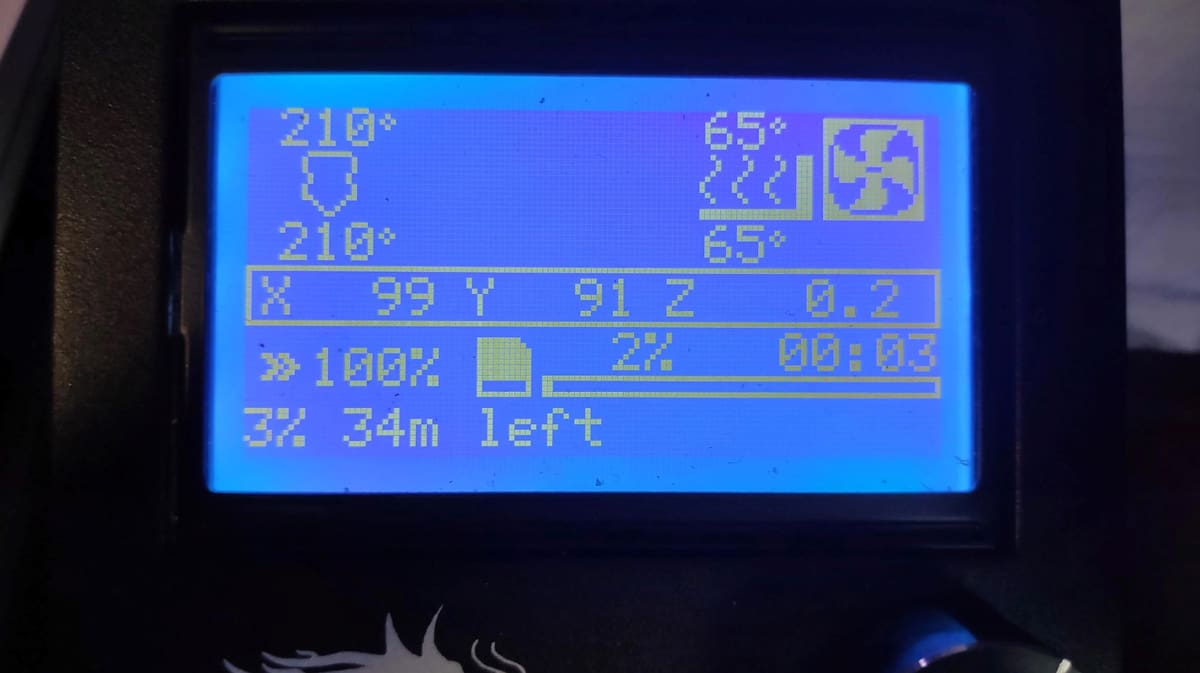
An important note for both Arduino IDE and VSC: Be wary of changes to units when entering values for speed or acceleration. Some firmware measure speed in mm/s, but others sometimes use mm/min. This can cause your printer to behave badly!
So, now that we know how to make the change, let’s look at the best options around!
Option #1: Marlin

Marlin is one of the most widely known and commonly used 3D printer firmware options. Many 3D printer manufacturers include Marlin firmware as is or adapt it to run on their 3D printers (known as forks). With its origins in Sprinter and GRBL (other firmware), Marlin’s strengths are in its high level of customization and strong community support.
It comes in two different versions: one for 8-bit boards and one for 32-bit boards. The 32-bit version offers better and more up-to-date features. The ability to customize almost everything allows you to use Marlin for even your own builds of 3D printers. In fact, Marlin is often used to drive CNC machines and laser engravers.
There’s also a relatively recent fork of Marlin‘s called Jyers. It’s meant for Creality’s Ender 3 V2, as the stock firmware, while based on Marlin, has certain limited capabilities that users may be interested in accessing.
- Website: Marlin
- Key features: Supports a large variety of machines, highly compatible, widely used, frequently updated
- Compatibility: Virtually every 8-bit controller or 32-bit controller boards
- Requirements: List of Marlin-supported hardware
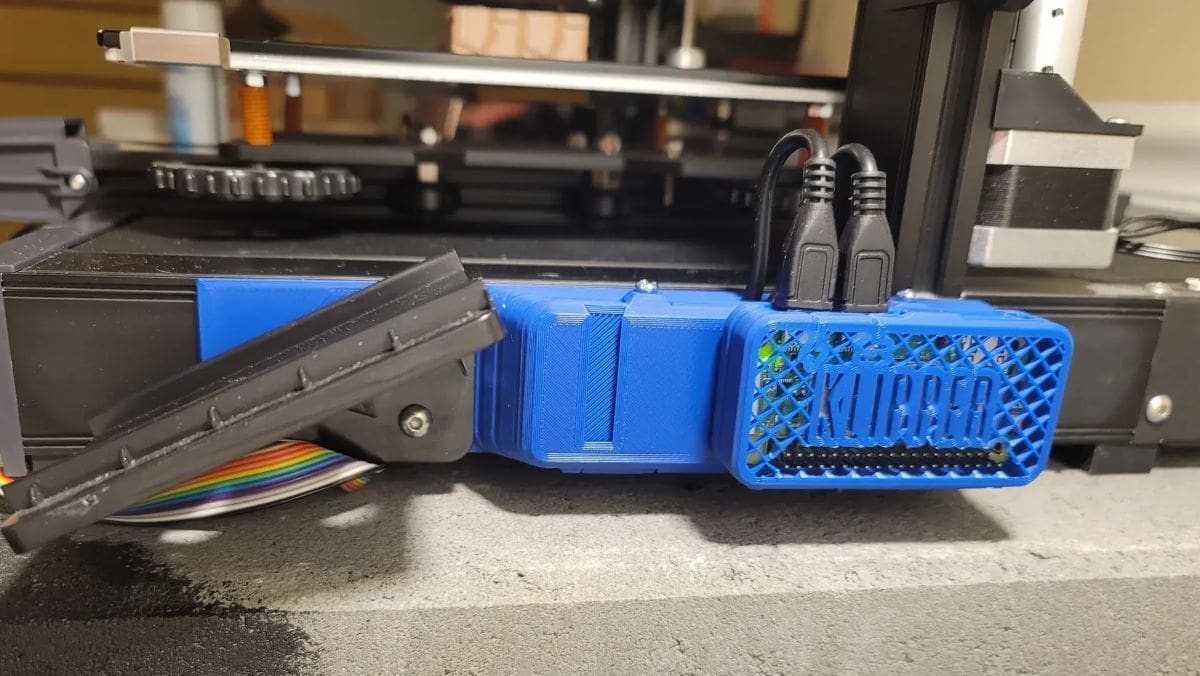
Option #2: Klipper
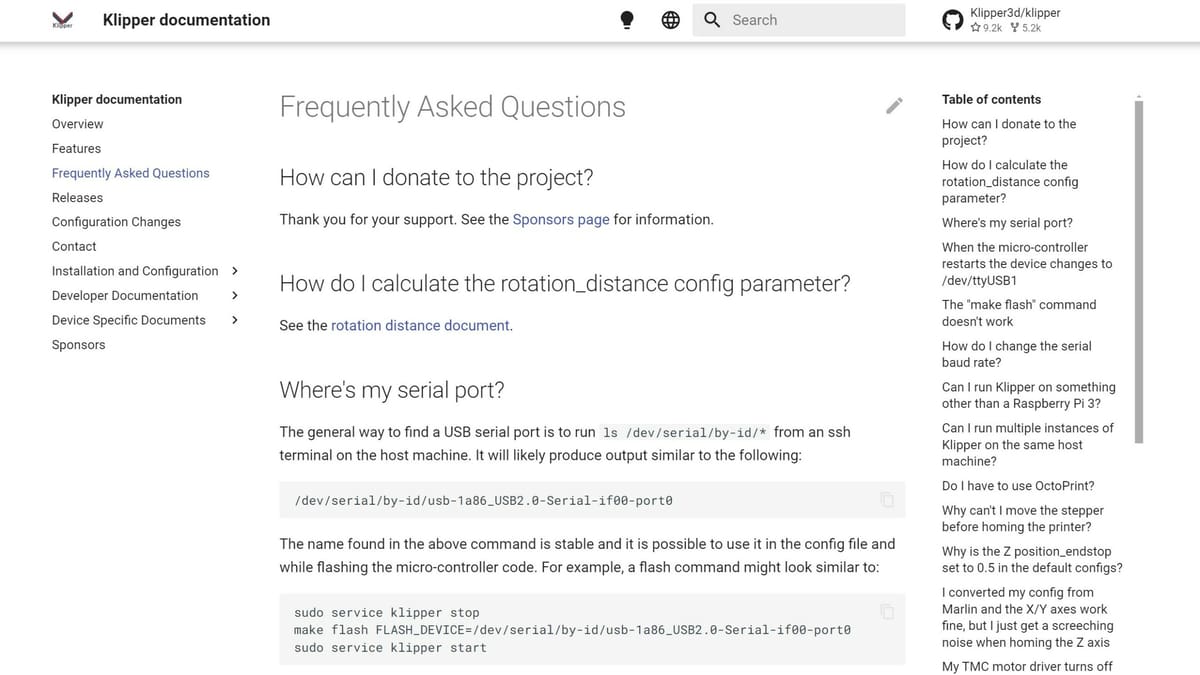
Klipper firmware is a feature-rich and newer 3D printer firmware. The main highlight of Klipper is its ability to do calculations at a high speed, which results in faster 3D printing speeds. Klipper firmware can enable your 8-bit 3D printer to run at speeds greater than 80-100 mm/s. To achieve this, it makes use of an additional single-board computer like a Raspberry Pi.
The features such as “smooth pressure advance” and “input shaping” deliver a highly reliable and good quality 3D printing experience. It can run on many Cartesian and delta-style 3D printers with little additional hardware (other than the Pi). Klipper firmware is written in Python, but with simpler coding.
You should definitely try this one out for better print quality with faster speeds.
- Website: Klipper
- Key features: Allows printing at higher speeds, OctoPrint compatibility, precise stepper motor movement, well documented
- Compatibility: Atmel ATMega-based microcontrollers, ARM-based microcontrollers
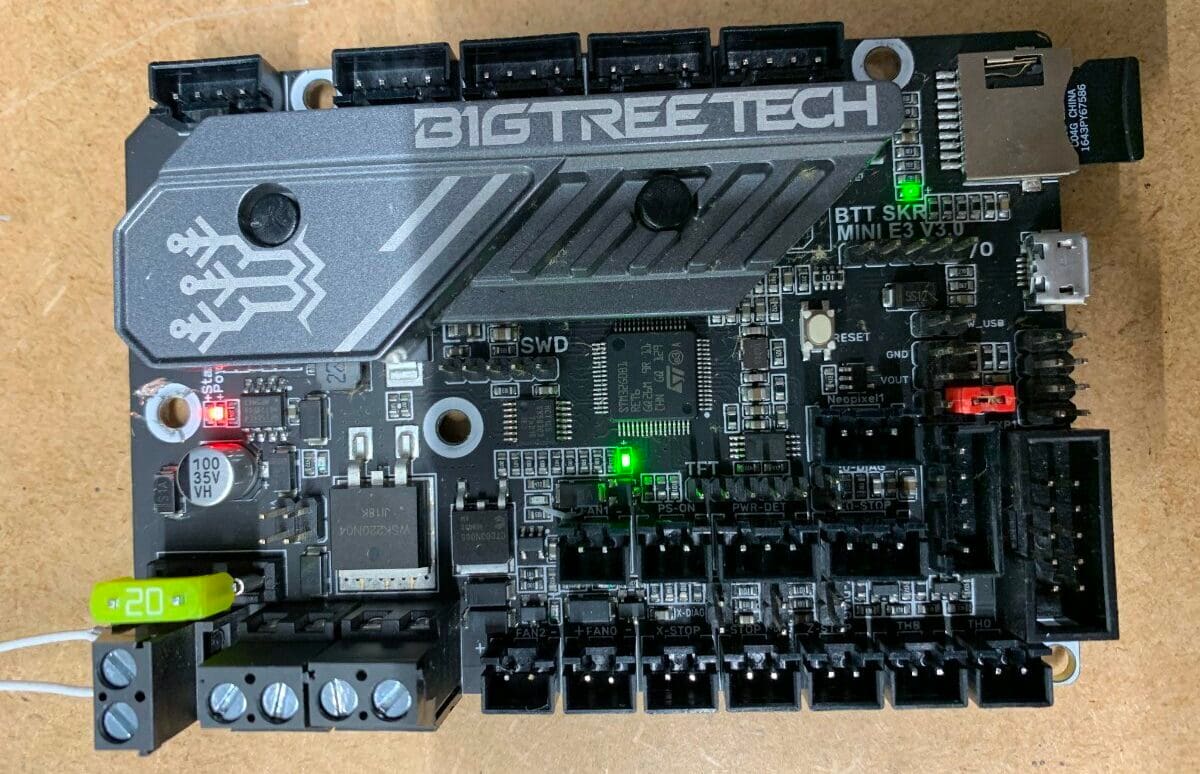
- Requirements: Raspberry Pi 3 or newer, or Linux-based SBCs like BigTreeTech Pi, BigTreeTech CB1, Makerbase MKS Pi; other Linux SBCs may work as well, but with varying degrees of “plug-and-play” compatibility (list of Klipper example configurations for different mainboards/3D printers)
Option #3: Prusa
Prusa’s firmware is a modified version of Marlin firmware. It’s tuned to work with the Einsy Rambo boards that come with Prusa 3D printers. This means that the firmware is only compatible with Prusa’s own printers, but it comes packed with neat features and is regularly updated.
Prusa printers are some of the best 3D printers out there with many proprietary features such as multi-material printing support, mesh bed leveling, and TMC 2130 drivers. These features benefit from firmware that’s specifically tuned to work best with them. With the open-source and free nature of Prusa firmware, it’s only gotten better with time.
- Website: Prusa
- Key features: Easy to use, well documented, and open source
- Compatibility: Einsy Rambo board
- Requirements: Prusa 3D printer
Option #4: Repetier
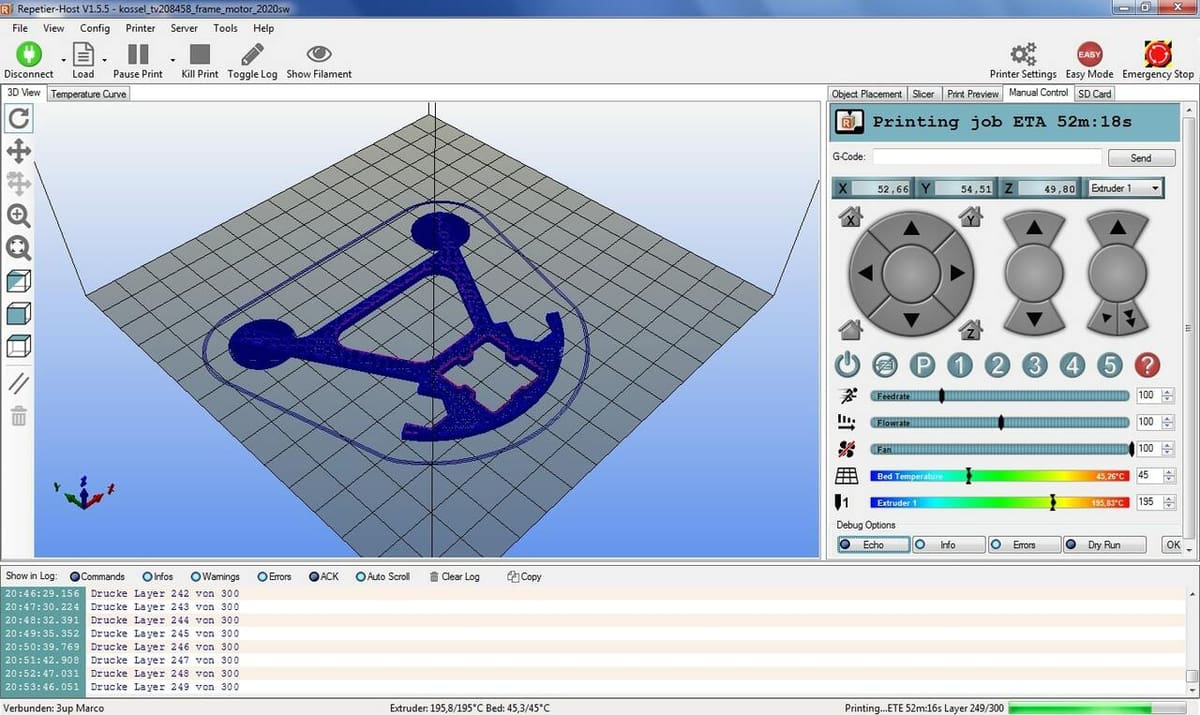
Repetier firmware comes from the same team that pioneered the popular Repetier Host software. These two work well together and complement each other’s features. Repetier firmware generates very reliable and fast 3D prints and works for both Cartesian and delta 3D printers.
Another great feature is that Repetier firmware is highly customizable. Using the Repetier firmware configuration tool, you can easily input your specific needs and control lots of parameters. Also, being open source and free to download helps with regular feature updates and maintenance of this firmware.
One thing to note is that it seems that Repetier firmware is no longer being actively developed. You can still raise issues on Repetier’s GitHub, but the last major release was version 1.0.4 back in June of 2020, so this might not be the best fit if you’re expecting an option that’s continuously updated or adding new features.
- Website: Repetier
- Key features: Excellent documentation, compatible with Duet-based boards, optimized for use with Repetier-Host, easy to customize
- Compatibility: A range of 8-bit boards, plus RADDS (RepRap Arduino-Due Driver Shield)
- Requirements: Any Arduino-based RepRap board with at least 64 kB of flash memory
Option #5: RepRap
Originally designed for the Duet controller board, RepRap firmware was one of the earlier options to support 32-bit boards. You can easily update the firmware by just making a few changes in the configuration file via an SD card. There’s also a great online configuration tool that can help you define or update your firmware configuration file.
One limitation is that RepRap firmware only works on a few boards, specifically ones that use 32-bit AVR chips. Setting up RepRap firmware can be intimidating, especially for anyone unfamiliar with the general process. However, if you have the patience to read through the documentation (and seek help where necessary), the features it offers are well worth your time.
- Website: RepRap
- Key features: Highly modular, web-based configuration and control
- Compatibility: Duet, RADDS, Smart-RAMPS
- Requirements: List of RepRap-supported hardware
Option #6: Smoothieware
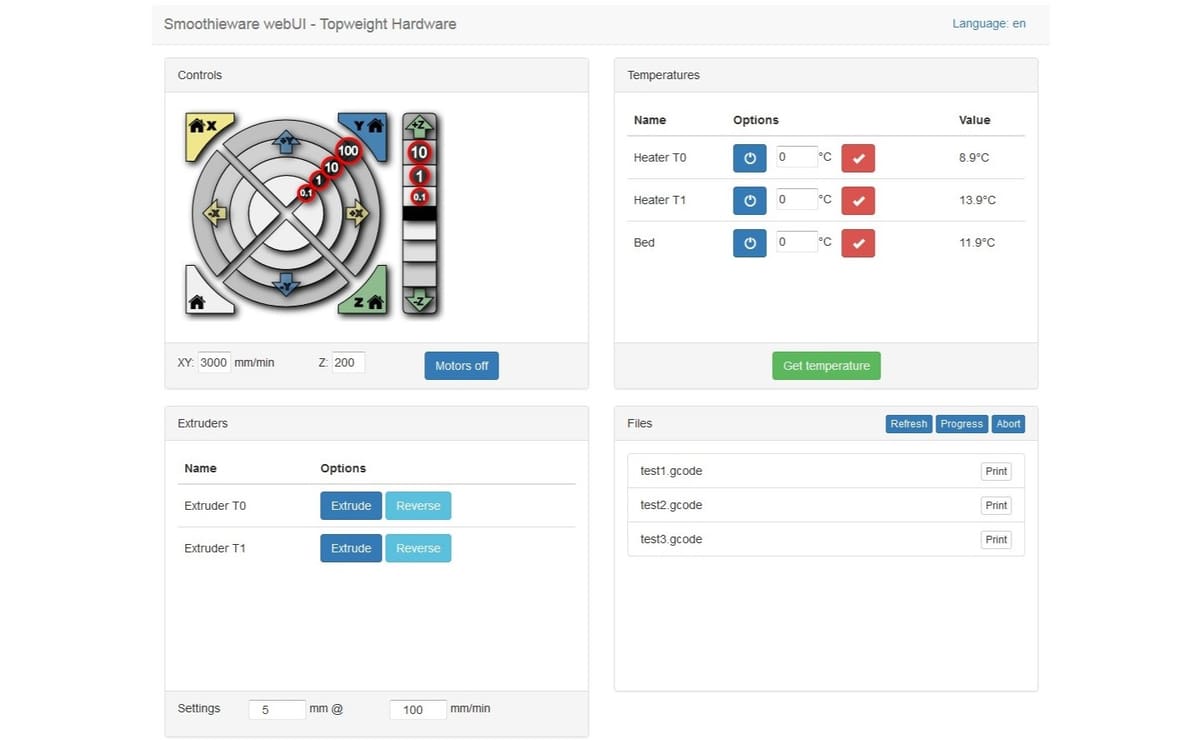
Written for the Smoothieboard controller, Smoothieware is another firmware designed for 32-bit boards. Smoothieware is a multipurpose, feature-rich program that was developed with performance in mind. It also allows for a huge amount of custom configuration, including the ability to add extra stepper motors and configure the board for laser cutting or CNC milling.
Similar to RepRap firmware, Smoothieware is limited to very few boards, the only major ones being the Smoothieboard itself and the Azteeg X5 Mini. The user and development community is also relatively new and small. But with great documentation, this open-source and free firmware is easy to explore.
- Website: Smoothieware
- Key features: 32-bit compatibility, easy and flexible configuration, support for laser cutters and CNC mills
- Compatibility: Smoothieboard, R2C2 electronics board, Azteeg X5 Mini
- Requirements: Smoothieboard controllers/mainboards, but with a few exceptions; however, to avoid compatibility issues, it’s recommended to use only Smoothieboard hardware
License: The text of "The Best 3D Printer Firmware of 2024" by All3DP is licensed under a Creative Commons Attribution 4.0 International License.