3D Printer Time-Lapse Video: How Best to Capture Prints

From TikTok to YouTube, time-lapse videos are all the rage. Find out how to create and get the best 3D printer time-lapses.
Let’s say that you’re recording a normal video with a phone of your 3D printer printing an object. You will need to leave it recording for 8 consecutive hours in order to capture everything, and then you’re left with an 8-hour long video!
Enter the time-lapse video. This is a series of photographs taken at specific intervals throughout the print. Software then stitches them together and replays them as a video. The result is that the passage of time appears accelerated during the playback of the video. You can think of a time-lapse video as taking a series of photographs and arranging them in the style of a flipbook.
Now that you know what time-lapse videos are and how they work, let’s get on with how you can start making your own!

Things You Will Need
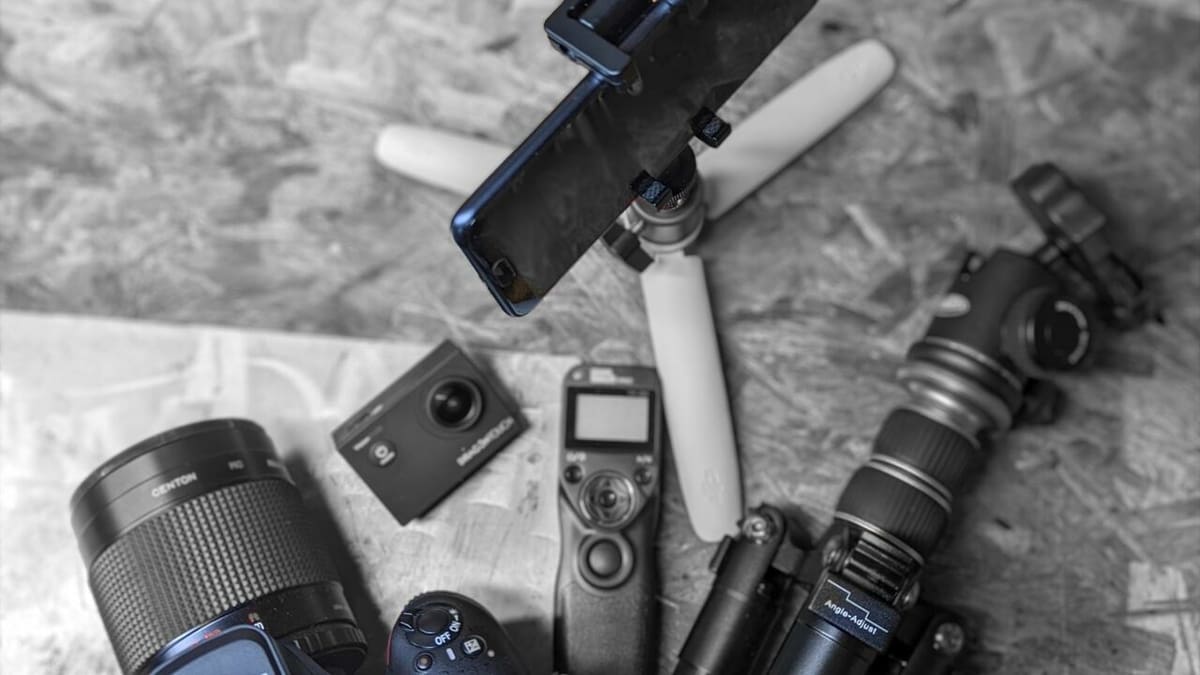
At its most basic, you can achieve a perfectly acceptable result with a phone and a tripod or 3D printed mount for your camera and printer combination. In fact, any camera (DSLR, Go-Pro style action camera, webcam, or dedicated option) can be used to create a time-lapse video. There are no hard and fast rules to time-lapse videos, you’re simply trying to capture the best picture you can, over and over again.
Either way, the basic equipment you need to make a 3D printer time-lapse video includes:
- A 3D printer
- A recording device (DSLR, action camera, webcam, smartphone)
- A mount or tripod (3D printed or purchased), or any secure way of holding your camera
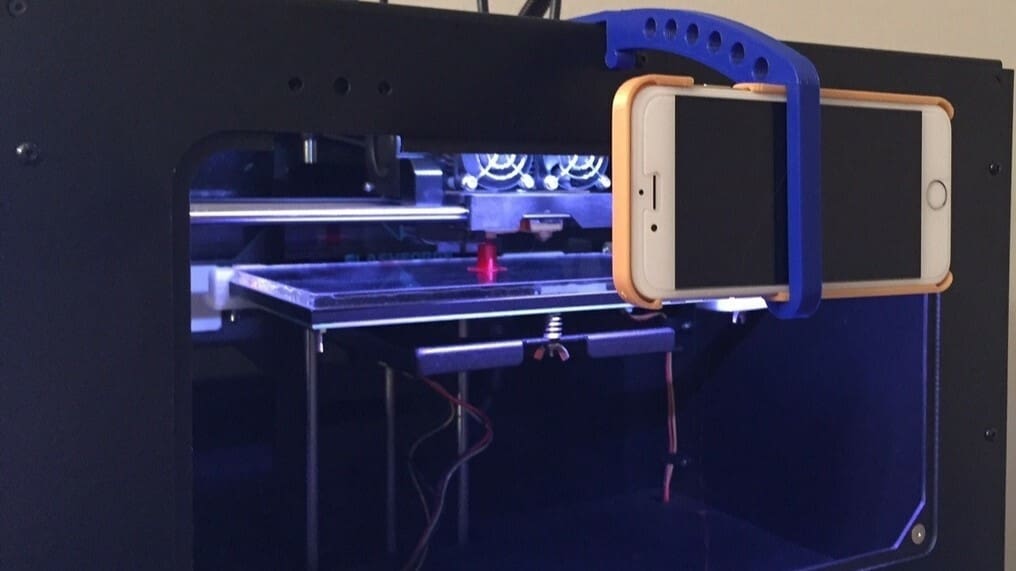
One of the simplest ways to make a time-lapse video without professional equipment is to use your phone. Some phones come with the option built-in, but if not, you can easily download an app like Printoid.
The stand you need will depend on where you have your 3D printer set up.
Think about your workspace for a minute. Do you have room for a standing camera tripod? Maybe your printer is in an enclosure, in which case a desktop tripod could fit the bill (depending on the enclosure’s material). In either case, can you be sure that the setup won’t be moved? Who or what has access to your workspace? Imagine being 8 hours into a 12-hour print when the overexcited swoosh of a tail destroys all your hard work.
So, depending on the above, a simple tripod might be all you need. If you’re using a smartphone stand, make sure the stand holds the phone at the right angle. 3D printing one is a great way to ensure you get exactly what you need!
No matter what recording device you’re going for, having a clear workspace, setting the scene, and checking the background, are key for great time-lapses. We’ll go over these further below.
Lastly, we recommend you leave your recording device charging while recording if possible, as some prints can take quite a long time. The last thing you want is the battery to run out and lose the entire recording!
Configuring the Time-Lapse
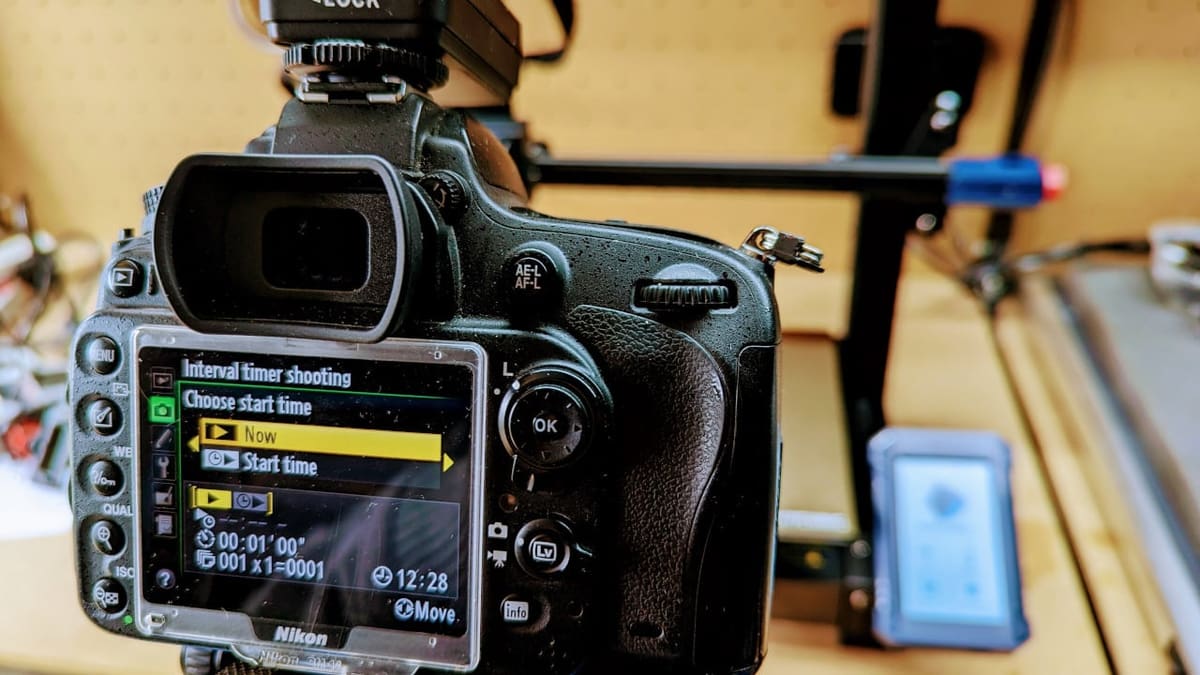
Invariably, your chosen recording device and the software you use to control your camera will differ, given that there are many options out there. OctoPrint stands out among the most popular, and for plenty of reasons. OctoRemote, OctoApp, and Octolapse are great tools to consider. However, even if you’re not taking the Octo-road, all setups share one thing in common: the “frame interval” (or “interval”).
Many devices, like some smartphone models, will allow you to set up time-lapse intervals on the device itself, whereas others like webcams may require you to load software applications to your phone or laptop.
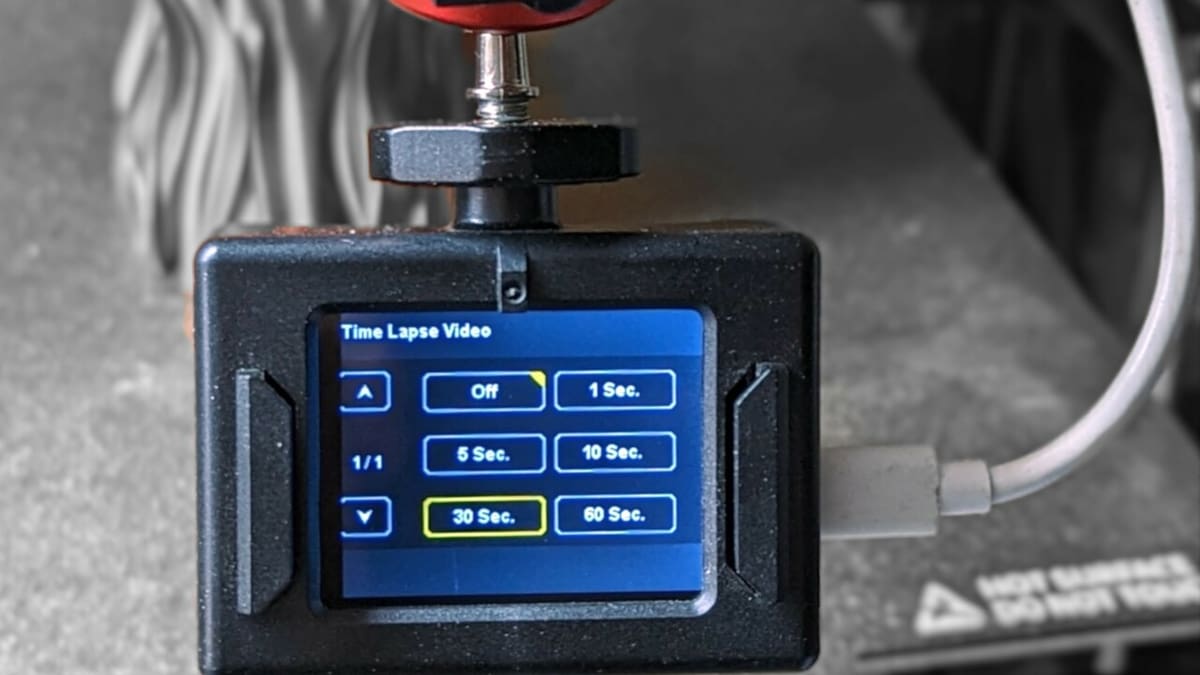
Generally, you can choose between several “frame interval” timings, and based on how long the print takes, you can calculate the ideal rate for your video’s final length.
The frame interval is the time that the recording device will take between taking pictures of your 3D printer. A low frame interval will result in more frames taken during the entire process, giving you a longer time-lapse, whereas a bigger frame interval will give you a shorter time-lapse.
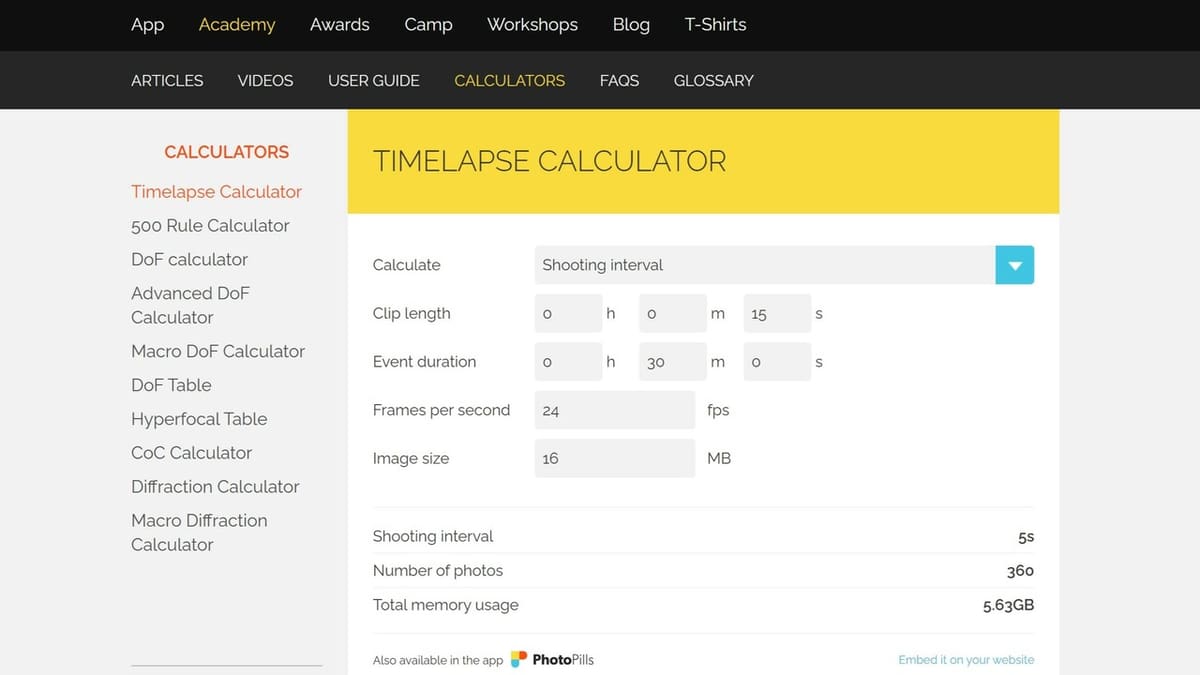
It’s also worth noting that the bigger the time interval, the increasingly jerkier the video becomes. For longer prints over 8 hours, we recommend setting a high frame interval, such as 30 seconds between pictures. As the model will be the star of the show, the finished video should be long enough to show the process, but short enough not to bore your audience.
At 30 fps (frame per second) and an 8-hour long print, the result is 960 total frames (pictures) taken during those 8 hours. Replaying the video at 30 fps will make the time-lapse 32 seconds long.
If the printing is going to be shorter, let’s say an hour, you will want to set a lower frame interval, such as 10 or 5 seconds. Using 30 seconds frame interval, like in the example above, will make your time-lapse video last only 4 seconds!
An easy way to help you decide what frame interval to choose is by looking at this equation:
Final playback time = Total time of recording / frame interval * fps (usually 30)
If you feel your math is not up to scratch, there are plenty of online time-lapse calculators available. Once you properly set the frame interval, make sure your 3D printer is ready to go. Once it starts printing, don’t forget to click the recording button!
Setting The Scene
We’ve shown you how to start making time-lapse videos with basic equipment, but what if you want to push your skills further and go a bit more to the professional side?
Worry not because we’ve got you covered.
You’ll need to consider more things when making high-quality time-lapse videos, such as the lighting, camera positioning, the movement of the 3D printer, and background, among others.
This will also require slightly better equipment. Many 3D printer owners regularly monitor their prints using webcams and OctoPrint. If you’re happy with your picture quality, then cleaning up your workspace and a couple of good lights should produce the desired effect.
OctoPrint even includes tools to help you produce some slick-looking time-lapse videos if you want to start by tinkering with the app.
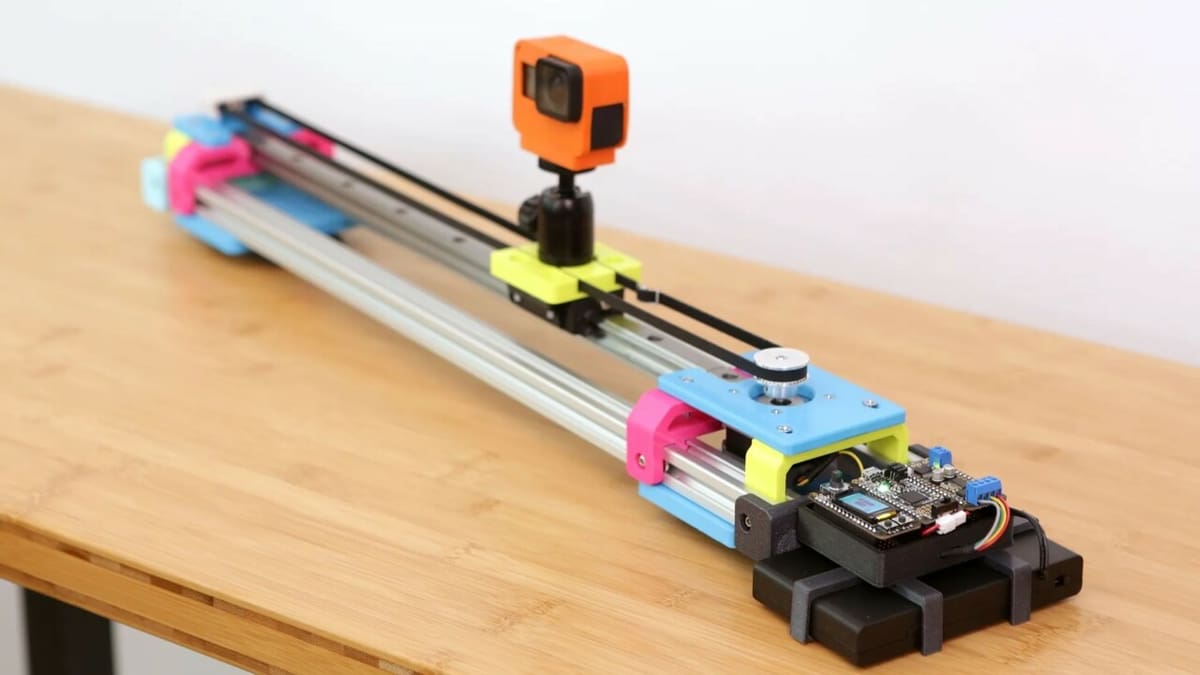
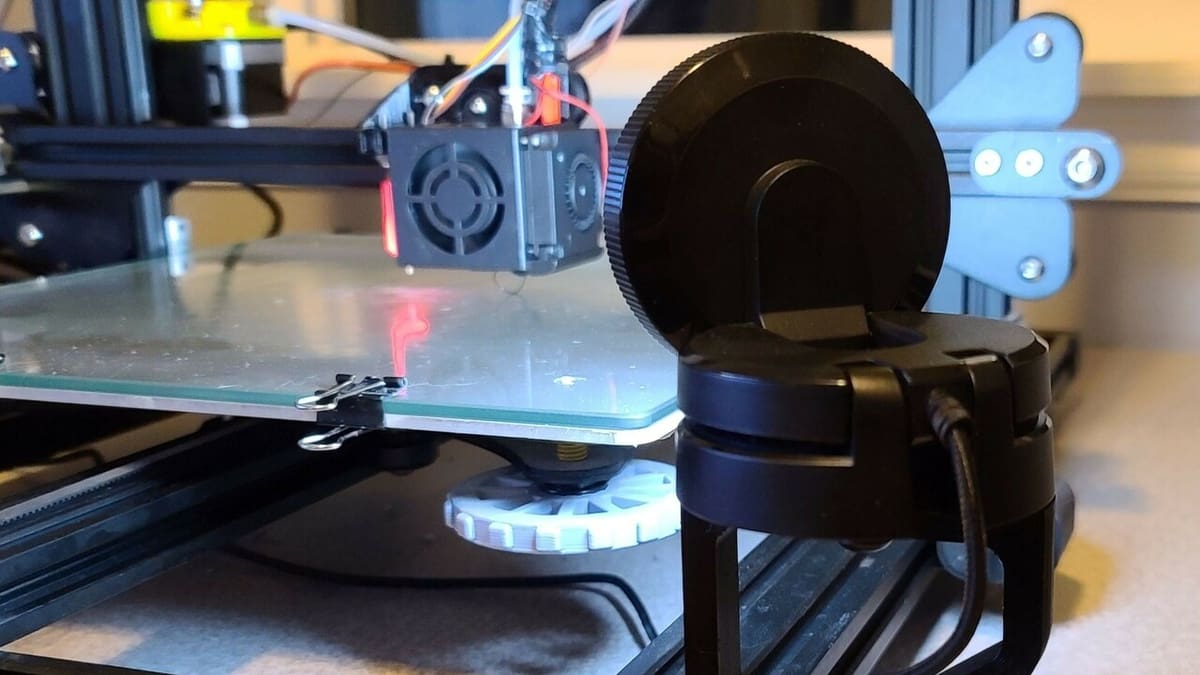
Action cams such as the Go Pro can and do produce high-resolution, professional-quality videos. They are small and lightweight, making them easy to mount onto a 3D printer or stand using one of the many 3D printable designs available in online repositories. Plus, most have built-in settings to record time-lapse videos.
Another thing to keep in mind is the recording angle. If your 3D printer can print tall or large objects, make sure your camera is recording at a suitable distance and angle to capture the entire printing field.
Placing the camera too close can cause the printed object to go out of the camera view, while positioning the camera too far will make it hard to properly see the object. Therefore, make sure you calculate how big the object is going to be beforehand so you know how to place the camera in the most suitable spot.
Some cameras, like the Go Pro we mentioned, already have settings to adjust the focal length without having to move the camera back and forth. You may need to take this into consideration with your setup.
Background
Once you’ve selected your preferred recording device and how you want to frame the video, it’s time to look at your workspace. The objects you are printing should be the stars of the show, not the large bundle of wires in one corner.
It’s often overlooked, but it’s always good to make sure that your printer and its surroundings won’t distract the viewer from your awesome 3D printing time-lapse video. Tidy up your 3D printer and check it on your camera’s screen, and make sure that no wires or pieces are moving around while recording, with the exception of the extruder.
Check your background and mount some colored paper or cardboard behind the printer. Use what you can to secure it, and check the view on your camera screen. This will ensure that the background will always be the same and won’t cause any distractions. By using a green background, you can use editing software to have your model floating in space or even on a tropical isle.
Lighting
Lighting is a key factor for good time-lapse videos and visual recordings in general. Without good lighting, the camera might struggle to perceive the object and it will be hard to see it on playback. Plus, it will lower the quality of the recording altogether.
You may want to consider studio lights to help you get a “professional” lighting setup for your 3D printer. Usually, they’re not used in time-lapse videos, but because 3D printers are operated inside a room, these lights may be necessary to get high-quality recordings.
Good lighting should illuminate the object being printed from many angles. Although, as long as the side the camera is recording is correctly illuminated, it won’t be necessary to cast a light on the entire object.
This lighting shouldn’t be too bright or too low. As mentioned above, poor lighting will cause your time-lapse to look worse. However, too much lighting can also saturate the object and make it look too bright, losing detail on the object being printed.
You can fine-tune this intensity by modifying your physical lighting (lamps, room lights, etc.) or in your recording device if it has the option to do so. And as always, check your setup on the camera’s screen. Remember that proper preparation will help you avoid poor performance.
Printer Movement
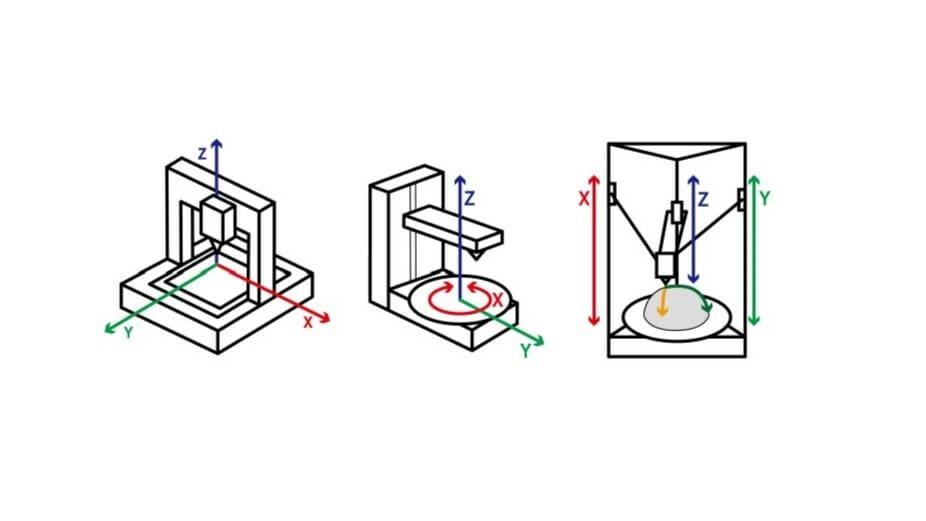
The way your printer moves should also be taken into consideration, as not all are the same. For example, delta printers have a baseplate that sits still, while Cartesian machines have horizontally moving build plates, and in CoreXY printers, the bed or the extruder may rise or fall.
For printers with a steady baseplate, it’s much easier to record, as placing your recording device on a stand near your 3D printer should be more than enough.
But if your printer has a moving baseplate, things become a little harder. As mentioned above, having the camera on a stand will provide horrible results given that the object being printed will constantly be moving in and out of focus. The final video will end up looking like a blurry mess.
Also, remember that your print is going to grow. Having a camera low on the build plate may mean that you miss the top half of the model completely. To avoid this, you could mount the camera on the baseplate of the printer.
The best way is to manually find a way to do this depending on what style of 3D printer you have – just make sure it’s possible to do so without interfering with the moving parts. Having your camera collide with the extruder won’t be good for anyone!
But remember, there is no wrong or right way to do this, and if the first time-lapse fails, you can always change the setup and try again! Let your creativity rule.

Going The Extra Mile

You may have watched those incredible videos where the print seemingly grows out of the build plate with no extruder spoiling the view, like Make Anything’s.
While the type of recording device can vary from cheap action cams to high-end DSLR or mirrorless cameras, the difference here is that, rather than relying on software or the device’s internal time management, a remote switch such as a Wi-Fi or Bluetooth keypad or intervalometer (a device which operates as a remote) is used to operate the camera’s shutter at the specified point. Chep gives a really useful example using Cura.
The switch can be mounted to the 3D printer using a printed jig or bracket, of which there are many available free models online. And with some luck, you’ll be able to find one compatible with your switch and printer.
The task is to operate the switch when the extruder is out of frame, usually at the rear right of your 3D printer bed. This means manipulating the G-code in your favorite slicer, instructing the extruder to move to a location at the end of each layer or layers, and in moving to that location, triggering the remote shutter. It sounds a little bit complicated, but with perseverance and preparation, truly incredible time-lapse scenes are within your grasp.
If you don’t set a fixed point, the extruder will be shown moving around. This will add a dynamic feel to the time-lapse video, but can also be a little dizzying.
License: The text of "3D Printer Time-Lapse Video: How Best to Capture Prints" by All3DP is licensed under a Creative Commons Attribution 4.0 International License.