3D Scanner Accessories that Make Scanning Easier

From 3D scanning spray and well beyond, these accessories will equip your 3D scanner to work on practically anything. Read on for more!
Just as 3D printing has caught on in the past few years, 3D scanning technology is transitioning from a research-oriented, professional task to a more affordable, entry-level activity for different areas, including education, entrepreneurship, and hobbyists. More affordable scanners have opened the door for non-professionals and enthusiasts to a new world of virtualization.
Most manufacturers used to sell their scanner models with just the minimal required connection hardware (USB cables or power supply cords). Nowadays, it has become typical to pack and ship scanners with a variety of peripherals and accessories. Some manufacturers even offer different types of kits to choose from.
However, as you start using the scanner and developing more complex scanning routines, you’ll realize there’s room for improvement. In addition, some of these items are disposable or might need to be discarded at some stage, and, eventually, you’ll need to restock.
A nice way to overcome these challenges is by 3D printing your own solutions. However, if you’re not really into tinkering or don’t have a 3D printer on hand, you’ll want to check out our list of must-have, purchasable accessories for 3D scanning. For the sake of organization, we’ve divided the accessories into different categories, according to their main application.
Let’s get started!
The Basics
Whether it’s your first time scanning or you’re an expert, you’ll find these items very helpful when performing complex scanning routines around objects or people.
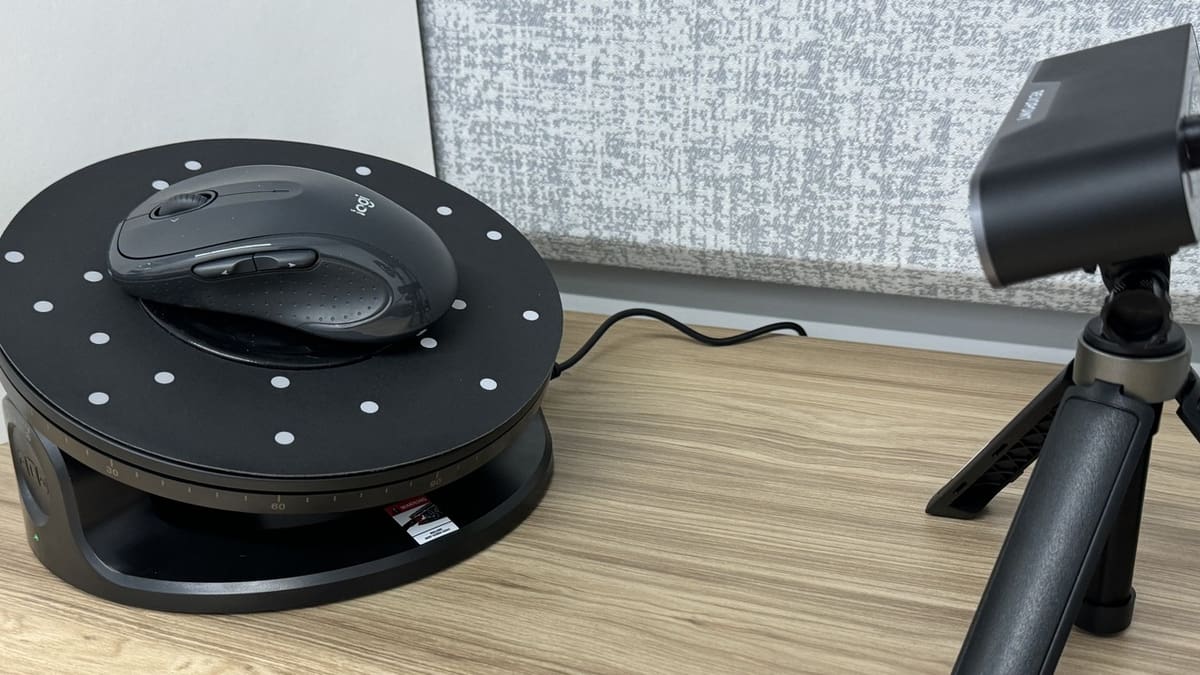
Turntable
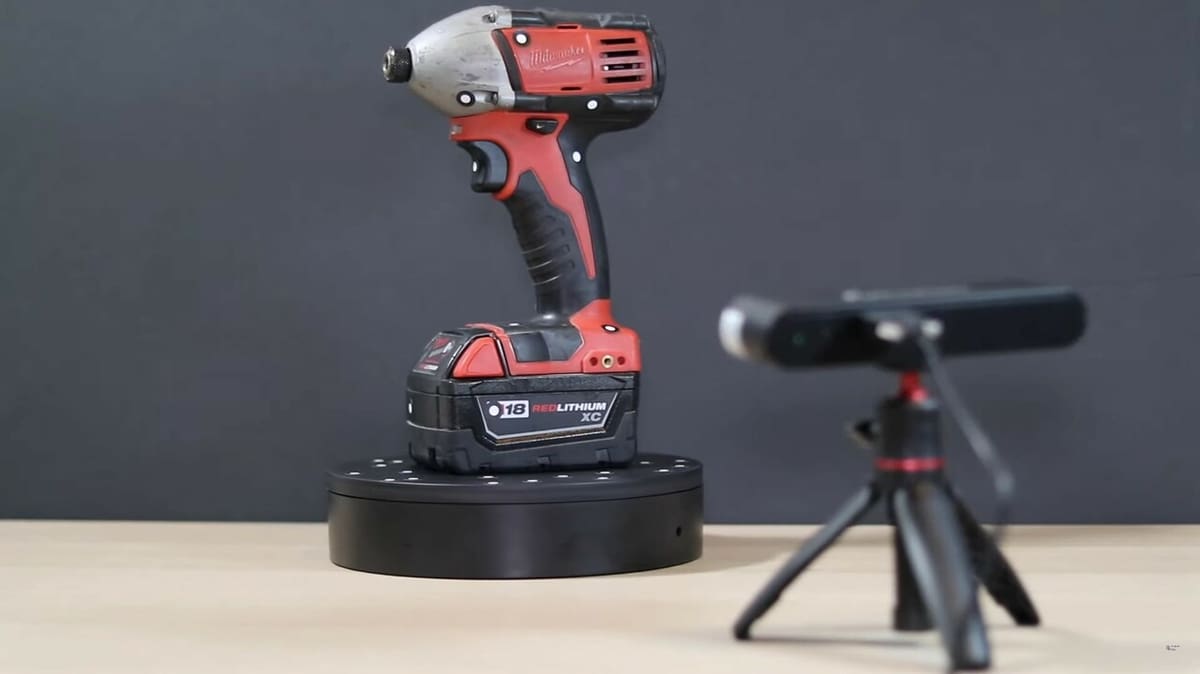
Sometimes, 3D scanning an object can be a bit tricky. It may take some time to master your scanning technique around an especially large object, but for smaller items the experience might be easier as you can use a turntable.
By fixing the position of your scanner using a small tripod, you can easily scan most of the object by rotating it on a turntable. There are many options out there, from simple, manually operated turntables, all the way up to automated, synchronized machines that rotate as the scanner needs.
A similar device that can be helpful is a rotating platform. The idea is the same as that of a turntable, the only difference is that the object stays still while the scanner is fixed on a moving arm that rotates around the object. While turntables are more popular, you may find these rotating platforms useful in certain situations.
Turntables come in a variety of sizes, and the right one for you depends on your specific needs. You’ll find a wide variety, from simple, manually-operated to automated, smart machines. For example, a manual rotary table is an affordable accessory that makes it easy to capture your object from 360 degrees, while Artec’s smart turntable is a fully automated option with auto-tracking recovery.
- What does it do? A turntable makes it easier to scan a (small) object by having everything set up and automated, plus you avoid missing spots.
- Where can you find it? Revopoint offers a portable and a dual-axis option at Amazon, while you have to check Artec’s official distributors.
Handheld Stabilizer

As mentioned, some scanning routines involve moving the scanner around the object. While most scanners nowadays incorporate image stabilization algorithms, it’s not a bad idea to reinforce this stabilization with the aid of a physical stabilizer.
Some scanner manufacturers offer their own version for one or more of their specific scanner models, but that doesn’t mean you can’t consider more affordable options. Most scanners incorporate a universal thread size – 1/4-20 UNC – which is the standard size for cameras and smartphone mount adapters and tripods. Therefore, if you don’t want to spend a lot of money or if you’re not happy with what the scanner manufacturer offers, you can opt for a generic DSLR camera stabilizer. You’ll find a wide variety of universal stabilizers that can be adapted to your scanner.
Two main categories are available: options for specific scanner models and generic DSLR stabilizers. You’ll find everything from simple, mechanical devices to complex, electronic gimbal-based models.
- What does it do? A handheld stabilizer helps keep an even grip on your scanner to avoid missing spots or incorrect scans.
- Where can you find it? Revopoint has an option for some of their scanners at Amazon, and there are also more general solutions that can fit more scanners, as well as for DSLR cameras. Depending on your scanner, you might also find a few 3D printable models on platforms like Printables.
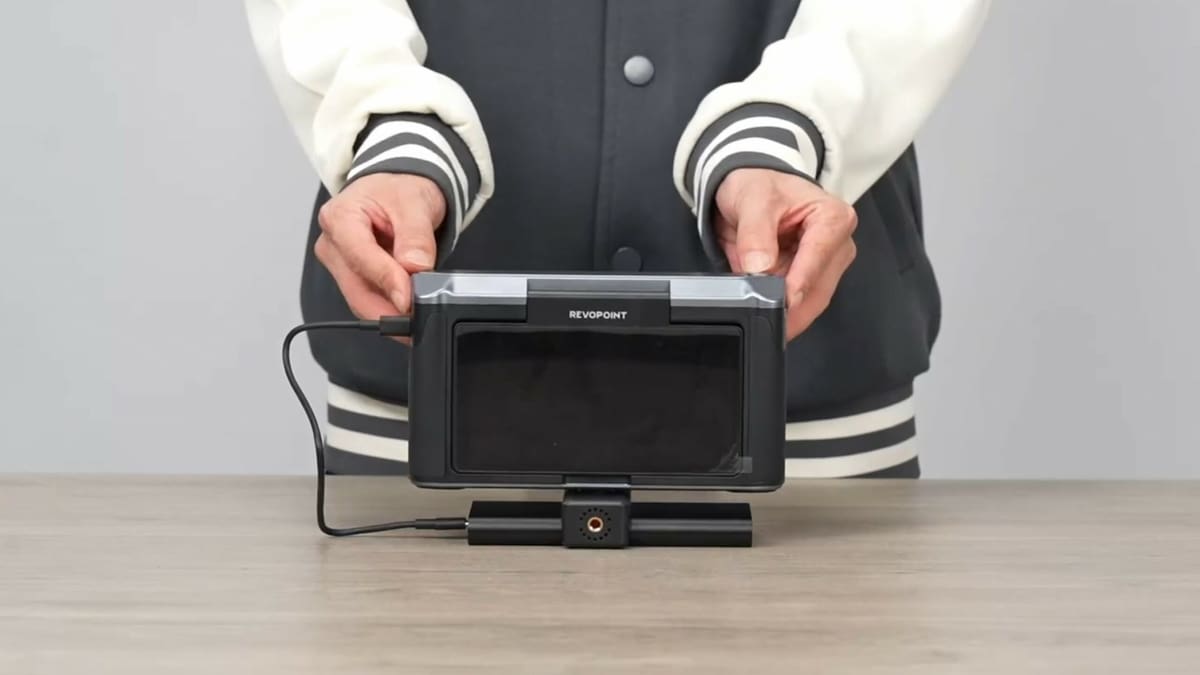
Phone Holder Attachment

3D scanners usually work using a PC connection. However, newer models offer a phone scanning mode, mainly through a corresponding Android or iOS app. This option provides a huge advantage in terms of portability. That said, in this scanning mode, the smartphone must attach to the scanner to easily visualize and monitor the scanning progress.
Therefore, a phone holder attachment is essential. This attachment is commonly placed between the tripod and the scanner, and most manufacturers offer their own scanner-compatible phone holder attachment. If that’s the case for the scanner you have, then you don’t have to worry. If not, you don’t have to worry either, because you can use any universal phone mount adapter. Just keep in mind that you must make some adjustments to properly fit the scanner on top of the phone mount adapter.
An easy solution could be 3D printing an adapter that connects both the scanner and the phone mount adapter.
- What does it do? A phone holder attachment makes portability easier by allowing the connection to an app for control and monitoring, instead of relying on a PC or notebook.
- Where can you find it? Revopoint offers the mobile kit at Amazon, and universal mount adapters can also be found there (although some adjustments may be necessary).
Scanning Aids
Ideally, scanning an object should be as simple as taking your scanner and scanning it. However, in real life, this simple task requires some extra work, and the device may need some help to properly identify and scan the object of interest.
You may face some challenges when scanning an object, such as light-related difficulties. These occur due to the excessive light reflection or absorption of the object’s surface, its transparency, or even its smoothness.
Another challenge arises when scanning symmetric, cylindrical objects, like tumblers or pipe-like items, especially when using a turntable. To overcome them, some aids can be used, either independently or jointly, depending on the nature of the object to be scanned and the capabilities of the scanner.
Let’s now take a look at some of the helpful aids available!
Markers
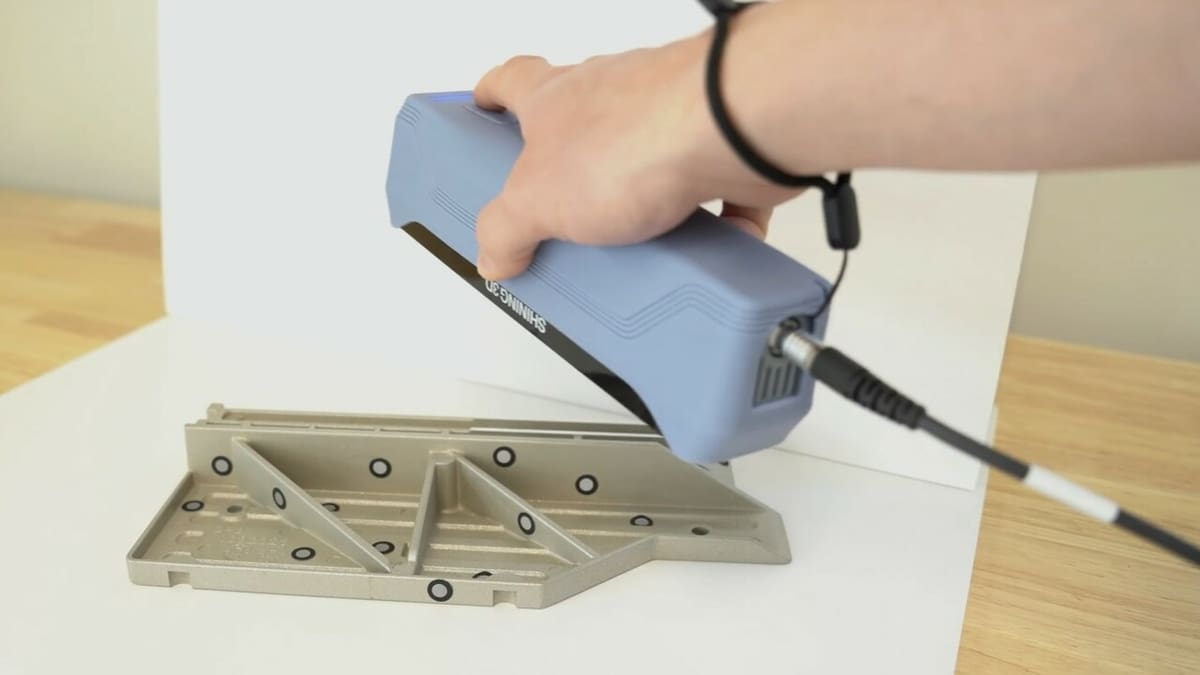
Ideally, when scanning an object, geometrical features should act as matching elements to virtually recreate the object from the images the scanner takes. However, sometimes the object’s surface is so uniform that the scanner isn’t able to find matching elements, failing to create an accurate point cloud.
Here is where markers come into play. They help the scanner identify checkpoints to match the many frames taken and build the 3D virtual representation of the object.
There are different types of markers, the most common being the simple, sticker-type. These are black dots with an inner white, reflective dot. More elaborate marker types include pyramid, magnetic, and even a markers net. You can buy them by the hundreds or thousands, or even create your own by 3D printing them, like maker eg_design did.
- What does it do? Markers help identify checkpoints in objects that would otherwise be difficult to scan due to their evenness or smoothness.
- Where can you find it? Maker eg_design has a DIY model on Printables, and you can also find markers at Amazon (among many other retailers) in a variety of sizes and shapes.
Scanning Spray

Here is another fundamental accessory for 3D scanning. As mentioned, some objects have characteristics that represent an optical challenge for the scanner. Surfaces that are either too shiny or opaque, or even translucent, prevent the light from being effectively reflected. This prevents the scanner from “seeing” that part of the object. By coating the object with a thin layer of scanning spray, it becomes visible to the scanner.
AESUB is a company that has developed a series of sprays that are specifically designed for scanning purposes. These sprays offer interesting advantages, such as evaporating after a couple of hours, skipping the tedious after-scanning process. Nevertheless, there’s a downside, in that the spray has a higher cost compared to alternatives.
These makeshift alternatives consist of options that are intended to be used for other purposes, but that the 3D scanning community has found useful under certain circumstances. For example, baby powder, dry shampoo, and foot spray have also been used as scanning aids. These can be cheaper than scanning-specific sprays and may be a better fit for your needs. However, keep in mind that you’ll need to clean the object after scanning it. This may be a drawback if you’re scanning electric devices, as you may need water to completely remove the coating.
- What does it do? Sprays (or their makeshift alternatives) can offer a layer that makes it easier for the scanner to recognize the object.
- Where can you find it? AESUB’s scanning sprays can be found at Amazon, and some alternatives come up when you’re searching through the online retailer.
Calibration Panels & Boards
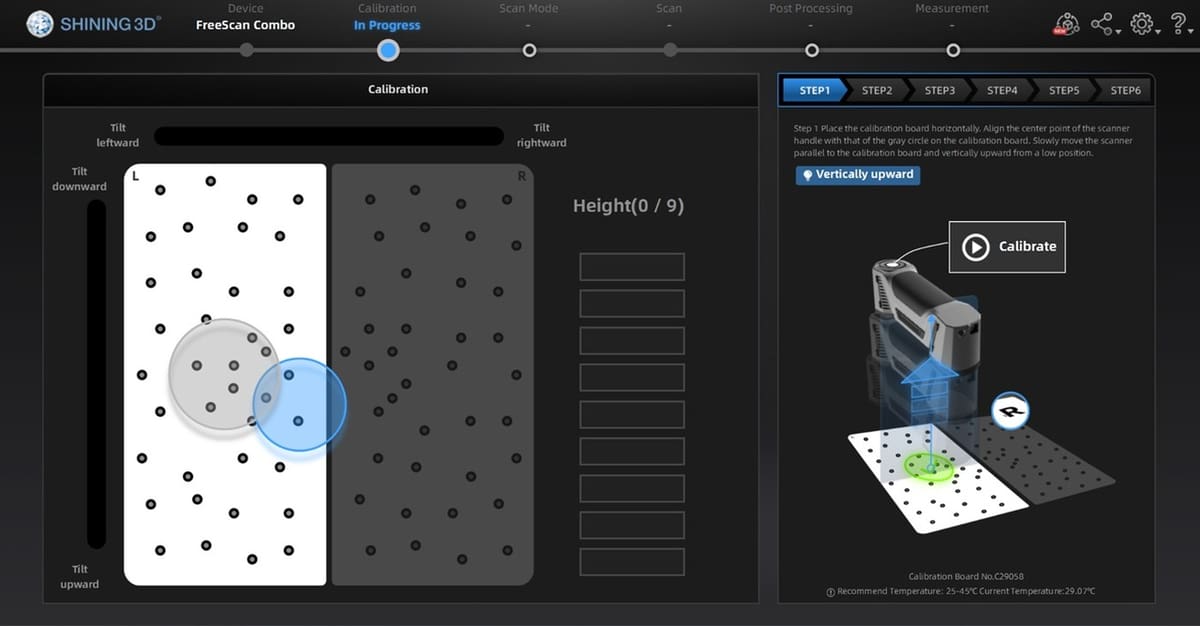
Scanners are usually delivered already calibrated. However, some of them might require initial calibration before performing the first scan. Additionally, chances are that you’ll need to recalibrate the device after some time.
Some scanners can be self-calibrated or calibrated performing simple rotational motions. In other cases, as in the case of Artec’s Leo, a calibration tool might be required, mainly in the form of a calibration panel or calibration board. These are scanner-specific, and you must use the one that corresponds to your scanner’s make and model. Usually, they’re included with the scanner, like the one included when buying the Revopoint Pop 3.
However, you can buy spare panels in case the original one gets damaged, broken, or lost, or a replacement or duplicate if the scanner is to be used in many places or shared by a group of people. Whatever the case, make sure to have it nearby just in case. You won’t want to delay your scanning routine due to a lack of calibration.
Calibration panels mainly consist of a set of white dots on a black square or a rectangular board with a specific pattern for each scanner model. There is no universal calibration panel or board, as each scanner is unique.
- What does it do? A calibration panel helps ensure that your scanner is well calibrated and ready for work.
- Where can you find it? Revopoint offers a calibration board at Amazon for the Miraco scanner and on their website for the Pop 3, among other options.
External Lights & Light Boxes
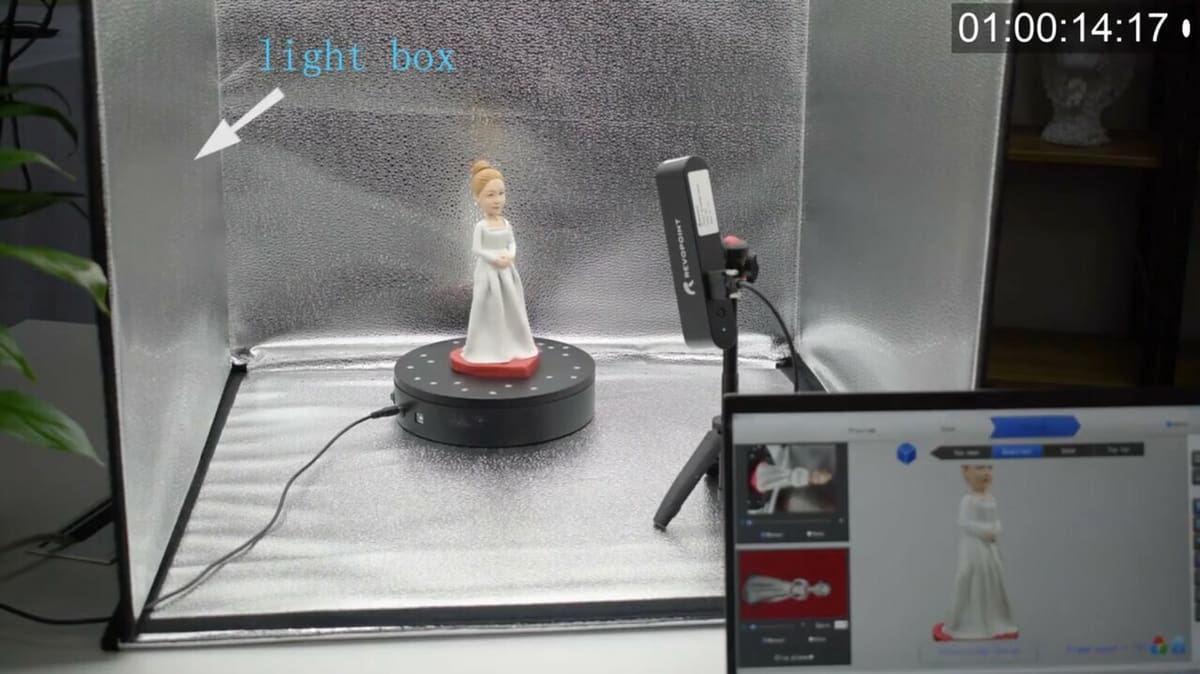
Since a scanner is a device that relies on optics, illumination plays a key role during the scanning process. Hence, proper light conditions must be provided to ensure a successful scan. This can be easily achieved by using room lights or natural light from windows or outdoor settings.
However, sometimes you may require more specific lighting conditions. In these instances, a more elaborate setup should be used, which may involve using external lights and enclosures. While a few manufacturers, like Revopoint, have developed scanner-specific lighting equipment, these setups aren’t typically that exclusive.
- What does it do? A lighting accessory can help ensure that the object will be fully and correctly scanned.
- Where can you find it? You can find a large variety of external lights at Amazon, like this rechargeable LED light, which can be attached to your scanner. Along with external lighting, a light box can be a great help.
Extended Range
Another fundamental advantage of newer 3D scanners is the portability they offer, especially handheld scanners. Whether it’s through a tethered connection or a wireless setup, the ease of access they provide is key.
However, you may face situations where you need to go beyond the limits of your scanner, in terms of range. This applies to both the space and time range. To help, you may want to add a couple of the following accessories to enhance your scanner’s capabilities.
Tripod
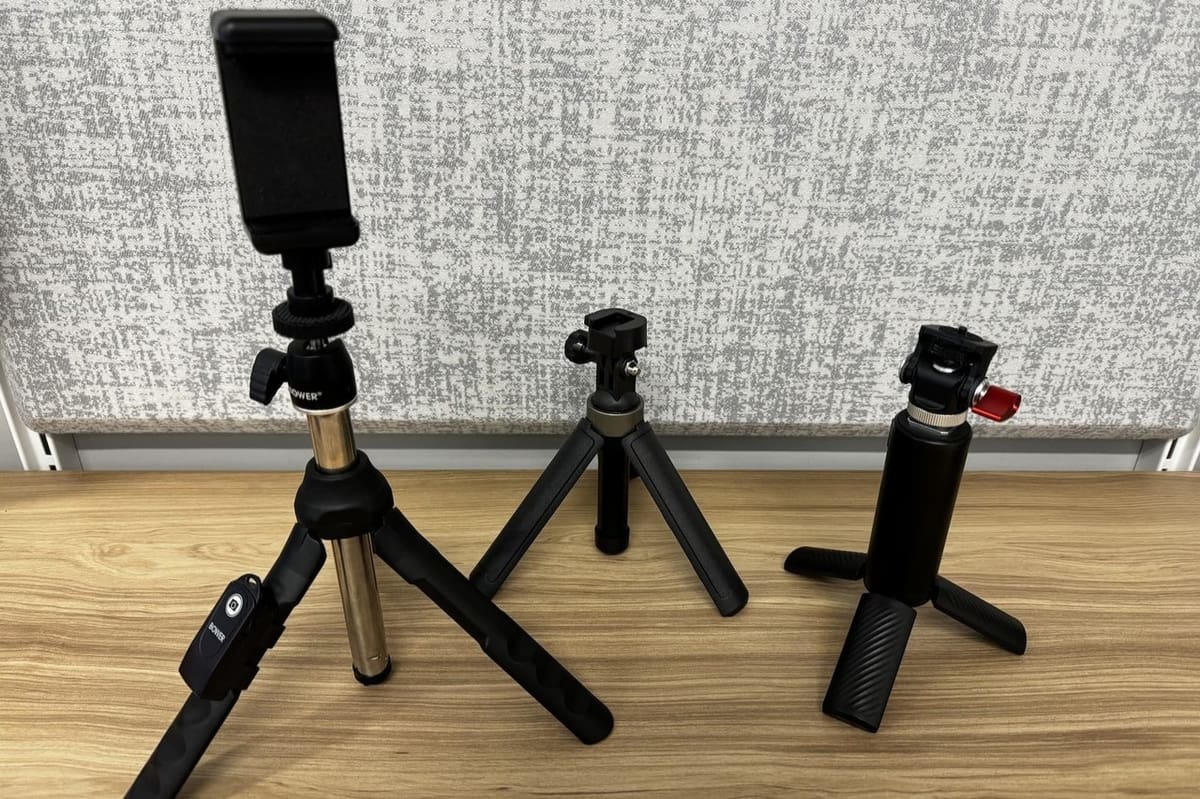
Most (if not all) scanners come with a small tripod. This tripod should be enough to conduct simple scanning routines for small objects. However, when it comes to scanning bigger objects, you may need a larger setup. This is particularly true if you want to scan people.
While you may find a variety of brands and sizes available, a tall (e.g. 62″) option could be the best solution. It should allow you to fix the scanner at different heights and angles. Thanks to the universality of the threads scanner and cameras use, it shouldn’t be difficult to find an affordable option.
- What does it do? A tripod can keep your scanner stable, and there are plenty options out there depending on your goal.
- Where can you find it? Universal camera tripods can be found at Amazon, and if you’d rather go the DIY route, you can also find plenty of models shared on Thingiverse, although some might need to be adapted to your particular scanner’s size or the overall setup.
USB Extension Cables & Power Banks
Remember how we said that sometimes the only way to scan an object (especially a large one) is to maneuver the scanner around it? Well, in this case, you may need to reach zones far away from the computer that the scanner is connected to.
If you’re using a wireless connection, then you don’t need to worry; rather, you may need another type of accessory, which we’ll cover in detail below. But if you’re using a tethered connection via USB, then you may need an extra couple of cable meters to reach those zones.
Manufacturers often include a considerably long USB cable to overcome these situations, but there’s no guarantee it will be enough every time you scan something. Hence, we recommend you have one or two USB extension cables around. There are different length options, but whatever you decide to use, just make sure it’s at least a USB 3.0 cable so it can properly power the scanner.
On the other hand, if you’re using a wireless scanner, then you have practically no restrictions in terms of movement. You can reach basically any location you want around the object. However, since there’s no USB connection, there’s no power supply, and you must provide this by other means.
The easiest way is by using a universal power bank. These devices are just like the ones you use to charge your smartphone when you go out or are on a trip. Just make sure to check the input and output specifications of both the scanner and the power bank, to avoid damaging either. As for the same-brand picks, even when they assure a more compact assembly, they might be more expensive and might not offer the highest charging capacity.
- What does it do? A USB extension can enable more freedom of movement and distance from your computer, while a power bank can allow for longer work without a direct connection to the setup.
- Where can you find it? You can find plenty USB extension cables at Amazon – just make sure to pick the right length and compatibility option. As for power banks, there are also many selections out there, like Belkin’s at Amazon, although we recommend looking first at the one provided by the manufacturer, such as Revopoint’s (also at Amazon), since it’s sure to be compatible with the scanner.
Rails System
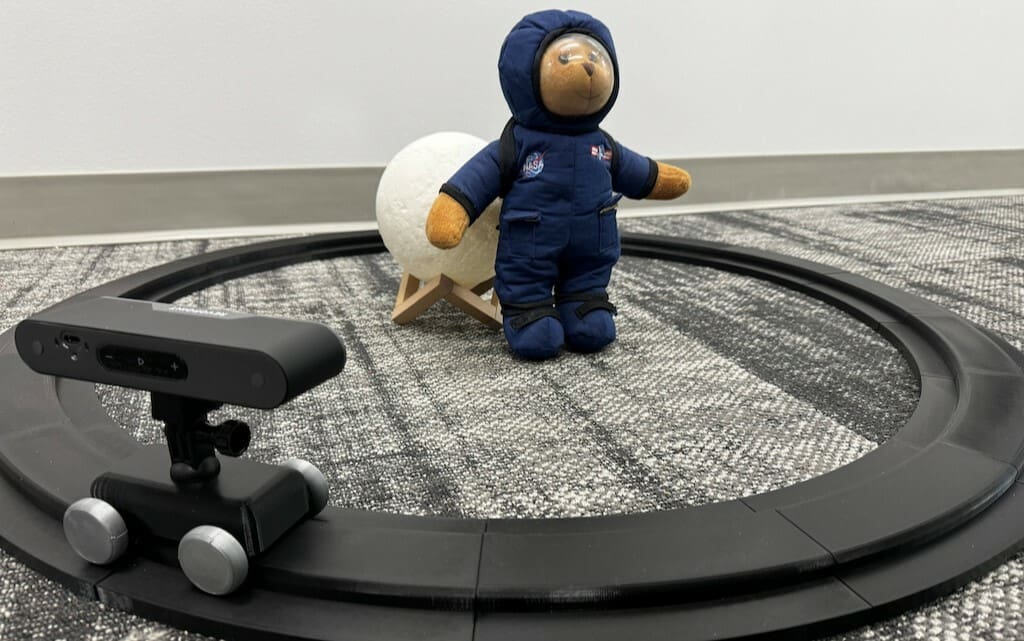
The final item on the list is a rails system. This accessory is rather rare, but can be useful for those once-in-a-while scanning routines or for very specific, but repetitive, tasks. The main purpose is to make the scanner follow a specific trajectory, capturing the object while moving around it. This way, by standardizing the scanning process, a more stable motion around the object is achieved, delivering better results.
Because this is a more customized accessory, you may find just a few commercial options available (and they might not be the most budget-friendly of accessories). However, you may be luckier finding these types of structures in 3D printing and scanning forums or repositories, like this quite-old-but-gold model on Thingiverse. If you’re planning to perform the same scanning routine tens or hundreds of times, then you may want to implement a system like this one, saving you time and effort.
- What does it do? A rails system provides stability and makes repetitive tasks easier.
- Where can you find it? For DIY makers, Thingiverse would be a good choice, but if you’re interested in a purchase, this model from Strak is available in two different heights: 1,000 mm and 1,500 mm.
License: The text of "3D Scanner Accessories that Make Scanning Easier" by All3DP is licensed under a Creative Commons Attribution 4.0 International License.