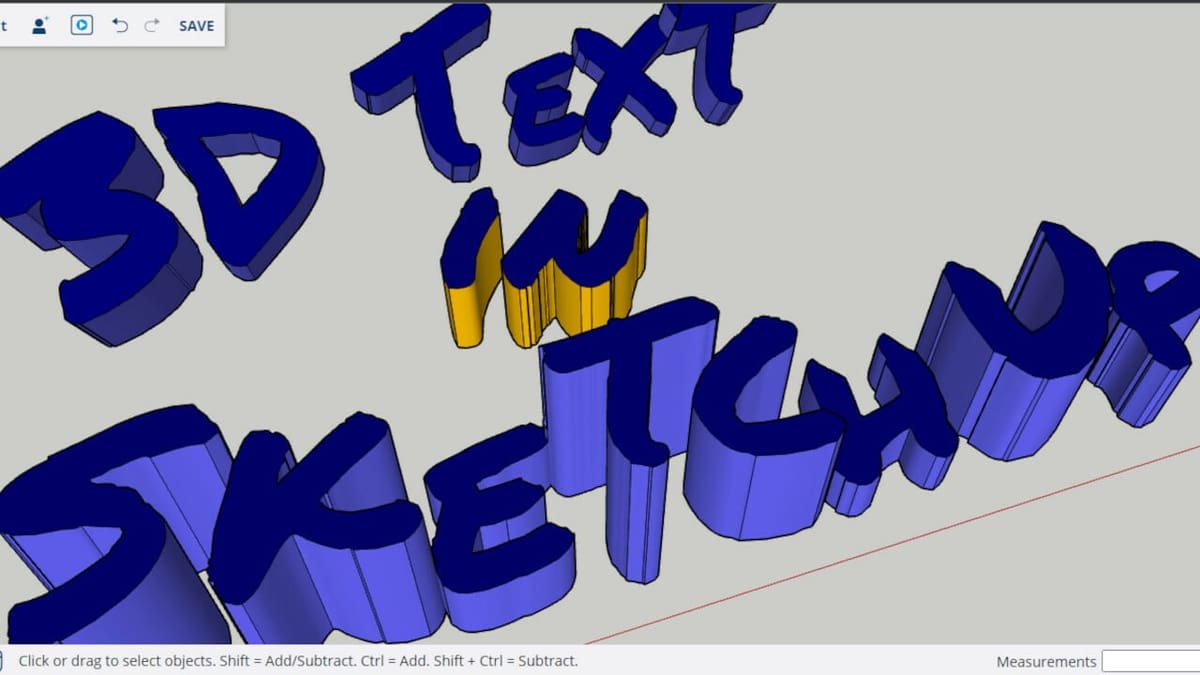
3D Text in SketchUp: How to Make, Edit & Move 3D Text?

Ready to unleash your creativity with 3D text in SketchUp? Check out the program's versatile and easy-to-use text and modeling tools.
SketchUp, developed by Trimble, is well-established and user-friendly 3D modeling software. With roots in the world of architecture and interior design, it’s a trusted companion for professionals in these fields. However, SketchUp’s appeal extends beyond seasoned designers.
Its intuitive interface and playful workflow make it an excellent entry point for those who are new to 3D modeling. The software’s accessibility is further enhanced by the free web version, which enables aspiring creators to dip their toes into the world of 3D modeling without paying for a subscription.
In this tutorial, we’ll guide you through the process of creating and editing 3D text in SketchUp. Whether you’re a professional looking to expand your skills or a novice taking your first steps into the world of 3D modeling, this tutorial will help you bring your 3D text ideas to life in SketchUp.
Versions
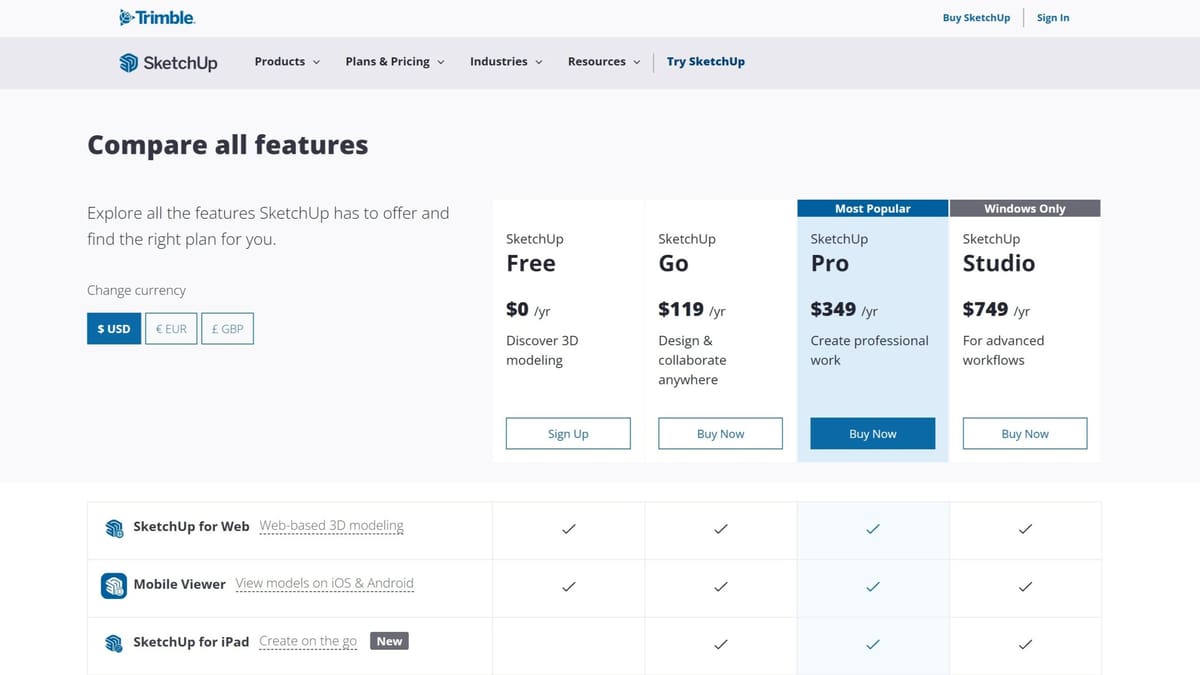
SketchUp offers a variety of versions catering to different needs and budgets. The free web version, which is accessible after creating an account, is a great starting point for beginners. While it does come with a limit of 10 GB cloud storage, basic tools, limited pre-created models on the 3DWarehouse, and simple features for exporting files, it remains a solid choice for basic 3D modeling tasks.
For those seeking more advanced features, unlimited cloud storage, and more flexibility with file exporting, the Go version, starting at ~$120 per year, is a nice web-based alternative. iPad users can also use this option.
In addition, there’s the Pro version, priced at ~$350 per year with a 30-day free trial, which is a more robust choice. It includes unlimited cloud storage, iPad applications, and a desktop version with an expanded toolbox and enhanced features. Along with that, users can also view 3D designs in augmented, virtual, and mixed reality using a compatible device. Stepping up to the Studio version at ~$750 per year gives you everything in the Pro version, plus scanned 3D point cloud visualization, V-Ray engine rendering, and Revit-to-SketchUp integration.
In this tutorial, we’ll focus on the Pro version and explain how it differs from the free web version. However, the version you’ll choose ultimately depends on your specific needs, expertise, and budget.

User Interface
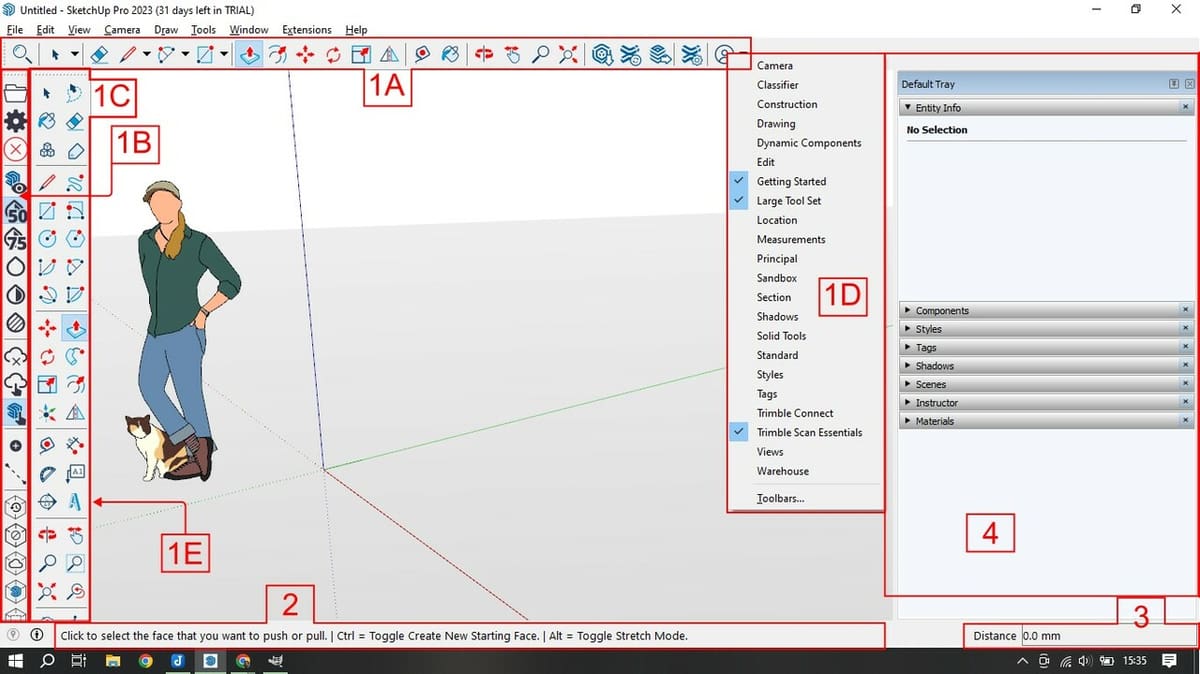
We’ll now cover the important areas for creating text in SketchUp’s UI, starting with template selection. When you create a new document, SketchUp prompts you to choose a template. The primary difference between templates is the units of measurement they use. For this tutorial, we’ll work with a millimeter template, but you can select one that aligns with your preferences.
- Customizable Toolbars: SketchUp allows you to tailor your workspace. It starts with a “Getting Started” (1A) toolbar and a “Trimble Scan Essentials” (1B) toolbar. Right-clicking a toolbar opens a menu (1D), on which you can choose from other toolbars. Here, we’ll open the “Large Tool Set” (1C), which includes the 3D Text tool (1E). You can position these toolbars at the top, bottom, or left side of the drawing area for your convenience.
- Active Tool Instructions: At the bottom of the interface (2), you’ll find instructions related to the active tools you’re using. This area helps you understand how to use the currently selected tool effectively.
- Distance/Angle Box: Located on the bottom right, the “Distance/Angle” box (3) allows you to input precise measurements. The unit will automatically adjust based on the template you’ve selected.
- Default Tray: On the right side of the interface, the “Default Tray” (4) contains various tabs. For this tutorial, we’ll focus on the “Materials” tab.
Finding the 3D Text Tool
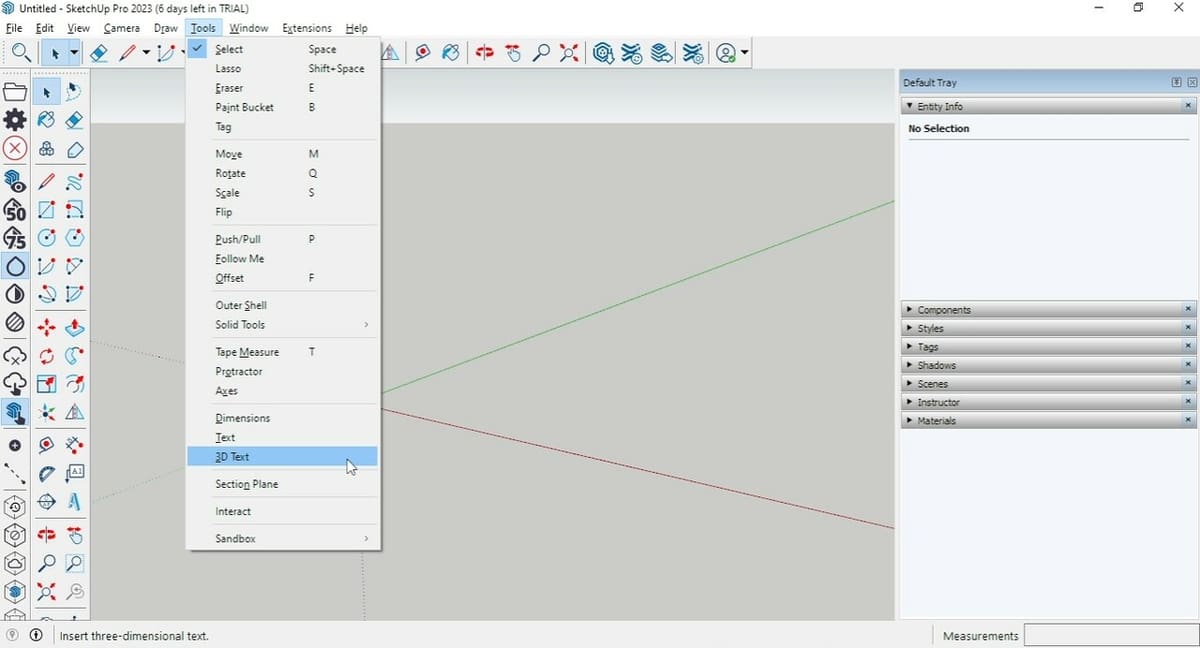
In SketchUp, the 3D Text tool makes it easy to create extruded text.
SketchUp Pro users can access the 3D Text tool in two different ways. First, it’s available under the “Tools” menu, specifically following “Tools > 3D Text.” Alternatively, you can open the “Large Tool Set” by right-clicking in the tools area, where you’ll find the distinctive 3D ‘A’ icon that represents the 3D Text tool.
In the web version of SketchUp, the process is slightly different. You have to click the three dots on the bottom of the toolbar, which will trigger a pop-up window. The 3D Text tool will be located at the far right in the second row of tools.
One notable distinction between the web version and SketchUp Pro is the font selection. In the web version, you have access to a limited set of font families, including Lora, Open Sans, Oswald, Permanent Marker, and Playball. In contrast, the Pro version offers all the fonts supported by your system, providing a more extensive range of options for your 3D text projects.
Configuring the Text
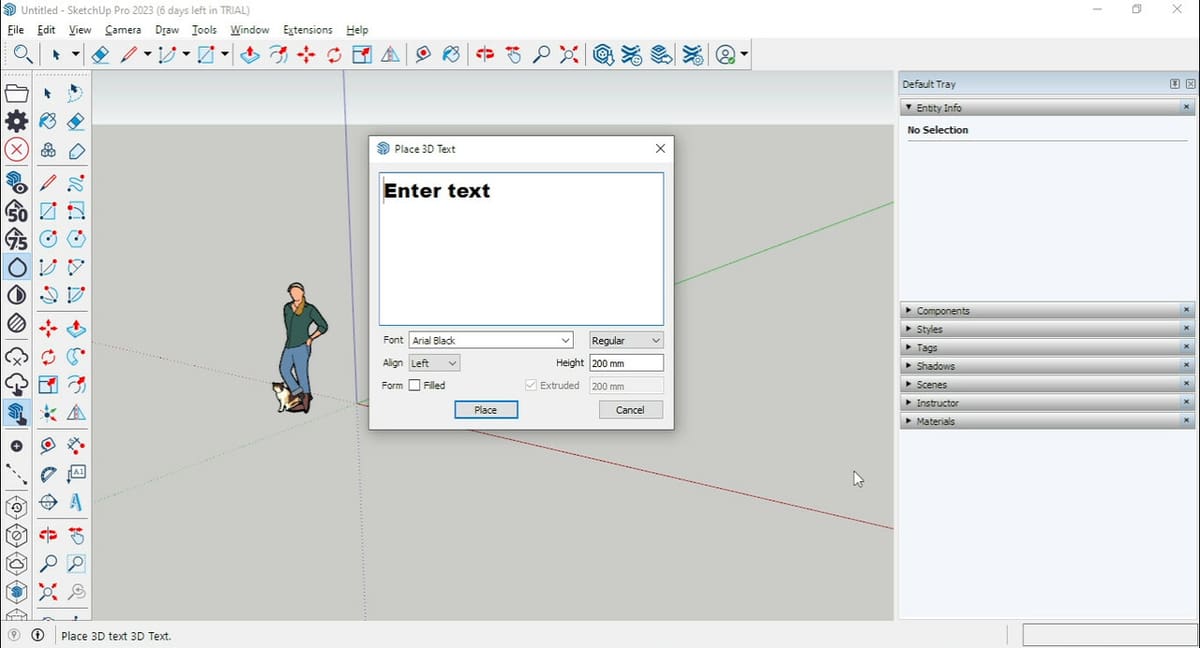
When you click on the 3D Text tool in SketchUp, it triggers the “Place 3D Text” pop-up window, where you can specify the parameters for your text. These settings let you create 3D text that meets your precise design requirements. Here’s an overview of the key parameters:
- Enter text: Begin by entering the desired text you want to create in 3D.
- Font selection: Choose the font family for your text. Depending on whether you’re using the web version or SketchUp Pro, you’ll have access to a different range of fonts, including options like Regular, Bold, and Italic.
- Text alignment: Set the alignment for your text, which can be Left, Center, or Right. This ensures your text appears exactly as you desire.
- Text height: Specify the text height, determining the size of the font.
- Form (filled or hollow letters): Decide whether you want the letters to be filled or hollow. Selecting “Filled” means the letters will have a surface and can be extruded. If the box is unchecked, you will only have the letter contours and extrusion will be unavailable.
- Extrusion: Choose whether you want the letters to be extruded in 3D or not. If the text isn’t extruded, it will be filled with a surface, which can be extruded at a later stage.
- Extrusion height: If you opt for extrusion, set the extrusion height, which determines the depth of the 3D text.
- Place: Once you’ve configured these options to your liking, click “Place.” Your text, following the specified parameters, will be added to the drawing area.
Editing the Text
In the following sections, we present the main tools you can use to further personalize your 3D Text.
Selecting the Features
The Select Tool, represented by the arrow icon or accessible via the space bar shortcut in SketchUp, is a fundamental tool for manipulating and modifying your designs.
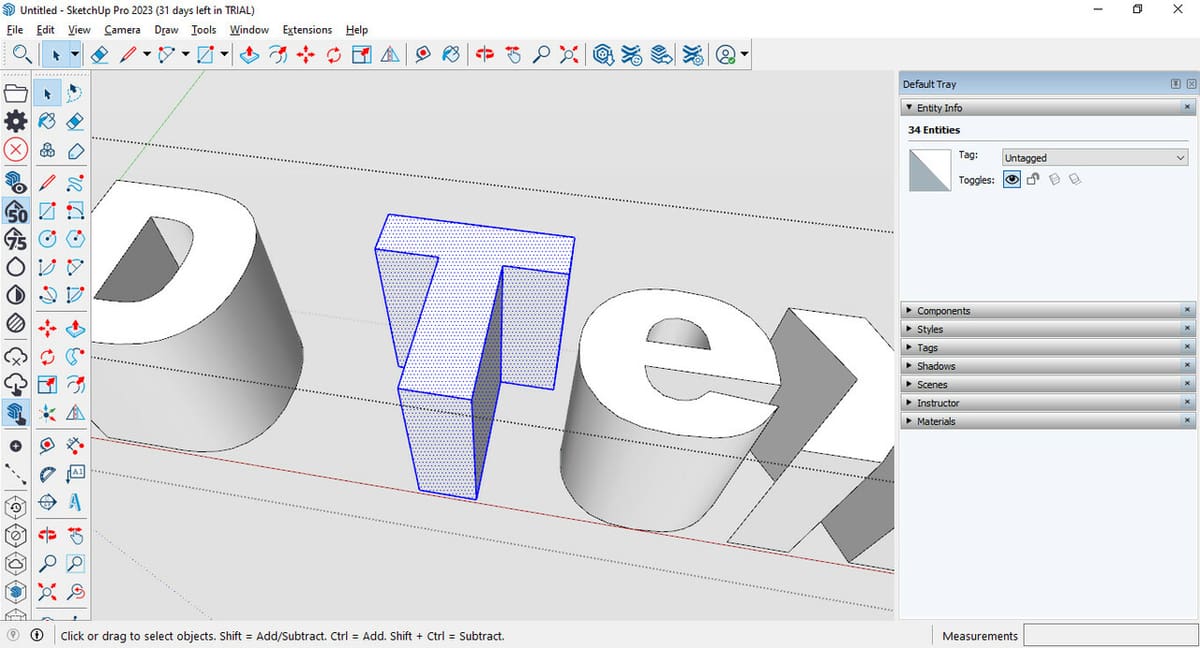
When working with 3D text, it’s important to note that the text is initially placed as a group. With the Select Tool activated, a single left click allows you to select specific elements. Left-clicking once on the group highlights it with a blue box, indicating that it’s selected. A double-click opens the group for modifications, showing a dashed line box.
With the group open for modifications, each letter consists of individual edges and surfaces that are editable. While using the Select Tool, you can single-click to select individual features like edges or surfaces. A double-click selects a feature and its directly connected features, such as a surface and its edges. A triple-click selects all interconnected features, allowing you to select an entire letter or group of elements.
To remove the selection with the Select Tool active, simply click outside the selected feature.
Push/Pull Tool
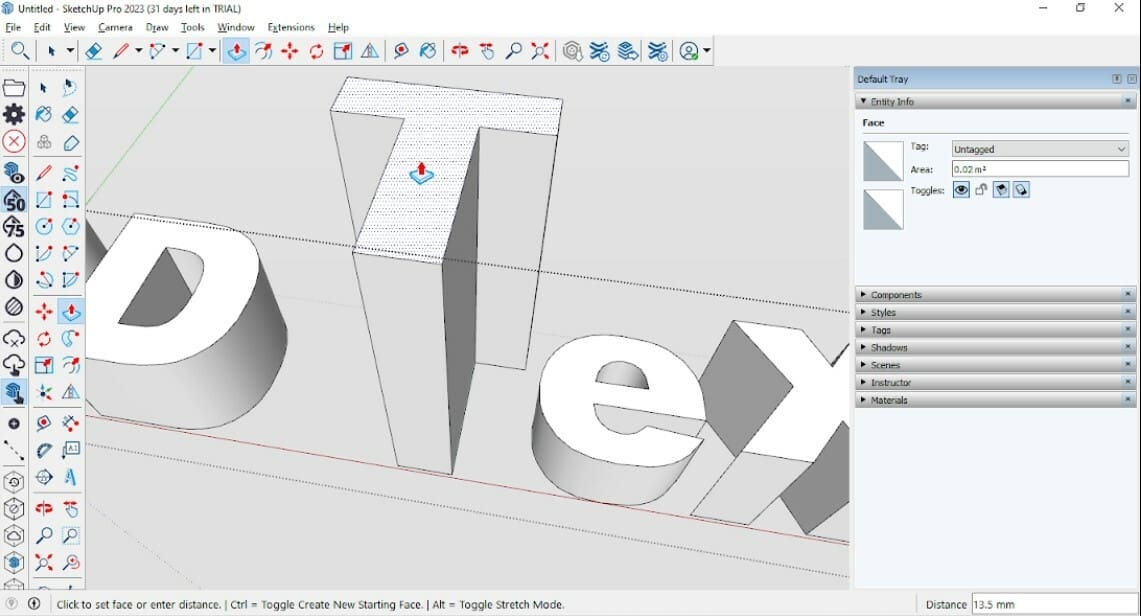
SketchUp’s Push/Pull Tool is a versatile feature designed for extruding surfaces, allowing you to easily add depth to your 3D models. As a helpful shortcut, you can activate the Push/Pull Tool by pressing the ‘P’ key on your keyboard.
When editing a group within the 3D text, selecting a surface causes it to be highlighted with a pattern of points, signifying its active state. With the Push/Pull Tool, you can modify the extrusion distance by pulling or pushing the surface to the desired depth.
For precise control, you can input the exact extrusion distance by typing it in the “Distance” box (located at the bottom right of the window). Notably, when the Push/Pull tool is active, you can directly input the desired distance without additional commands.
Move Tool
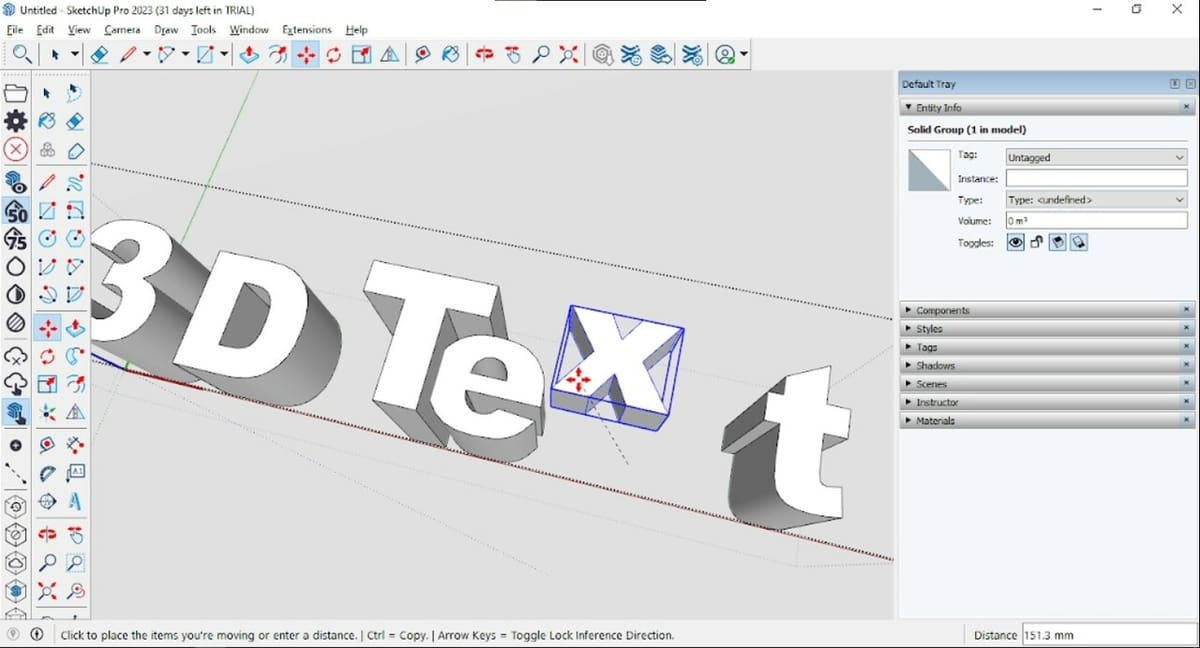
The Move Tool offers a straightforward way to adjust the positioning of individual letters within your 3D text. To activate the Move Tool quickly, you can use the ‘M’ key on your keyboard as a shortcut.
You can select an entire letter with three consecutive clicks, making it easier to manipulate the letter as a single entity. Once selected, use the Move Tool to reposition the letter as needed. To do this, select any base point with a single left click and drag it in the desired direction.
To maintain control over a single motion axis, namely X, Y, or Z (red, green, and blue in SketchUp), initiate a movement in your desired direction and then hold the Shift key. Similar to the Push/Pull Tool, you can precisely set the distances for moving by utilizing the “Distance” box located at the bottom right of the SketchUp window.
It’s important to note that if you bring letters into contact with one another, they will join as a single body. To prevent this, select a complete letter, right-click, and choose “Make Group.” This action will create a distinct group within the 3D text group, maintaining separation between the letters.
Rotate Tool
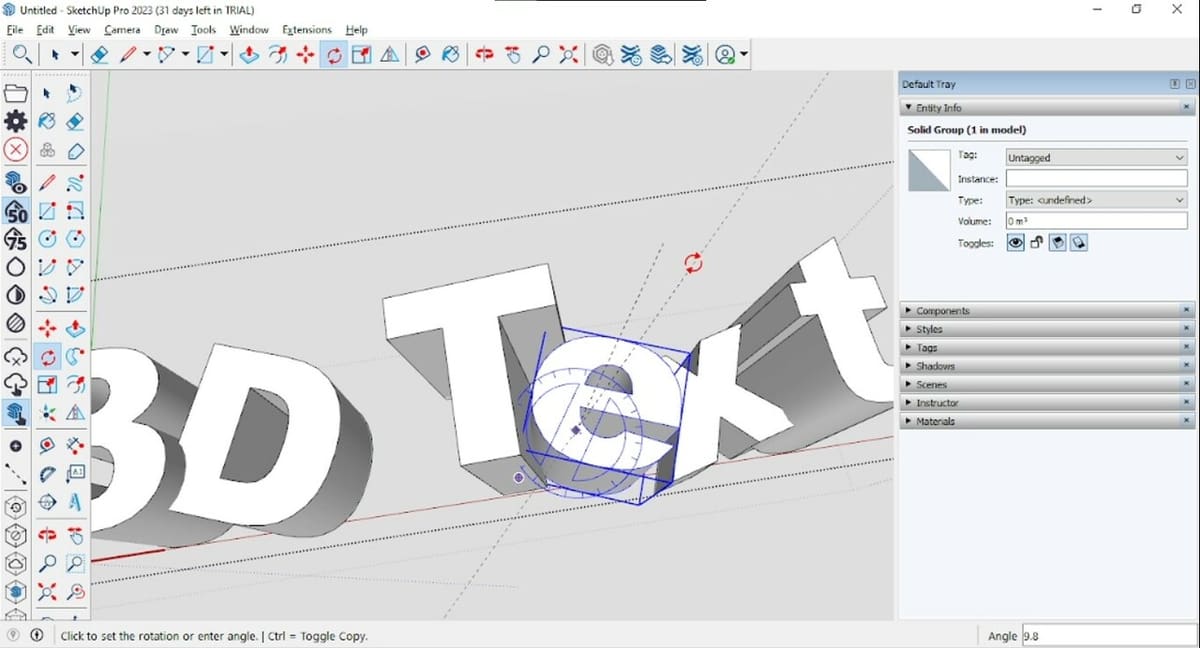
Just as you can manipulate the position of letters, SketchUp also enables you to rotate them for precise orientation adjustments. To activate the Rotate Tool, locate it on the Toolbar or use the ‘Q’ key on your keyboard as a shortcut.
To rotate an entire letter, begin by selecting it with three consecutive left-clicks. Once selected, activate the Rotate Tool. Upon activation, an angular measure icon will appear. Move your cursor along different surfaces and choose the desired axis for rotation. The measure icon changes color – red, green, or blue – according to the selected rotating axis, in a similar way as the Move Tool.
You can then manually rotate the letter to the desired angle, or you can input the exact angle in the “Angle” box located at the bottom right of the window.
Scale Tool
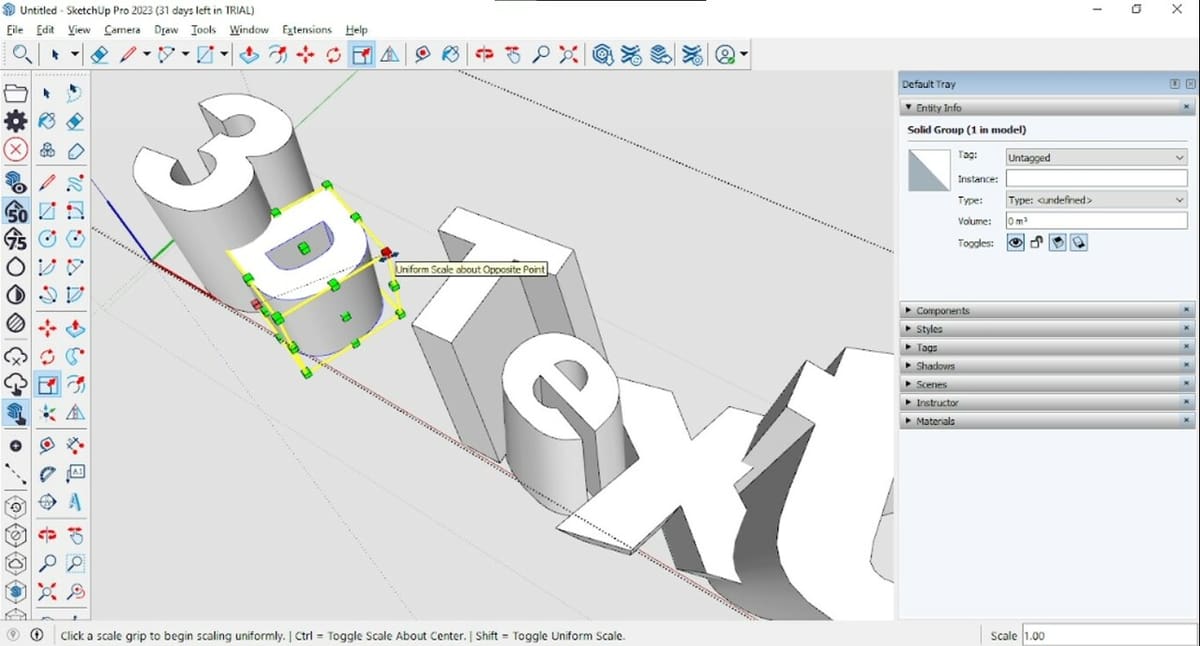
The Scale Tool offers a versatile way to resize your 3D text, allowing you to adjust the entire text group or individual components. To activate the Scale Tool, use the ‘S’ key as a shortcut.
When the entire text group is selected, activating the Scale Tool creates a box with green anchor points. To explore how each pair of anchor points modifies the text group, hover the mouse over an anchor point. It highlights the point in red and its corresponding point on the opposite side of the box. This symmetry allows for both 3D and 2D scaling options. Just click and drag the point to scale. For more precision, you can adjust the scale number in the lower right box.
In addition, you can modify individual letters or features within a letter. To do this, double-click the text group using the Select Tool (‘S’) to enter the group. Select an entire letter with three consecutive clicks to scale it as a whole. Otherwise, select a single surface or edge of a letter and scale it to the desired size.
Adding Colors
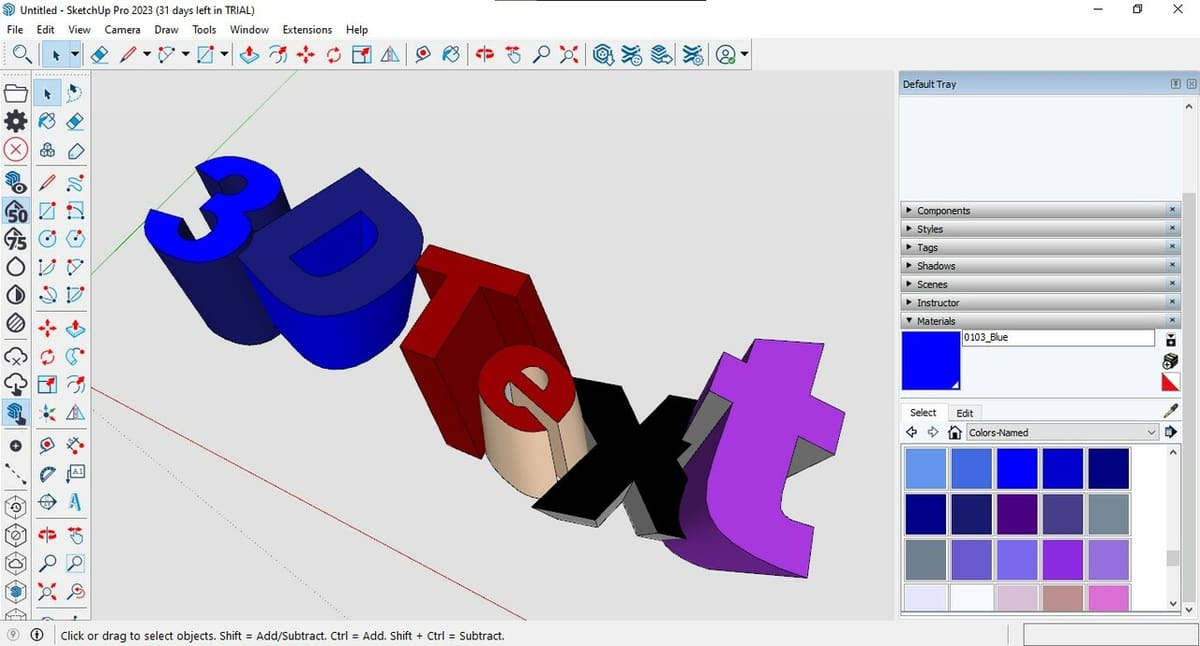
In SketchUp, the Paint Bucket Tool is a powerful feature that allows you to easily change the color or texture of your 3D text. To activate the Paint Bucket Tool, use the ‘B’ key as a keyboard shortcut.
Once the tool is active, the Material tab will automatically open in the Materials side window. From here, you can select the desired color or texture that you want to apply. When you click the 3D text group with the Paint Bucket, it will paint the entire group with the chosen material, giving all of the text the same appearance.
Alternatively, for more precise customization, you can select individual parts of the group for editing, as you would during moving or rotating. Within the group, you have the flexibility to choose and apply colors and textures to individual letters or surfaces, allowing for detailed and customized text finishes. It’s worth noting that the Pro version lets you customize and upload your own materials and colors, unlike the free version.
Exporting
Once you’re done editing your 3D text, it’s possible to export it as a 3D model or 2D graphic. In SketchUp Pro, go to “File > Export > 3D Model” or “File > Export > 2D Graphic”, and select your desired file extension.
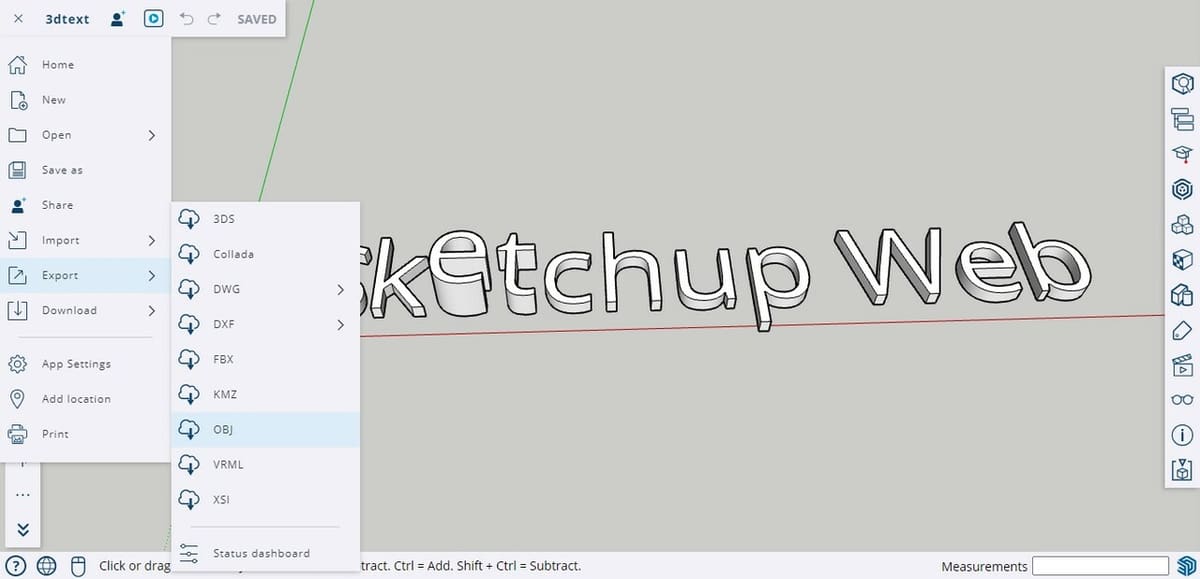
You can access the drop-down menu represented by the three parallel lines at the top left, then click “Export” or “Download” and select the desired format. While the free version offers a more limited selection of file extensions, it still includes the most commonly used formats, such as STL, OBJ, DXF, DWG, and PNG.
It’s worth noting that the conversion process in the web version is cloud based, while it’s locally processed in the Pro desktop app. Once your file is processed, you can conveniently download the exported model to use in other applications or share it with others.
License: The text of "3D Text in SketchUp: How to Make, Edit & Move 3D Text?" by All3DP is licensed under a Creative Commons Attribution 4.0 International License.