Anet A8 Cura Settings: The Best Anet A8 Cura Profile

What are the best Anet A8 Cura settings? We’ll explain the most important slicer features and provide you with the optimal Anet A8 Cura profile.
Cura is "Control Rich"

3D printing was supposed to be a fun new hobby, not a master’s physics thesis. But Cura slicing software has an amazing variety of settings, giving the savvy user ultimate control over the finished part. The new user, however, can easily be overwhelmed by choices like “support horizontal expansion” or “enable jerk control.” So, do you really need to learn all these slicer settings?
While all of these adjustments can be valuable, there are a few that, when set properly, lead to quick success on the Anet A8 and similar printers. Let’s explore which settings will give the most satisfying results for most types of printing.
Temperature is Simple for most Materials

Temperature control is a critical factor in 3D printing. It is, however, one of the easiest to factor in. Most filament manufacturers print the proper extrusion temperature on the spool. Cura’s default settings here are usually fine, although I have used some “not a brand name” filaments that required tweaking. A word of warning: PLA is made from organic material. Push it too hot and it will burn, leaving black streaks and structural weakness in your printed piece.
The other temperature is bed temp. The bed is usually set to a much lower temperature than the hotend. The ideal bed temperature is that temp where the plastic just changes from solid to liquid. This is referred to as the glass transition temperature. Bed temperature is meant to assist in the plastic adhesion to the build surface. Too cold and your part can break away during printing, ruining the project. Too warm promotes warping, especially in PLA. Again, manufacturer’s recommendations are usually the go-to with 60 degrees being the general best setting for PLA and 80 degrees being the default for ABS.
End-item use is Key
What is the purpose of the part that you’re producing? Are you making a new handle for a shop tool or a Baby Groot figurine for your desktop? Overall, the end-use matters. It dictates wall thickness and infill density. And for many 3D printed parts, too thick or too dense can be too much of a good thing.
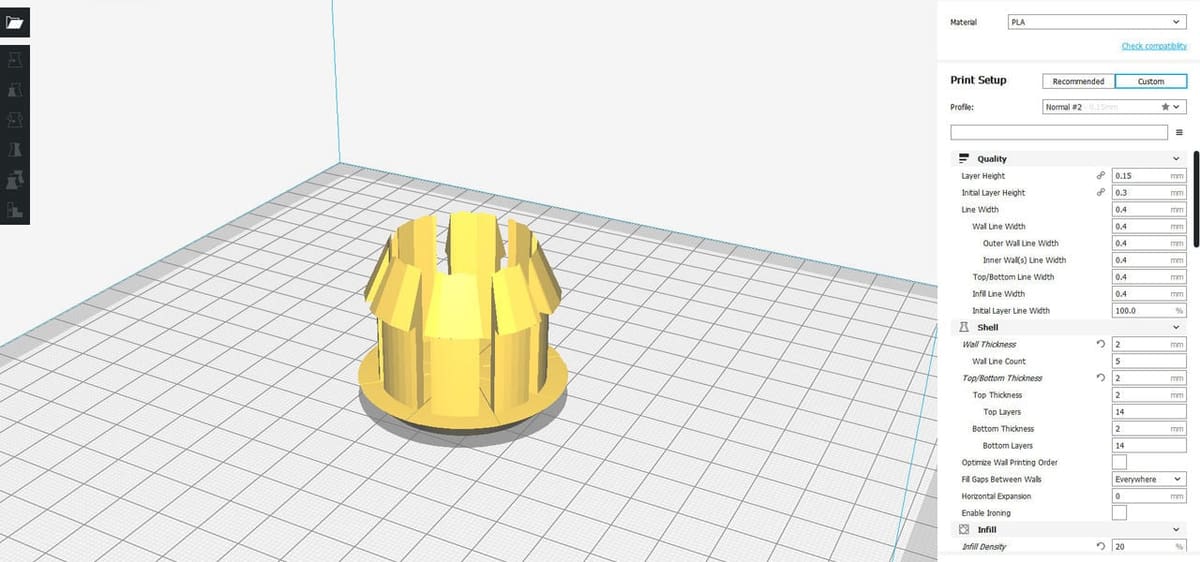
Wall thickness is controlled by the Shell setting. For a static figurine or part of a model, a 1-to-2 mm shell thickness will yield a part strong enough to be handled without fear of damage without being overly heavy or wasteful of material. Shell settings also allow the base thickness, as well as the top shell thickness, to be individually manipulated. Again, depending on the function of the part, a thicker, heavier base may be recommended.
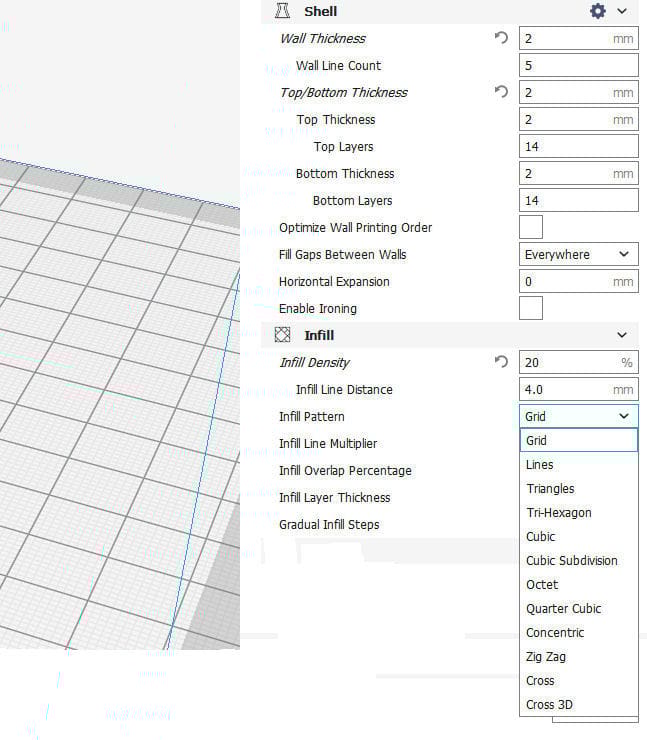
The other setting to be considered here is Infill. Infill, in percentage, is the ratio of plastic to air inside the printed shell. A vase, for example, would have 0 percent infill while a structural component like a brace or a motor bracket, may well benefit from 100% infill, making it a solid object. While infill does contribute to the physical integrity of an item, non-structural builds, display pieces, in example, benefit most from infill as internal support over which to lay the “roof” of the printed project.
Cura allows not only the percentage of infill material but also the infill pattern. The default pattern here is grid, which, along with most other built-in patterns, builds an internal support structure from the bottom up by laying identical lines of material one atop the other. Other infill patterns, cubic, for instance, change position and placement with each successive layer, distributing weight and density throughout the part. While these “exotic” patterns can be useful, a 20-to-25% grid pattern will be suitable for the vast majority of your printing.
Print Speed: The Holy Grail
How great would it be if you could load in your sliced G-code, press start and 5 minutes later remove your finished part from the build plate. Unfortunately, 3D printing brings the term “patience is a virtue” to an entirely new level.
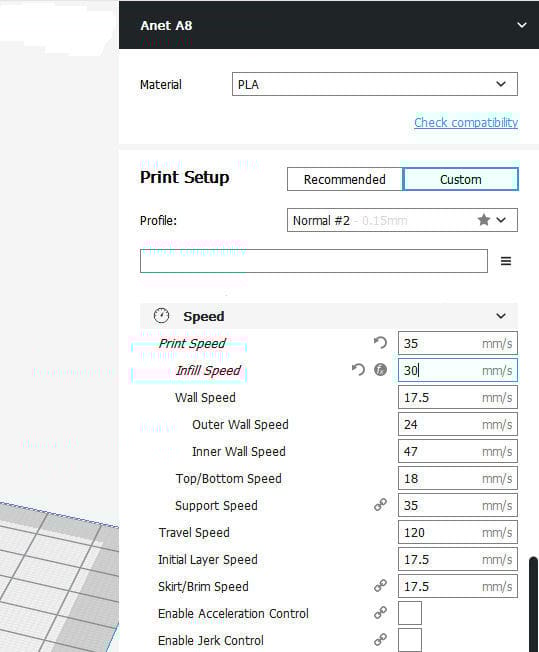
In theory, the print speed of a 3D printer can be much faster than reality allows. Some machines will push the envelope, with speeds of 150-to-200 mm/sec reached on draft parts. The Anet A8, however, has two design elements that prevent satisfactory results when attempting high-speed printing. These are both related to inertia.
Foremost is the acrylic frame. While being low cost, easy to assemble and lightweight (perfect choices for an entry-level machine), the A8’s plastic frame flexes under stress. This flexing is reflected in the printed part’s surface finish, yielding oscillation patterns at every angle on the piece. Some of this can be mitigated by stiffening the frame with printed braces, but for the most part, speed is the enemy. You have to slow the print speed down.
The second factor that carries movement inertia into the finished part is the extruder servo’s location. Mounted on the hotend gantry, the servo represents almost a pound of mass which, when moving at high speed, resists any attempt to slow down or change direction. Again, physics cannot be defeated, only mitigated by the reduction of speed. And while both frame rigidity and hotend inertia can be addressed by other means, for the sake of improving print quality without rebuilding your printer, a reduction in speed will be demanded.
No Visible Means of Support
Let’s talk about support. Let’s face it – no one likes half of your printing material going into the trash because your part included overhangs that required braces that would be discarded once the print is finished.
Most professionals don’t really like including supports, required or not. Cura does allow support pattern and density to vary according to the user’s preference. Ultimaker’s community resource page here provides excellent commentary and visuals on using support.
In general, when supports must be used, there are two rules to follow. Generate the lowest percentage possible and, once finished, be patient and remove the supports slowly! It can be disheartening be in the support removal phase of a project, only to break away a necessary part of the printed item.
Build Plate Adhesion - Skirt, Brim or Raft

There is no perfect build surface. Some like to give the bare build plate a spritz of hairspray or a swipe from a glue stick to add some tac. Others prefer a glass surface covered with painter’s tape or a custom build surface overlay. In any case, Cura’s adhesion setting will come into play.
The adhesion settings perform two important functions. First, they prime the printhead, ensuring that once the model printing begins, there will actually be material flowing from the print nozzle. If this is the sole concern, skirt is the proper setting. Skirt lays down a single line of material around the outside of the actual print perimeter, without ever contacting the part itself. Once printing begins, liquefied medium can begin dispensing immediately.
The second selection here is brim. Brim takes skirt to the next level, laying down an outer perimeter, one layer thick, working itself inward toward the actual base layer of the printed part. Its primary function is to increase the adhesion area with the hope of preventing part loss due to adhesion failure. The width of the brim can be defined by the user with a 5-to-8 mm brim thickness being the standard.
The third adhesion setting is known as a raft. A raft is a multi-layer foundation for a print. While it does work to aid adhesion, it’s greater value is to provide a reference surface, above which the print nozzle is perfectly parallel and at a precise height. While there can always be some judgment error above the machine print surface, the multiple layers of the raft absorb that, along with any irregularities into a foundational mattress with a perfect surface on which to print. For precision prints, a raft cannot be beat. Most prints, however, will deliver more bang-for-the-buck with a 5mm brim.
The Shortlist: Recommendations for Best PLA Prints on the A8

As a summation, a recap of suggested Cura settings when printing with PLA:
- Shell thickness: Start with a shell thickness of no more than 2mm. The bottom can be thicker if desired but sides and top of non-structural prints don’t require as much material as you might think.
- Infill: For most non-structural prints, infill greater than 25% is a needless expenditure of time and material.
- Temperatures: For hotend printing temperatures, follow your material manufacturer’s recommendations. Otherwise, use the defaults provided in Cura unless you happen to be working with a particularly troublesome media. Feel free to tweak your settings, just don’t go overboard. On the print surface, drop back 20 to 25 degrees from the hotend.
- Print speed: 30 to 40 mm/sec for draft work, 20 to 30 for fine detail and finish.
- Supports: Avoid supports when you can. Reorient your work before slicing to minimize their interference with printing and cleanup. When they must be used, patience is the key to their proper removal.
- Adhesion: A brim is your go-to adhesion aid. 5 to 8 mm is usually sufficient. When precision is required, opt for a raft.
Is that all there is to it?
By no means is this an exhaustive list of print settings. As you step up through Cura’s experience tiers, you will find there are settings and tweaks for issues that you had no idea even existed. These, however, will be waiting when you reach the next level or when you’re ready to try your first print in a new material. The thing to remember is, for most of us, this is a hobby. While there is a learning curve, it is very satisfying when you master a basic approach and are ready to take that next “what if” step. When your first box of failed prints (or learning exercises as I call them) gets full, dump it out and start again. With practice, you should find that successive trips to the dumpster will be less traumatic and farther in between.
So, for All3DP, good luck and happy printing.