AutoCAD Point Style: All You Need to Know

Points are one of the most main reference tools in AutoCAD. Explore how you can customize AutoCAD point style to fit your workflow and needs.
Making a Point
AutoCAD is among the oldest and best-known CAD programs, dating all the way back to 1982. It stands out for its 2D drafting capabilities, making it a popular tool for floor plans, layouts, and more.
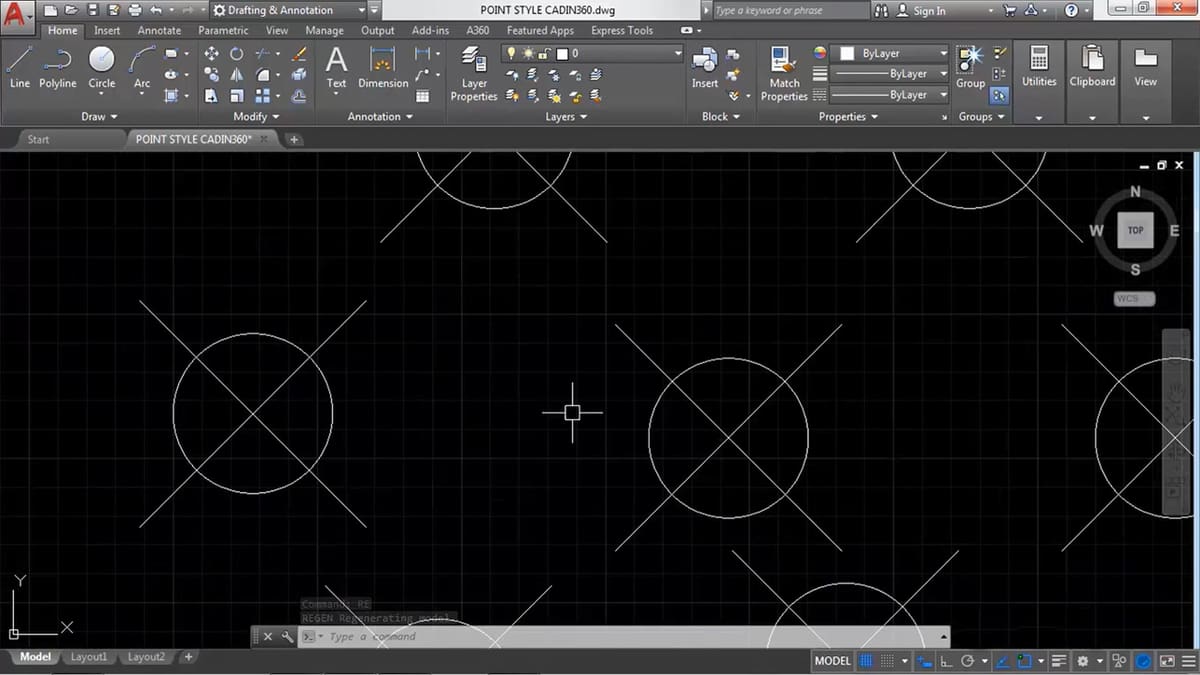
While sketching in AutoCAD, you’ll often find yourself in need of a reference – something to help you precisely place a block, define a shape, or draw a line. This is where points come into play: they create known locations (“nodes”) to which other components can “snap“, allowing you to accurately manipulate and shape your designs. As such, you can expect to find points scattered throughout your AutoCAD workflow.
Here, “point style” refers to the shapes and sizes that your points take. By default, points are square pixels, but that might not be the most useful form for you. With a customized point style, you can make them larger, a different geometry, or disappear completely to suit your needs. It’s much like changing fonts in a word processor – it helps you tailor your designs to emphasize certain features or make the document easier to work with.
In this article, we’ll explore the two methods of changing your point style, as well as the various options you have for each. Along the way, we’ll drop in some helpful tips on how to get the most out of your point style experience.
Let’s get started!

Changing Point Style
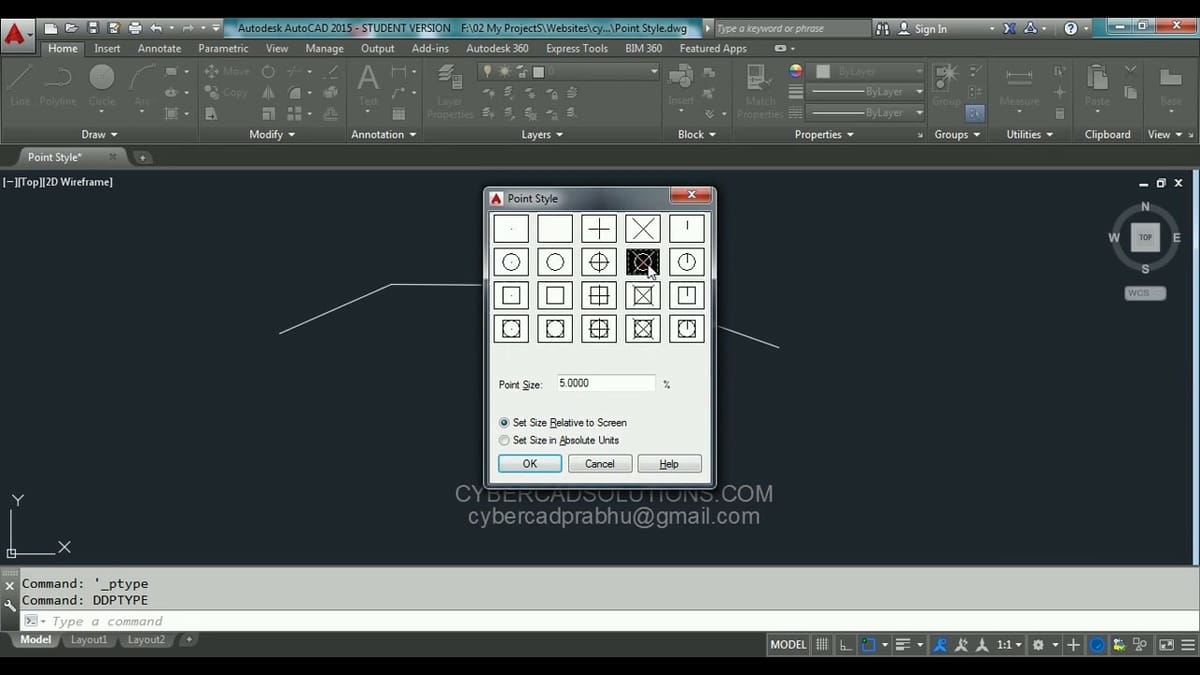
To access your point style settings, navigate to Home > Utilities > Point Style, or use the “PTYPE” command. (Note that the “DDPTYPE” command also works, but it’s now obsolete.)
From there, you should see the following dialog box pop up:
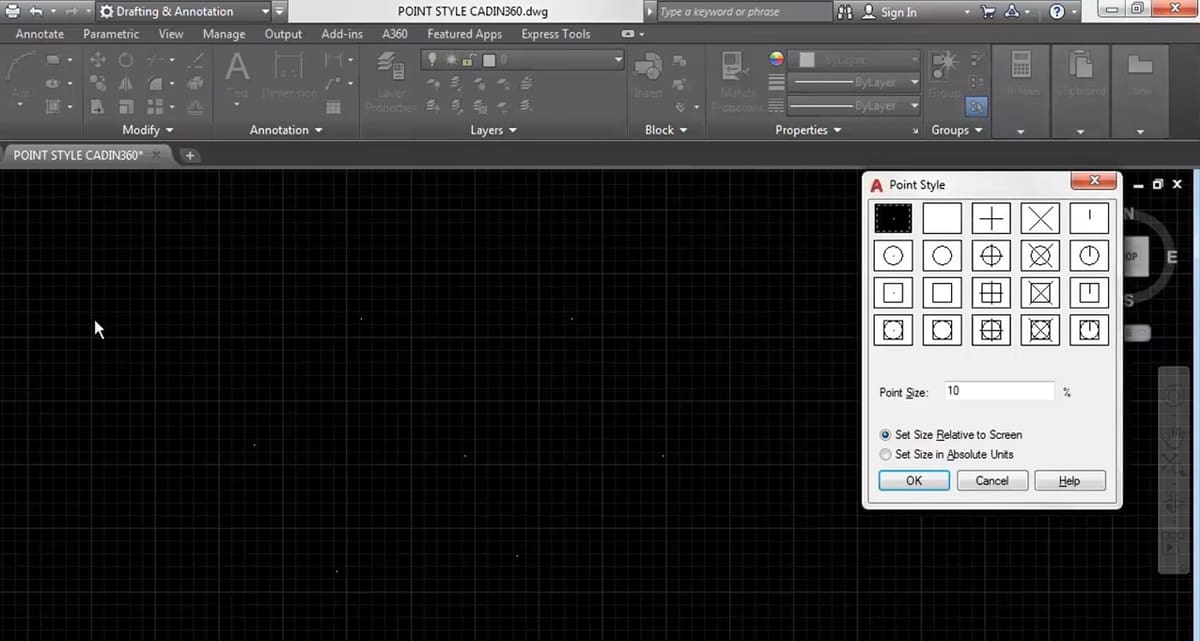
Here, you’ll find options to change the shapes and sizes of your points. Let’s explore these in more detail:
- Point shape: There are 20 options for your point shape. The default is the square pixel in the top-left corner, but you can select any other one you prefer. If you’d rather have invisible points, select the second, blank option.
- Point size: This specifies the size of your points, based on your selection of relative or absolute sizes. If you select “Set Size Relative to Screen”, your points will always appear the same size, regardless of how far zoomed in or out you are. Here, your point size is a percentage of your screen size (refreshed each time the drawing is regenerated). Alternatively, if you pick “Set Size in Absolute Units”, the points will scale with your drawings as you zoom. (Your point size will be specified in your default AutoCAD units.)
Option #1
Adjust the options in the dialog box to your liking, and hit “OK” to make your changes. All of your points will update accordingly, including ones you have already drawn. To undo your changes, simply restore your former point style. As mentioned earlier, relative point sizes will update each time the drawing is regenerated.
Option #2
Instead of using the dialog box, you also have the option of directly modifying the PDMODE and PDSIZE variables that store your point style; each style is tied to a certain numerical value. By changing these values, you can directly alter how your points look, bypassing the user interface. For full details on which styles are tied to which values, refer to Autodesk’s documentation for PDMODE and PDSIZE.
Finally, you’ve likely noticed that changing the point style changes all of the points in your drawing. Unfortunately, point styles are system-wide; you can’t specify two or more at the same time. If you wish to get around this, look into using blocks for your AutoCAD workflow.
Going Further
Congratulations! You’ve successfully modified your point style. With that, you’re ready to go above and beyond to explore the many rich features that AutoCAD offers. To help you out, we’ve put together dedicated guides on AutoCAD’s DWG files, the aforementioned CAD blocks, as well as the full AutoCAD workflow.
We hope these resources are helpful as you continue your journey with this wonderful software. Stay curious and happy CADing!

Lead image source: Autodesk
License: The text of "AutoCAD Point Style: All You Need to Know" by All3DP is licensed under a Creative Commons Attribution 4.0 International License.