
Bambu Studio: Support Settings – Simply Explained

Mystified on how to best support your objects in Bambu Studio? Fear not, all Bambu Studio support settings are here! Read all about them.
Bambu Studio and supports, both (almost) inevitable pieces of the modern 3D printing world.
With the rise of Bambu Lab and their printers over the last few years, and the ever-growing demand to print more and more complex objects, running into these two when using a Bambu Lab printer is all but guaranteed.
Bambu Studio contains a variety of settings and tweaks to get the most out of using supports when printing.
In this article, we’ll give an overview of these settings and how they can be applied to your prints, as well as dive further into how to get the most out of your supports!

Supports: What & Why?
Supports are nothing new in the 3D printing world. They’re a necessary evil because of the way fused deposition modeling (FDM) printers create objects: layer by layer. Due to the geometry of the model being printed, new layers may not be able to build off the structure of previous layers. Since printers can’t print in thin air, caution needs to be taken to ensure a print’s success.
Sometimes, this is possible to do by changing a model’s orientation, and modern 3D printers are capable of tackling decently sized overhangs and bridges. But these methods may not always be enough, and supports offer the solution to allow these extrusions to be held up. These temporary structures make their way up, either from the print bed or from another part of the object, to eventually meet with and support what would otherwise be a floating extrusion.
Supports can then be removed through various means of post-processing after a print has been completed, where they are no longer needed.
Now that we’ve got an understanding of what supports are and why we need them, let’s get into how to best utilize Bambu Studio’s relevant features!
Different Supports & Techniques
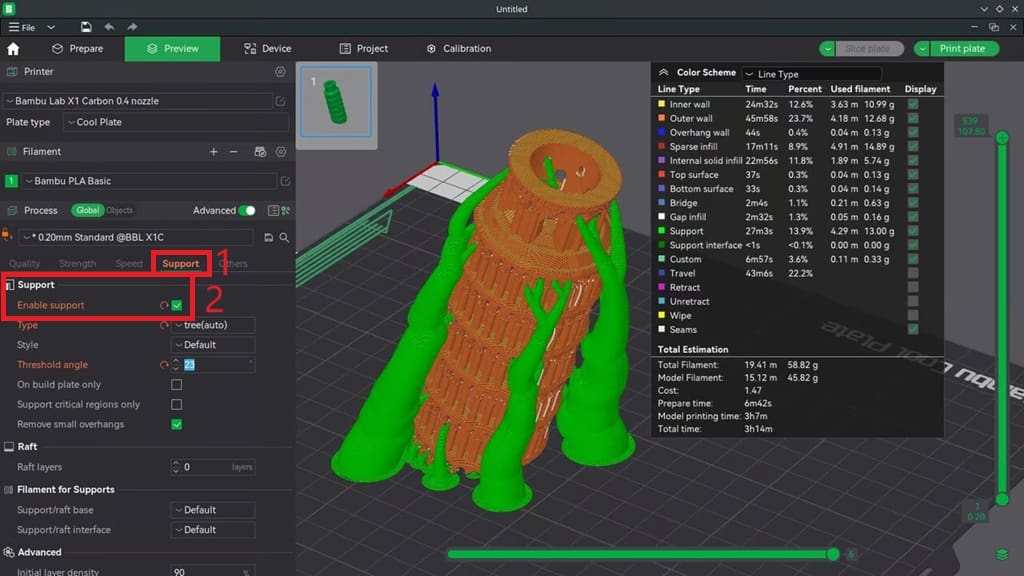
Supports are disabled by default in Bambu Studio. To enable them, head over to the Support tab (1) and check the “Enable support” box (2). This will open up access to all support settings, the first and most important of which being the type of support.
Normal vs. Tree
Supports take two main forms: “normal” and “tree” (also referred to as “organic” in other slicers).
Normal supports look like simple blocks that encompass the area being held up. The inside of the blocks contains a light, infill-like structure that the extruder later bridges over during printing. Tree supports, on the other hand, take the form of organic branch-like shapes that can twist and curve around model geometry to eventually meet the area they must support.
Each support type has its own distinct advantages and disadvantages. For example, tree supports are a good choice for complex models where there isn’t a clear path up from the build plate to support-needing areas, as they can navigate around the model’s geometry. However, normal supports may be a better option for less complex tasks, where they can often save filament and print time and might be more easily removed.
Auto vs. Manual
Besides choosing between Normal and Tree supports, Bambu Studio also lets you choose between Auto and Manual generation modes.
Auto mode, as the name suggests, automatically generates supports where the angle of the print to the horizon is less than the given “Threshold angle” setting, the default of which is 30 degrees. On the other hand, Manual support allows the user to manually paint structures onto the model.
Support Painting

In the Prepare tab (1), after selecting a model, the “Supports Painting” option (2) can be chosen. You can “paint on” areas where supports should be generated with the left mouse button, and the right mouse button can be used to paint areas where supports should not be placed. This painting works regardless of mode (auto or manual).
Available options include changing the pen size and highlighting overhang areas for easier painting, as well as clipping the view of the model to view and paint internal sections (3).
Last but not least, if you’ve painted on supports (or blockers) and you think a do-over is warranted, instead of manually deleting them, you can simply click on “Erase all painting” (4).
Basic Settings
Configuring your settings correctly is an important aspect of using supports, ensuring the reliability of your prints. It’s important to first gain a good understanding of basic settings before later moving on to advanced tweaks.
Style
Different styles can be selected for your supports, depending on whether you’ve opted to use normal or tree.
For normal supports, the Snug option may prove more useful than the default Grid style in tighter areas or for smaller prints where there isn’t much space for support to build off. On the other hand, Grid can help save filament for large blocks of support found in larger prints.
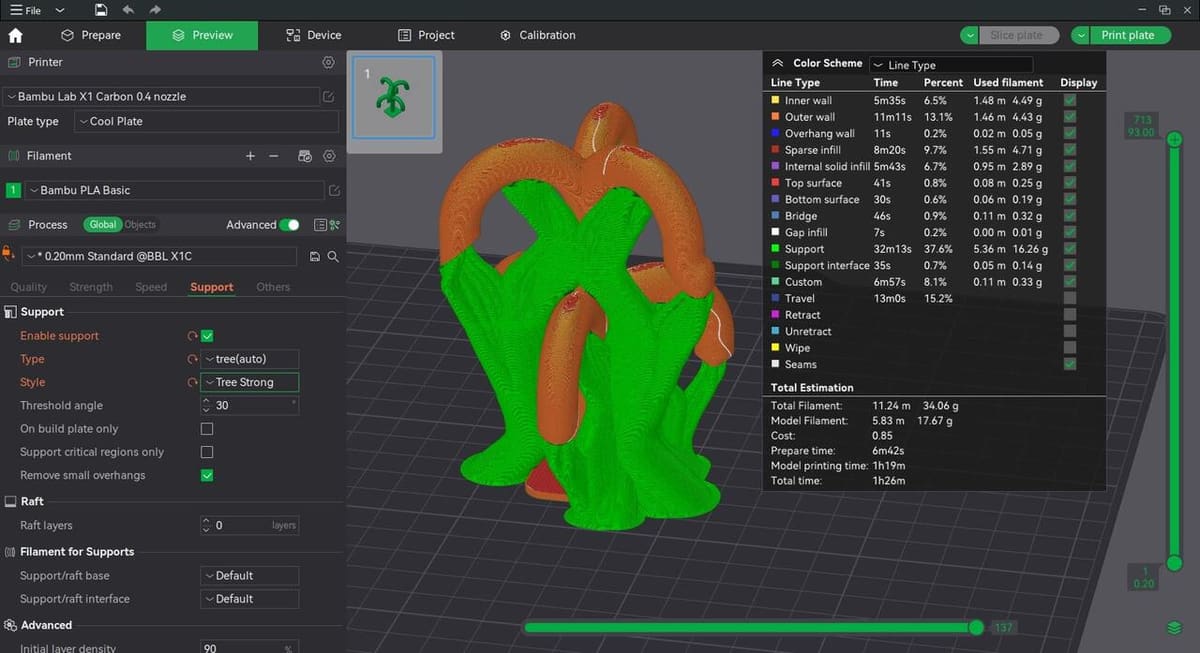
As for tree supports, there are a multitude of options to choose from, including Slim, Strong, Hybrid, and Organic. The default usually suffices, however, Strong may provide more stability when printing, and Organic can be useful for complex objects where the tree structures are required to maneuver around more complex geometries. The Hybrid option combines both normal and tree supports, which can offer the best of both worlds in objects with large amounts of support needed.
On Build Plate Only
This setting limits supports to build only off the print bed – they won’t generate on top of models themselves. Enabling it can make supports easier to extract post-print and reduce scarring on objects when they are pulled away, but keep in mind that it may also prevent supports from reaching all areas of the model.
Remove Small Overhangs / Support Critical Regions Only
These options may reduce the amount of support by only supporting regions deemed “critical” by Bambu Studio and removing small areas that may not actually require support. Enable these if you’re looking to save a little filament and print time, but for many the peace of mind outweighs the slight increase in these metrics.
“Support critical regions only” is restricted to use with tree supports only.
Advanced Settings
Once you’ve got a sturdy grasp of those basic settings, you can try experimenting with some of these advanced ones!
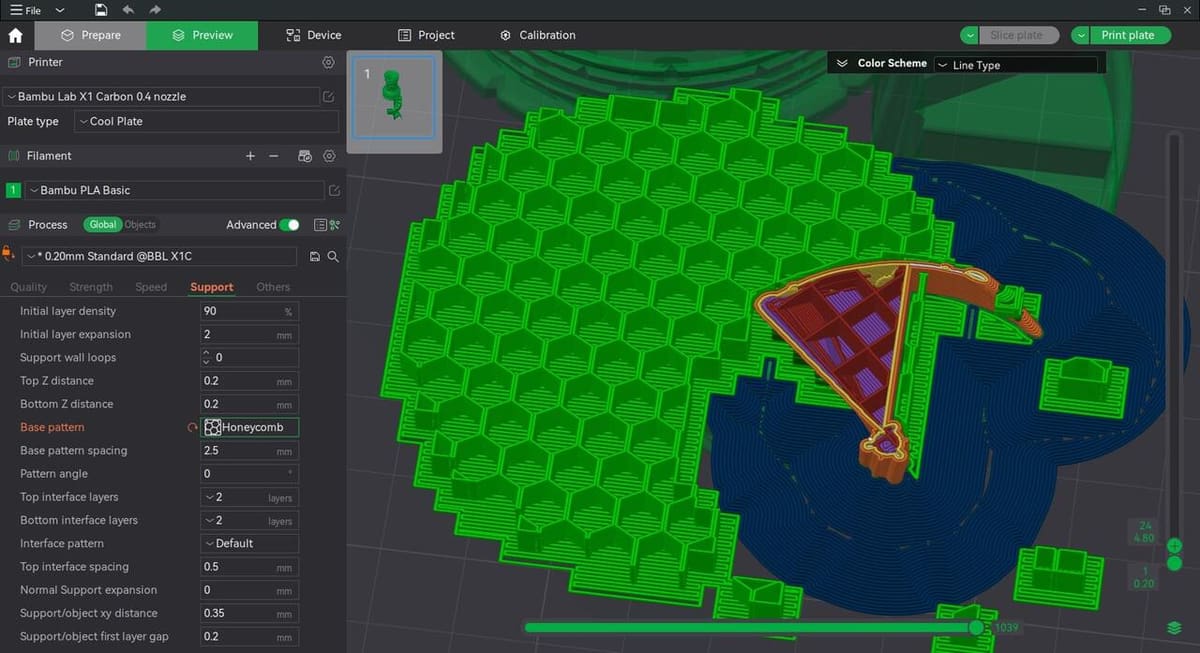
Base Pattern
For normal supports, this setting allows changing the pattern filled inside of them. Different patterns can provide different mixes of support strength versus filament usage and print time. Patterns such as Lightning can provide faster print times at the expense of strength, while others (such as Rectilinear grid) switch the roles and provide better strength but require more time to print.
Top & Bottom Interface Layers
Interface layers are the thicker layers that interface between the bulk of the support material and the object being supported. They increase print time but also provide a substantial increase in the quality of support and their strength. Increasing the number of interface layers will result in higher print times and material usage, but better overall support quality.
Support Blockers/Enforcers
By right-clicking on a model, support blockers and enforcers of a variety of shapes may be added. These operate similarly to the support painting feature discussed earlier, where support enforcers highlight areas where supports should be generated, and support blockers bar supports from being generated in the specified locations.
This tool can be an alternative to support painting to enforce or block large regions of a print.
There are many more settings to play around with. Check out the Bambu Lab Wiki for more information on all settings present in the slicer!
XY/Z Distance
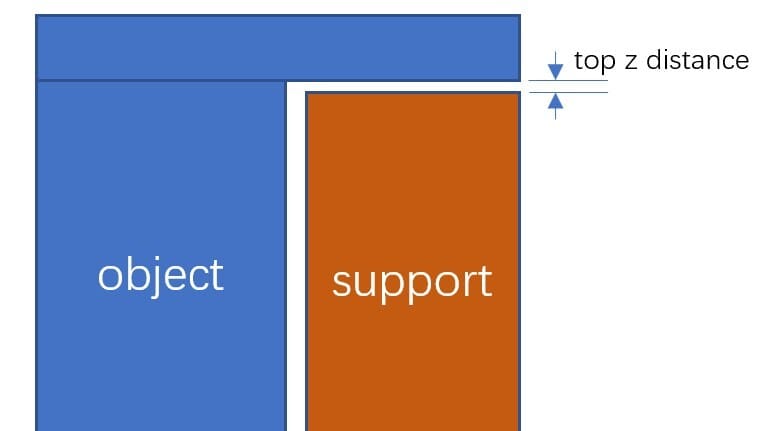
The “Top Z distance” setting alters the distance between the topmost support layer and the object it is supporting. A lower value allows for a better support job but makes it more challenging to break away the helpers after completion.
If you’ve opted for a different material for the support (e.g. the model is printed in PLA and the support in PETG), the “Top Z distance” may be set to zero as adhesion isn’t a factor.
Similarly, the “Support/object xy distance” specifies the separation between an object and its support in the XY plane.
Support Wall Loops
This setting bears many similarities to the “Wall loops” or perimeter setting we all know and love. It specifies the number of outer walls for supports, ranging from 0-2 (with 0 being auto).
As typical with wall loops, more walls equal more strength – but increased print time. The default value of zero (or auto) is typically sufficient.
Tree Branch Settings
If tree supports have been selected, many aspects of their branch generation can be customized.
This includes branch distance (distance between different neighboring branches of a support node), branch diameter (the initial diameter of these support nodes), branch angle (the maximum angle branches are allowed to print at), and branch diameter angle (the angle at which branches widen towards their base).
Lower branch distance and higher branch diameter values may result in stronger and higher quality support structures, at the cost of removal difficulty. Higher branch angles and lower diameter angles will allow branches to maneuver more flexibly, but keep in mind that this also increases the chances of failure.
Filament for Supports
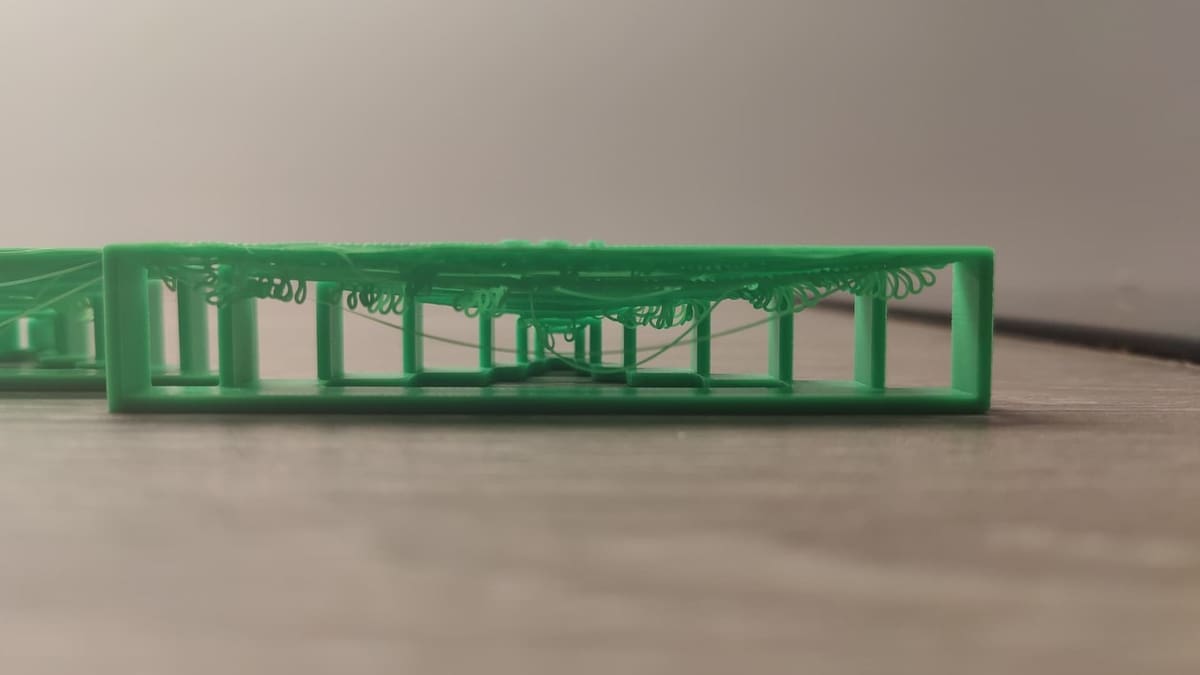
While many supports print in such a way that they can be easily broken away from a model with little to no residue, this isn’t always the case.
When support material is difficult to detach, special filaments come into play. These have properties that allow them to be easily broken away from prints, and some are even soluble in water, so as to require little to no manual removal!
If you have a multicolor or multi-material setup, such as Bambu Lab’s AMS or AMS Lite can aid in using these special filaments by automatically switching to them when supports are being printed.
In the Support tab and under “Filament for Supports”, other filaments can be selected for printing the supports’ base and interface layers. Change the interface layers to use your special filament, and optionally the base material to better adhere to the build surface, and you’re all good for hassle-free support removal!

License: The text of "Bambu Studio: Support Settings – Simply Explained" by All3DP is licensed under a Creative Commons Attribution 4.0 International License.