Bambu Studio Tutorial: Hands-On Tutorial to Get Started

From model to masterpiece – read all about how to slice, preview, and 3D print like a pro with our Bambu Studio tutorial!
Bambu Studio is powerful slicer software developed by Bambu Lab, designed to streamline the 3D printing process. Built on the foundation of PrusaSlicer with influences from UltiMaker Cura, it offers a unique blend of features tailored primarily for Bambu Lab printers.
Following a recent security firmware update, Bambu Studio is aiming to be the only software that can remotely control Bambu Lab printers, though it also includes presets for other brands like Anycubic, Creality, and Elegoo, plus it has the option to create custom printer profiles. Its project-based workflow, which we explored in our introductory article, makes it approachable yet versatile.
In this tutorial, we’ll guide you through slicing your first model in Bambu Studio, step by step. Whether you’re printing with a single filament or leveraging the Bambu Lab Automatic Material System (AMS) for multicolor prints, we’ve got you covered with two distinct categories.
To follow along, you’ll need the latest version of Bambu Studio installed. Grab it from the official Bambu Lab website if you haven’t already and let’s dive in!
Preparing Your Model for Slicing

Before you can slice a model, you need to set up Bambu Studio and get your 3D file ready. This section covers the essentials to ensure your model is properly imported and positioned.
Initial Setup
- Start by launching Bambu Studio.
- The Setup Wizard (1) will guide you through the printer and filament selection. For this tutorial, we’ll use a Bambu Lab X1 Carbon, but you can choose any compatible printer.
- After the Setup Wizard is done, click on “Create new project” (2) or just move to the “Prepare” tab (3).
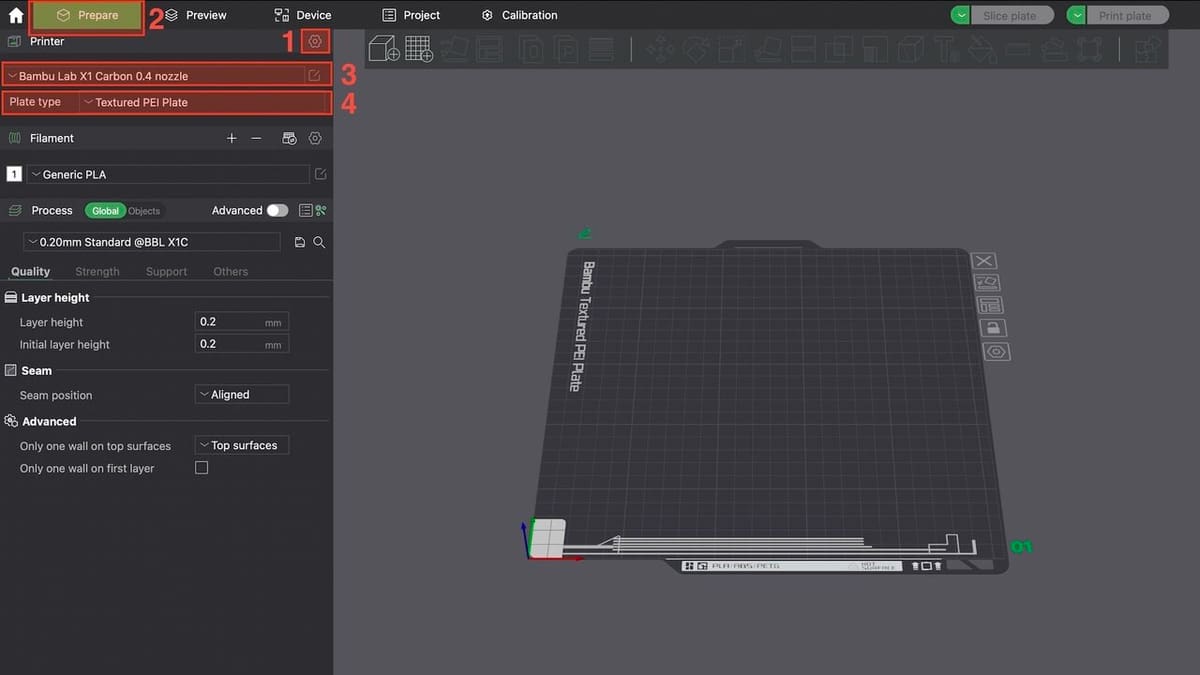
- Note that by the gear icon (1), under the “Prepare” tab (2), you can modify the printer selection available. Then select the desired printer from the options available (3). Here, we’re using the Bambu Lab X1 Carbon with a 0.4 mm nozzle.
- Then, pick your build plate type (4) based on the build plate you have and the filament you’ll be using; in our case, the PEI Textured Plate. Check your printer’s manual if unsure.
Importing a Model
We selected xijun’s Sitting Cat model for the tutorial.
Bambu Studio offers several ways of importing files to be prepared for 3D printing. From MakerWorld, there’s the option “Open in Bambu Studio”, which will import the 3MF file straight to the slicer, but you need to be logged in to the platform. Otherwise, you can download the 3MF, STL, or CAD file and open it manually on Bambu Studio. The arguable advantage of the 3MF file is that it often includes preconfigured settings.
For our tutorial, we’ll create a new project and import a CAD file directly from the slicer, in the traditional way. This way, we’ll do the slicing configuration from scratch. Bambu Studio supports various file types, such as OBJ (great for color data), STEP, and even SVG for 2D graphics, with STL being the most common.
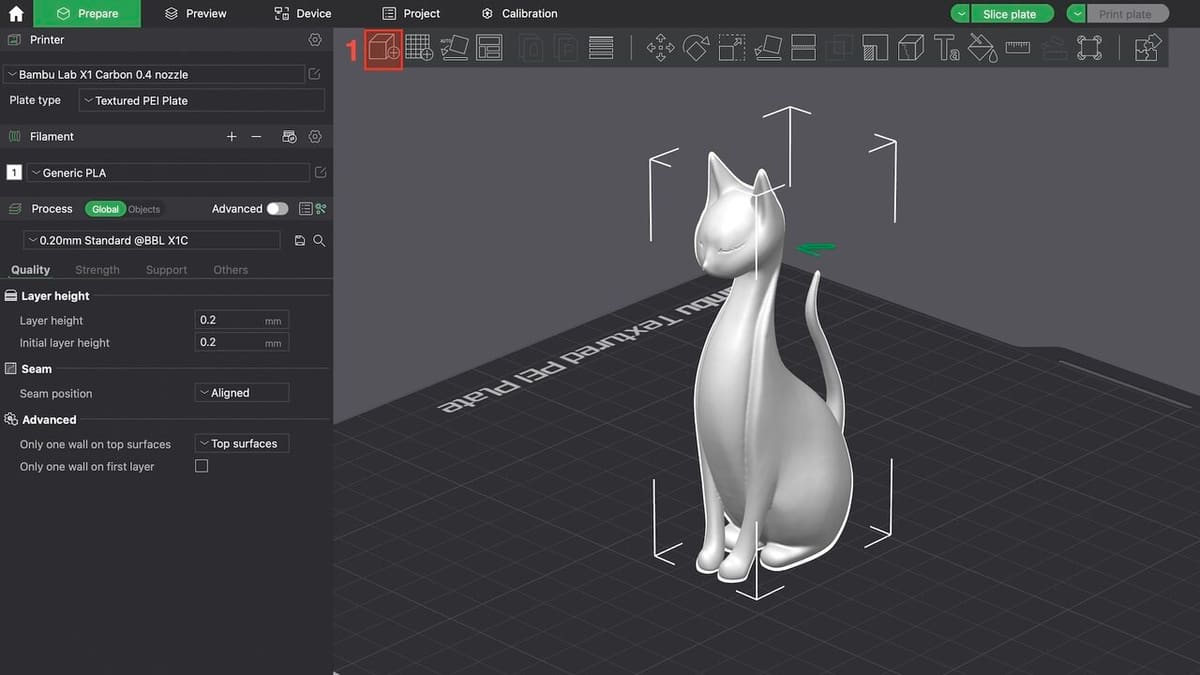
- Click “File > Import > Import 3MF/STL/STEP/SVG/OBJ/AMF…” or drag the file into the workspace. You can also use the cube icon (1).
- Select the downloaded STL file and click “Open”; the model will appear on the build plate.
- To navigate in the workspace, you can orbit, pan, or zoom in and out. To orbit – rotate the build plate – click and drag with the left mouse button. The same operation with the right mouse button will pan the view – move the build plate while keeping it in its set angle. Use the mouse scroll to zoom in and out.
Model Orientation & Placement
How your model sits on the build plate affects print quality and support use. Our example sculpture has a flat base and comes already in the aimed-for position. But let’s check out different ways of orienting our model, to see how it is done:
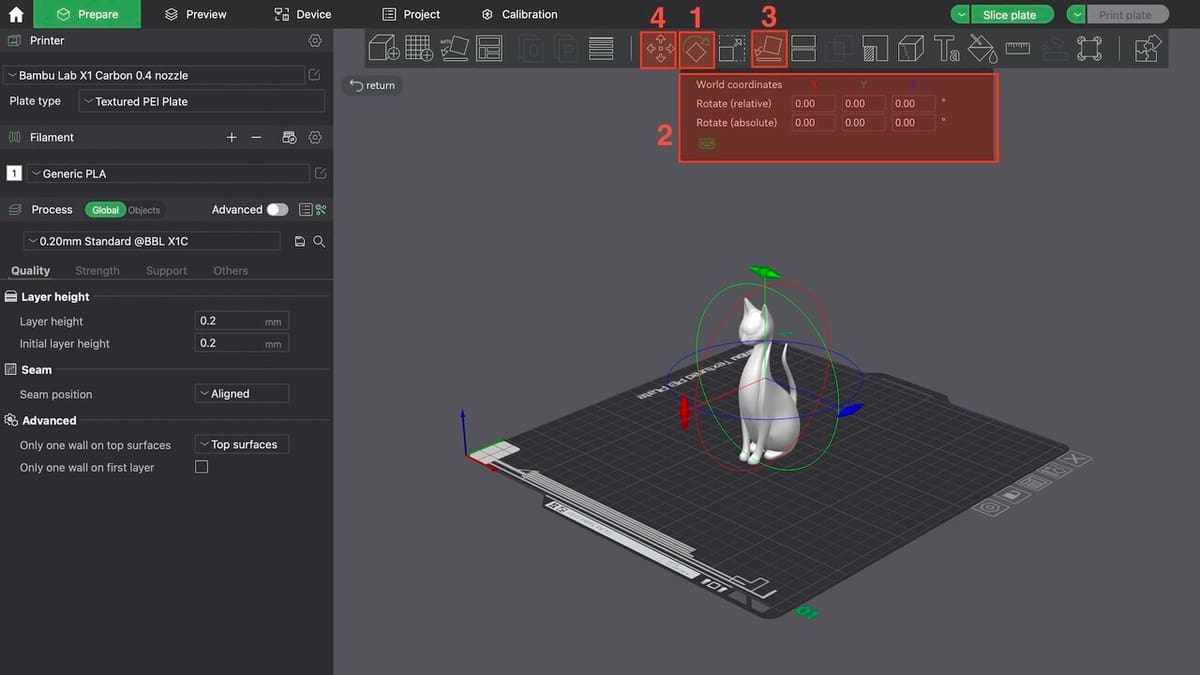
- Select the model, then click the Rotate tool (1) (shortcut ‘R’). Use the on-screen handles, colored in red (X-axis), green (Y-axis), and blue (Z-axis), to rotate it, so that the flattest side rests on the plate. You can also rotate it by typing the desired rotation angle in the pop-up window (2).
- A handy tool for aligning flat faces to the build plate is the “Lay on Face” tool (3) (shortcut ‘F’). With this tool, simply select a face and the software will align it, touching the build plate.
- You can click and drag the model to move it around the printing area, but the Move tool (4) (shortcut ‘M’) is also a resource. There’s also the option of right-clicking the model and choosing “Center” in the drop-down menu, to position the model exactly at the center of the printing area.
Proper orientation reduces print time and material waste, so take a moment to experiment with angles. Should the model be placed outside of the build plate’s boundaries, an “Error” message will appear in red that you won’t be able to miss. It’ll let you know that the design needs to be moved to print within the printer’s scope.
Scaling & Resizing
If your model is too large for your printer’s build volume (e.g. 256 x 256 x 256 mm for the X1 Carbon), you’ll need to resize it.
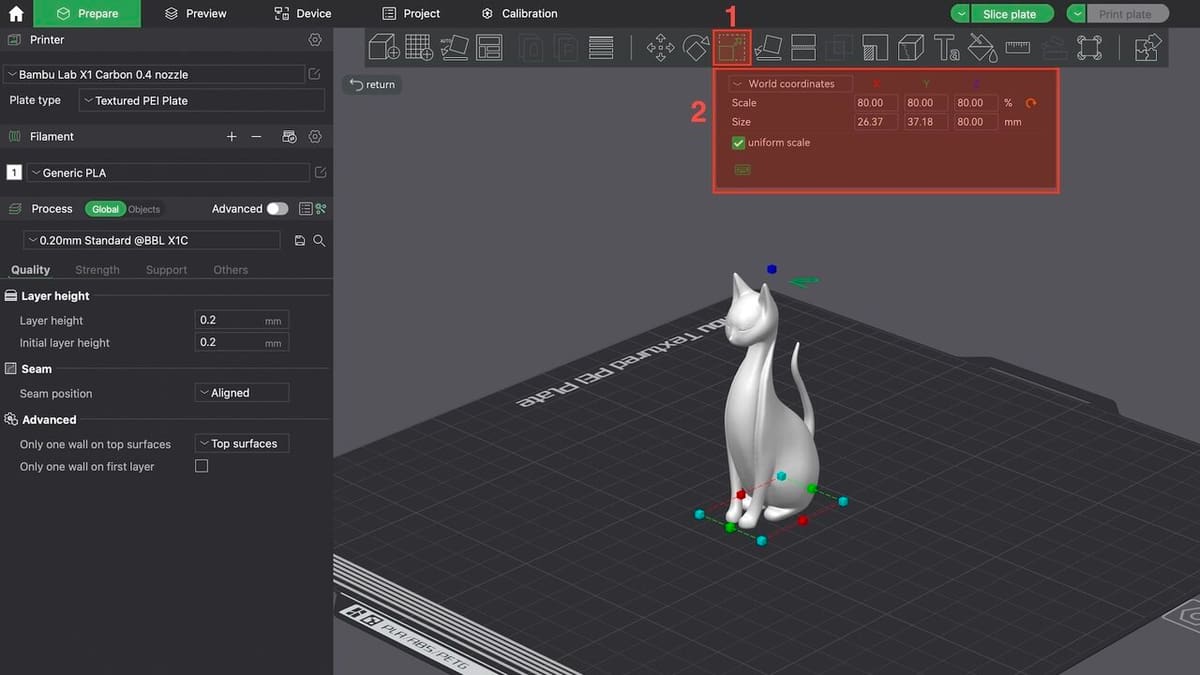
- Select the model and click the Scale tool (1) (or press ‘S’).
- Adjust the size by percentage or enter the exact dimensions in the pop-up window (2). For this sculpture, 80% keeps it detailed yet printable.
- Check the “Uniform Scaling” box to maintain proportions. Unchecking it risks distorting the design.
- There’s also the option of using the colored handles to scale the object in a more visual or comparative way.
Ensure that the resized model fits within your printer’s limits while preserving its intended look and strength. As with the model’s placement, if you’ve scaled the design up too much – or if the imported model’s simply larger than your print area – an “Error” message will appear.
Basic Slicing Settings
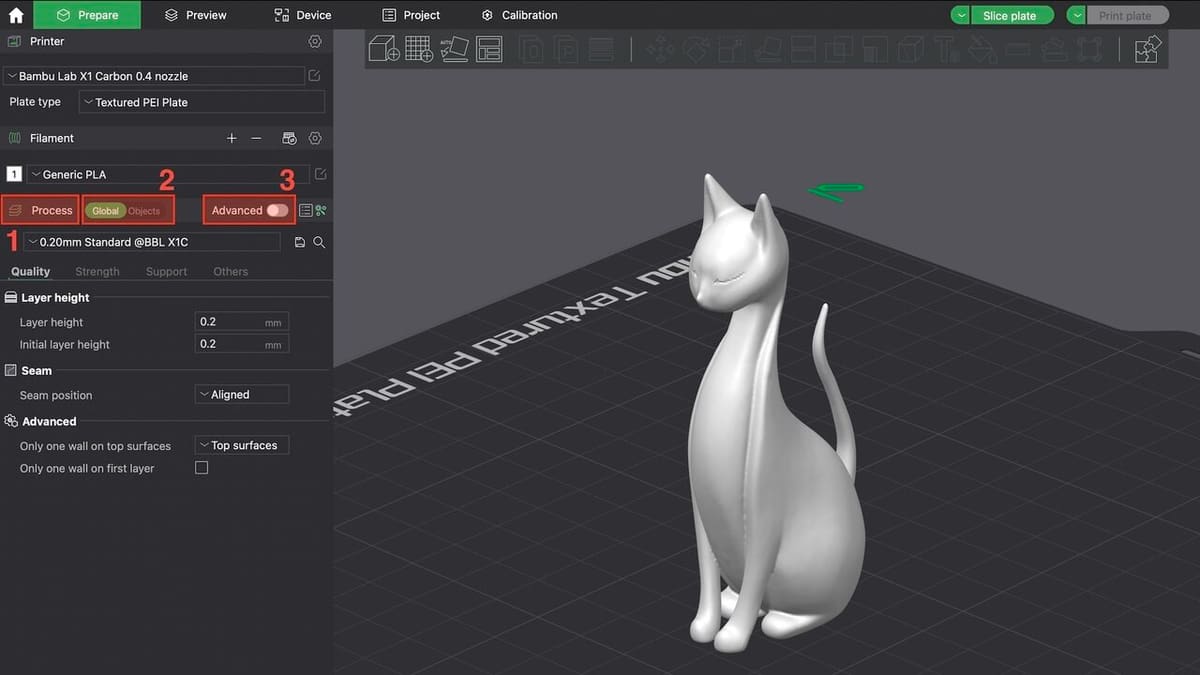
With your model ready, it’s time to configure the slicing settings. These determine how your printer translates the 3D file into physical layers. For this, we will work within the Process group (1). In this group, you can switch the toggle Global/Objects (2) to change the view from the printing parameter to the list of objects in the project.
In the following sections, we will only use the Global option, with the Advanced toggle (3) switched off.
Preset Profile vs. Custom Settings
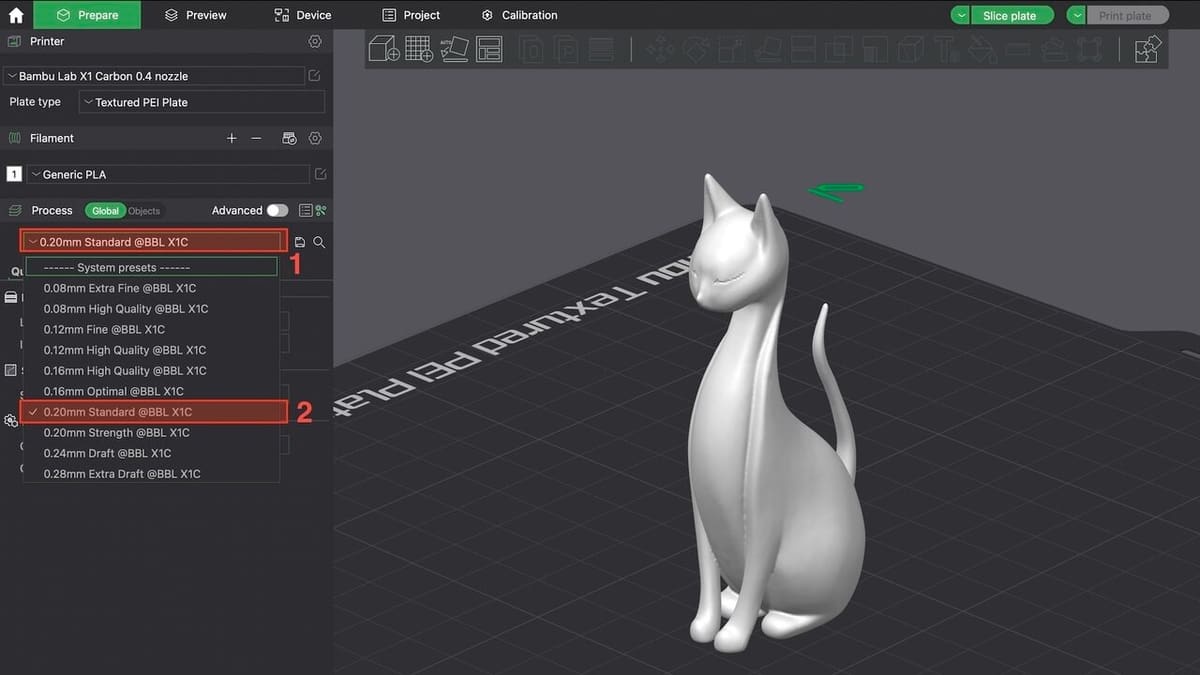
Right below the main options, Bambu Studio offers preset profiles that balance speed and detail, presented as a drop-down list (1). For beginners, starting with a preset is easier, but understanding parameters like layer height and infill lets you customize prints to your needs.
For example, we have the profiles “0.20mm Standard” and “0.2mm Strength”. They both will work in the sense that you’ll have a printable file in the end, but the latter is configured toward a more robust printing configuration for parts that need to handle more stress or strain.
On the other hand, for a decorative part, one might lean toward the Standard profile. If the model, while decorative, will be handled frequently, it might need a modified Standard profile to achieve the desired result. This is because the base configuration might yield a more fragile part.
For the tutorial, we’ll choose the 0.2mm Standard profile (2), which we will adjust for our needs. To keep the tutorial lean, not all parameters from the preset will be covered, as we’ll focus on the ones relevant to our model.
Quality Tab
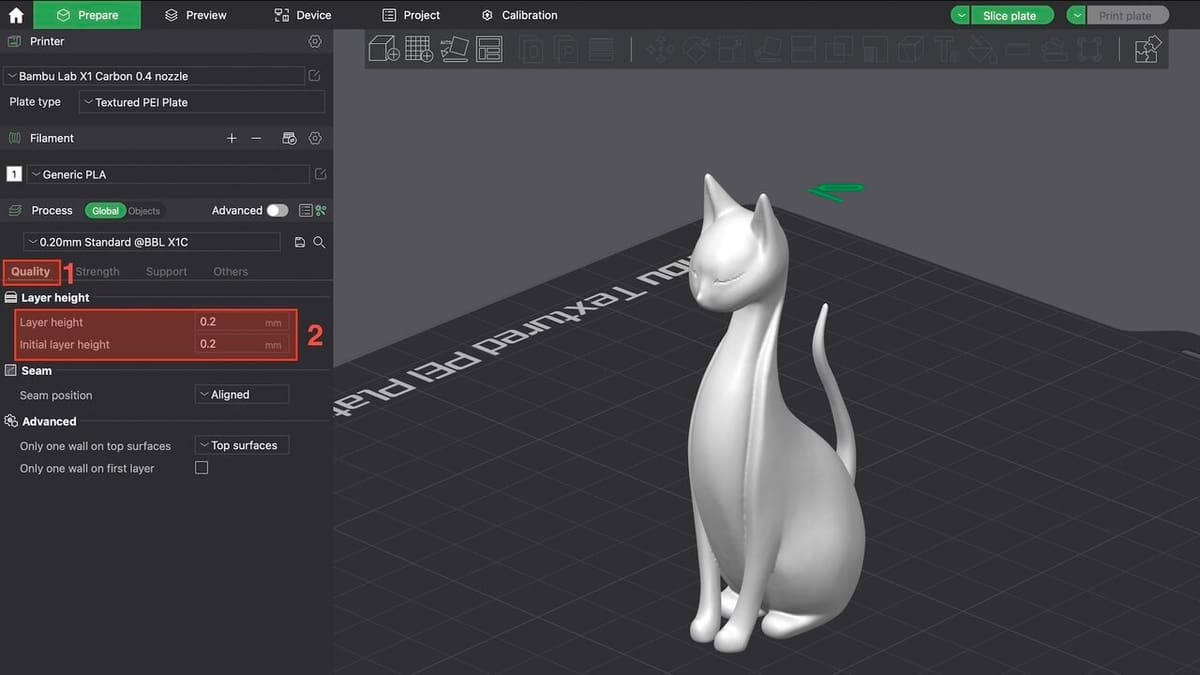
The Quality tab (1) groups the parameters related to the configuration of how the layers are formed, including the thickness and seam.
Layer Height
Layer height controls the thickness of each layer, balancing quality and speed. Thinner layers, such as 0.1 mm or 0.12 mm, are ideal for intricate models, as they enhance the details – at a cost of increased print time. Thicker layers, such as 0.24 or 0.28 mm, will provide more robust parts with faster prints. A 0.2-mm layer height is a beginner-friendly default that will work fine in most cases.
For our project, because the “0.2mm Standard” preset has both “Layer height” and “Initial layer height” set to 0.2 mm (2), we don’t need to make any changes.
Seam Adjustment
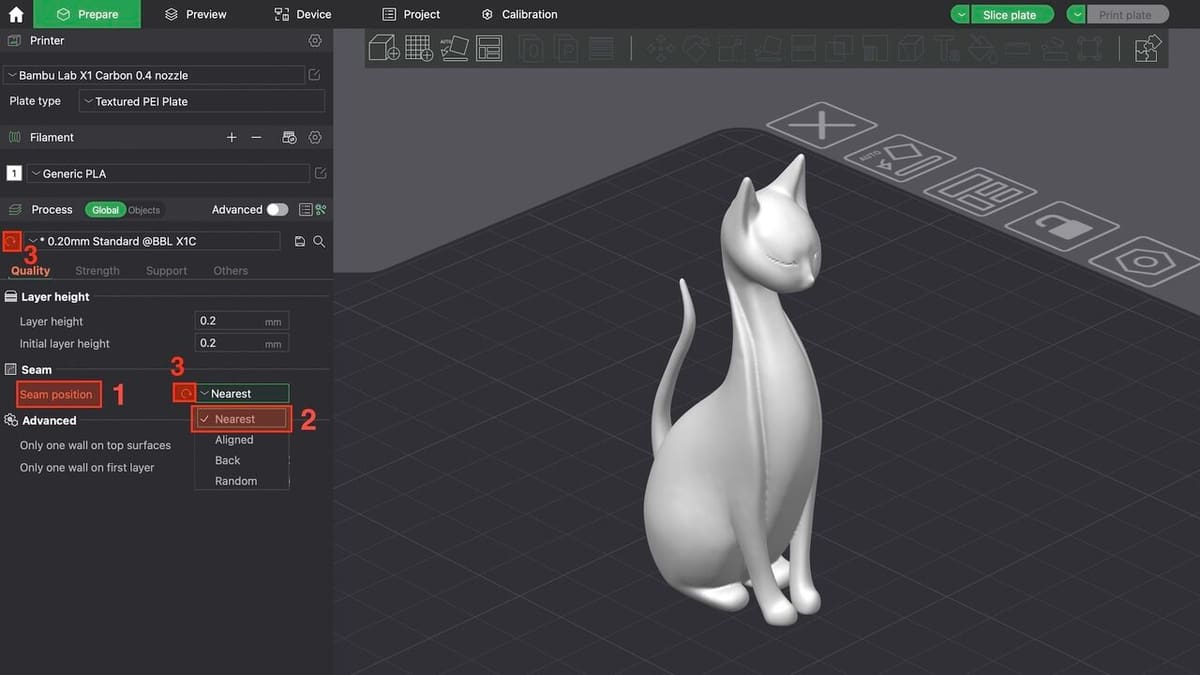
The seam is the mark created by the initial and the final points of a layer. This vertical line that shows on fused deposition modeling (FDM) creations are part of the manufacturing process but, as it usually pollutes the surface of the model, we try to hide it.
- Under Seam, click the “Seam position” setting (1), which is the default for this preset.
- A drop down-list shows Nearest, Aligned, Back, and Random options. Back will position all the seam points vertically aligned at the back side of the build plate. Random will randomize the position, which is interesting but can leave a flat surface filled with irregular spots.
- We selected Nearest (2) this time, as it looks less visible in this model.
- Note that the modified values are marked in orange, with a loop arrow (3) on them. By clicking the loop arrow, the modified values will return to the original preset. This is a Bambu Studio standard that follows across all the software’s parameters.
The seam is shown as a white spot in the preview after we slice the model. We will leave the Advanced group for another tutorial and move to the Strength tab.
Strength Tab
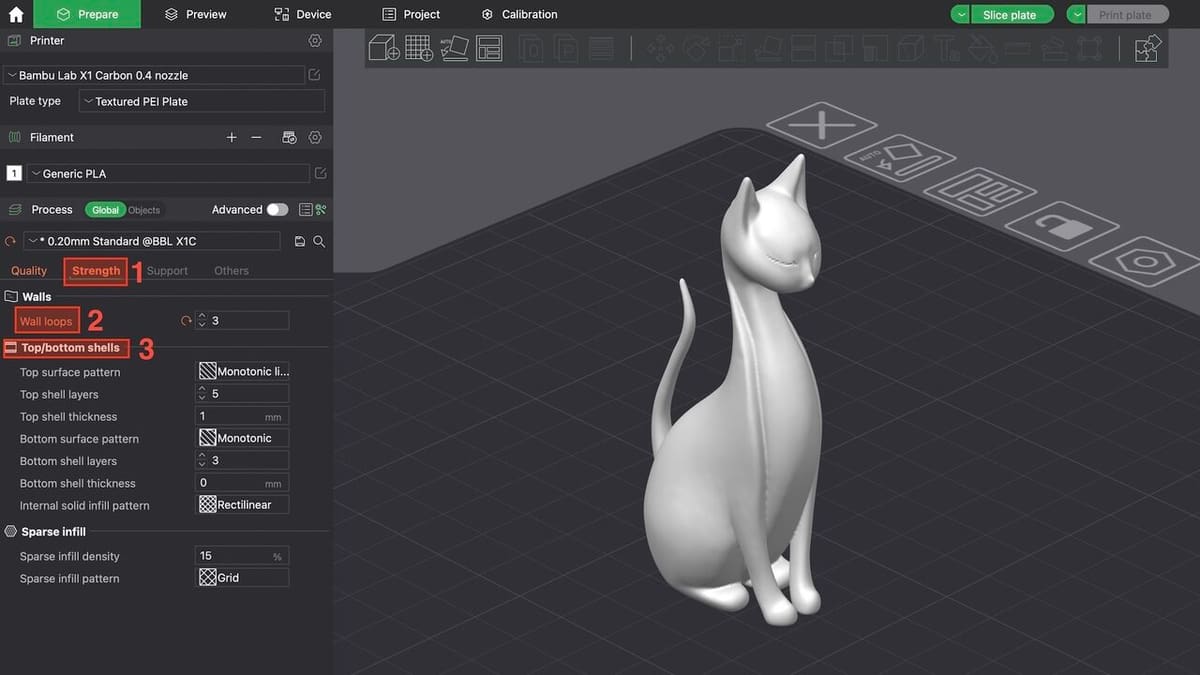
The Strength tab (1) groups parameters related to how the model will be printed regarding the external wall and the infill. Learn more in our dedicated article on wall thickness.
Walls
Walls are the vertically stacked lines that will create the external surface of the model.
- In Wall loops (2), the standard for our preset is set to two walls.
- Click on the up and down arrows or simply type a number to modify it. Let’s adjust it to three, to print a more resistant wall.
Top/Bottom Shells
The Top/bottom shells (3) are similar to the walls, as they form the exterior part of the printed model, with the difference that the are formed horizontally, covering the infill. Models with steep slopes might need more top and bottom shells to ensure the infill will be properly covered.
There are several surface patterns to be explored but, for this tutorial, we will leave this setting as default.
Sparse Infill
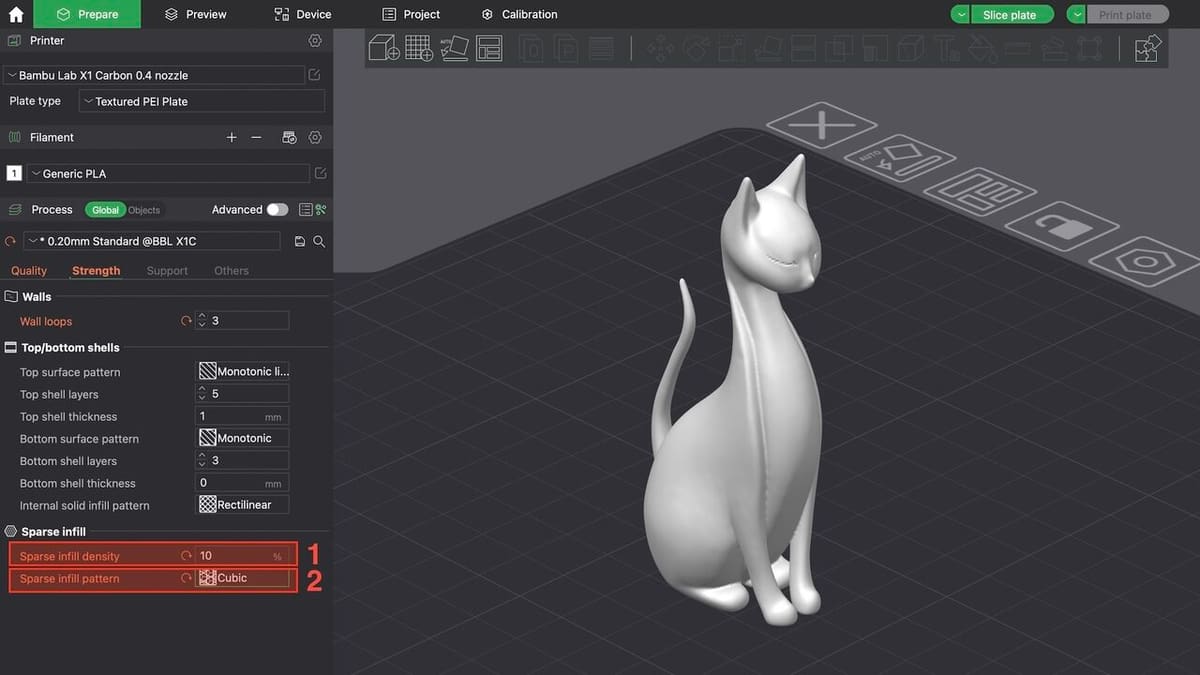
Sparse infill is the honeycomb-style structure that forms the interior of the 3D printed model, commonly know as just infill.
- On Sparse infill density (1), we can set the percentage of infill our model will have. The standard for the preset in 15%, but we’ll change it to 10% for a lighter model.
- Under Sparse infill pattern, we can choose from many options for the pattern the infill will have. We’ll opt for Cubic (2).
As we might intuitively imagine, the higher the infill percentage, the stronger the part gets. Even so, we hardly use more than 40% infill even for functional parts, and some models can even be printed with a 0% infill!
There are many pattern options available in Bambu Studio, many of which are covered in this article. Experimenting with patterns can optimize your print’s purpose.
Support
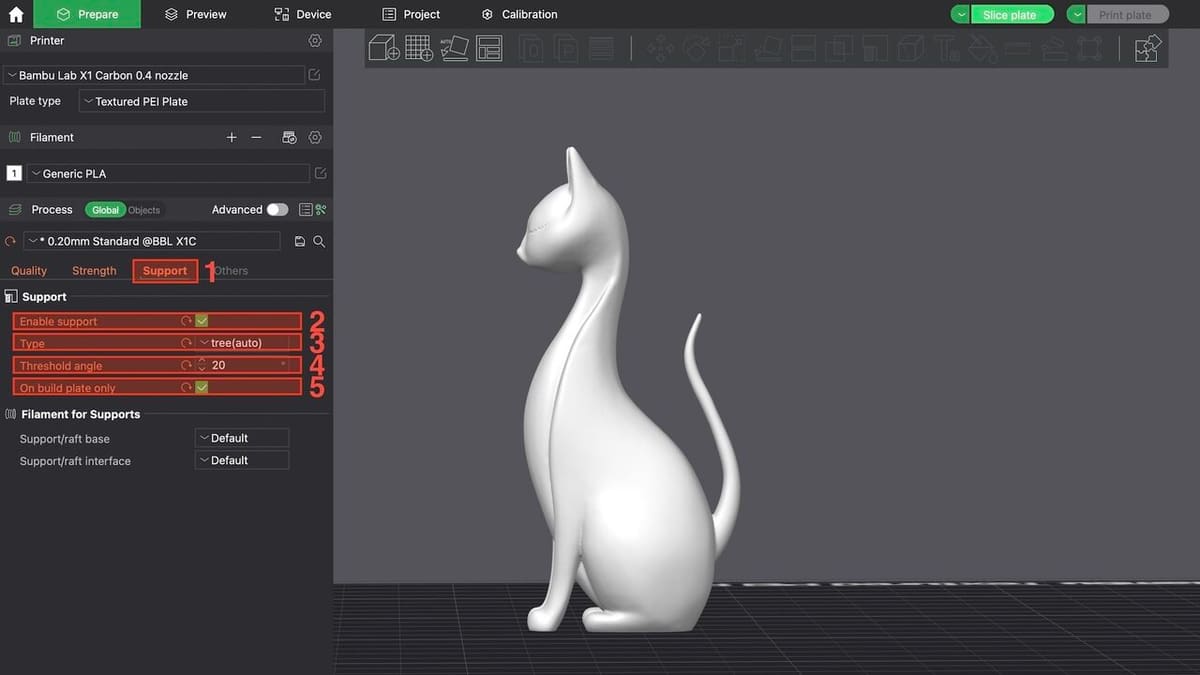
This sculpture has some overhangs, especially the cat’s chin, so we’ll enable them.
- Check the Enable support (2) box.
- Under Type (3), change to “Tree (auto)” for organic supports. While Normal supports grow only vertically, Tree supports can grow organically, following the model’s shape.
- Let’s set the Threshold angle (4) for 20°. Note the the lower the angle, fewer supports are created, reducing unnecessary supports. For example, try to set the angle to 45°, and you will see some supports forming on the cat’s belly.
- Check “On build plate only” (5), so we won’t have supports growing from the model itself.
Others Tab
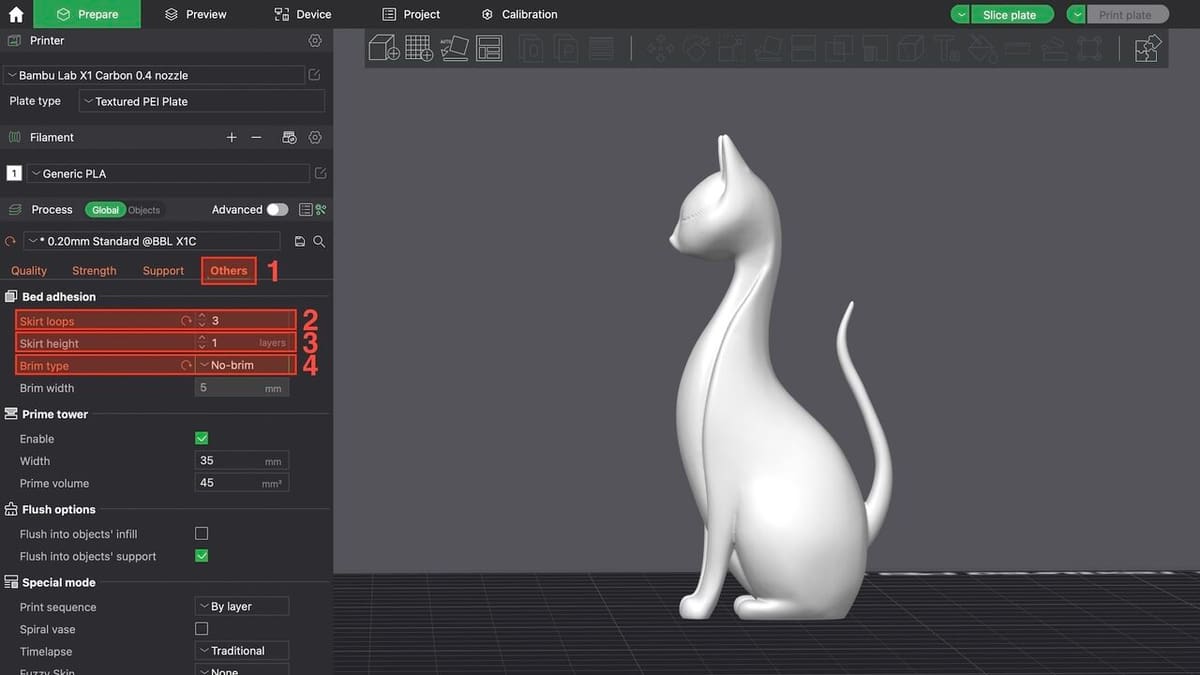
The “Others” tab (1) contains auxiliary parameters for the 3D printing process. In this instance, we’ll focus on bed adhesion only.
Bed Adhesion
Bed adhesion refers to skirts and brims that ensure your model sticks to the bed, especially for those with smaller footprints.
- We’ll tweak our settings for three Skirt loops (2), which are the number of spirals printed, leaving the default single Skirt height (3), which is the number of layers the skirt will print in.
- For this model, we’ll ignore the brim. Because it’s a decorative print, the brim could leave lines during removal, which we want to avoid. For this, on Brim type set to No-brim (4).
Brims widen the surface area of the base of the print to promote adhesion, while skirts are simply loops of filament unconnected to the model itself. That said, they ensure a proper flow of filament as the extrusion for the model starts.
Slicing without Bambu Lab AMS
For printers without the AMS (or a multicolor or multi-material setup), you’re working with one filament. Here’s how to slice our sculpture.
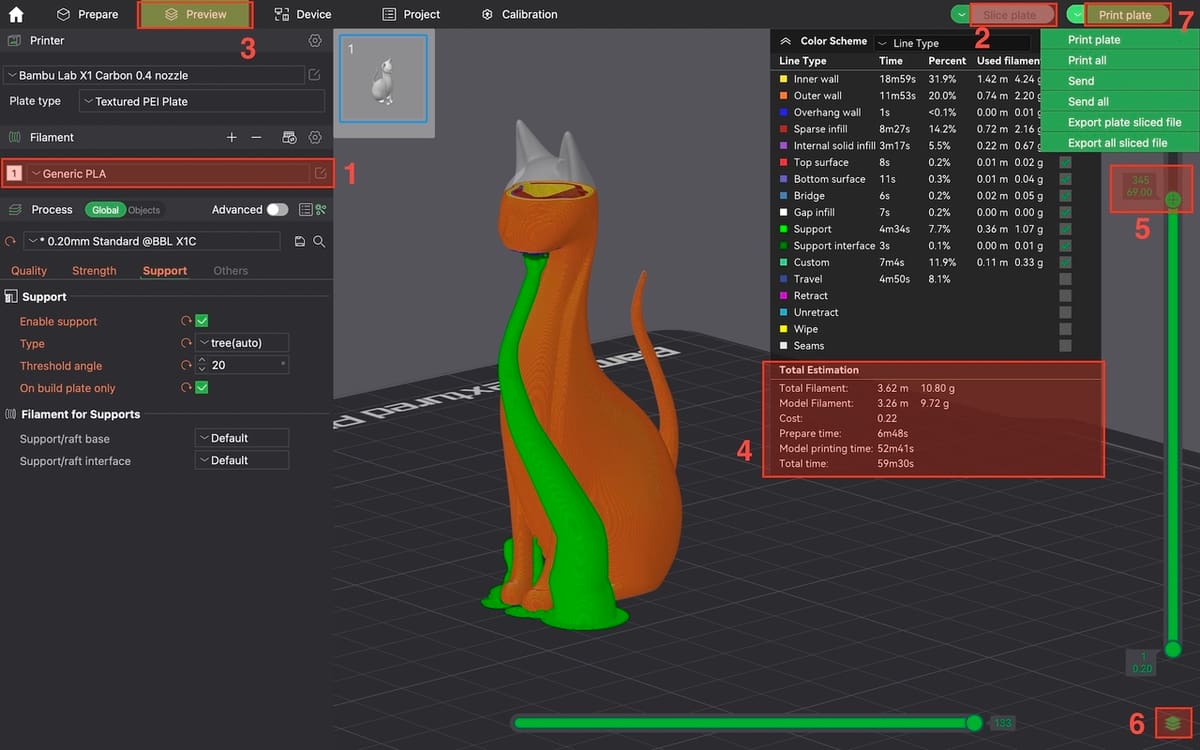
- Under Filament, ensure that the filament loaded in your 3D printed matches the specified one in the slicer. Here, we’re using Generic PLA (1).
- Click on Slice plate (2). It will perform the slicing and automatically change to the Preview tab (3), where you can visualize layers. A pop-up window will appear, showing the total filament usage and estimated printing time (4).
- Scroll down the vertical scroll bar (5) to visualize all the layers from the bottom up. This makes it easier to foresee any troubles the print might have. You can click the layers icon (6) to see only one layer at a time. Note that if you change one of the parameters, the preview disappears. That happens because, as you change one parameter, all the slicing has to be recalculated.
- From here, click on Print plate (7) if you have a synchronized printer. If you don’t, click the arrow in the left of the toggle and choose “Export plate sliced file”. This way, you can load the file on the printer’s SD card for offline printing.
Single-material printing is straightforward and perfect for mastering the basics.
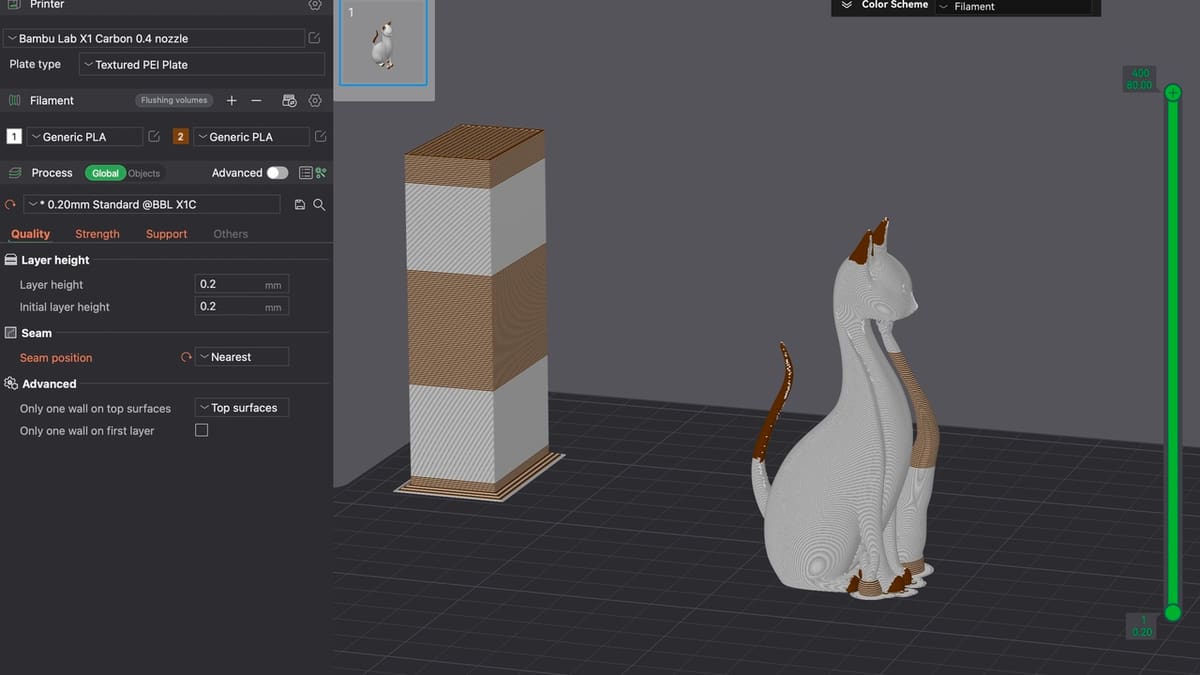
Slicing with Bambu Lab AMS

The AMS feeds up to four filaments into your printer, enabling seamless color swaps and letting you print with multiple colors or materials. It’s ideal for vibrant designs or functional multi-material prints. Let’s make this sculpture multicolor.
Setting Up AMS
If you already have a printer synchronized with Bambu Studio, just connect your AMS to the printer and load the filaments (e.g. white PLA in Slot 1, brown PLA in Slot 2), and click on Synchronize (1). Note that if the spools don’t have the RFID chip, the printer will ask you to manually indicate the kind of filament and its color.
If you’re creating a 3MF file to load to the printer through an SD card, you can add the filament information manually in the plus sign (2) and, at the time of printing, you can remap the filaments created to what is actually loaded to the printer. For now, let’s add just one more filament color to try painting the model.
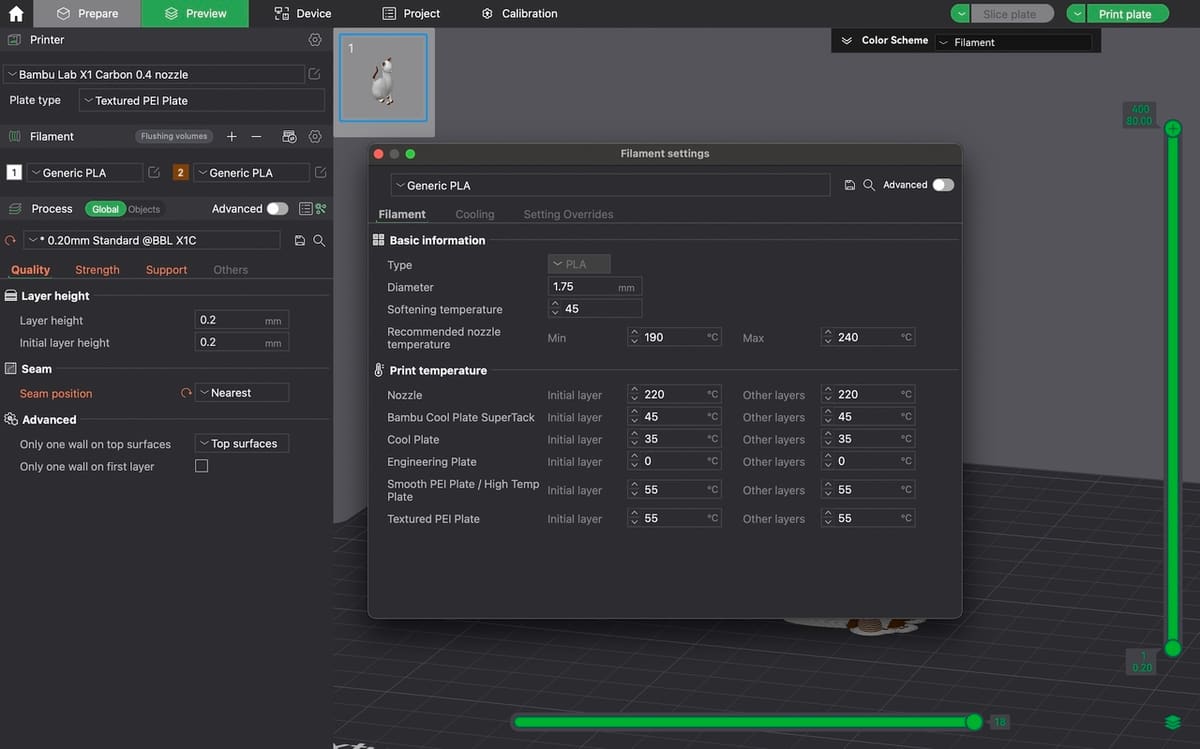
- Click on the filament type (3) to change the filament according to the presets available.
- Click the numbered rectangle on the left (4) to change the color of the filament.
- Use the editing icon (5) to adjust the filament settings, such as printing temperature and cooling.
Adding Color
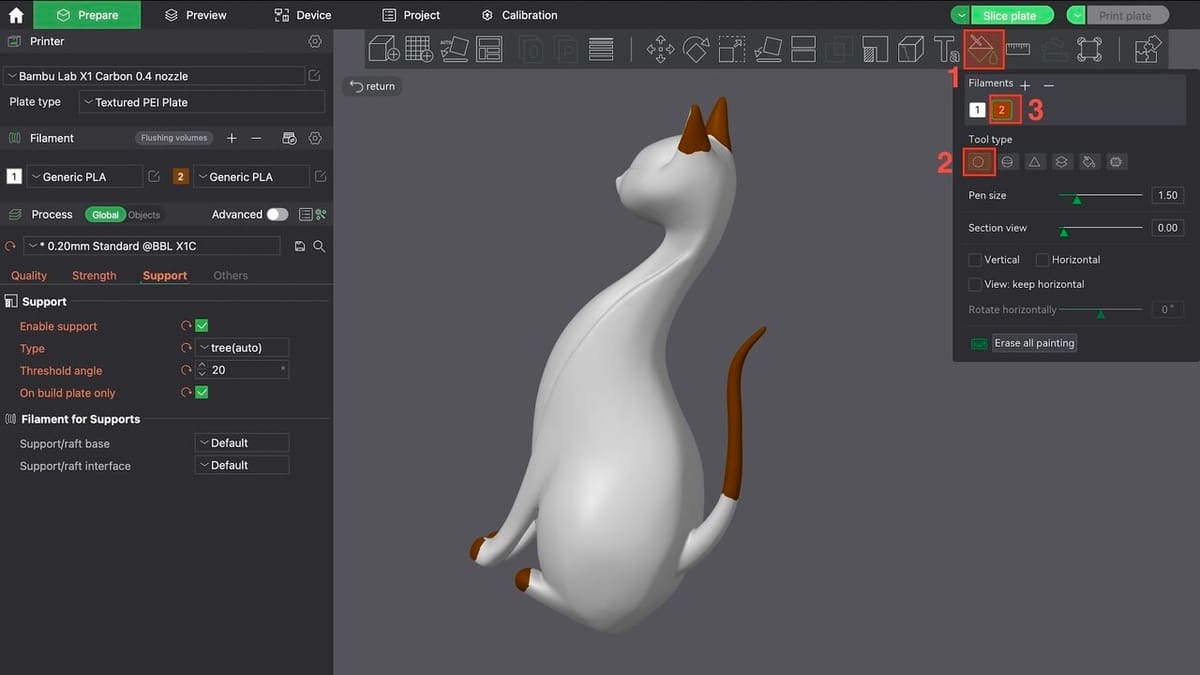
Since our model isn’t multicolor, we’ll paint it manually.
- Select the model by clicking over it, and click the Color Painting tool (1) (or press ‘N’).
- Use the Circle tool (2) to color the ears, tails, and tip of paws in brown (3). Check out this tutorial for plenty more multicolor tips.
- After adding color, just slice the model to check the result.
Tips & Tricks
If you know your way around other slicers, Bambu Studio is a fairly intuitive program. Even if you’re completely new to 3D printing, the uncluttered UI and useful pop-up messages make things easy. Plus, there’s plenty to learn as you go, and given all its features, tools, and customizable options, it’s worth investing some time to carry out a project or two to get your bearings.
In addition to everything we’ve gone over, here are a few general tips you might want to keep in mind as you work on Bambu Studio.
- MakerWorld imports: Models like ours often come with predefined profiles shared by the designers or even by other makers, which can include specific tweaked settings. While a great starting point, it’s useful to check the Prepare tab to ensure everything matches what you’re after.
- Reducing waste: Color changes can significantly increase filament waste. One option is to uncheck the prime tower under the “Others” tab. You can also lower the purge amounts in the AMS settings. Our previously mentioned tutorial on multicolor prints has more information about how to reduce filament waste.
- Troubleshooting: Issues may occur that aren’t noticeable at the slicing stage, especially regarding the filament settings if there’s a variation according to type, manufacturer, and quality. Those issues might include bridging sags, stringing, and warping. These matters can usually be addressed by refining a variety of settings, by following guides, and with some trial-and-error.
License: The text of "Bambu Studio Tutorial: Hands-On Tutorial to Get Started" by All3DP is licensed under a Creative Commons Attribution 4.0 International License.