The 10 Best Arduino Projects with LCD

These Arduino projects with LCD screens will help you unleash your creativity. Read on for some useful (and fun) projects!
Arduino is a solid creation platform for enthusiasts and professionals alike due to its versatility and accessibility. With the ability to control a wide variety of devices and sensors, it offers a robust development environment for a multitude of projects, from simple experiments to complex robotic systems. Among the peripheral components commonly used in Arduino projects, the LCD (Liquid Crystal Display) screen stands out, as it plays a crucial role in the human-machine interface.
Including an LCD screen in Arduino projects provides a tangible visual interface, so system information, data, and feedback are displayed in real time. With the combination of Arduino and an LCD touchscreen, for example, designers can create interactive solutions that significantly improve user experience and functionality.
In this article, we selected Arduino projects with a variety of LCD screens that can help put your knowledge into practice or inspire you to create something completely new!
Smart Coffee Machine
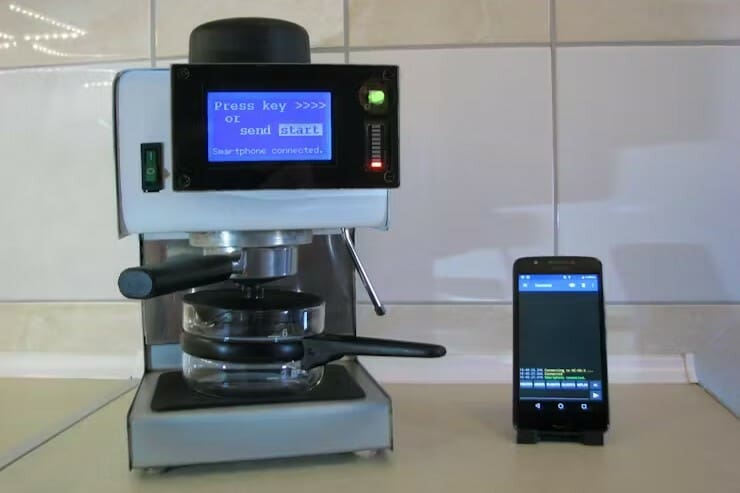
Ah, that smell of fresh coffee. Whether in the early hours of the morning or on a quick break, it’s hard to resist a cup of coffee. However, machines are not always as easy and practical to use as you might expect. Why not make your coffee machine even smarter? Controlling everything via Bluetooth using text commands will be fun and a good dose of learning!
While it won’t accept voice commands, this project analyzes the coffee machine’s process through an intelligent graphical analysis function that considers temperature sensor reading variations and what they indicate. Among the analysis options, it can report and display results on the LCD screen, such as “You forgot the water”, “Coffee for Two”, “Coffee for Six”, “Heating coil error” and “Sensor error”. Test mode allows the device to be adapted to other tasks and it’s also possible to switch the measurement unit to Celsius or Fahrenheit.
- Designer: Gyula Ősi
- Difficulty: Beginner
- Core components: Arduino Nano R3, HC-05 Bluetooth module, DS18B20 temperature sensor
- Project page: Hackster
Metal Detector Robot
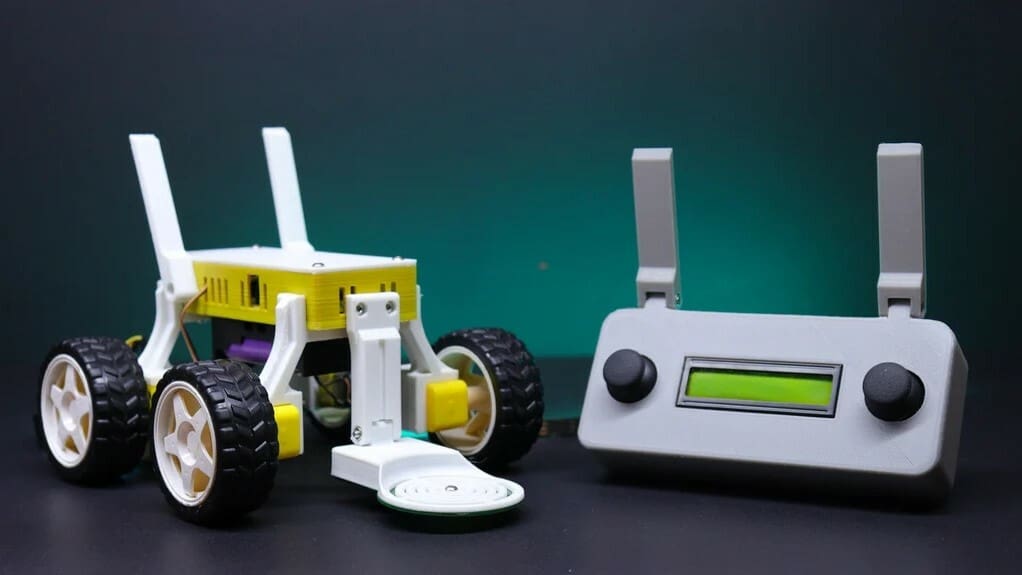
If you like robots but haven’t built one yet, this is a great option to start! The metal detection function will be a lot of fun to play around with, especially if you’re on the hunt for buried treasure at the beach. Universal PCBs are used to assemble the components that are interconnected with wire bridges soldered directly at each point.
In this project, the author used two Arduino Nano boards, one for the robot and one for the controller. In the video tutorial, you can see every detail of the construction and assembly. Although the links to the parts and modules mentioned in the YouTube video may be out of date, it’s easy to find these components in online stores, such as the metal detector kit at Amazon. This kit includes a buzzer and a power button. As for the print settings, 30% infill and supports are recommended for some parts.
- Designer: DIY_Builder
- Difficulty: Beginner
- Core components: Arduino Nano, 3D printed parts, 16×2 I2C LCD, metal detector module, TT gear motor and driver
- Project page: Thingiverse
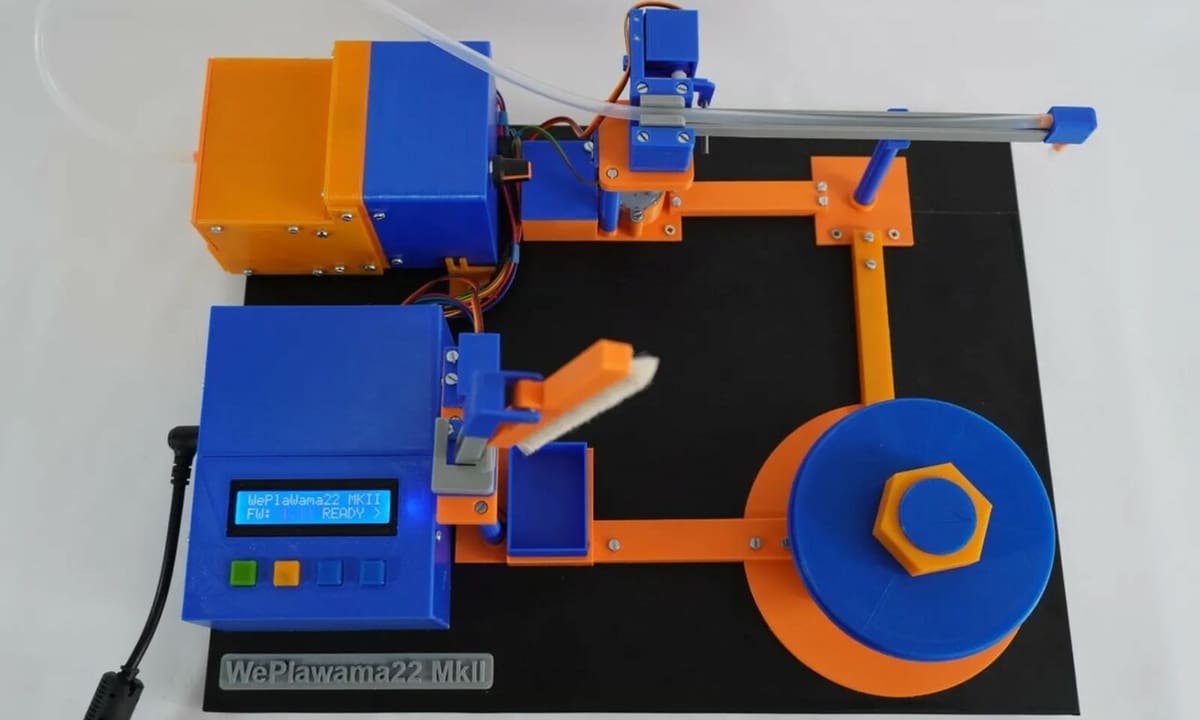
Filament Dry Box
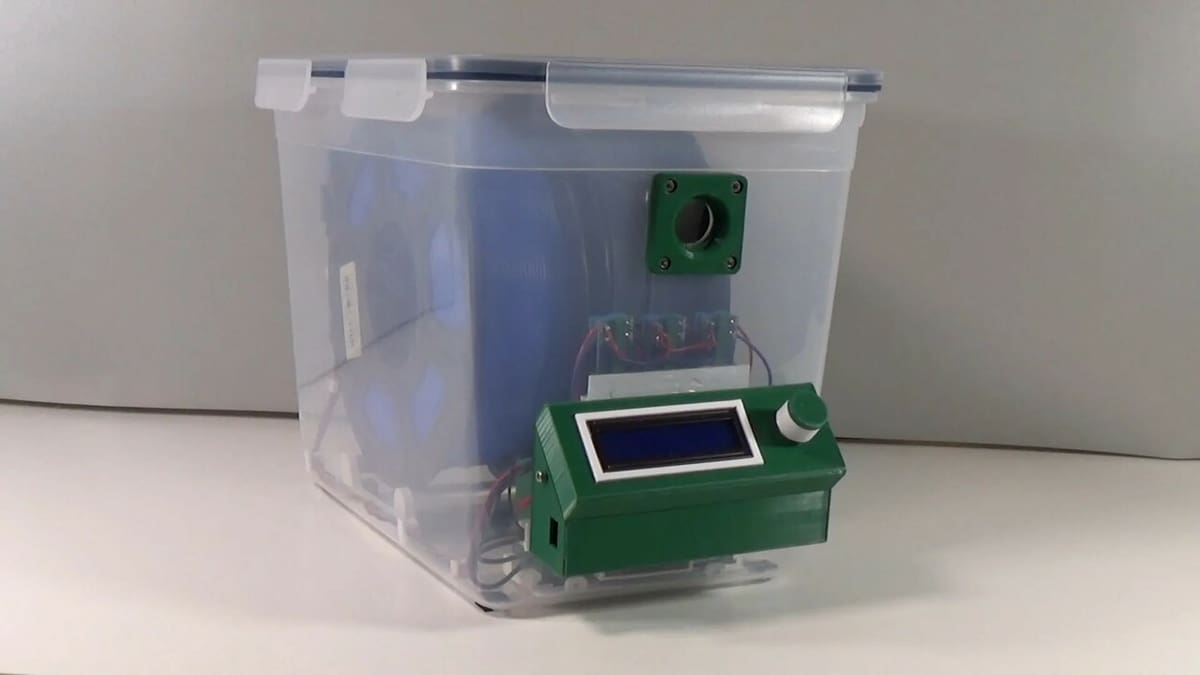
Anyone who has an FDM 3D printer knows how important it is to keep their filaments in proper condition. Since many of them are hygroscopic, they can easily absorb moisture which causes nightmares when you start printing, so having a box that preserves and dries your filaments is essential. This option, which is different from other solutions on the market, not only heats the box but also has active ventilation.
The 16×2 LCD screen makes operating the device easy, and it displays humidity and temperature levels. It’s possible to program a drying time so you don’t use more energy than necessary. In the video shared by the author, you can see a test with a wet sponge that loses approximately 6 g of water in 1 hour of heating. You can also observe during the test the humidity that condenses inside the box, which is conveniently eliminated by the ventilation system.
- Designer: werner_rh
- Difficulty: Beginner
- Core components: Arduino Nano, 3D printed parts, 16×2 I2C LCD, DHT11 sensor, storage box, heater, fan
- Project page: Printables
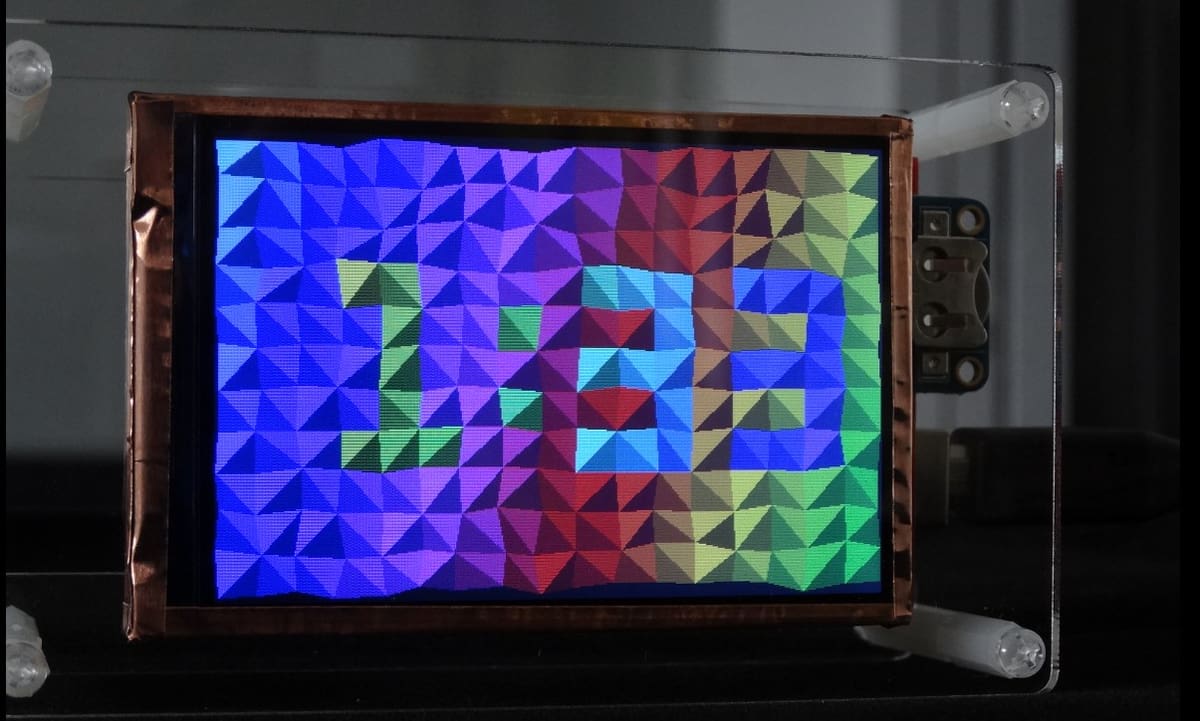
Air Particle Sensor

Around the world, more and more people are concerned about the quality of the air they breathe, and it’s no wonder. Forest fires, urban pollution, and many other environmental problems can cause health issues. Being aware is very important, but what if the problem is something that we can’t observe with our eyes? To help build awareness, the author created this incredible project that detects particles that are not visible to the eye, but which can be extremely harmful to our bodies. This device can be especially useful if you use 3D printers in poorly ventilated areas.
It all starts with a special sensor capable of detecting very small particles of up to 0.3 µm. This is used to calculate the number of particles per liter of air. The dust sensor works on a laser basis, and the author indicates that it’s possible to use another model, but that it will require adjustments to the case to correctly accommodate the sensor. The 1.8-inch LCD color screen is perfect for displaying particle counts, and it also displays a background color that corresponds to the air quality level, with six different levels.
- Designer: imageguy
- Difficulty: Intermediate
- Core components: Arduino Nano, 3D printed parts, 1.8-inch color TFT LCD with MicroSD card breakout, PMS1003 particulate sensor
- Project page: Instructables
Creative Console
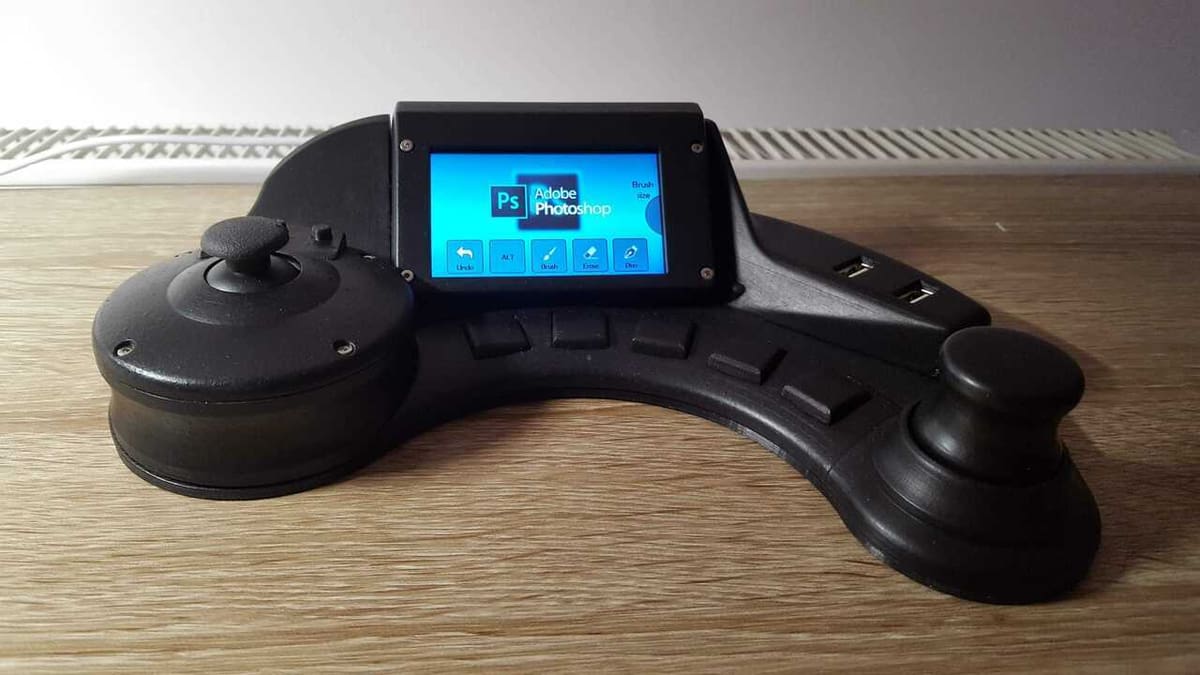
If you don’t already know what a space mouse is, it’s a wonderful tool for productivity. It allows you to optimize navigation in graphics and vector programs and allows more precise and dynamic movement. Thinking about further optimizing one’s workflow, the author created this extension that expands the options to increase productivity with shortcut buttons integrated into an all-in-one console! All of this may seem very modern and expensive, but the project is relatively affordable and customizable.
This console can be used with or without the space mouse, which is a separate project available from the author on Instructables. Note that in this project a Nextion screen is used, which has its own integrated microcontroller. This makes customization and programming much easier. The author also provides several tips on important details such as tolerances, sizes, and configurations to help readers build their own devices.
- Designer: StefanoS48
- Difficulty: Intermediate
- Core components: Arduino Leonardo, Arduino encoder, 3D printed parts, Nextion 3.2-inch LCD
- Project page: Instructables
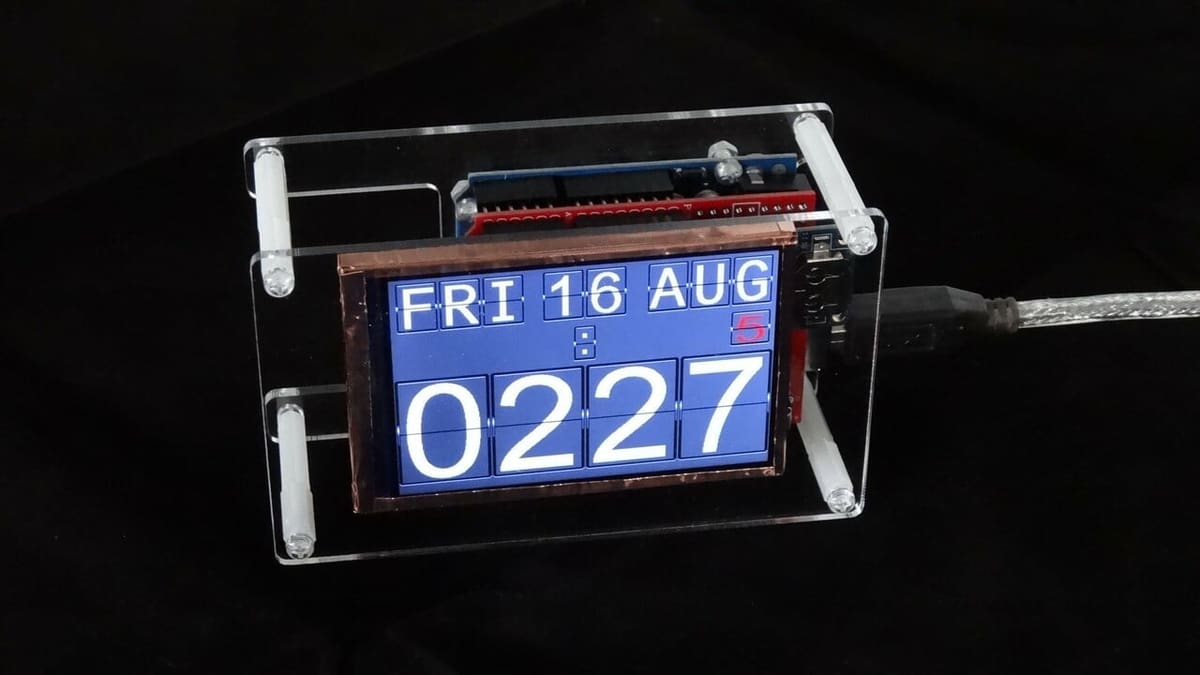
Flip Clock
This small flip-style clock could be exactly what you need to avoid wasting time. Initially, the project shared on Hackaday used a shield. However, this was eliminated in future updates by the author, and he also created a beautiful case with the help of 3D printing. The 3.5-inch color LCD screen is perfect for displaying graphic details. If you don’t like the flip style, there are three other versions available, including a cubist, triangular, and pong clock.
While the animated display is impressive, there is no brightness control. Thinking about getting a good night’s sleep, the author included a little trick in the code so that the screen stays off within a pre-established time range. In updates, the author also included support for the Arduino Mega and important fixes. When 3D printing the case, don’t forget to consult Printables for tips.
- Designer: Mark Wilson
- Difficulty: Intermediate
- Core components: Arduino Nano, 3D printed parts, 320×480 color LCD, RTC battery module
- Project page: Hackaday, Printables
Breadboard Game
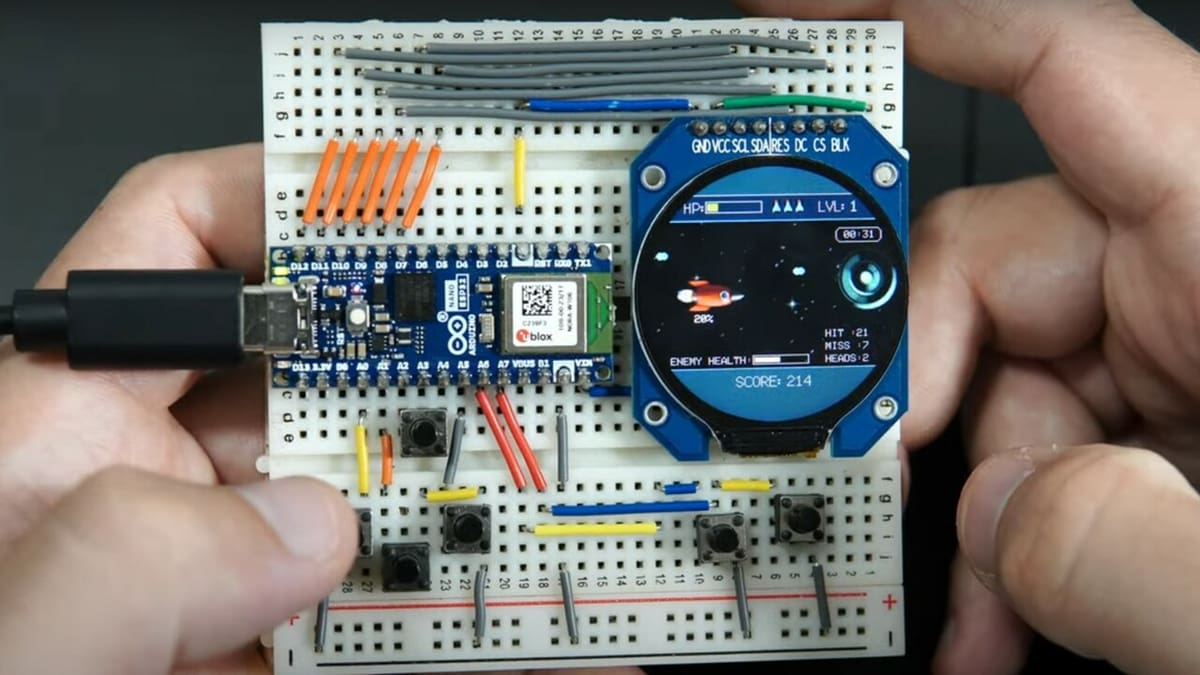
Whether you love games or just want to provide some entertainment to the little ones without spending a lot of money, this next project can help. Only a few components are used here to create a colorful and animated spaceship game on a simple breadboard, All you’ll need is just a small round screen, wires, push buttons, and an Arduino Nano Esp32.
Be sure to update your library to use the appropriate screen drivers, which may use direct USB power instead of the Arduino’s internal 3.3-V power supply. You’ll find all the code you need on GitHub, but it’s important to watch the video to understand how to connect all the wires correctly on the breadboard. For those who are learning and using a breadboard, this is the perfect opportunity to practice wired jumpers.
- Designer: Volos Projects
- Difficulty: Intermediate
- Core components: Arduino Nano Esp32, 240×240 SPI LCD, pushbuttons
- Project page: YouTube, GitHub
Stream Deck
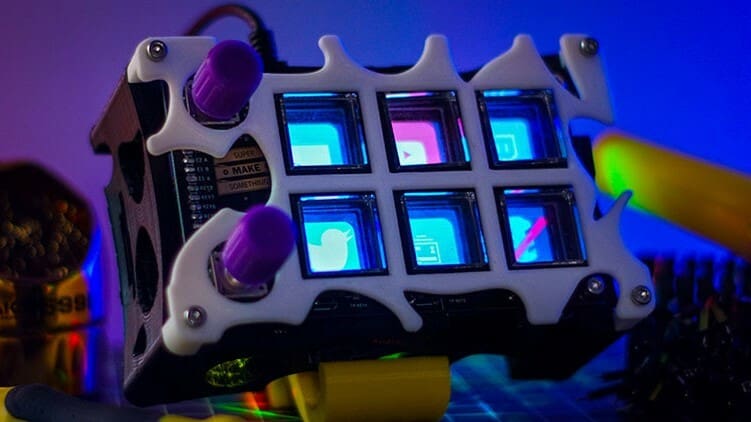
Being a streamer is not an easy task, as you have many things to manage and keep an eye on while on air. A stream deck is a solution that can help simplify the task. The macro keyboard lets you program custom shortcuts that control the apps you need frequently to make the most of every second. While there are commercial options in stores that can be heavy on the wallet, there’s also the option to use the power of Arduino to make this idea a reality at the same cost or less.
To replicate this open-source project, you’ll need two custom PCB boards, one to house the two Arduinos and the other to house the controller buttons. Each Arduino controls one of the boards while communicating with each other and with the computer. The circuit boards were designed using Eagle software, which allowed the author to import the files into Fusion to design the rest of the parts for 3D printing. The STEP files used are available alongside the STL files. The author also used a Voronoi style for the case, making the design more beautiful and faster to print.
- Designer: SuperMakeSomething
- Difficulty: Advanced
- Core components: Arduino Pro Micro, Arduino Nano, 3D printed parts, 3.5-inch TFT LCD screen, SD card breakout board
- Project page: Thingiverse
Remote-controlled DSLR Camera
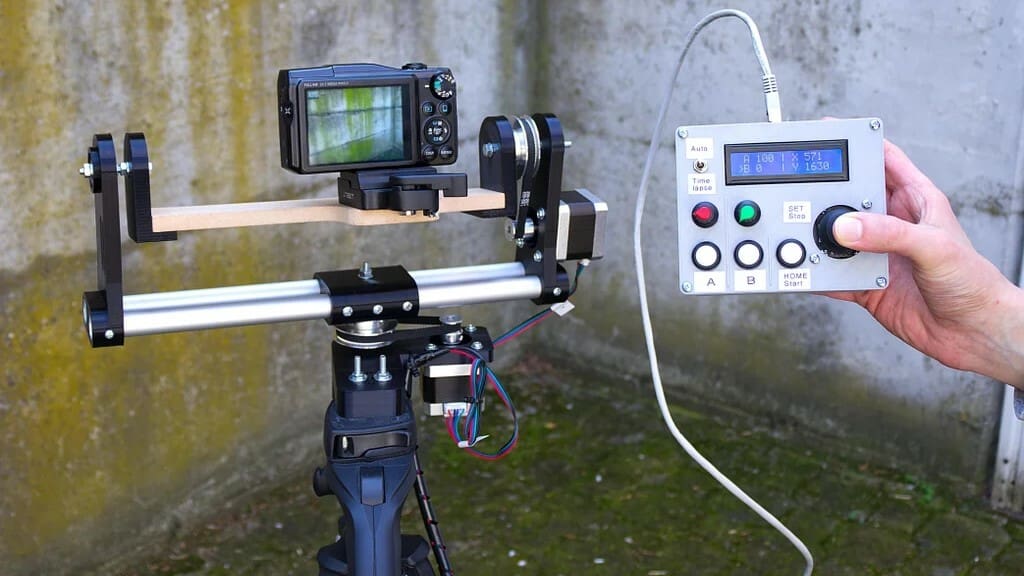
They say a picture is worth a thousand words, but you first need the right picture! This next project is a homemade solution that will bring professional results to your video recordings. The author’s idea was to create a device that offers stable and smooth movement, as this can be difficult to achieve manually. The entire system can be easily attached to a professional tripod and controlled remotely with programmable buttons and a joystick. Automatic mode allows you to define two positions between which the camera will move, and there is also a time-lapse mode.
There are many necessary components and the parts require precision for everything to work correctly, so be sure to review all of the details and instructions left by the author on the Instructables page and video tutorial on YouTube. The control structure houses one of the most popular LCD screens used with Arduino with a size of 16×2 character lines, which are enough to display the controller position and status. The entire circuit was made with universal PCB boards and wire bridges, so this might be a good time to practice your soldering skills or make a custom board.
- Designer: Giovanni Aggiustatutto
- Difficulty: Advanced
- Core components: Arduino Uno, 3D printed parts, 16×2 I2C LCD, stepper motors and drivers, aluminum tubing
- Project page: Instructables
Vinyl Record Cleaning Machine
Vinyl records are a classic that many collectors treasure. Even though it’s a vintage technology, vinyls offer great sound quality and are capable of storing sound in analog waves that enhance the bass. This is great news for DJs, but also a challenge for cleaning. Depending on the size of your collection, cleaning your records one by one can be an arduous and tiring task. This author decided to go one step further and developed a great solution.
This machine doesn’t just clean; it’s capable of washing, vacuuming, and drying the record in an almost fully automatic process, ensuring that the sound is always in its best shape. In total, the project has 82 3D printed parts. The designer recommends using 50% infill or more, especially for smaller and more delicate pieces, which should have 100% infill. There are valuable tips on adjusting Arduino codes and assembly in the comments, and the author is eager to help with any questions that may pop up.
- Designer: werner_rh
- Difficulty: Advanced
- Core components: Arduino Nano, 3D printed parts, 16×2 I2C LCD, stepper motors and drivers, vacuum turbine
- Project page: Printables
License: The text of "The 10 Best Arduino Projects with LCD" by All3DP is licensed under a Creative Commons Attribution 4.0 International License.