Best Arduino Simulators (Online & Offline): Our 10 Picks

It's always nice to be able to try something out before doing it for real. Read on to learn all about some great Arduino simulator options!
Among hobbyists, Arduino is a very popular open-source platform for hardware projects that require a microcontroller. The platform consists of easy-to-use development boards that are programmed using the Arduino IDE. With only an Arduino board and some additional components, you can make a lot of cool projects!
Sometimes, it’s a good idea to test out your design before purchasing all of the components and investing a lot of time in assembling everything. An Arduino simulator allows you to do just that! It simulates physical components and Arduino boards virtually so that you can test the circuit you’ve designed and even its code before assembling it in real life.
Using a simulator is often the most productive approach when prototyping a design in its early stages. That being said, it comes with some disadvantages as well – which we’ll explore soon.
In this article, we’ll discuss some of the best Arduino simulators available (both online and offline), the factors we considered when selecting them, and how to choose the ideal simulator for your needs.
Without any further ado, let’s get started!

Online
To start with, let’s look at the options that are available online. That’s to say, you’ll need a browser and a good internet connection – no need to download any programs.
Microsoft Maker Code
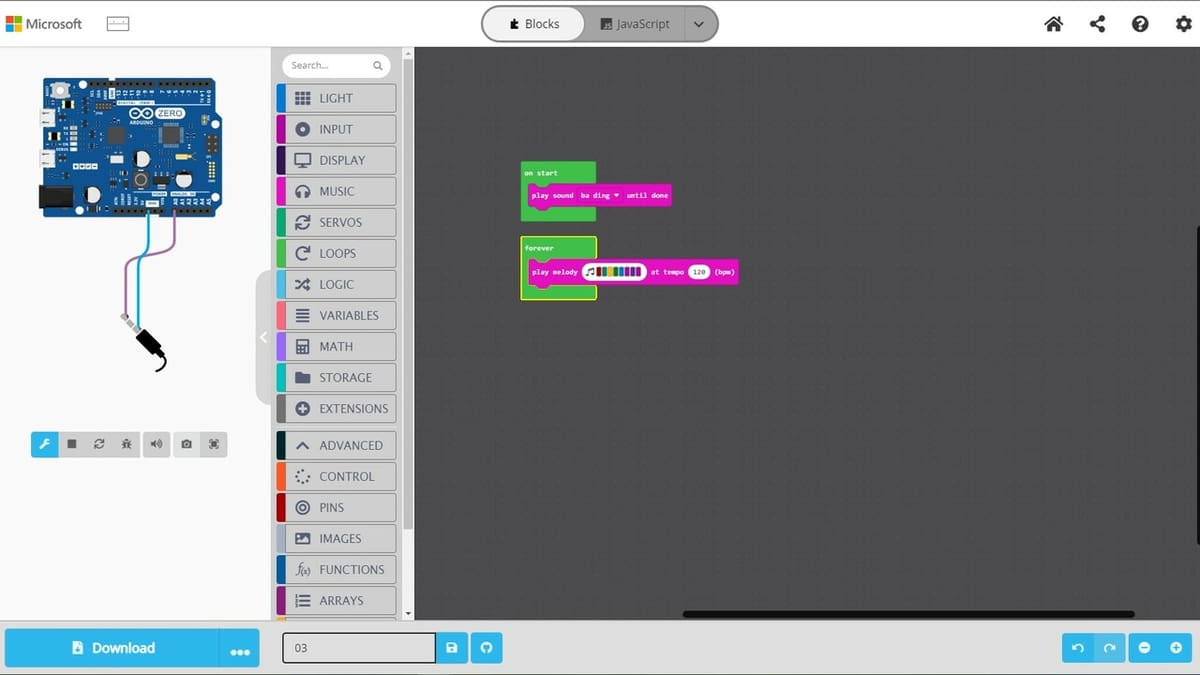
In Microsoft Maker Code, creating simulations with various boards, including Arduino models, is done with visual blocks, making it accessible even to those who have no prior coding experience. One can also opt for programming in Python or JavaScript. Everything in this environment is very intuitive, and once you nail down basic concepts, you’ll be able to create excellent simulations.
Despite it being an online platform, you can also connect physical devices. You’ll have access to a wide variety of extensions for sensors and other components that are a great help for simulations. In addition to the most basic functions, there are more advanced extensions that can be found lower down in the panel to give you additional features such as a joystick, sensors, or even commands for USB pen drive support and flash storage.
The UI is quite streamlined, displaying an illustrative panel with animations on the left and the block programming panel on the right. Some output commands display results even without an Arduino or a component being connected, such as sound. You can even print the electronic wiring diagram to assist with physical assembly.
- Developed by: Microsoft
- Best for: Beginners to intermediate users
- Special features: Test various virtual components, beginner-friendly
- Compatible with: All systems (web-based)
- Price: Free
Example
Let’s see a basic example of an operation:
- Open the Microsoft Maker Code page.
- Click on “New project” and select a board.
- In the Music tab, click and drag the “play sound” block to the “on start” block.
- Select the desired sound.
- In the Music tab again, click and drag the “play melody” block to the “forever” block.
- Click on the musical note bar and select some squares that represent notes. Test your song with the triangle play button at the bottom of the field.
Tinkercad Circuits
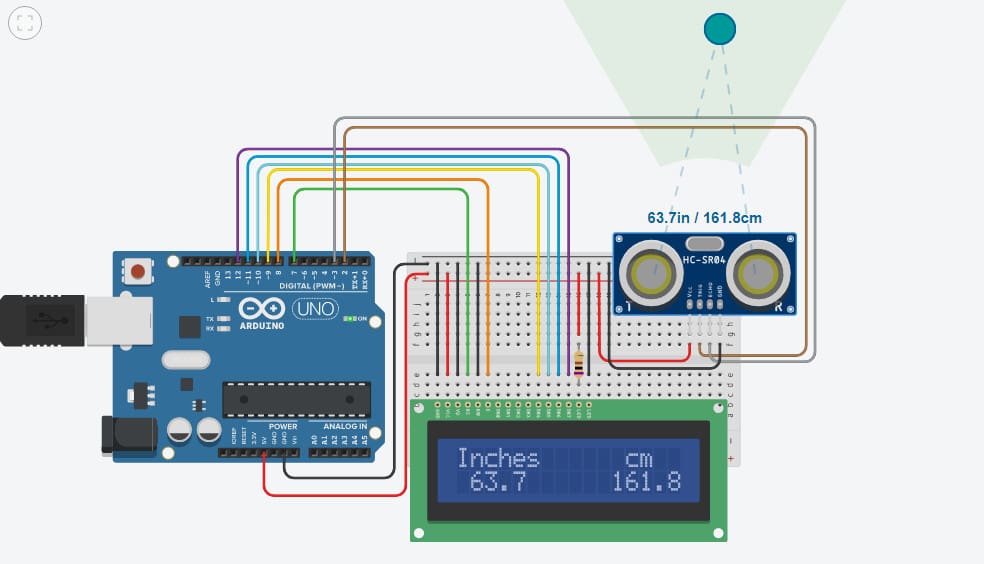
Tinkercad Circuits is a free, online service from Autodesk that began in 2017 and is probably the most user-friendly Arduino simulator. You can easily design your own circuits, create a program in block or text format, then debug it.
The simulation of Arduino boards and IO interfaces as well as the interaction with the code works like a charm. Further, the code can be downloaded and shared with other makers.
There are limits, of course. Tinkercad allows you to use any item from its library, but it doesn’t allow you to add new component options (Arduino modules, different models of Arduino boards, Arduino sensors) to the library, and you can’t modify the items that are available in the library. Some more basic components such as resistors can be parameterized, but this isn’t an option for microcontrollers, and for Arduino, there’s only the Arduino Uno R3 model.
If you want to give Tinkercad a try, you’ll need to join, choosing either an educator, student, or personal account.
- Developed by: Autodesk
- Best for: Beginners to intermediate users
- Special features: Export boards and schematics for PCB production
- Compatible with: MacOS, Windows, Linux, and so on (web-based)
- Price: Free
Example
To get a feel for the program without joining, you can test out this virtual tape measure. Once you’ve opened the link:
- Click on “Simulate” (change your browser to full screen).
- Click “Start Simulation”.
- Click on the HC-SR04 ultrasonic sensor and drag the small green circle to change the distance (if the image is too big, you can drag it with the left mouse button or zoom with the mouse wheel).
And, it works! The distances on the LCD screen are equal to the data shown by the sensor. For more, check out our article on how to design and simulate circuits in Tinkercad.
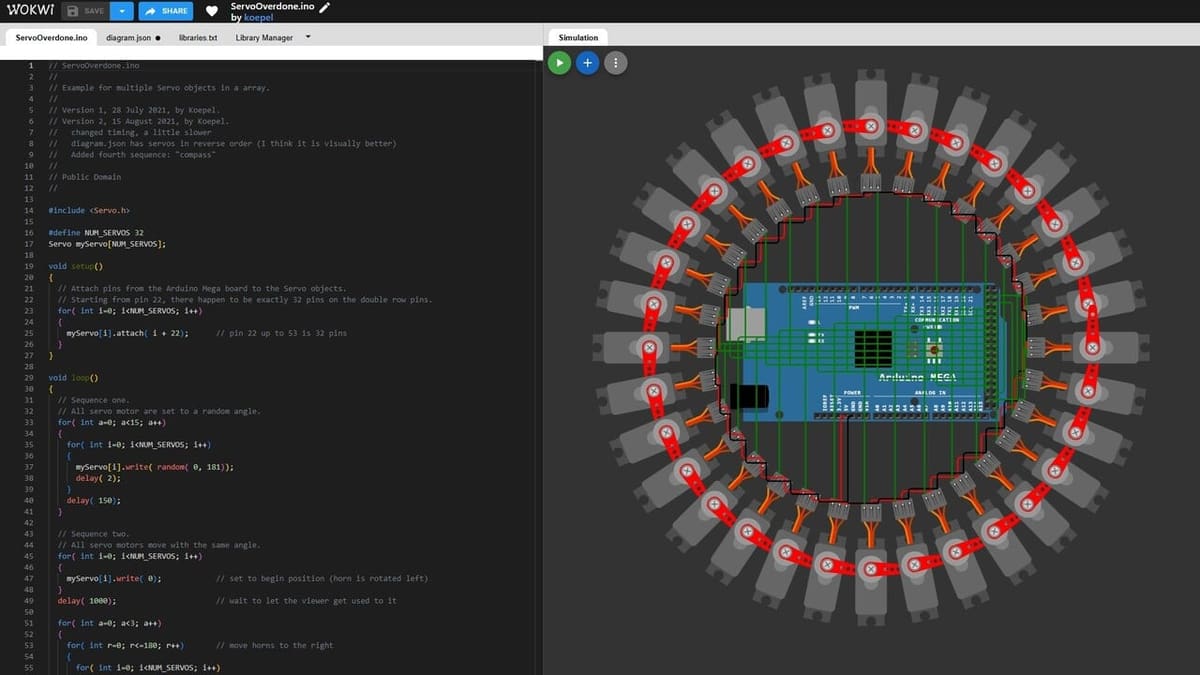
Wokwi

Wokwi originally built its foundation on AVR8js, a JavaScript-based implementation of the AVR 8-bit architecture. It’s the same microcontroller family as the one the Arduino Uno, Nano, and Mega uses. In the recent years, they have also integrated a couple of other popular platforms such as ESP32, STM32,and RP2040 (Raspberry Pi Pico). The complete list of supported hardware can be found on their website.
The easiest way to get started is to go to the home page, where you can pick the platform you want to try (e.g., Arduino). From there, you can explore the featured projects and simulate them. You can also modify the code and the circuit schematic by either modifying the diagram.json file or simply dragging the new component into the circuit. For tips and instructions, there’s a decent guide on how to use the diagram editor.
If you want to save your work, you’ll need to register with Google or GitHub. After signing in, you’ll see a small menu (on the top right corner of the screen) with an option called “My Projects” where you can create and organize your projects.
WokWi allows for creating or adding custom components as well as uploading custom libraries, which are discussed in more detail in their documentation. For advanced users, there’s also the option to use interactive debugger and logic analyzer to debug your code better.
The developer and the community are very active, and Wokwi has evolved quickly, thanks to its open-source model that encourages a collaborative environment. In the Discord channel and LinkedIn group, you can ask questions and receive support, including from the developer.
In terms of pricing, Wokwi has a free tier for open-source projects, which means everyone can see your project’s files. This should be sufficient for most users, although it doesn’t support uploading custom libraries.
For more advanced hobbyists, the paid tiers named Hobby and Hobby+ offer some additional features, including private projects, custom libraries, and Visual Studio Code integration. Lastly, the Wokwi Pro tier accommodates commercial projects and includes faster build time and the ability to run a private IoT gateway, among other features.
- Developed by: Uri Shaked
- Best for: Intermediate to advanced users, commercial projects
- Special features: Discord chat and LinkedIn group (online help), support for various types of microcontrollers, advanced debugging feature, GitHub repository
- Compatible with: MacOS, Windows, Linux, and so on (web-based)
- Price: Free for open-source projects, paid plans with additional features starting from $7 monthly
Example
Let’s check our test program:
- Register with Google or GitHub.
- Start the simulation by clicking on the white arrow inside a green dot (change your browser to full screen).
- Click on the HC-SR04 ultrasonic sensor and drag the slider to change the distance.
- If the image is too big, you can zoom with the mouse wheel or hide the code by clicking the small square on the right top side of the screen.
It works! The distances on the LCD screen are nearly equal to the data shown by the sensor.
Online & Offline
The following simulators are available both online and offline, so different needs can be met.
Virtual Breadboard & Avatar Hardware
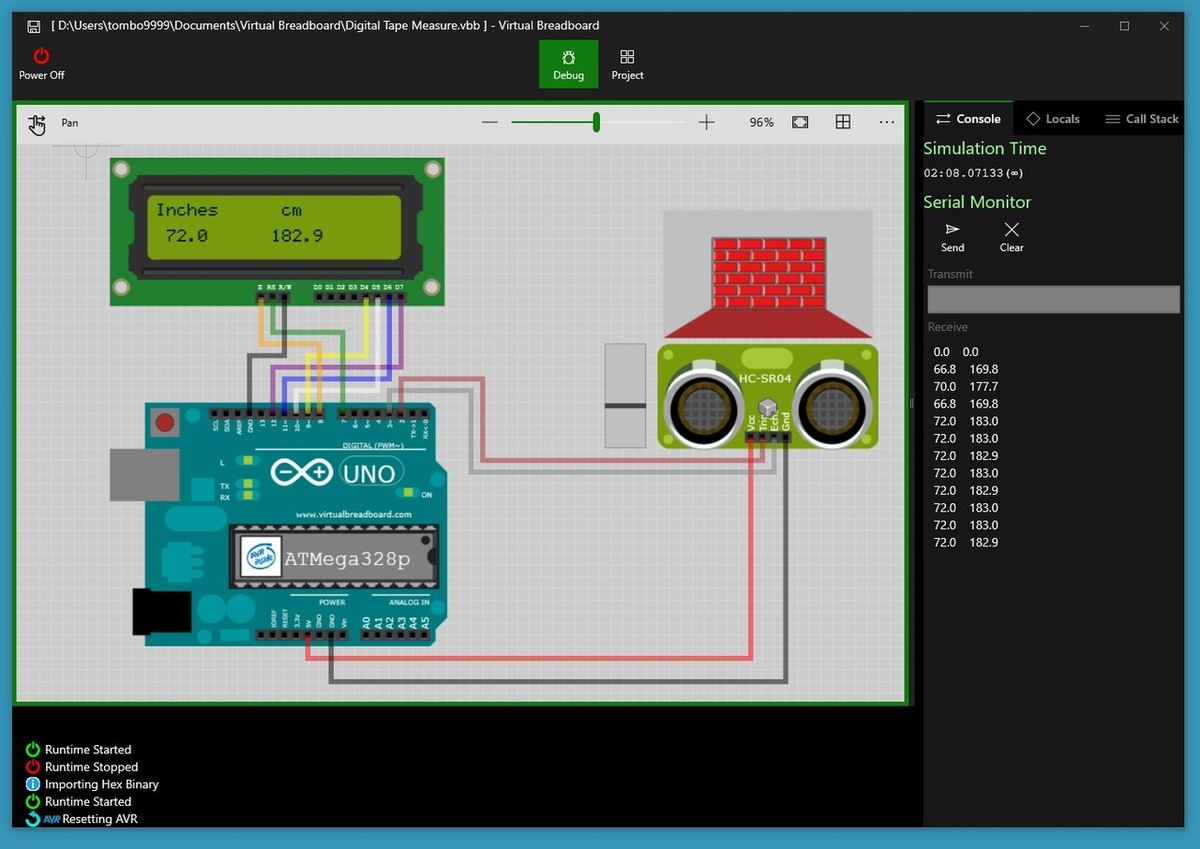
Virtual Breadboard is a Windows Store app. The interface is user-friendly, and you can easily design your own circuits (with drag-and-drop tools). You can also upload your sketches in HEX format from Arduino IDE, Arduino Create, PlatformIO, Visual Studio, and so on.
The scope of its functionality includes simulating an Arduino board, IO interfaces, and program interacting. Additionally, you can export your project in SVG and KiCad format. What’s special about Virtual Breadboard is the inclusion of mixed reality virtual hardware and the opportunity to remodify hardware.
The simulator is a bit restrictive in that you can’t create or add your own parts and components nor create your own programs from the software interface. And finally, you can’t export boards and schematics for PCB production.
- Developed by: James Caska
- Best for: Beginner to intermediate users
- Special features: Create mixed reality virtual hardware, remodify hardware
- Compatible with: Windows
- Price: Free app, ~$10 for Avatar hardware, $15-$60 for interface devices
Example

To test the Virtual Tape Measure, download the software and install it on your PC. After doing that, you can start to use the Toolbox to add your components by clicking and dragging. For instance: “Toolbox > Integrated circuits > ATMega328p”.
You can now load your HEX file just by dragging it, but you’ll receive the following error message:
Unlicensed components: ATMega328Uno

Consider purchasing a license to enable these components at runtime
To check if our test program works, you’ll need a license and then you can:
- Start the Virtual Breadboard app.
- Click on “Menu > Open > Browse Files > Open DigitalTapeMeasure.vbb”.
- Power on (wait a few seconds).
- Move the slider on the left side of HC-SR04 to change wall distance.
- If you want to use a real Arduino, copy IO connections and open the sketch in your favorite editor, then upload it to the board.
It works! And the distances on the LCD screen are equal to the data shown by the sensor.
If you don’t want to buy a subscription, you can try the online beta examples.
PICSimLab
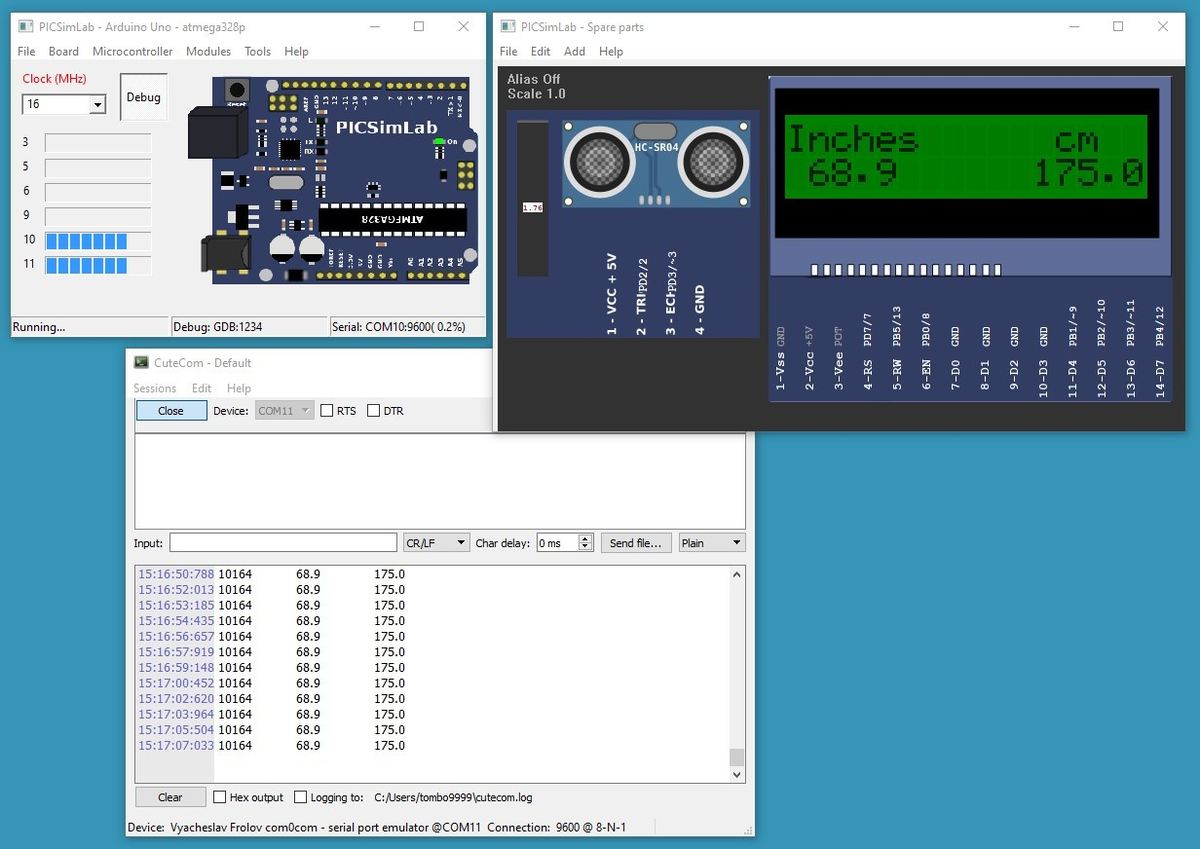
PICSimLab is a realtime emulator of development boards with an integrated MPLAB X/AVR-GDB debugger. It supports some PICSim microcontrollers and some Simavr microcontrollers. PICSimLab has integration with MPLAB X Arduino IDE for programming microcontroller boards.
You can design your own circuits, load HEX files, or upload directly from Arduino IDE. You can also simulate Arduino I/O interfaces and program interacting. Advanced users can create or add their own parts and components, but once again, you can’t design boards and schematics, then export them for PCB production.
- Developed by: Luis Claudio Gambôa Lopes
- Best for: Intermediate to advanced users
- Special features: Emulate some PICSim microcontrollers, GitHub repository
- Compatible with: Windows 32- or 64-bit, Ubuntu, MacOS (with Wine)
- Price: Free
Example
- Download and install the software.
- Download and install Com0com (for serial emulation in Windows, use the PICSimLab manual).
- Start the software.
- Click on “File > Load Workspace”.
- Choose the DigitalTapeMeasure.pzw file.
- Move the slider on the left side of HC-SR04 to change the distance.
- Click on “Tools > Serial Terminal”.
Offline
And to round things up, here are a few options that you can download and work with without needing to stay connected as you simulate.
Flowcode
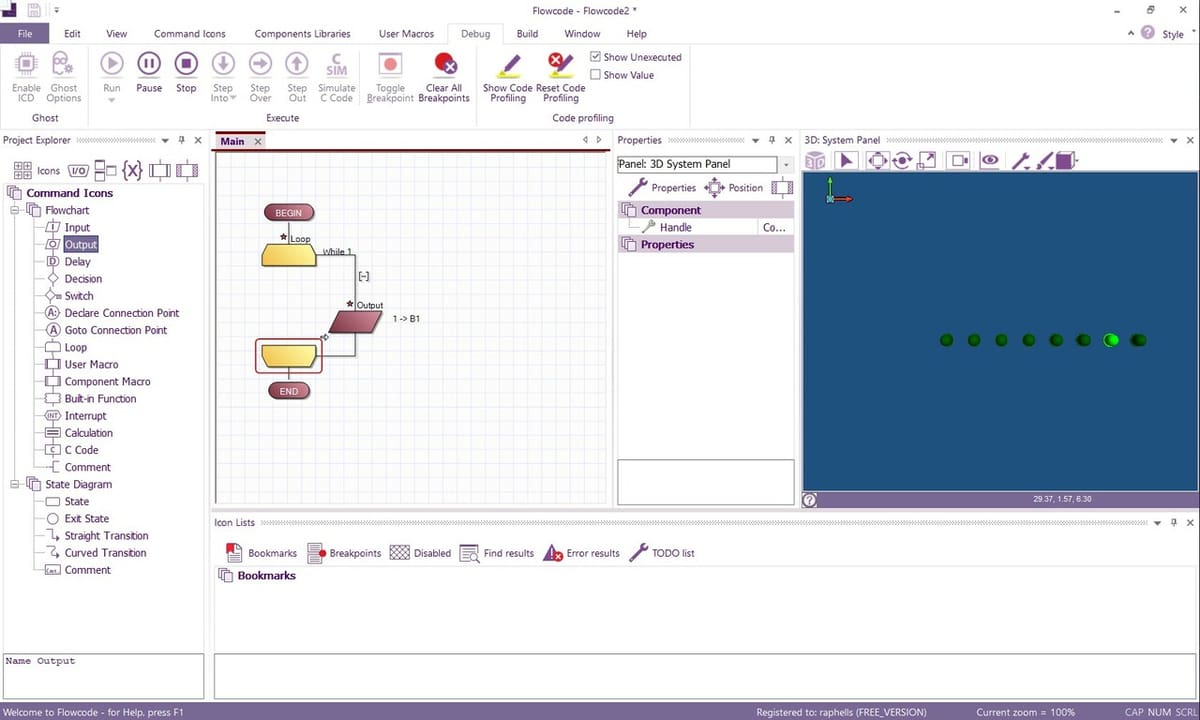
Flowcode is a graphical programming platform with an integrated IDE for various controllers such as PIC, AVR, ARM, ESP, or Raspberry Pi. In addition to easily simulating Arduino, it offers a wide range of testing components and 3D or 2D environment visualization. With a simple click and drag, you can include editable command blocks in a flowchart to test your Arduino without even switching screens! Check out this YouTube video from StudentCompanion Electronics to see the program in action.
Flowcode is quite intuitive and suitable for both users who are just starting out and those with some prior experience. It uniquely features the ability to import 3D models in MESH, STEP, and OBJ file formats, making it perfect to experiment with electromechanical systems where motors, servos, and actuators can all be integrated into the digital representation.
There is a free version of Flowcode available for registered makers and hobbyists with a lot to offer and no limitations on project size. The Pro and Academic versions have a few special features related to debugging, paradigms, and documentation. Flowcode lays out all the differences in detail on their site. It’s available in six languages.
- Developed by: Matrix TSL
- Best for: Beginners to advanced users
- Special features: Graphical programming and Integrated Development Environment (IDE)
- Compatible with: Windows
- Price: Free for makers and hobbyists, plus a 30-day trial for the Pro version (~$330)
Example
In addition to the getting started guide and an instructional video for first-timers, we can give our test program a spin to see how a workflow may look like:
- Download and install the software.
- Create an account and log in.
- Start a new project and select “Arduino Uno R3 SMD” in the free targets tree.
- Under “Component Library > Outputs”, search “LED ARRAY PCB” and add the item to the 3D panel.
- In the Project Explorer window, drag and drop “Loop” and position it between the start and end blocks of the flowchart. Drag and drop another “Loop” and position it between the loop tags in the flowchart.
- With a double click on the right mouse button, open the properties window of the “Output” item.
- In the “Use Chip References” dialog box, select port B as the Port Field. Set the value in the variable field to 1. In the Advanced Options, select “Single bit” and set the value 1, too.
- In the Debug tab, click on “Run” or press F5 to start and observe in the 3D visualization panel.
SimulIDE

SimulIDE is a real-time electronic circuit simulator with PIC, AVR, and Arduino simulation. It has a spartan interface, aiming to be fast, simple, and easy to use.
You can design your own circuits and program them with a code editor and debugger for GcBasic, Arduino, PIC, and AVR. SimulIDE also has a YouTube channel with over 45 videos.
As we’ve seen in the previous examples, you can’t create your own parts or components (though you could ask on the forum or Patreon). It’s also not possible to design boards and schematics and export them for PCB production.
- Developed by: Santiago Gonzales & Popov Alexey
- Best for: Beginner to advanced users
- Special features: GitHub repository
- Compatible with: Windows 32- or 64-bit, Ubuntu, MacOS (with Wine)
- Price: Free (donations accepted)
Example
We’ll try the free version to create our example. There are two ways to do this:
The Simpler Way
- Download, install, and start the software.
- Click on the Open Circuit icon.
- Choose the DigitalTapeMeasure.simu file.
- Click on the red button to power up the circuit.
- To change distance, click on the small volts display window and rotate the knob.
The More Complicated Way
- Download, install, and start the software.
- Drag and drop the following components: Arduino Uno, Hd44780 (LCD display), HC-SR04 (Ultrasonic sensor), and voltage source.
- Connect all wires.
- Right-click on Arduino and load the firmware (HEX file).
- Click on the red button to power up the circuit.
- To change the distance, click on the small volts display window and rotate the knob.
Arduino IO Simulator
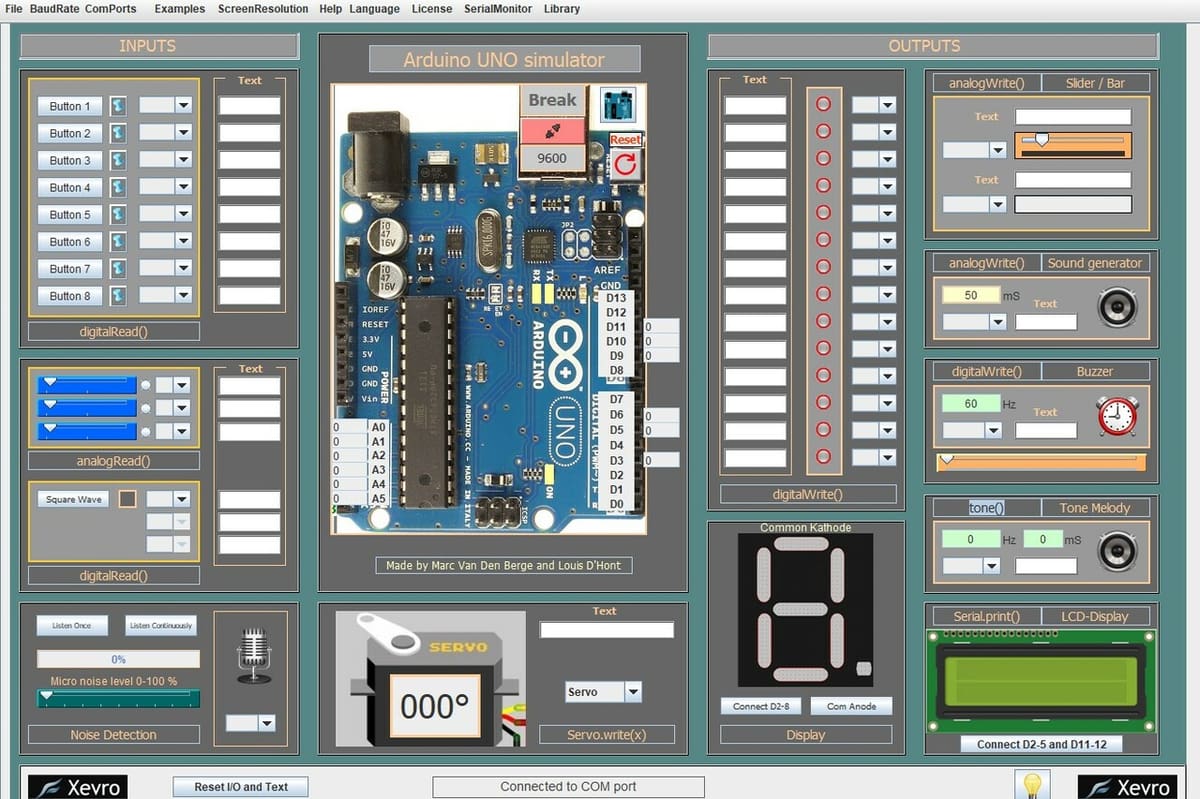
Despite the name, the Arduino IO Simulator is best for testing components and requires a physical Arduino connected to the computer to use. When running a code or example on the Arduino connected to the PC, you can interact with this Arduino through the sensors and components of the simulator. In the free version, you need to be connected via a USB cable and use a COM port, but in the Pro version, it’s possible to emulate ports via TCP protocol and thus connect via Wi-Fi. The Pro version is currently available for free.
The promise of this program is to facilitate a test if you don’t have all the components or to quickly check how your code behaves. Everything is well-documented, including an instruction manual and installation guide that explains what one needs for Java installation. There are several examples that the program offers for testing, and there are also libraries to facilitate the use of components. This program can be very useful for educational purposes.
- Developed by: Xevro
- Best for: Beginners to intermediate users
- Special features: Test various virtual components
- Compatible with: MacOS, Windows
- Price: Free
Example
Let’s check how to use this program:
- Download and install the software.
- Activate with one of the keys provided on the download page.
- Choose a servo from the examples menu and open it in the IDE.
- Adjust component ports according to the channels used in the program.
- Load your code into your Arduino and connect the serial port.
- Manipulate the virtual component that represents the potentiometer and observe the component’s reaction!
UnoArduSim
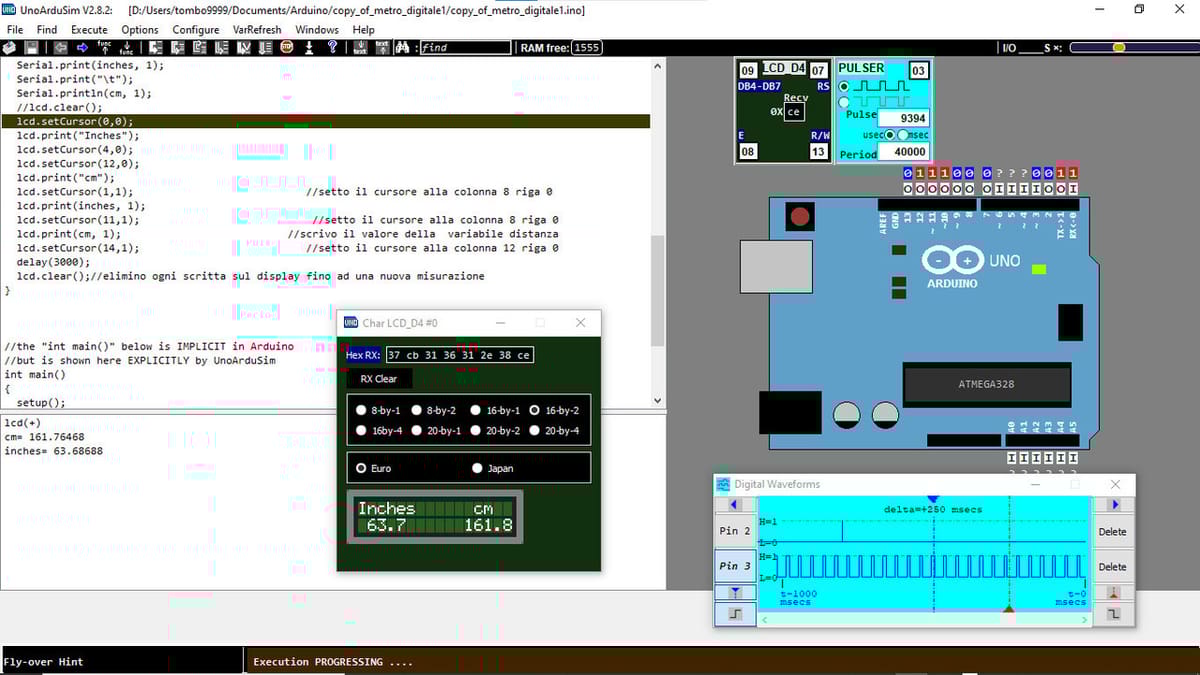
UnoArduSim is a free educational tool where you can design your own circuits (by clicking “Configure > I/O Devices”), programs (text only or by loading Arduino files), debug code, and simulate Arduino IO interfaces and program interacting.
Note that you can’t create or add your own parts and components, drag and drop components, design boards, and schematics, or export boards and schematics for PCB production.
- Developed by: Stan Simmons
- Best for: Intermediate to advanced users
- Special features: Nice oscilloscope-like interface
- Compatible with: Windows
- Price: Free
Example
Let’s check our test program:
- Download and install the software.
- Copy into the same folder the INO sketch as well as the myArduPrefs.txt and myIODevs.txt files.
- Load the INO file.
- Select components by clicking “Configure > I/O Devices”.
- Right-click on “LCD” to choose the type.
- Click twice on pins 2 and 3 to open a digital waveforms (oscilloscope-like) display.
Proteus VSM

Proteus VSM for Arduino AVR is by far the priciest option on the list. That being said, in addition to all the basics, it offers some special things that we haven’t seen with other simulators. For example, you’ll have access to thousands of peripheral models, plus you can drag and drop dozens of shields into your simulations.
- Developed by: Labcenter Electronics
- Best for: Advanced to professional users
- Special features: Shields can be added to simulations
- Compatible OS: Windows
- Price: Starting at ~$300 (with additional costs for bundle options)
Example
Although we couldn’t test our example because the professional demo version is quite limited, a lot of people on YouTube have used the same simple tape measure project.
If you want to give it a try, there are many sample projects:
Sample 1
- Download and install the Demo Version.
- Start the program and open the sample.
- Search for “Arduino LCD”.
- In the VSM for AVR Category, choose “Arduino using I2C 16×2 LCD breakboard”.
- Run the simulation.
- You can change the source code, but you’ll likely get the message “Saving is disabled in the demonstration version of Proteus” when you try to save your changes.
Sample 2

- Start the program and open the sample.
- Search for “Arduino SRF04”.
- Choose one project.
- Run the simulation.
- Right-click on the sensor, select “Edit Properties”, then change the Range Value to 125.
- Run the simulation again.
How to Pick a Simulator
With simulators, we need to keep our expectations in check because they’ll never be as smooth and reliable as real hardware. With that being said, an ideal simulator should still have the following:
- Acceptable performance: Runtime performance of simulation is absolutely critical for a smooth workflow, since a laggy or glitchy simulator can be frustrating to work with. Moreover, a problematic simulator can also mask hidden issues in the circuit or code.
- All the components you’re using in library: The components library of most simulators include popular Arduino boards such as the Uno, Nano, and Mega as well as commonly used components like buttons, LEDs, LCD screen, and the like. Simulators with smaller libraries usually don’t include components that are not frequently used – for instance, specialized sensors like the BMP180 barometric sensor. This can be a limitation for a project that uses such sensors.
- A decently sized active community and developers: The availability of tutorials, active forums, and support from developers can determine whether a user’s experience is wonderful or miserable. Users will benefit from an active community that can answer questions and share knowledge to help each other get the most out of the simulator.
- Free or affordable pricing plans: Many of us have to keep an eye out on our pocketbooks. So, it’s a no brainer that the ideal simulator should go easy on our budgets.
License: The text of "Best Arduino Simulators (Online & Offline): Our 10 Picks" by All3DP is licensed under a Creative Commons Attribution 4.0 International License.