The Best Creality K1 Mods & Upgrades

The Creality K1 has proven to be a fast and reliable 3D printer. Check out how to improve it even more with the best Creality K1 upgrades!
Creality is one of the most recognized names in the 3D printing world. From the Ender 3, the incredibly popular printer that made the company famous, to its newer printers and accessories, Creality continues to be a pioneer in the industry.
After the release of the Ender 3 in 2018, Creality has gone on to introduce machines with significant improvements and new features, including two flagship models: the K1 and the K1 Max. These two machines differ from the company’s previous models due to several standout features. The most obvious one is the enclosure, which facilitates the printing of high-temperature materials, such as ABS and nylon. In addition, the K1 and K1 Max boast incredibly high speeds. We’re talking about 600 mm/s!
Released this year, many makers have become fond of their K1. If you love your machine but feel like there’s room to make it even better, check out the best upgrades for the Creality K1 in this article. We’ve included both purchasable and printable upgrades on our list. Let’s dive in!
To Buy
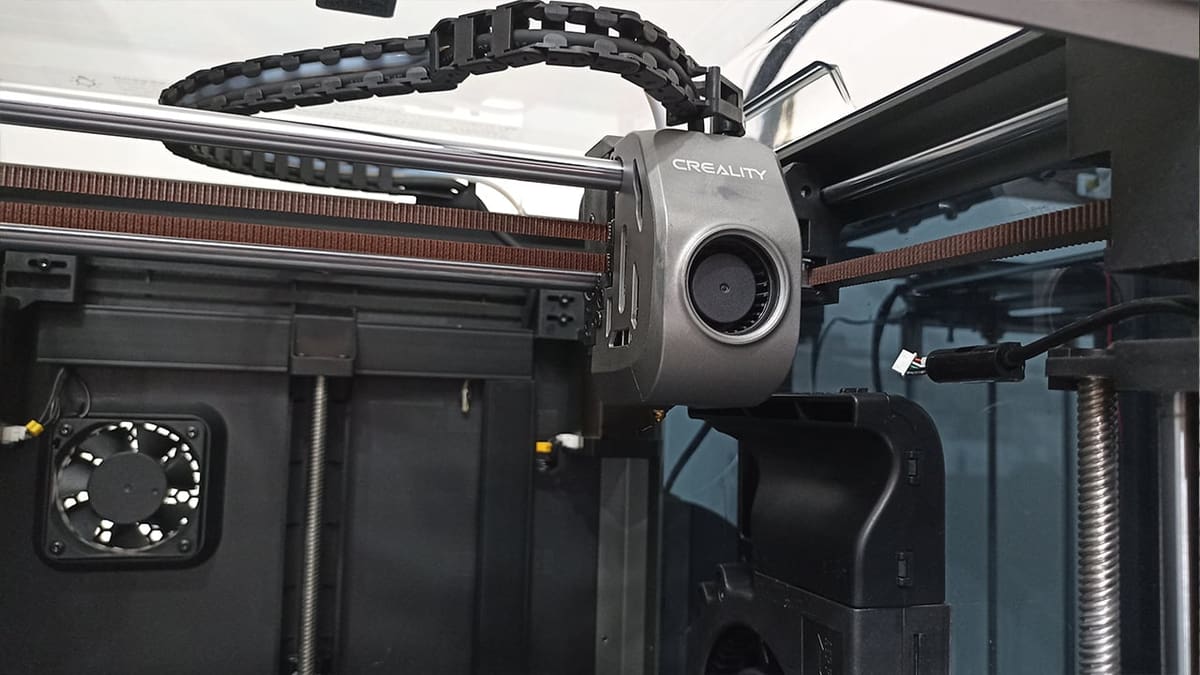
Camera
Cameras are really useful when 3D printing. They allow you to check how your print is proceeding to catch problems and allow you to create some cool time-lapses that you can share with friends or on social media platforms. Since the K1 has LEDs installed in the stock configuration, you’ll be able to have a great view without even needing to install lights.
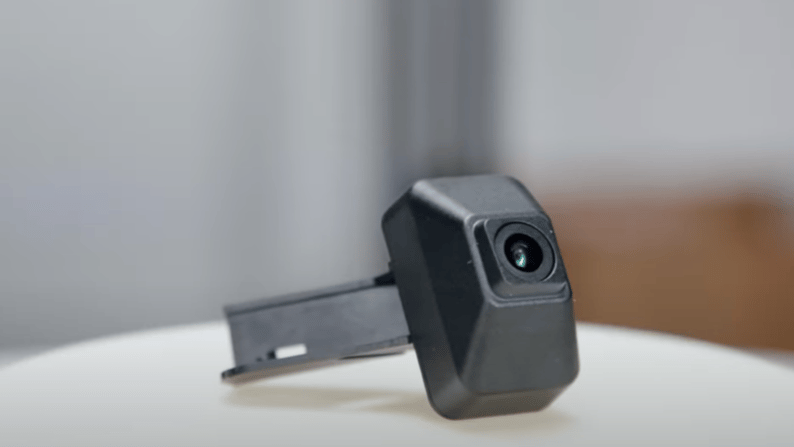
Creality has released an official camera for the K1, the same one that’s installed on the K1 Max, and it’s an easy upgrade to install. Plus, it features AI detection to watch out for print failures. It comes with a structure that screws into the hole above the right threaded rod, designed for that purpose. The cable is already wired and installed.
If you want to tweak the angle of the camera, you can replace the pre-installed structure with a 3D printed camera support. Remember that you’ll need to print it with a filament that can resist high temperatures, since the piece will stay in the chamber of the printer. You should consider ABS, ASA, nylon, or PC.
- Difficulty: Easy
- Compatible model: K1
- Additional hardware: None required
- Price: ~$40
Hardened Steel Nozzle
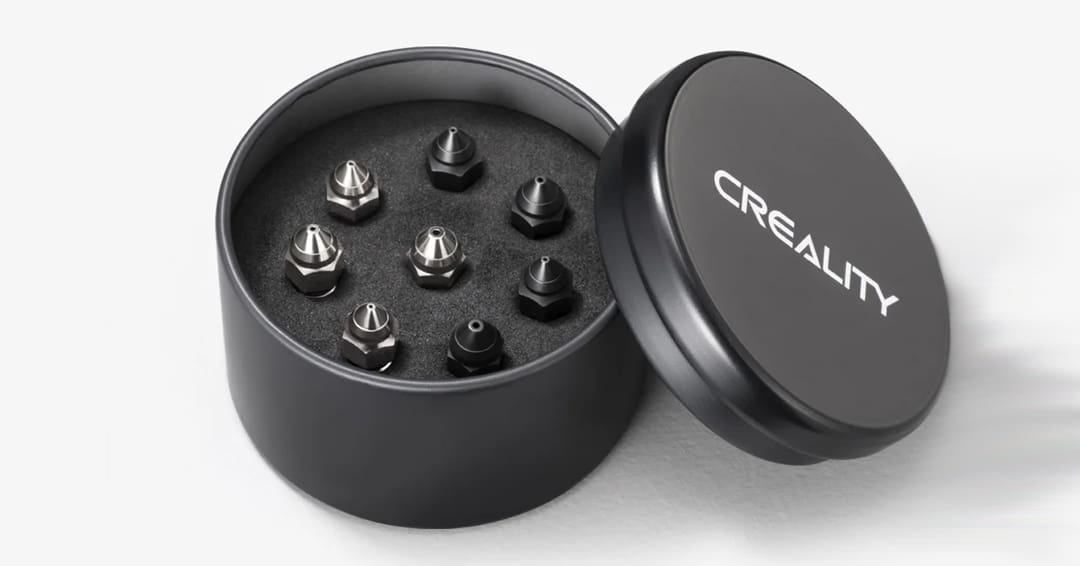
The vast majority of 3D printers come with a pre-installed brass nozzle, and the K1 isn’t an exception. Although there’s nothing wrong with this material, if you want to print abrasive filaments such as carbon fiber composites or glow-in-the-dark PLA, your nozzle will deteriorate faster due to the particles.
This is where a hardened steel nozzle comes in handy. You can buy the Creality K1 nozzle kit upgrade or consider a CHT hardened steel nozzle. Swapping to one of these nozzles will let you print abrasive filaments without worry, and it’s a simple switch. You can use the included instruments that come with the printer. Heat the nozzle to 200 °C and unscrew the previous nozzle. Then, you can screw the new nozzle on a little bit, let it heat up, and finally screw it on entirely.
- Difficulty: Easy
- Compatible models: K1, K1 Max
- Additional hardware: None required
- Price: ~$40

Textured Build Plate
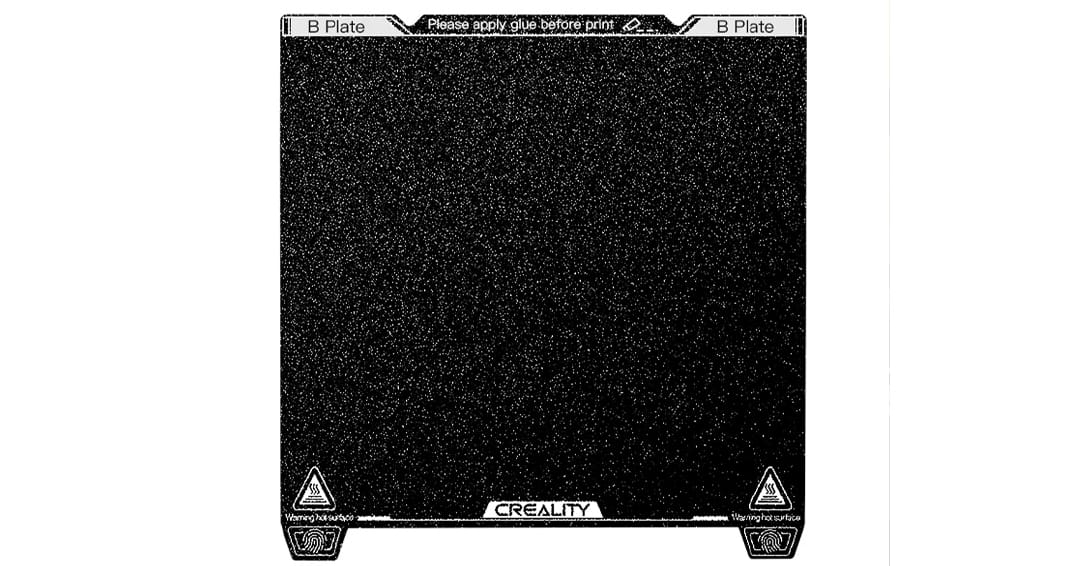
The K1 comes with a smooth PEI build plate. It also comes with a gluestick that you can use to detach pieces more easily from the build plate, as they tend to adhere well. You can check out Reddit for some more discussion. Although prints stick fairly well to it, you may want to add some texture to your parts. Textured plates can help if you need lowered adhesion when printing PETG, and there are many different options out there since the K1 is a popular 3D printer.
You can choose between a variety of textures for your build plate, from typical ones such as textured PEI to options like diamond or carbon fiber. You can either order the original textured PEI from the Creality website or take a look at other vendors.
- Difficulty: Easy
- Compatible models: K1, K1 Max
- Additional hardware: None required
- Price: ~$26
To DIY
PTFE Guide
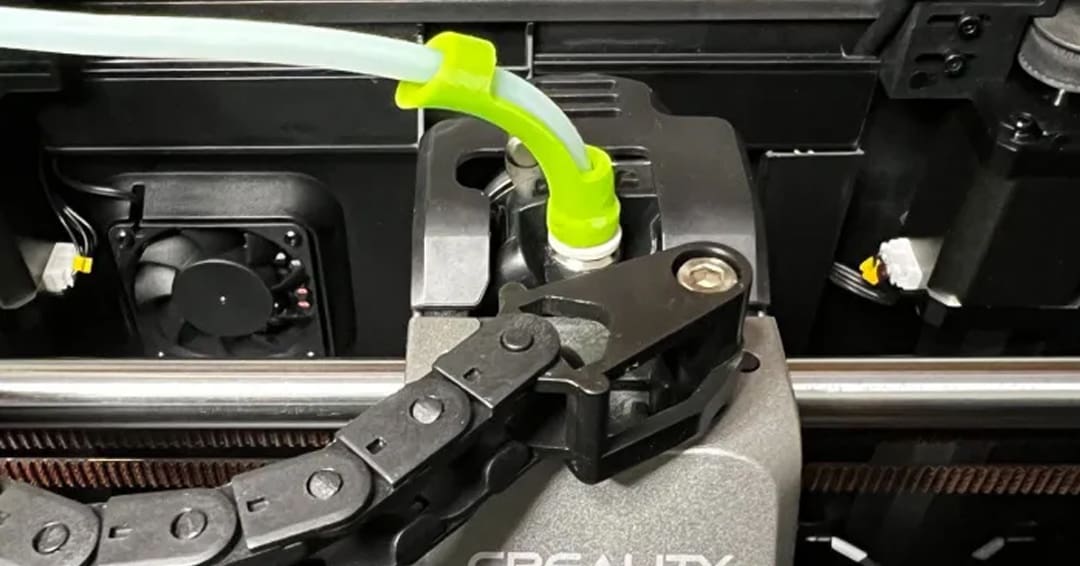
One of the most common problems on the Creality K1 (Max) is clogs. Although clogs can occur for many reasons, you might be able to prevent them by slightly modifying the PTFE route. On the stock K1 (Max), the filament path takes a narrow curve when approaching the printhead, and this can prevent the material from loading smoothly. This PTFE guide modifies this section of the path, creating a softer curve for the filament.
To print this model, you won’t need any supports if you position it standing up. You’ll also want to pay attention to the material you print it with. Since the K1 (Max) features an enclosure, the temperature in the chamber can get quite high, especially when printing more high-temperature filaments. So, to avoid problems, print this model in ABS, ASA, nylon, or PC.
- Difficulty: Easy
- Compatible models: K1, K1 Max
- Additional hardware: None required
- Designer: LMaker
- More information: Creality Cloud, MakerWorld
Side Fan Mesh Cover
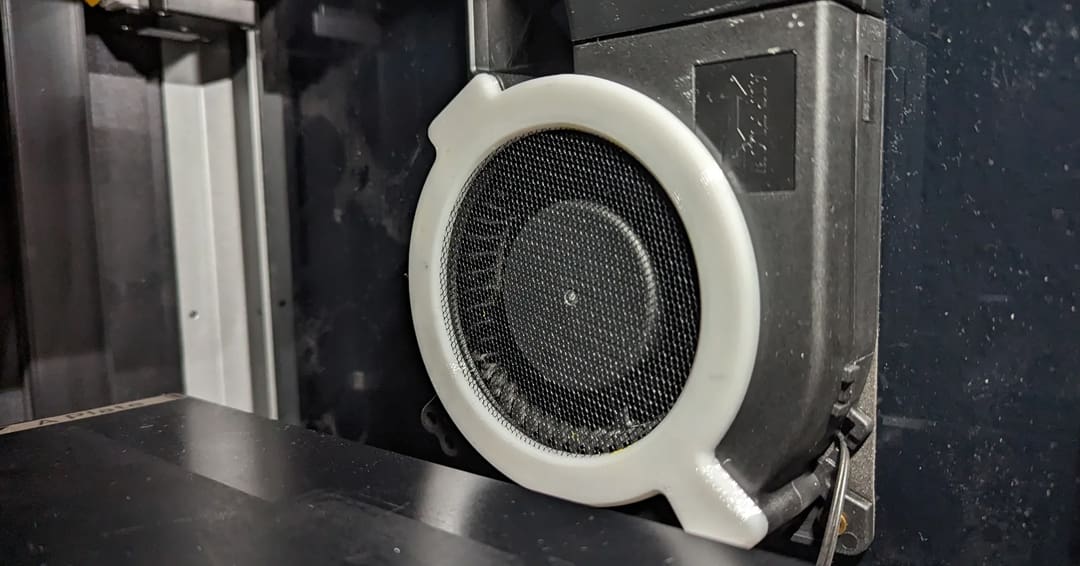
The side fan of the K1 (Max) is powerful and necessary to print fast, but it can be quite annoying because it often catches filament pieces that get stuck between its blades or all over the enclosed chamber. To keep your machine tidy, this designer came up with this fan cover that uses a piece of fly screen to catch all the dirt and keep it away from the fan.
The cover is made up of two parts. Cut a circle with a diameter between 85 mm and 95 mm out of the fly screen and place it between the two pieces. You can then glue the two halves together and install them by simply pressing the pins to the existing holes of the auxiliary fan. Whenever you need to clean the fan, simply remove the cover.
- Difficulty: Easy
- Compatible models: K1, K1 Max
- Additional hardware: Fly screen, glue
- Designer: Snuffypot
- More information: Creality Cloud, Printables
Carbon Filter
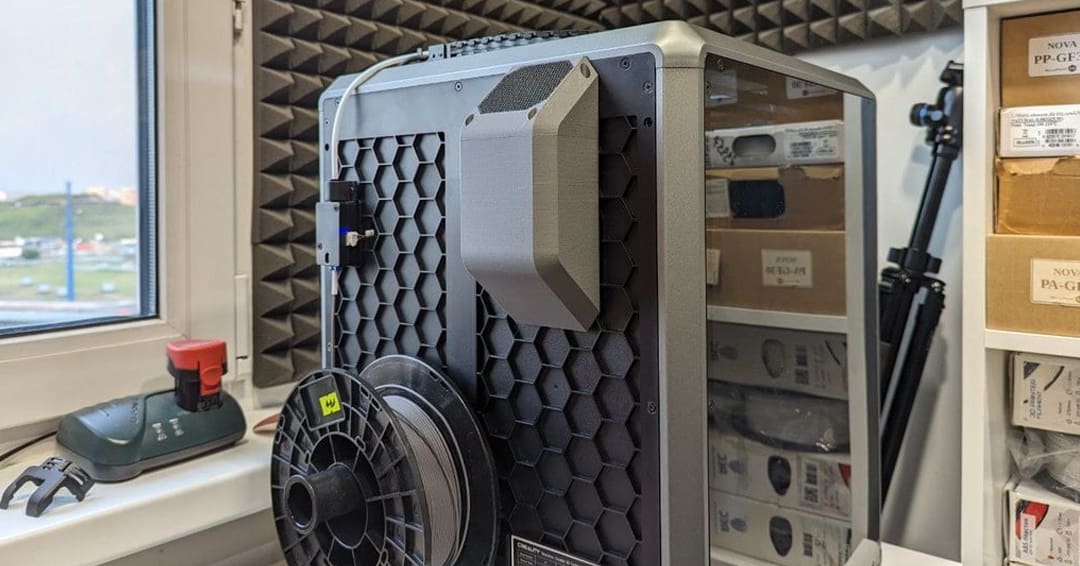
As an enclosed printer, the K1 allows you to print high-temperature filaments, such as nylon and PC. Unfortunately, these materials produce VOCs and particulates that can damage your lungs. If you want to print them, you have to take the right precautions. These can also help reduce the unpleasant odors and unhealthy fumes that these plastics may produce.
The K1 comes with a back fan for air recirculation. You can mount a carbon filter here to purify the air when you print these particular materials. With this modification, you can 3D print a structure to hold the filter. The structure is assembled with some screws, and it uses magnets to attach to the backside of the machine, where the back fan is located. You can insert the carbon filter in the structure and change it when needed by unscrewing the cap.
- Difficulty: Easy
- Compatible models: K1, K1 Max
- Additional hardware: A carbon filter, magnets, M3x8-mm screws, glue
- Designer: Sorkin
- More information: Thingiverse
Door Cover
Staying on the subject of high-temp filaments, you should definitely consider this next modification if you’re planning to print ABS and similar materials. Printed on the K1, this cover will take under 30 minutes and help you maintain the temperature inside the chamber by covering the gap between the door and the touchscreen. It also cuts down on noise, which is always a plus!
For this mod, you’ll need a wide foam tape. The designer recommends 6-mm tape, but there are also other thicknesses available. The only note is that you shouldn’t go lower than 2 mm. The creator also wrote that you can use PLA because the bottom of the chamber doesn’t usually reach 60 °C.
USB Dust Cover
With the K1 (Max), you can send files to your printer in a multitude of ways, including from the slicer, Creality Cloud, or via the USB port. Since most of us prefer using Creallity Print or Creality Cloud to start prints, the USB port sits unused, collecting dust. If that’s the case for you too, here’s the perfect model to print. This simple and light mod plugs into the USB port and covers it, so dust won’t be a problem anymore!
This is one of the fastest mods to print in our list. It weighs under two grams! The only thing you should pay attention to when slicing is the infill. Since we want to avoid breaking the part especially when it’s in the port, use 100% infill to make the cover stronger.
The designer has uploaded four versions of the model. You can choose between the logo and the plain file as well as an option that sits flush against the port.
- Difficulty: Easy
- Compatible models: K1, K1 Max
- Additional hardware: None required
- Designer: SHaDoW6
- More information: Thingiverse, Printables
Lid Riser
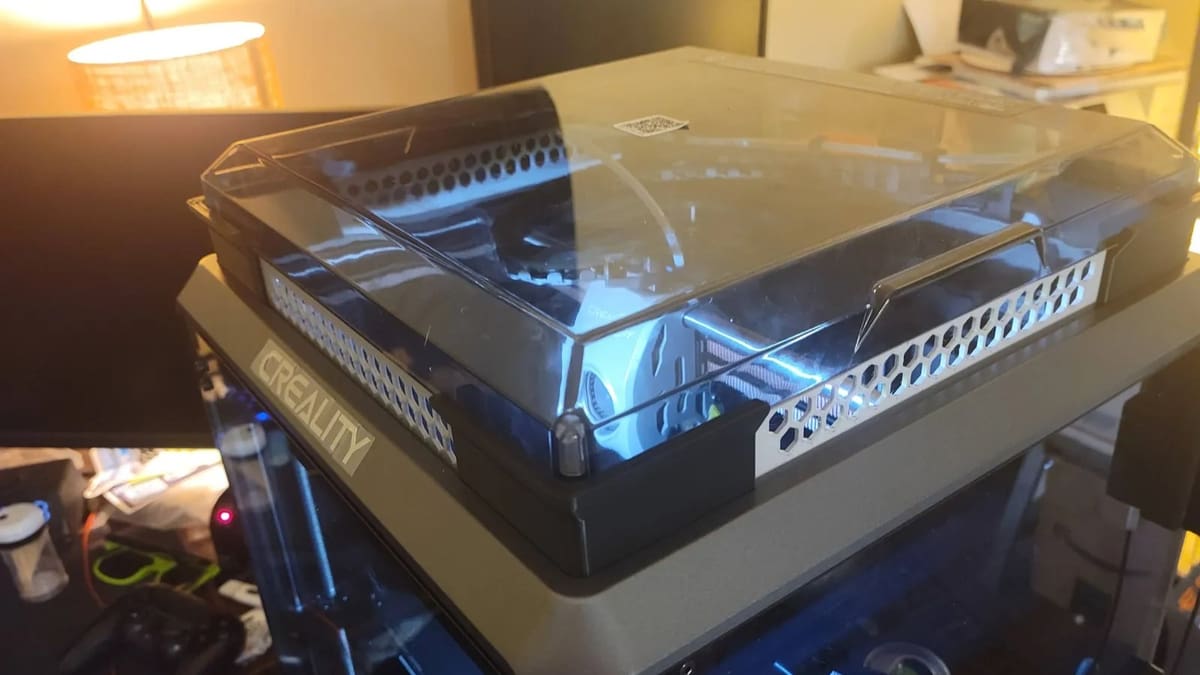
While the K1 is enclosed on all sides, it’s possible to open the door and remove the lid when printing materials that require more cooling, such as PLA. Unfortunately, when printing at high speeds, the cable chain of the machine can impact the left side of the lid, causing some noise. With this lid raiser, you can solve this problem.
This structure is fast to print and doesn’t need support. Plus, the whole structure weighs only 100 g. The pieces can either be screwed on the top of the machine or, the preferable option, attached with magnets.
However, you can even go one step further with this modification and print a hinged lid riser. When you print PLA and TPU and put away the lid, you have to find a place to leave it, which can be inconvenient and space-consuming. With this modification, you can solve the problem by adding a hinged lid riser to your machine. In this way, you’ll be able to open the machine without having to find a place to set the top cover.
- Difficulty: Easy
- Compatible models: K1, K1 Max
- Additional hardware: M3x30-mm screws or 6×2 magnets
- Designer: Joe Cooper, FredBoisselie
- More information: Printables – K1, K1 Max
Lid & Build Plate Holder
When printing with materials with a low melting point, you should take off the lid to avoid clogs. If you didn’t opt for the hinged lid riser in the previous section, you’ll have to find a place to store the lid. This design will help you with just that, providing a clever solution for storing your lid and build plates that might lay around.
The design consists of two holders that are mounted on the side directly on the K1 (Max) acrylic panel. Since they must carry the lid’s weight, consider printing them at 100% infill to make them durable. You can print them in whatever filaments you like, even PLA. After the print is finished, to put it in use you’ll need four M3 screws that are either 10 mm or 12 mm long.
270-degree Door Hinge
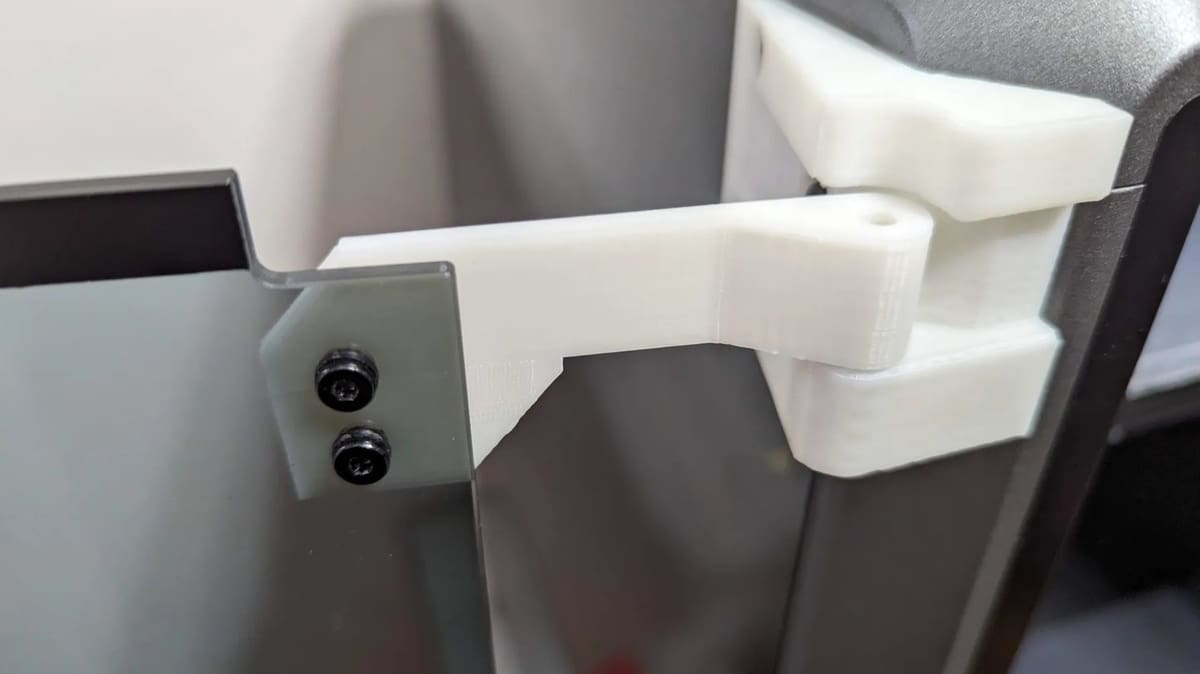
The K1 ships with a beautiful front glass door that is convenient for maintaining the temperature of the chamber while checking prints in progress. The only downside of the glass is its fragility.
If you want to protect your front door, consider printing and installing a 270° door hinge. This will let you open the door completely when needed, and the chances of it bumping into something will decrease significantly. This design is a print-in-place hinge that will allow you to align the door with the left side of the machine. Pay attention to turning off brims that could impede the motion of the print-in-place mechanism.
- Difficulty: Intermediate
- Compatible models: K1, K1 Max
- Additional hardware: M3x3-mm heat-set inserts, M3 nuts, M3x6-mm screws, M3x8-mm screws
- Designer: Alex_cf_Siu
- More information: Printables
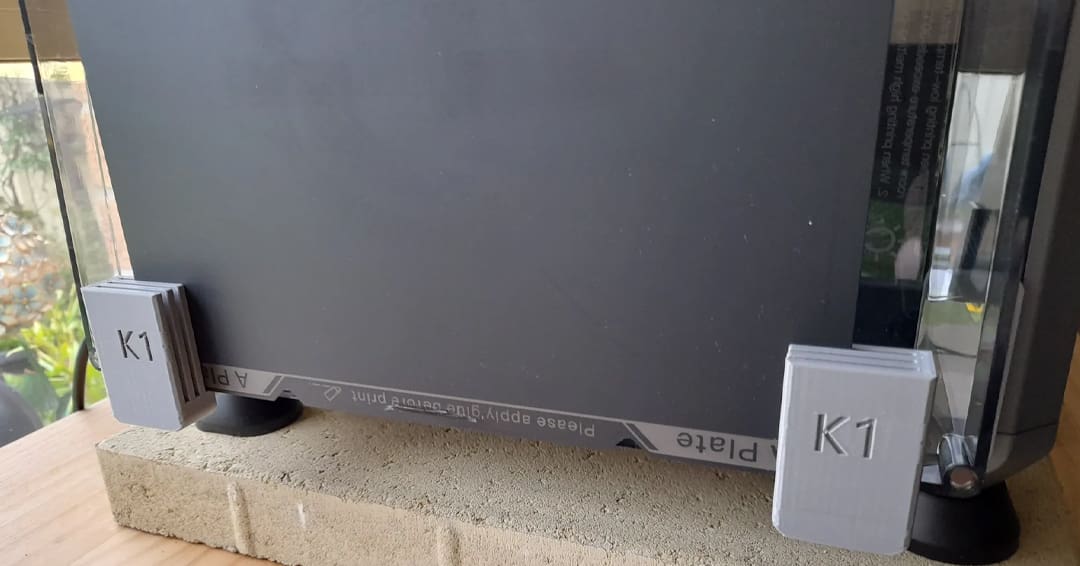
Tool Holder

If you want to make your instruments more accessible, you should definitely consider this tool holder. The part attaches to the left side of the printer via a little dowel. You can use also double-sided tape to secure it a little bit more to the panel.
It accommodates all the instruments that you may need for emergencies, such as keys or the spatula, and also includes space for tweezers. You can consider using this tool holder for the tools that you use the most and the previous drawers for the other components.
- Difficulty: Easy
- Compatible models: K1, K1 Max
- Additional hardware: Double-sided tape, a 5.5-mm dowel or screw
- Designer: revoked
- More information: Printables
Bottom Drawer
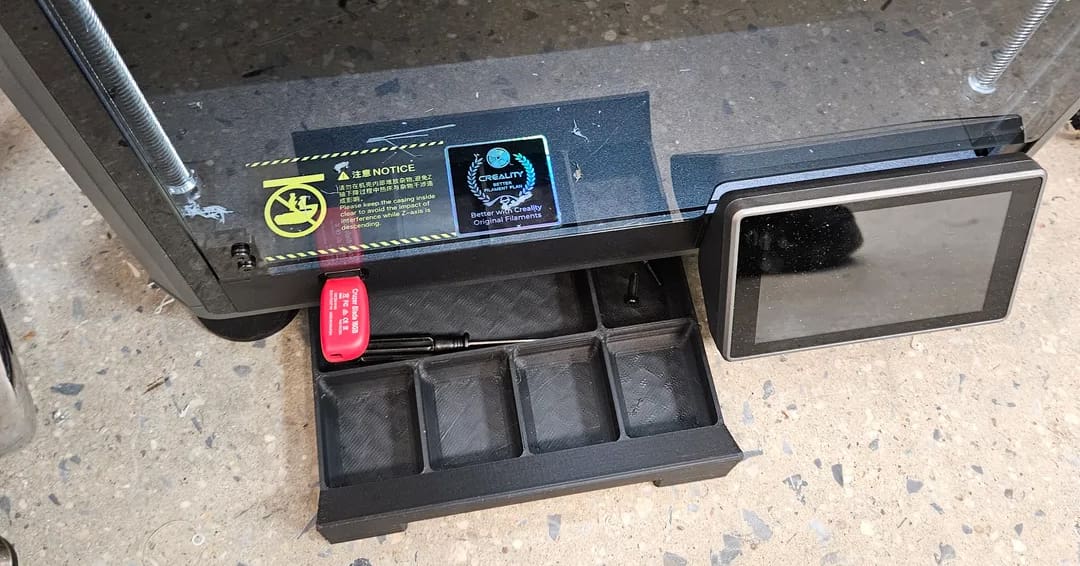
The K1 comes with a lot of accessories, and like many 3D printers, it requires regular maintenance. With this drawer, you can add an accessible and easy-to-reach place for all the instruments needed for cleaning and maintaining your 3D printer.
This 3D printable drawer is mounted on the underside of the Creality K1. There are two: a front one and a right-side one. The most important feature is that they don’t block the ventilation at the bottom of the machine.
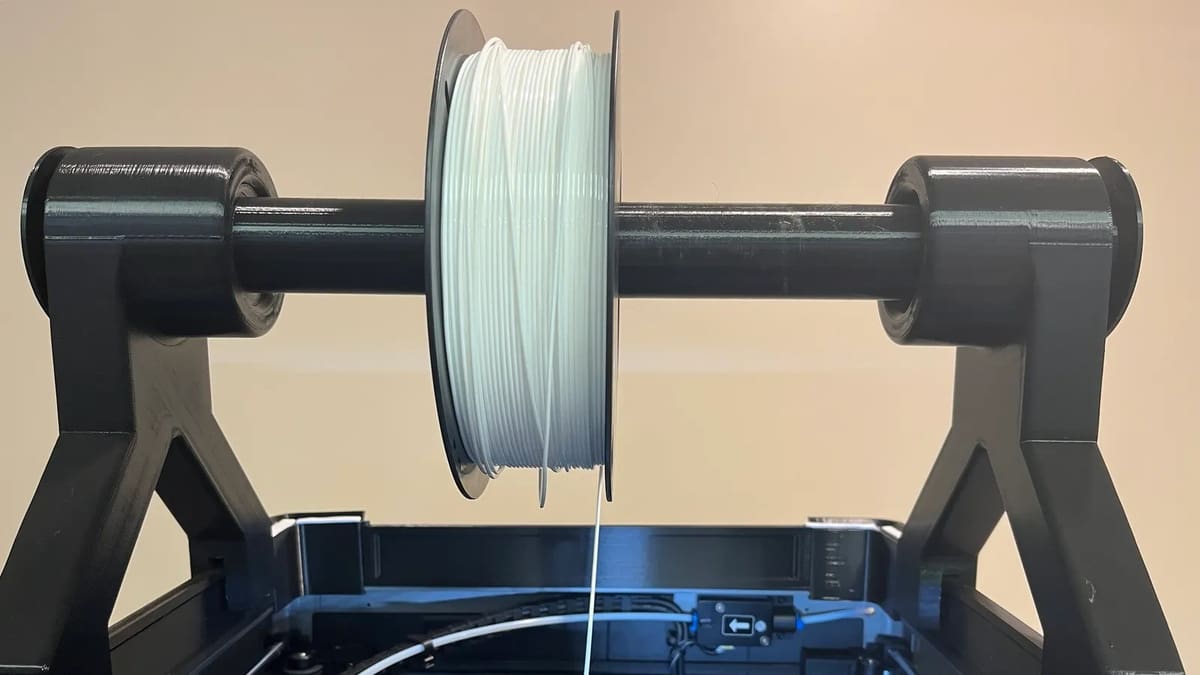
Side Spool Holder
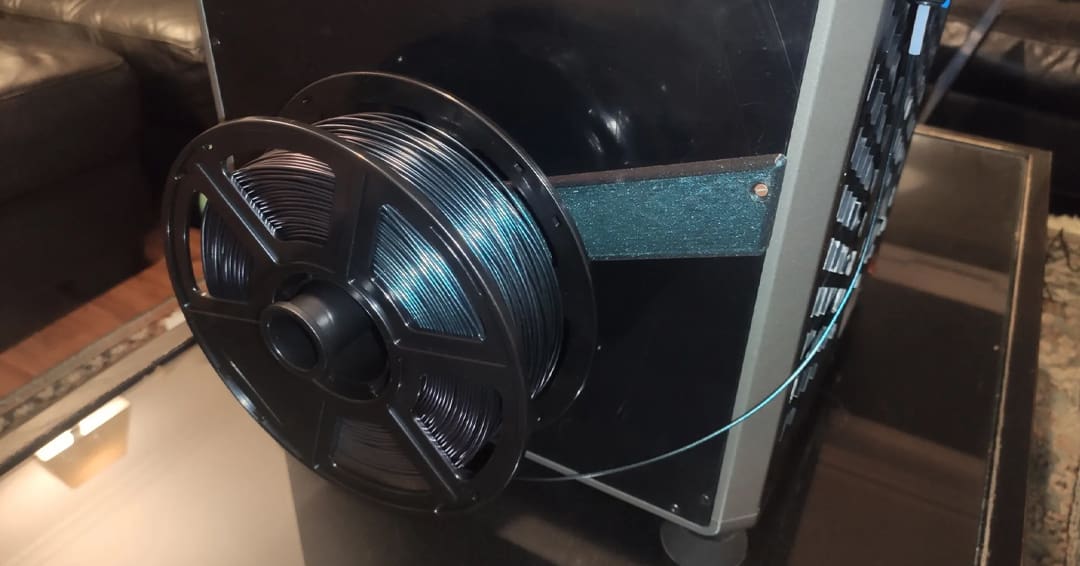
One of the major complaints of K1 (Max) owners is the position of the spool holder. Having it on the back side of the machine makes it quite challenging to load the filament comfortably. So, the community decided to do something about it. The result is this lateral spool holder that allows us to conveniently load filament. While you’re at it, you can also print a new side mount for the filament sensor.
This modification will require a little bit of work. To install the spool holder, remove the middle right screw from the acrylic panel and the bottom right screw from the auxiliary fan, then substitute them with two M3 screws that are 14 or 16 mm long. This compensates for the additional thickness of the spool holder. The stock roll can be used in the new setup.
If you want to change the position of the filament sensor too, remove the two top right screws of the acrylic panel. Then, mount the filament sensor on the acrylic by using the 3D printed bracket and two M3 screws, also either 14 or 16 mm in length.
For the super conscientious makers, you could also move only the filament sensor to the side and, instead of the side-mounted spool holder, load your filament into a filament dryer.
- Difficulty: Intermediate
- Compatible models: K1, K1 Max
- Additional hardware: 14- or 16-mm M3 screws
- Designer: MDFPereira
- More information: Printables – K1, K1 Max
Top Spool Holder for TPU
If you like printing with flexible filaments, consider this next upgrade for your K1. TPU is known for being a filament adapted to a direct extruder rather than a Bowden extruder. The K1 comes with a direct extruder, but it uses also a Bowden tube to guide the filament sensor from the backside, where it’s positioned the filament sensor to the tool head.
With this top spool holder modification, you’ll be able to bypass the Bowden tube and print your flexible filament without headaches. To use it on the K1, simply adjust the width of the part. One maker successfully printed it for their K1 by scaling to 80% along X- and Y-axes for all parts, then scaling Part A to 50% along the Z-axis and Parts B and C to 76% also along the Z-axis. It’s certainly a beefy print, but it will be super useful if you like printing TPU.
- Difficulty: Intermediate
- Compatible models: K1, K1 Max
- Additional hardware: None required
- Designer: MicKuo
- More information: Printables
License: The text of "The Best Creality K1 Mods & Upgrades" by All3DP is licensed under a Creative Commons Attribution 4.0 International License.
CERTAIN CONTENT THAT APPEARS ON THIS SITE COMES FROM AMAZON. THIS CONTENT IS PROVIDED ‘AS IS’ AND IS SUBJECT TO CHANGE OR REMOVAL AT ANY TIME.