DIY Filament Extruders: 8 Great Filament Makers

If you're tired of buying 3D printer filament, why not make your own? Read on to learn about DIY filament extruders!
Ever wondered where 3D printing filament comes from? Well, the stringed material that gets melted by your 3D printer is usually made with filament extruders.
Filament extruders turn granulated material pellets into 3D printable filament by melting the pellets into a molten substance, then feeding them through an output nozzle. While such extruders are most commonly found in the mass production of filament for commercial purposes, there are also a handful of DIY filament extruder projects that are perfect for individual use.
Some DIY filament extruders are more DIY than others. There are kits that you assemble, while others are open-source projects with guidelines or recommendations for hardware. In the former, most of the hardware is provided, and in the latter, you have to gather components yourself, some of which are 3D printable. In either case, you have to build the extruder on your own.
In this article, we’ll go over some of the best DIY filament extruders you can get. Even DIY extruders will cost something, so we’ve made sure to cover a wide span of prices to help you find a project that fits your budget. Before we get into the selections, though, let’s first discuss the nuances of homemade filament and what’s important when choosing between DIY filament extruders.

Hobbyist-Made Filament
Hobbyists can make filament in a somewhat similar way to how a large, professional manufacturer might produce filament – only at a much, much smaller scale. Whether hobbyist or professional, a filament extruder is needed, along with some granulated pellets, which are fed into the extruder, melted, and pushed out in a string-like form.
The devil is in the details, though. Hobbyists typically use smaller, slower, and less expensive filament extruders to make filament. This process is a lot more hands-on because these DIY or consumer filament extruders are less reliable than professional-grade extruders. So, a good amount of maintenance has to go into the machine for it to run reliably.
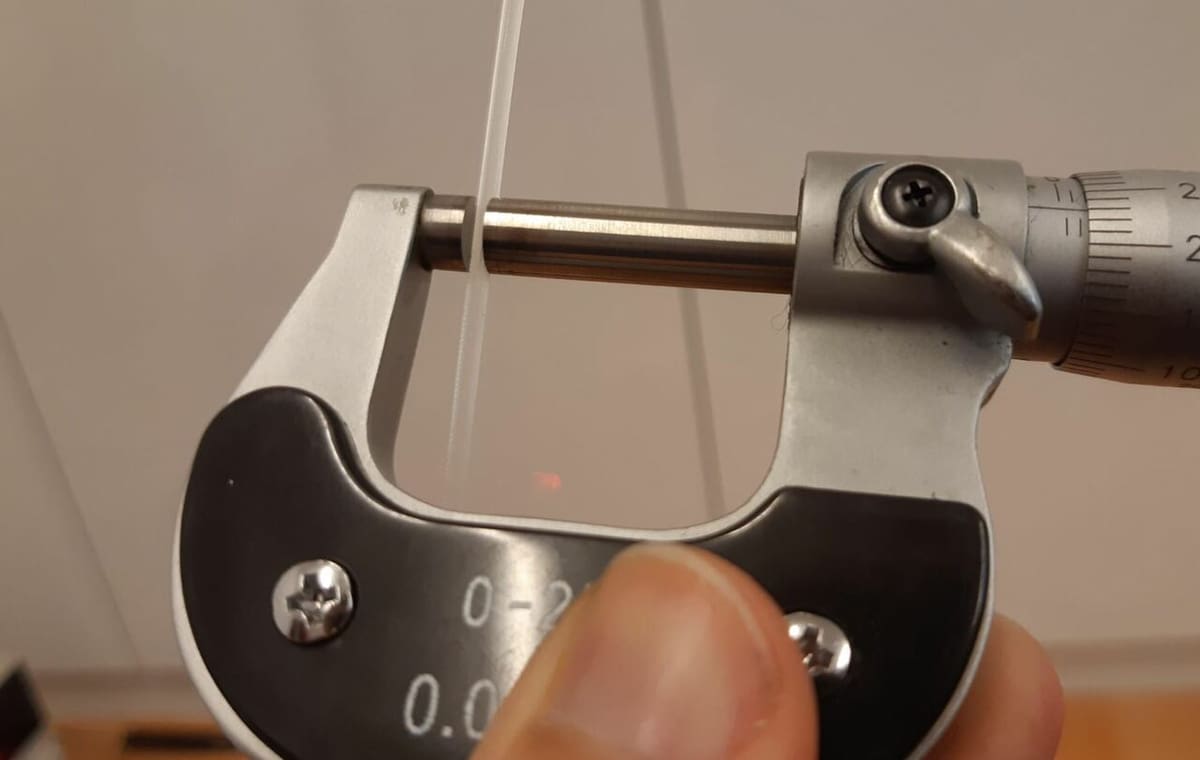
It’s also worth pointing out that hobbyist filament extruders don’t have the same high-end heating and cooling mechanisms. With fewer heating and cooling zones, these machines usually produce filament with a higher degree of variance in the filament’s diameter when compared to professionally made filament.
Finally, unlike professional manufacturers, hobbyists might not have the same post-extrusion tools and machines that make mass-manufactured filament so nice. For example, many hobbyists make their own filament without a spooling device to wrap the stringed filament around a spool.
At the end of the day, though, filament is still filament. While homemade filament might have some quirks compared to mass-produced, commercial filament, you can still make it work. It just might take some time to fine-tune the slicer settings.
The Next Layer
Before we take a look at how we narrowed down the list and what these projects are about, let’s have a look at one that has stood out in the DIY filament space.
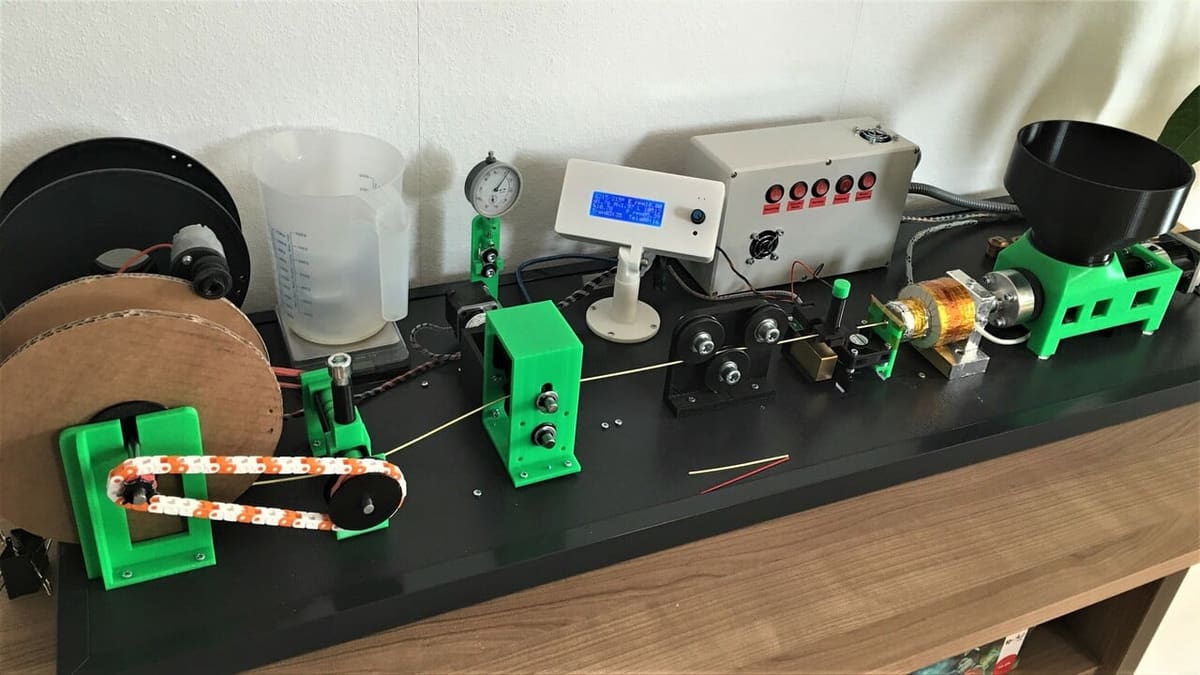
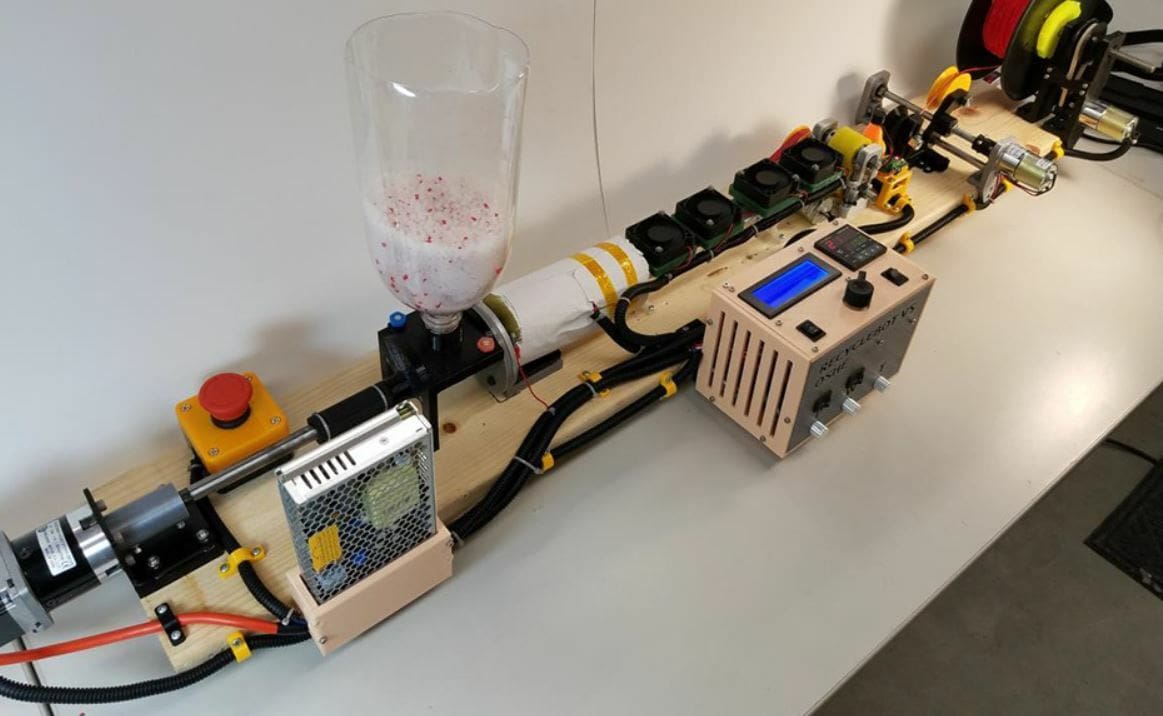
The Next Layer has an ongoing 3D printing project dedicated to recycling printing filament. The video series approaches 3D printing with the awareness of the growing environmental concerns associated with plastic waste in the 3D printing community. By recycling 3D prints into usable filament, The Next Layer aims for a sustainable alternative to conventional filament production, all for less than $1,500.
The videos show the various steps, including the framework and welding, building an extruder and shredder, sorting through plastic, and extruding your first DIY filament. At time of writing, the project is a work in progress – we’re looking forward to the latest updates!
Whether you’re looking into truly DIYing your own filament extruder or if you’re just curious into everything that should be considered depending on budget, time, and access to hardware, as well as other hidden gems, this series is great for anyone interested in recycling their filament at home.
Considerations
There are many important characteristics to consider when looking at a filament extruder. Here are some of the most important ones.
- Speed: When it comes to filament extruders, speed refers to how fast it can melt the loaded plastic pellets and pump out filament. As we mentioned above, the speed of DIY filament extruders is much less than that of a professional-level filament extruder. Still, there’s some variation between DIY setups, so speed is an important factor to consider. In each section, we’ve listed a range (or an average value) for the speed of each extruder, measured in kilograms (of filament) per a certain amount of hours.
- Supported materials: Depending on the maximum heating temperature, as well as a handful of other factors (type of feed screw, for example), filament extruders are only able to extrude certain pellet materials. In general, the higher the maximum heating temperature of the extruder, the longer the list of materials the machine can work with. Most DIY filament extruders will be compatible with ABS and PLA pellets, as it doesn’t take much heat to melt these materials.
- Assembly difficulty: As all of the featured options are DIY, it’s important to assess how difficult the project will be to assemble and get up and running. Difficulty is subjective and will depend quite a bit on your familiarity with the hardware involved and your experience with such machinery. The instructions for some projects are more straightforward than others. Take a look at the “Difficulty” bullet point at the end of each section to see how challenging we estimate the project to be.
Note that we didn’t list the projects in any particular order. Now, let’s check them out!
Lyman Extruder V5
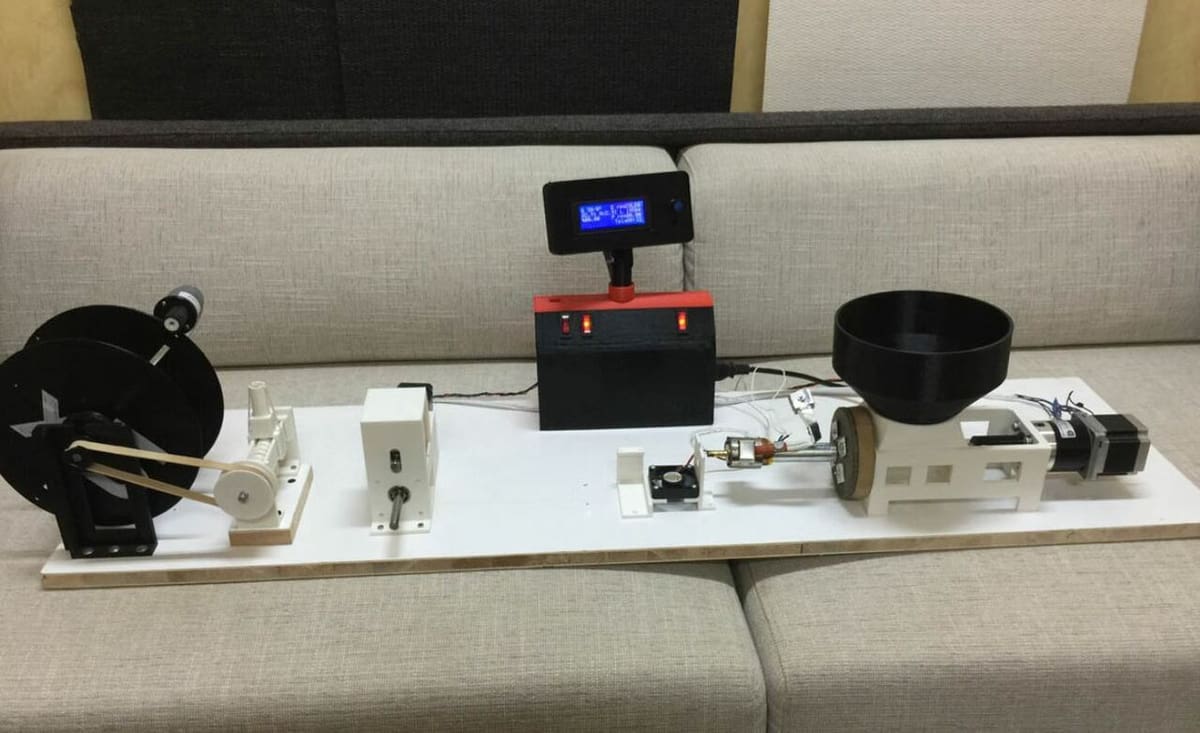
First up, the Lyman extruder was one of the first, if not the very first, home filament extruders. It was invented by 3D printing enthusiast and maker Hugh Lyman. Of course, like any first-generation machine, the original Lyman extruder had some issues, but the designer continues to integrate community feedback, which has led to the Lyman Extruder V5. There’s also a V6, but it’s less popular, and we think the V5 is more capable and better documented.
According to the designer, this filament extruder should cost around $600 to build, which isn’t bad compared to many other extruders on this list. Of course, this is partially because the Lyman V5 extruder is completely DIY. Luckily, the designer posted a 65-page tutorial guide for making the extruder, and there’s a lot of other community support for this project.
The V5 can produce a little under a kilogram of filament in around four hours, which again, isn’t bad for the price. Besides being more visually appealing than the previous version, the V5 Lyman extruder also has many other new features, like its LCD screen for showing the temperature and other data for the extruder.
The extruder also has a wider hopper than some previous versions to allow you to load more pellets into the auger bit. To further help ensure that only high-quality filament is produced, the designer included a filament diameter sensor on the machine. Additionally, this extruder project has a filament spool winder built onto the end of the machine.
- Approximate speed: ~1 kg per 4 hours
- Supported materials: PLA, ABS, and more
- Difficulty: Medium
- Price: ~$600
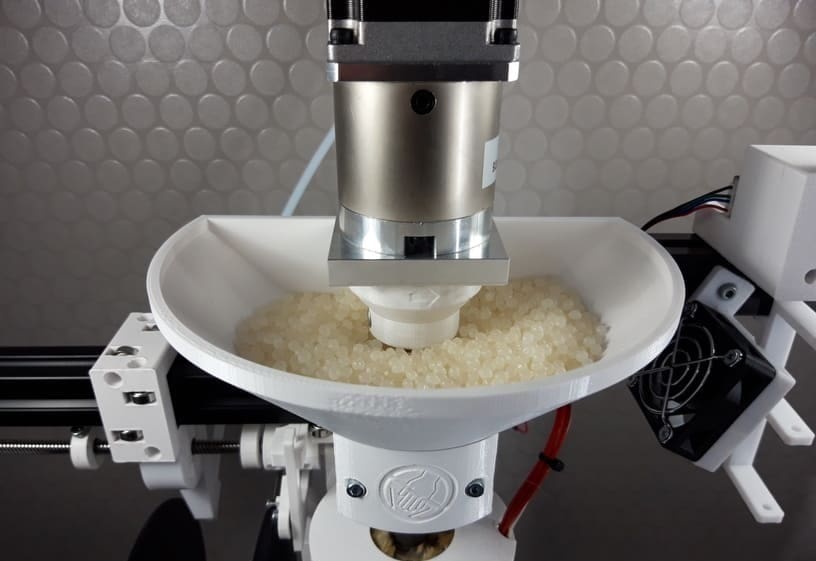
Precious Plastic Extruder
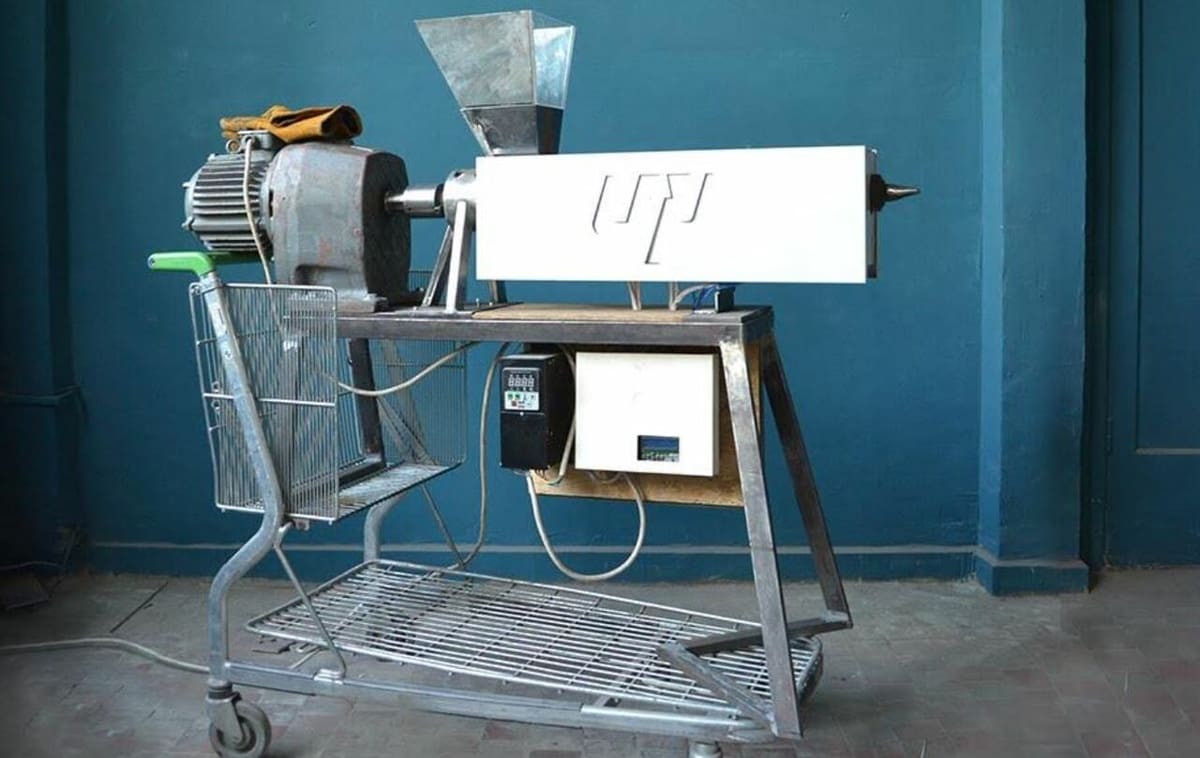
Precious Plastic is a company that provides build details for different plastic production devices, including injectors, shredders, and extruders. Their extrusion system, currently in version 2.0, is an open-source filament extruder meant to help you recycle old plastic. It’s important to note that this system isn’t technically meant for producing 3D printer filament, but attaching the right diameter output nozzle to the machine should make it possible.
This extruder should only set you back around $540 if you buy all the parts. According to the manufacturer, this price is closer to $215 if you happen to have some basic components, like a wood augur screw, lying around.
While the price is pretty cheap, even Precious Plastic admits that its extrusion system is pretty complex to build. As stated on the project page, you need to know how to configure electronics as well as weld and assemble mechanical structures. To make some of the custom parts for this DIY extruder, you’ll therefore need access to a drill press, angle grinder, and metal welder.
The fun part of the Precious Plastic extrusion system being open source is that you’re not constrained to only one set of building materials. Users have made Precious Plastic extrusion systems on a lemonade stand and even a shopping cart, as shown above!
This extrusion system is meant to produce a few widely recycled plastics, including HIPS, LDPE, PP, and PS. Still, there isn’t any reason lower-temperature 3D printing materials, like PLA, shouldn’t work.
Also, Precious Plastic states that their extrusion system should output around five kilograms of stringed plastic per hour. However, if you want a diameter tolerance that’s good enough for printing, you’ll have to use a much slower speed.
- Approximate speed: ~5 kg per hour (though less if you want quality filament)
- Supported materials: HIPS, LDPE, PP, and more
- Difficulty: Hard
- Price: $215-$540
Felfil DIY Project Pack
The Evo is a purchasable filament extruder made by Felfil, a company that specializes in filament production equipment. However, it’s completely open source. Technical drawings, 3D models, and instructions are all part of the Felfil’s DIY Extruder Project Pack.
Many of the parts required to complete the DIY extruder are easy to source and similar to parts used on 3D printers. For the specialty mechanical parts that are harder to source, Felfil sells a basic kit for makers who want to get a headstart on building their DIY filament extruder. There are also a few 3D printable upgrades you can print to soup up your DIY Felfil extruder.
If you follow Felfil’s design, the extruder will have three heating zones and be able to reach maximum temperature of 250 °C. As a result, you should be able to produce most standard 3D printing materials, including PLA, ABS, and PETG.
The assembly will be more difficult than simply buying their fully assembled Evo filament extruder, but thanks to their detailed step-by-step guide, the DIY version should be well within the reach of a determined maker.
- Approximate speed: ~1 kg per 7-10 hours
- Supported materials: PLA, ABS, and more
- Difficulty: Medium
- Price: ~$400 for basic kit
X3Uder
The X3uder, by Thingiverse maker mirox3m, is a DIY filament extruder that uses 3D printed parts and other widely-available hardware. Originally developed in 2013, the X3uder was designed after similar projects, such as Lyman’s Extruder, the Filastruder, and the Filabot. What makes the X3uder unique, however, is that you can use the existing electronics in a 12-V 3D printer to run the extruder rather than having to purchase a lot of proprietary hardware.
This machine is also pretty customizable. The designer posted a handful of editable Tinkercad designs, which allows you to adjust the dimensions of some of the 3D printable parts to make the filament extruder compatible with certain hardware.
While the designer stated that they hadn’t tested the X3uder with 1.75-mm filament yet, technically, it should work if you use an output nozzle with a diameter of 1.75 mm. Additionally, it’s worth noting that the creator of this project only mentioned that they extruded ABS filament. Given ABS requires a higher heat setting, you should be able to also make PLA filament, too.
- Approximate speed: ~1 kg per 10-12 hours
- Supported materials: ABS, PLA (likely)
- Difficulty: Medium
- Price: $200-$400 (depending on what hardware you already have)
RepRap Recyclebot
The RepRap Recyclebot is an open-source filament extruder project developed by Michigan Tech’s Open Sustainability Technology Lab. While most of the information about the device can be found on the RepRap project page, the 3D printable part files for the extruder – 25 in total – are available on the project’s Thingiverse page.
The 3D printable components make up the body of the filament extruder. A few other pieces of hardware are required, including metal sprockets, a windshield wiper motor, an auger bit, some wire, and an Arduino Uno board to control the machine. None of the hardware is proprietary, and as the Recyclebot is an open-source project, you can make basically any parts work. For example, the original maker of the project was able to use an old laptop power adaptor as their heating component.
Assembling the Recyclebot is a bit difficult, considering how many different parts are involved in the machine. However, the RepRap and Thingiverse pages (wiring, parts) for the projects all have some instructions about how to make the machine, which should make the building process slightly easier.
- Approximate speed: ~1 kg per 2.5 hours
- Supported materials: ABS and PET (PLA should also work, but it hasn’t been officially tested)
- Difficulty: Hard
- Price: Varies depending on hardware
Artme3D MK2
Artme3D is a well-known name in the 3D printing community, mostly for small-scale plastic extrusion. Established in 2016, the company has created several DIY extruder kits, the latest being the MK2 and the MK2.5. The kit (at time of writing, only the MK2.5 is available) doesn’t come assembled and you have to print the plastic parts yourself.
It should be noted that the only difference between the two kits is the gear for the extruder drive, which in the MK2.5 includes 3D printed parts as the creator faced challenges when acquiring the hardware, causing further delays in preparing the MK2 kit. There are otherwise no differences in performance and features. So, the MK2 (and MK2.5) works with pellets and grinds as raw materials to produce filament. The creator notes that fiber-reinforced, polypropylene (PP), and shredded PET materials shouldn’t be processed. Some flexible materials have been tested, but it might be best to err on the side of caution.
Once the kit is assembled, it’s possible to interchange nozzles and adjust temperature and speed. But what really sells this machine is its stir bar, which allows even feeding of the shredded filament or pellets that might otherwise congest and stop the feeding. If the shredded plastic has some impurities, some plastic grinders are prone to letting these into the extruded filament, which may also clog the nozzle. Luckily, Artme3D MK2 uses a melt filter, with holes smaller than the nozzle of a typical 3D printer.
Its output is at about 1 kg per hour, which is decent for its price range. When it comes to filament diameter, it won’t give the tightest tolerances, but users can expect a variance of about 0.01 mm, which, to be fair, is acceptable even for commercial filaments.
On the flip side, assembling the kit requires a more than significant amount of tinkering. On top of that, its wire sensor arm can get in the way, causing the filament to get stuck to it and bounce back. And there’s no shredding solution – users have to build or buy one themselves.
While it might be a bit on the more expensive side and will require significant tinkering, the Artme3D MK2 gives a good bang for your buck if you’re a hobbyist intent on making your own filament.
- Approximate speed: ~1 kg per 4 hours
- Supported materials: PLA, ABS, PETG, and more
- Difficulty: Hard
- Price: ~$730
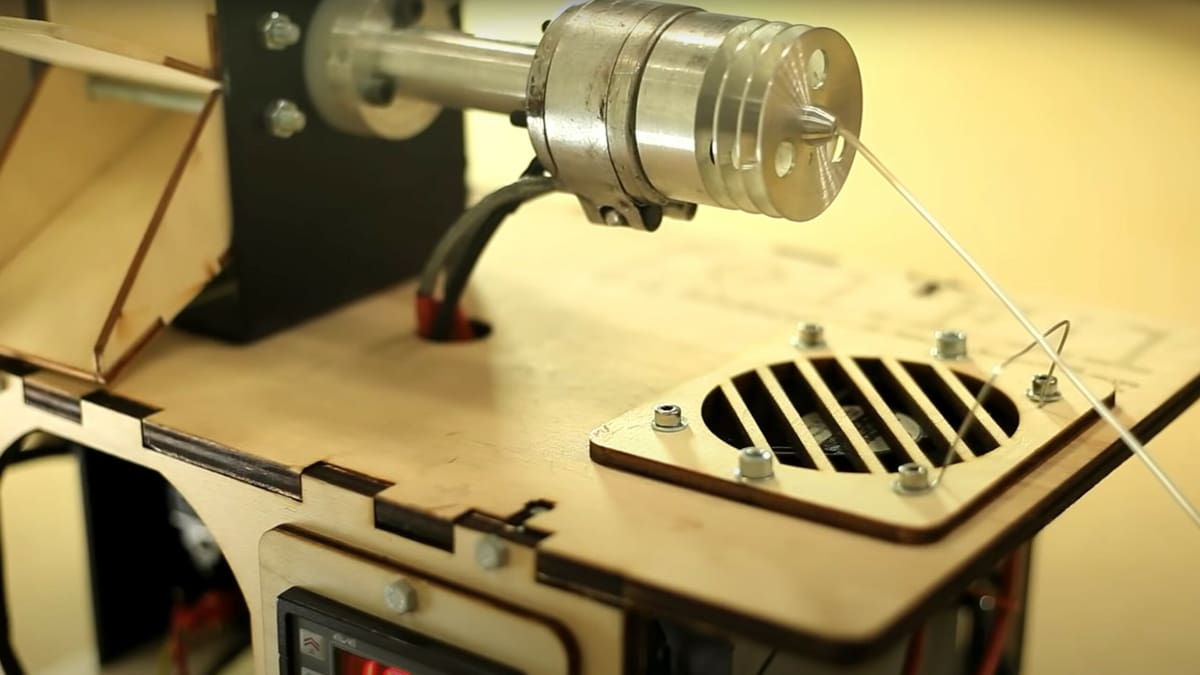
DIY Filament Factory
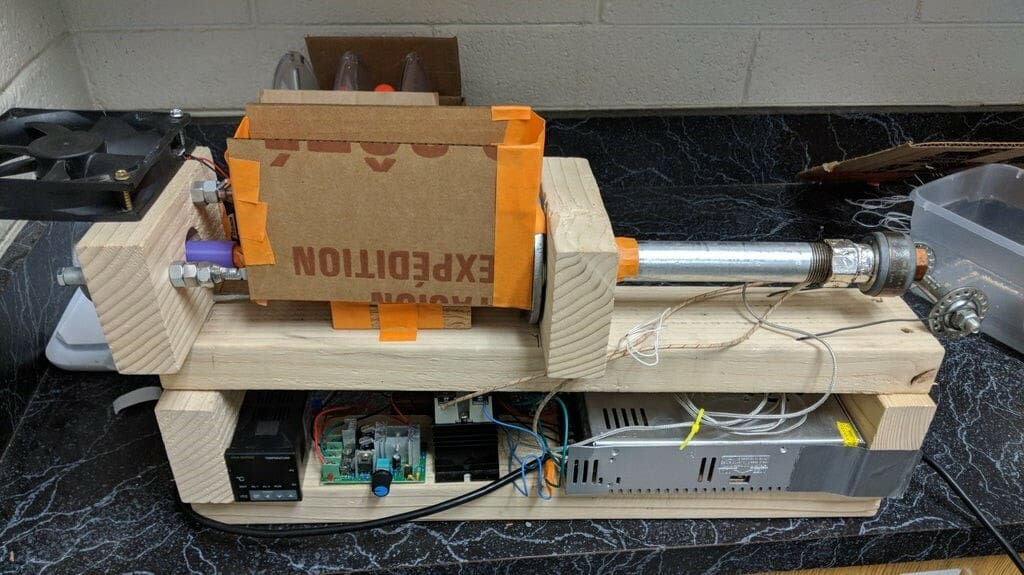
Lastly, this DIY filament extruder was made by Instructables user ianmcmill. They stated that the project was inspired by other community creations, including Lyman’s and Xabbax’s extruders. Perhaps the most unique characteristic of this DIY extruder is its cost. According to the creator, you should be able to make this extruder for under $200.
This extruder is said to be pretty fast, producing a kilogram of filament in less than an hour. It uses basic and special hardware to function, including an auger bit, wood boards, fans, and motors. It’s also completely DIY, and while the maker has posted useful instructions, wiring diagrams, and a list of parts, this project will still require some experience to make.
- Approximate speed: ~1 kg per hour
- Supported materials: PLA, ABS, PC blends, and more
- Difficulty: Medium to hard
- Price: ~$200
Bonus: Pultrusion
Another DIY filament-making method called “pultrusion” – you’ll also see “pullstrusion” – takes the notion of reduce, reuse, and recycle to the next level. Rather than melting pellets and extruding them into filament, used PET bottles are the source material for the pultrusion method.
They’re cleaned, then depending on the shape of the bottles, inflated and heated to achieve a smooth surface. Next, the bottles are sliced into long strips, then fed through a heat end and nozzle where they’re curled into a hollow filament whose cross section isn’t perfectly round. This last point is particularly important when it comes to 3D printing because the flow rate settings must be adjusted to compensate for the filament’s shape.
The obvious benefit of pultrusion is the ability to reuse a material that’s readily available in abundant quantities. It’s easy to do, even on a shoestring budget, and there are a number of devices that can be printed at home or purchased to facilitate the process.
In terms of cons, the amount of filament you can get is limited to the size of the bottle. You’re looking at about 20 grams of filament, so you’ll have to splice the filament together to get a longer strand for larger printing projects. Then, there’s the adventure of printing with PET. However, with adequate cooling and the right print settings, these challenges can be overcome.
Example Machines
As mentioned above, there are several machines out there, both DIY and paid, that facilitate filament making with pultrusion. The following are a few that caught our attention:
- Recreator 3D: Designed by Joshua Taylor, this pultrusion unit is created from a combination of 3D printed parts as well as parts from an Ender 3 3D printer. The design has gone through a few iterations, with the MK5 Kit being the latest. There copious amount of support materials on the website and YouTube, and all of the necessary STL files can be found on Printables.
- Polyformer: This award-winning design was inspired by Taylor’s Recreator 3D project. Unlike the Recreator, though, all of the pultrusion action happens vertically in a compartment that opens rather gracefully at the front of the unit. The strips sit above and are fed down into the hot end. The curled filament exits the nozzle, rolls along a guilder, then is wound with a winder at the back of the unit. The machine is fully open source, and non-printable parts can be repurposed from a 3D printer or bought separately.
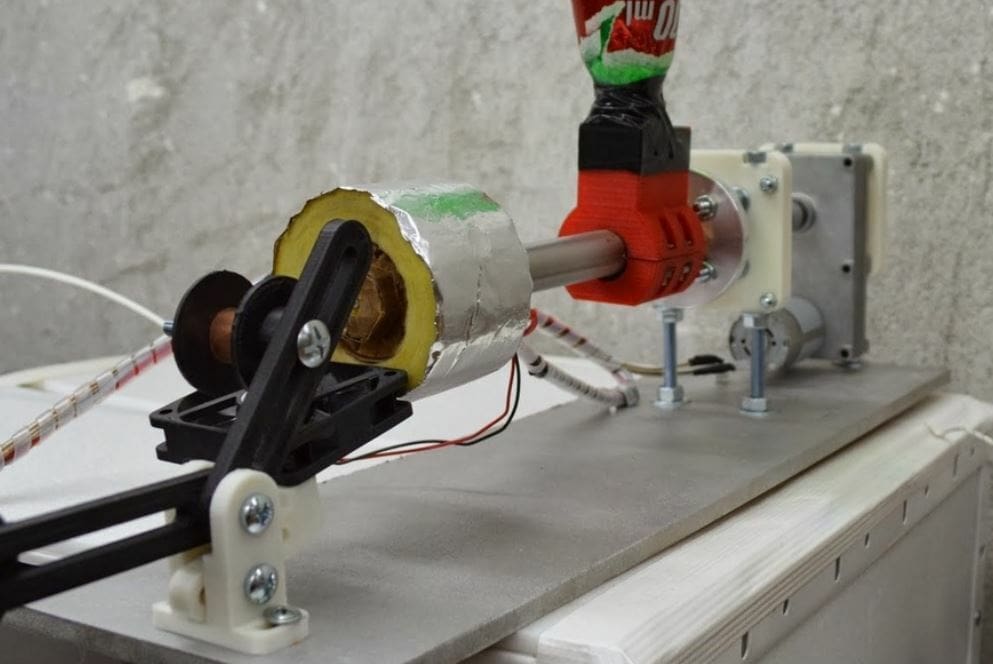
- Pullstruder: This DIY project is the most complex of the three. While the concept is pretty much the same, it involves building a custom hot end with a combination of aluminum, a heat band, and a PID controller. Similar to the other projects, repurposed parts are used – this time, a car wiper motor from an old car. This one is definitely for those who love to tinker.
License: The text of "DIY Filament Extruders: 8 Great Filament Makers" by All3DP is licensed under a Creative Commons Attribution 4.0 International License.