
14 Cool Esp32-Cam Projects for All Levels of Experience

The Esp32-Cam is a very versatile microcontroller, with onboard Wi-Fi, Bluetooth, and a camera! Read on for the coolest Esp32-Cam projects.
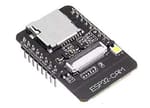
Tinkerers will recognize the Esp32 as one of the most versatile microcontrollers, with its small footprint, powerful processing capabilities, and onboard wireless connectivity. Building upon its predecessor, the Esp8266, the Esp32 is one of the most popular wireless microcontroller boards and a great choice for wireless projects. The Esp32-Cam adds another useful feature into the mix: a camera!
The Esp32-Cam brings together some impressive features, with a dual-core 32-bit processor, ultra-low-power modes for increased battery longevity, up to 34 programmable GPIO pins, a Hall effect (magnetic) sensor, capacitive touch sensors, as well as Bluetooth 4.2 and 802.11b/g/n Wi-Fi connectivity. All these features fit within a package that is just 40 x 30 x 5 mm!
These features make it an ideal choice for any sort of internet of things (IoT) devices, hosting HTML pages, or streaming videos over the internet. With such versatility, it can be difficult to know where to start. We’ve collected our favorite Esp32-Cam specific projects for your viewing pleasure!
Beginner
These first projects are great to get your bearings with the Esp32-Cam and what it can accomplish.
Plant-Growing Assistant
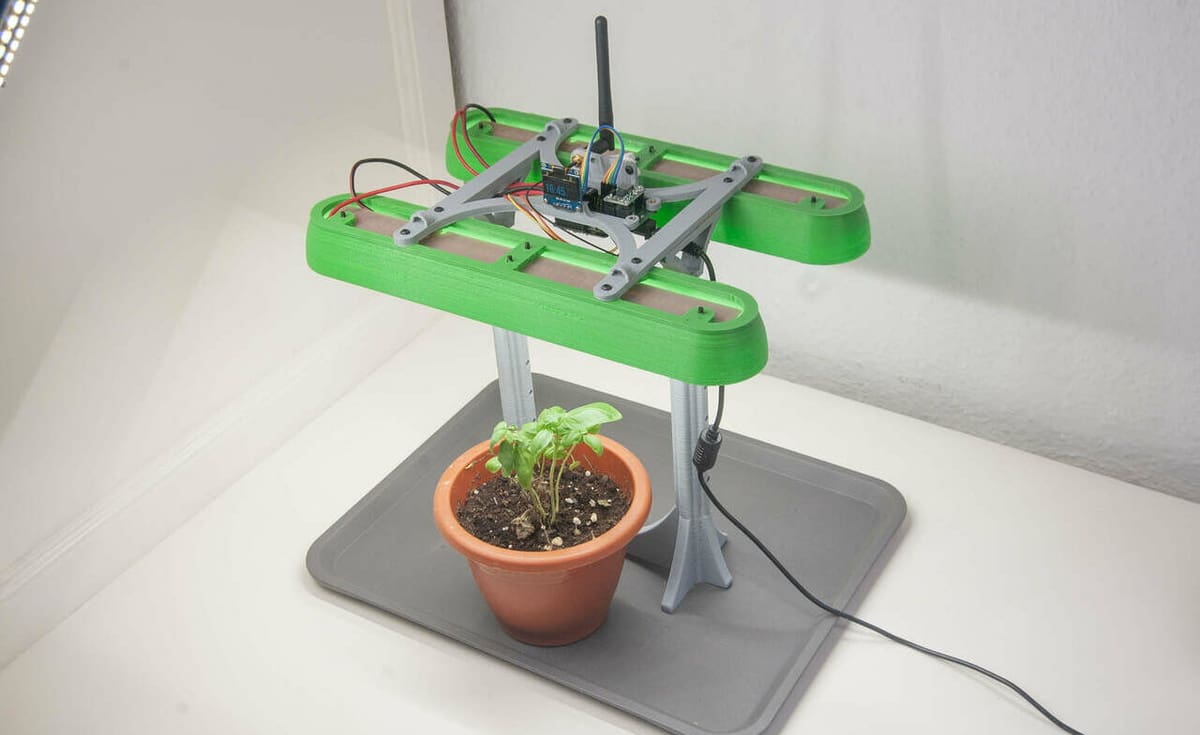
User nkmakes has created an Esp32-based assistant for growing plants! Integrating with the popular ESPHome IoT platform, the Esp32-Cam is mounted directly above whatever you’re growing, giving you a clear view of the plant’s health. Two powerful lamps are remotely controlled through the Home Assistant apps and plug-ins, and a small OLED screen displays the time and other information.
Using a simple 3D printed stand, this project is great for beginners looking to have a real-world output from their projects. Combine this with some other microcontroller projects, and you’ve got a full greenhouse on your hands!
- Designer: nkmakes
- Project page: GitHub
- Core components: Esp32-Cam, BXEB-L0280 LED, Meanwell LDD-700L, 24‑V power supply, OLED screen, DHT22 temperature sensor, MP1584 buck converter, 3D printed stand
Interactive Minecraft Sign
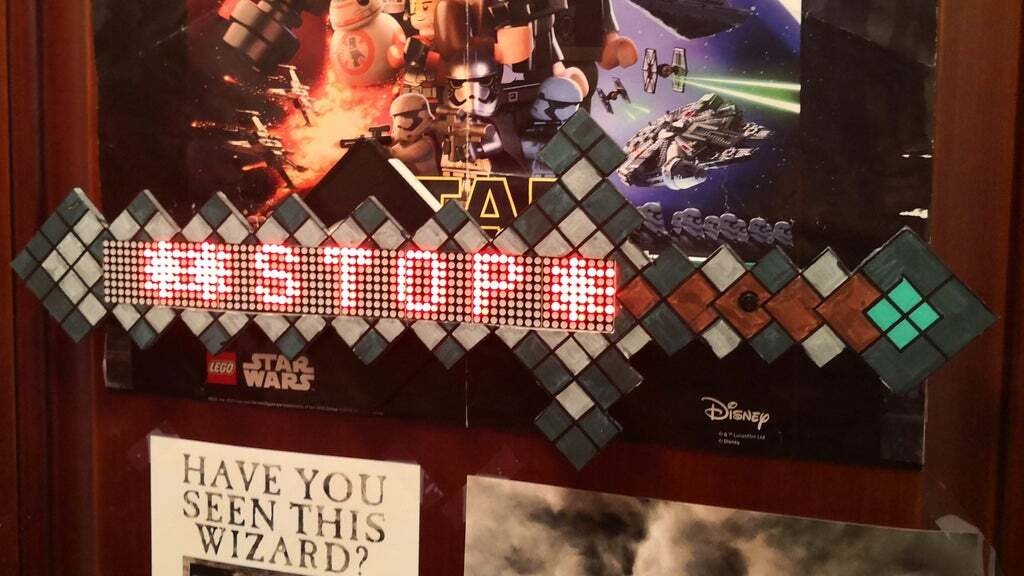
Replace that old “Keep Out” sign on your door with a high-tech customizable sign. This project from arkhipenko on Instructables uses an Esp32-Cam and a couple of dot matrix modules to have a scrolling display of words, so it can have any text you’d like! With the Esp32-Cam, you can stream a live view of who’s at the door and change the text for a quippy response!
This project is built on FreeRTOS, a real-time operating system. It’s a great way to learn about the inner workings of the different cores of an Esp32-Cam. The project takes you through the design choices, including clear pictures and diagrams with code examples. It’s great for beginners looking to learn a bit more about how one microcontroller can do multiple tasks at once.
If you’re not entirely sure it’s what you’re after, check out the YouTube demo to be swayed!
- Designer: arkhipenko
- Project page: Instructables
- Core components: Esp32-Cam, Max7219 dot matrix module, 2,500 mAh USB power bank

Mailbox Monitor
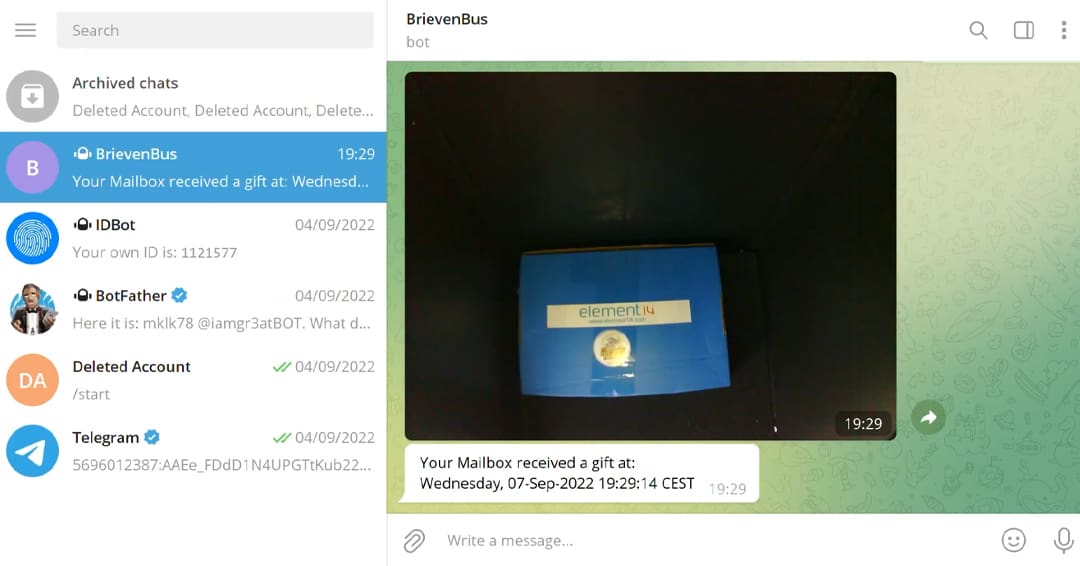
Nowadays, the vast majority of the correspondence we receive is online, but there are still plenty of letters and packages to be received. Since we aren’t always at home, it wouldn’t be that odd to forget to check the mailbox, leaving mail there for some days.
No more with this cool project! This mailbox monitor will alert you via Telegram when you receive a package. Thanks to the Esp32-Cam, not only will you receive notifications when mail arrives, but you’ll also be able to take a photo of the package.
To recreate this project, you need very few components: the Esp32-Cam, an antenna, a capacitor, and a switch. A 3D printed case, to keep the wiring tidy and to protect the Esp32-Cam from weather, would be handy. If you don’t own a 3D printer, Craftcloud can take care of it for you. Finally, to program the Telegram bot, you’ll need BotFather.
The video tutorial thoroughly explains the steps required to recreate the project. Furthermore, the creator published a bonus tutorial where they explain how to install libraries if it’s the first time you’re using the Esp32-Cam with Arduino. That’s for sure a great functional project to get started with the Esp32-Cam!
Security
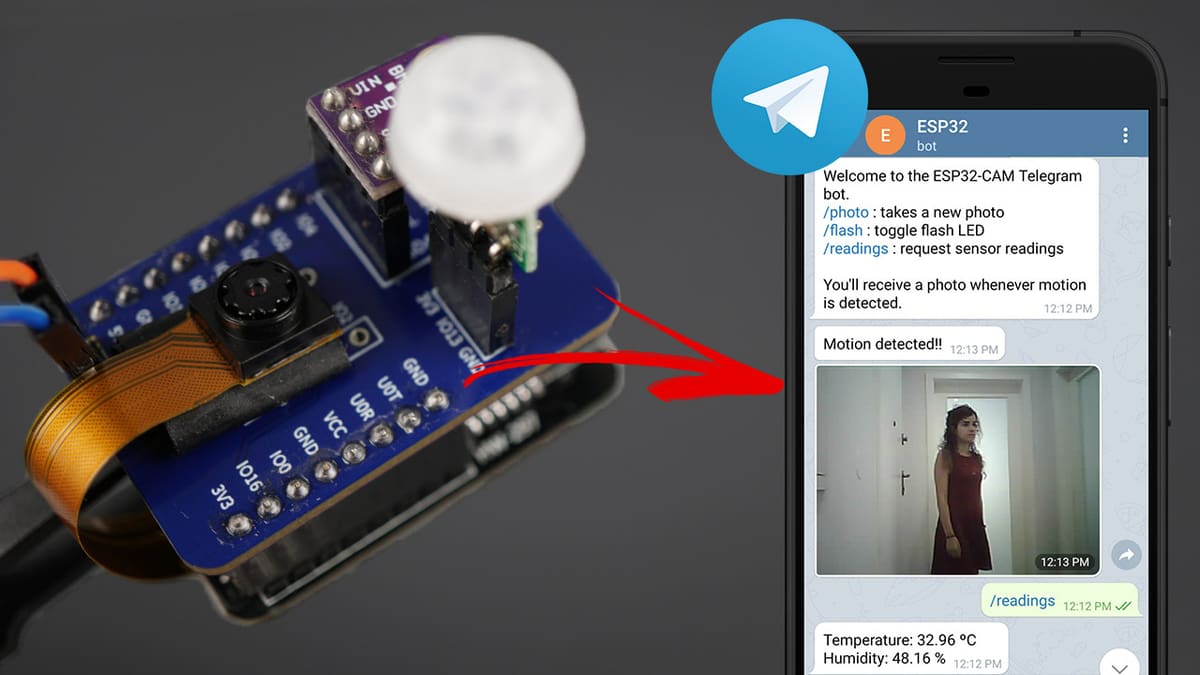
With the Esp32-Cam’s built-in Wi-Fi and Bluetooth, making an IoT security camera is easy as pie! This tutorial goes through step-by-step how to put together a motion-activated security system using the Esp32-Cam, a custom-made PCB, and a simple PIR and temperature sensor for detection of someone within the camera frame.
The tutorial link is filled with example code, thorough instructions, and clear pictures and diagrams for all who are looking to replicate this project. Whether you’re just getting started with Arduino IDE or if you’ve already got your bearings, this project will be a great learning opportunity!
- Designer: Random Nerd Tutorials
- Project page: Random Nerd Tutorials
- Core components: Esp32-Cam, custom PCB, BME280 sensor, AM312 PIR sensor
Intermediate
Taking it a step further, the following projects might require a bit more tinkering or background knowledge.
Face Recognition Door Lock
For those looking to make their facial recognition project tangible, this project builds upon the previous facial recognition project by adding a lock. With a voltage regulator and a couple of diodes, it can unlock a door whenever it detects your face!
Techstudycell has a full wiring diagram and example code to integrate this simple electronic lock into your own door, turning it into a cool futuristic gateway!
- Designer: techstudycell
- Project pages: Electronic Projects, YouTube
- Core components: Esp32-Cam, 12-V electronic door lock, IC 7805 voltage regulator, TIP122 NPN transistor, 12-V DC power supply, various resistors, capacitors, and diodes
Computer Vision
Combining computer vision with the Esp32-Cam turns this versatile little microcontroller into an AI-powered machine! This tutorial is the perfect introduction to OpenCV, taking you through each step of the image processing done for object detection.
Change values on the fly to see the effect on your image, and dial in the perfect settings for optimal object detection! No extra hardware is needed, as the Esp32-Cam will host the web server with the user interface.
- Designer: Random Nerd Tutorials
- Project page: Random Nerd Tutorials
- Core components: Esp32-Cam
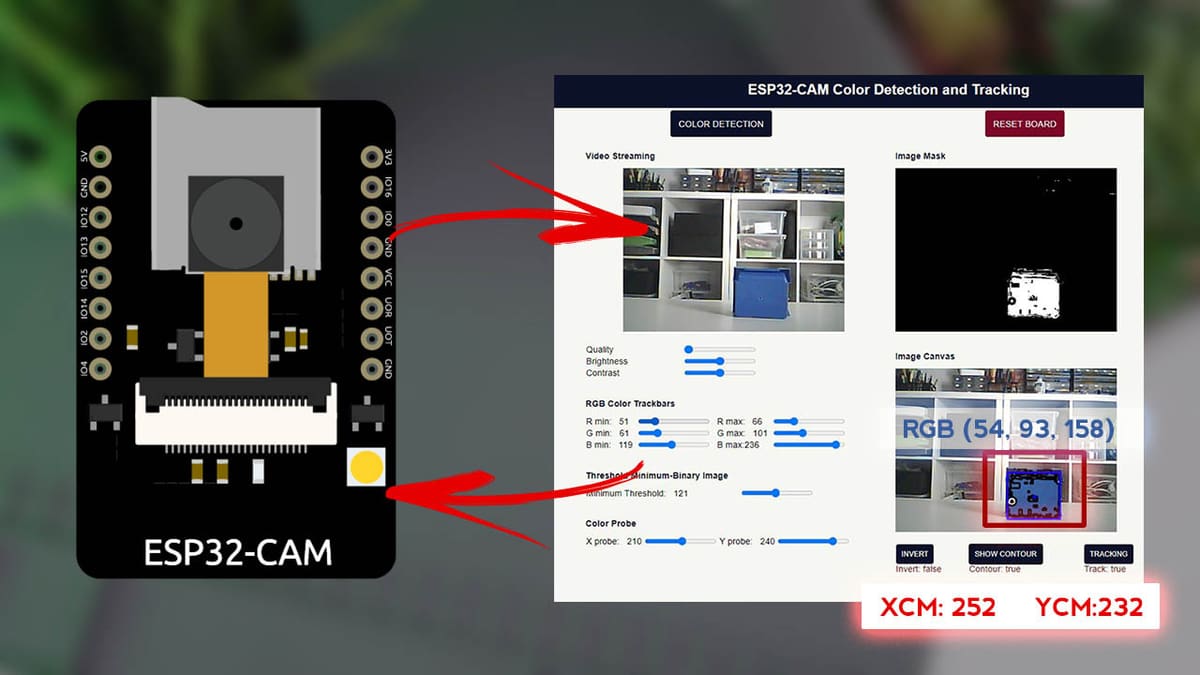
Object Counter
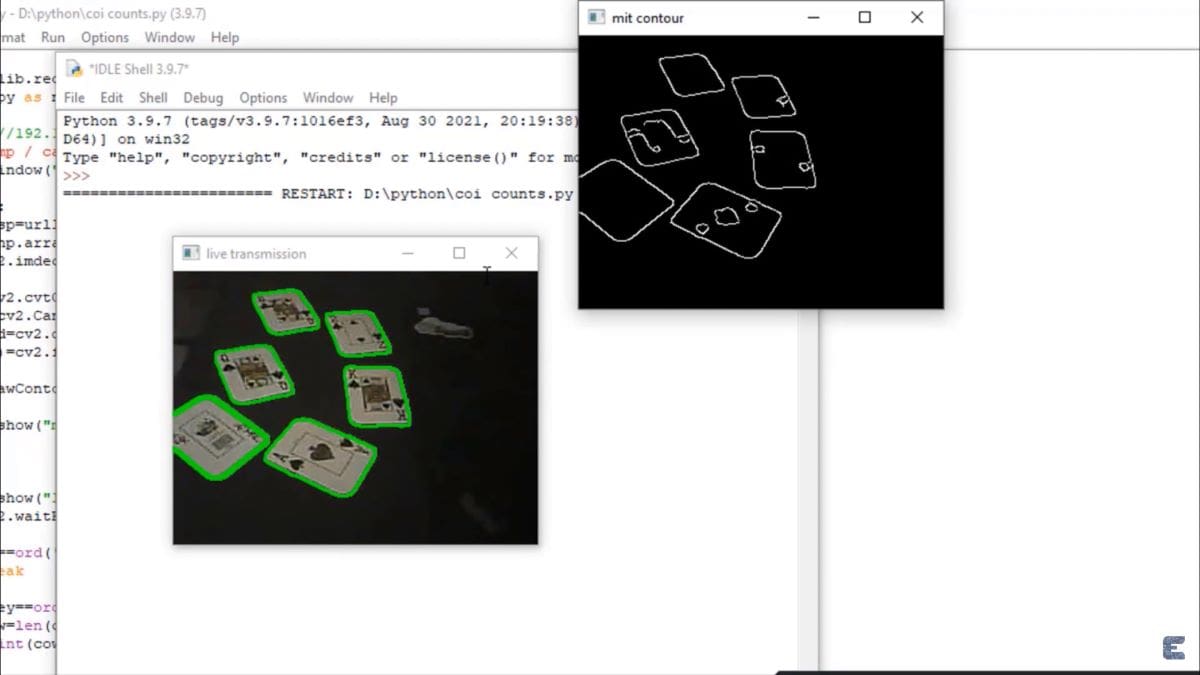
Object counting is quite important to keep track of inventory. With this project, you can realize your own object counter with an Esp32-Cam and some coding. The creator has taken inspiration from an existing phone app and has transformed it into a funny electronics project, based on OpenCV libraries.
To achieve its goal, the processor converts the image recorded from the camera into a greyscale frame, so that different shades are clearly distinguishable. Then it proceeds to identify the borders of the objects and finally count them to give us a result.
The logic behind this counter is simple: the Esp32-Cam compares the background color with the objects color to distinguish them. Unfortunately, this means that if the background and the objects present the same color, the Esp32-Cam won’t detect any object. So keep this in mind when using the device.
- Designer: HowToElectronics
- Project pages: HowToElectronics, YouTube
- Core components: Esp32-Cam, FTDI module
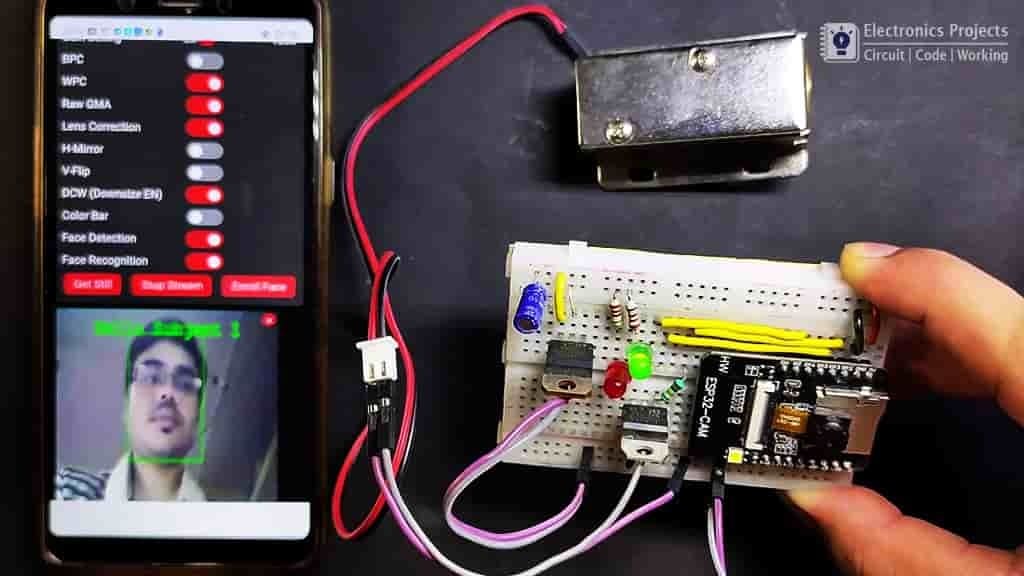
Face Detection
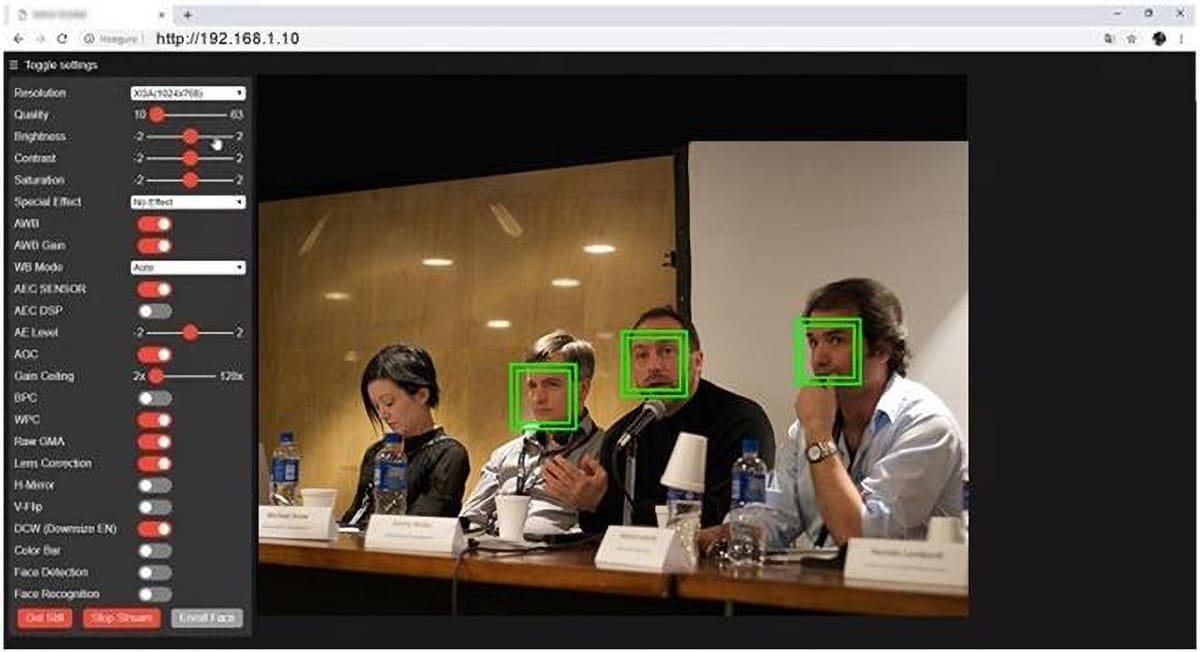
With the Esp32-Cam, you can run a facial recognition program on a budget! The tutorial takes you through running a tiny video streaming server on the Esp32-Cam and using a premade model for facial detection.
You’ll be able to “enroll” your own face so that the Esp32-Cam gets trained to recognize you. The project is also based on the ExpressIDF IoT framework, rather than the standard Arduino IDE you might be used to.
Smart Doorbell
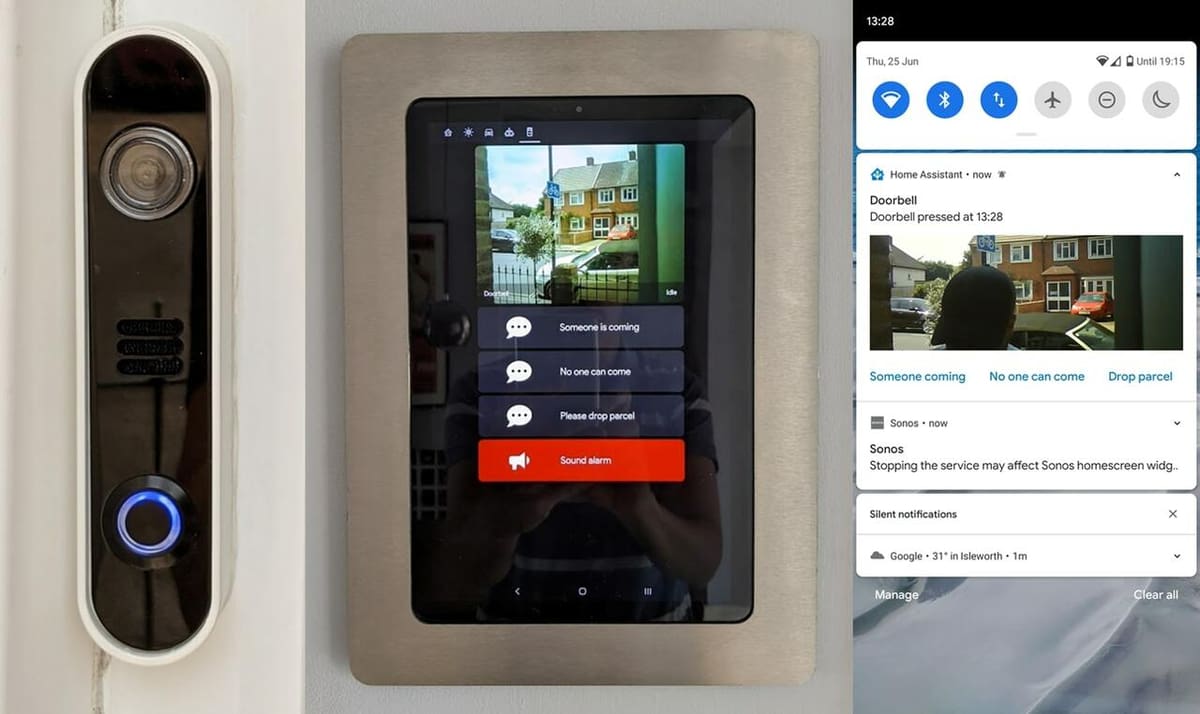
Similar to a Ring doorbell, this project is an ESPHome project that integrates well with the DIY Home Assistant platform. When the doorbell is pressed, a message gets sent to the connected Google Home devices and notifications with photos are sent and stored. Plus, selected lightbulbs inside the house flash blue to visually notify you. Given how easily Home Assistant workflows can be defined, you can have the doorbell automate any number of tasks within the platform!
User ronschaeffer has uploaded all their 3D files, scripts, and configuration files for this project for all of those who wish to create something similar!
- Designer: ronschaeffer
- Project page: GitHub
- Core components: Esp32-Cam, illuminated 12-V momentary push button, DFPlayer Mini, 3D printed housing
Robot
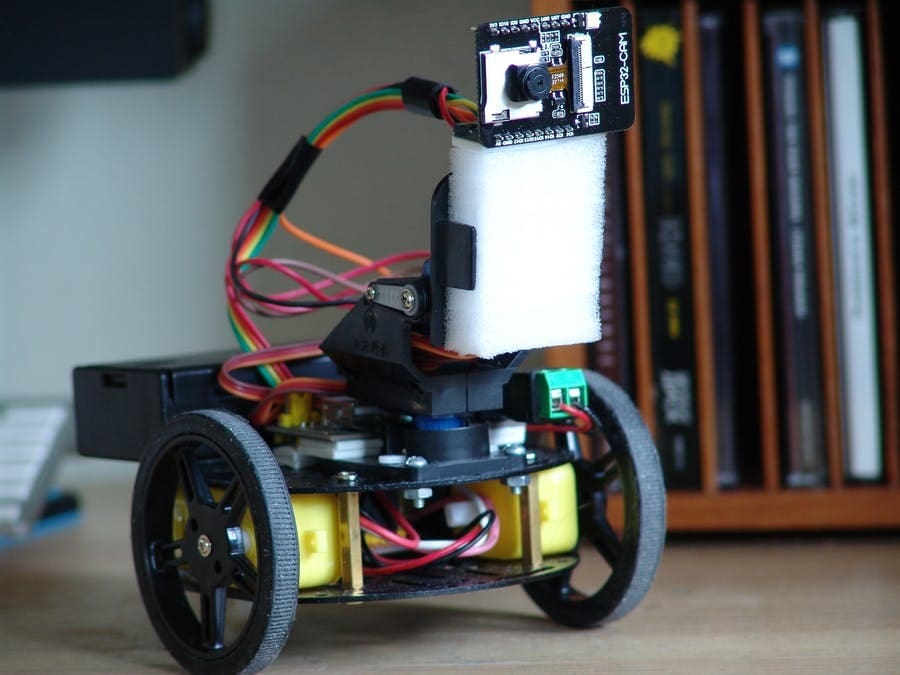
This tutorial combines the simple Adafruit three-layer robot chassis with an Esp32-Cam to give you a two-wheeled security robot! Using L298 motor drivers and motors for the wheels, you can build this robot from an off-the-shelf chassis kit and a pan/tilt camera platform.
If you want to take it a step further, you can download the iRobbie-A app (~$6). With it, you’ll control the robot’s driving from a simple joystick, while seeing a live view of the attached camera on the Esp32. The app even allows for object tracking and built-in voice control!
- Designer: KDPA
- Project page: Hackster
- Core components: Esp32-Cam, L298N motor driver, Adafruit (PID 3244) Three-Layer Round Robot Chassis Kit, 18650 battery and holder, MB102 breadboard, mini pan/tilt camera platform
Rover

Rovers are really fun to play with. Thanks to their structure, they can climb up on rocks easily and move without problems in nature. If you’re into 3D printing, this could be the perfect project for you to use the Esp32-Cam.
The creator designed a rover that can be remotely controlled and checked thanks to the camera. The designer has uploaded a series of eight videos about this project, so if you want to build the rover, there’s plenty of information to guide you.
You can choose between the Scout32 and the ScoutXL that, as you might have guessed, is the bigger brother. If you choose the XL model, keep in mind that the complexity of the build increases, since you’ll need multiple batteries. For the 3D printed parts, the tracks should be printed in TPU (the creator recommends 95A Shore hardness) and the chassis in PLA.
This is a perfect project to combine mechanics and electronics and test your skills. If you successfully complete the build, you’ll obtain a cool FVP rover that can be controlled via Wi-Fi both from your phone and your computer. Thanks to the Esp32-Cam, you’ll also be able to film what the rover frames.
- Designer: RossPeters
- Project pages: Printables, YouTube
- Core components: Esp32-Cam, 3D printed parts, servo motors, LiPo battery, LEDs
Advanced
These last projects will be a bit more challenging to put together, but they’re going to be well worth the effort!
Gesture-Controlled Mouse

This project is really cool because by following the guide, you’ll be able to realize a gesture-controlled mouse: The Esp32-Cam will detect your hand and fingers, allowing you to move and click wirelessly.
Be aware that to successfully complete the project, you need to have some knowledge of Python, image processing, IoT, and embedded systems.
The first thing you have to do is to test the code with the laptop’s or a USB camera. In order to do that, you have to install Python – at least the 3.7.8 version. Then you can test the code that’s available on the website by saving it in a new folder and naming it “track_hand”.
After you’ve installed the required libraries, you should create a virtual environment for the test. You can just run the code and check that your hand and fingers are correctly identified by moving your hand and checking the key points. If the code passes the test, you can upload it to your Esp32-Cam and start using your gesture-controlled mouse.
- Designer: HowToElectronics
- Project pages: HowToElectronics, YouTube
- Core components: Esp32-Cam, FTDI module
Red Light, Green Light
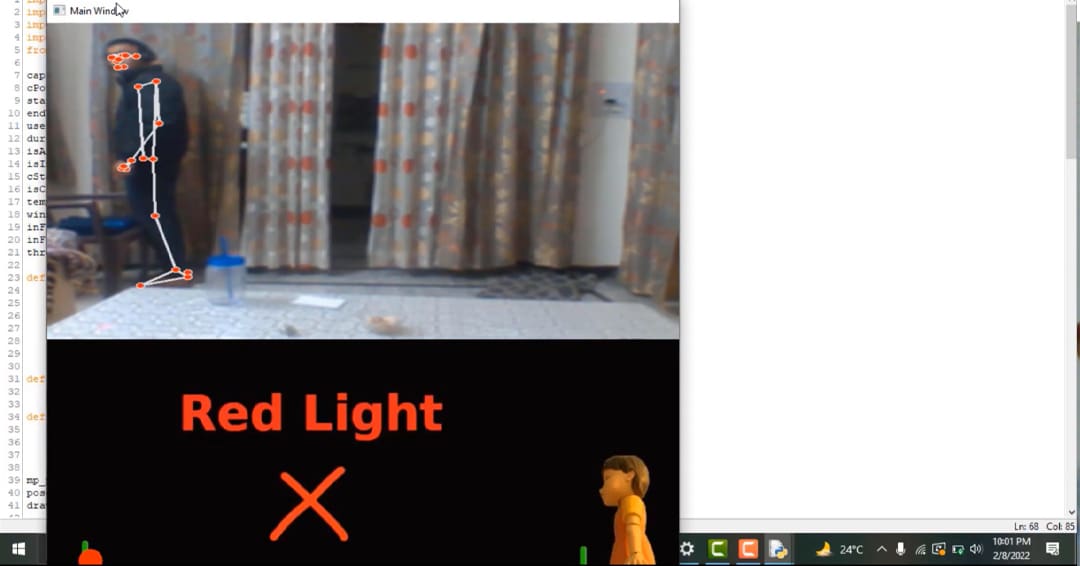
Squid Game skyrocketed in popularity a couple of years ago. This well-known TV series shows some challenges that the protagonists have to face, one of which is “Red Light, Green Light”. The rules are simple: with the green light you can move, but with the red light you must stop and stay still. The Esp32-Cam will use motion detection to establish if you win or lose.
The logic behind this project is really similar to the one used for the gesture-controlled mouse. Because both projects require some background knowledge to make them work, beginners might be better suited starting with another one.
On the computer, you’ll be able to check what the camera is seeing, together with the animation “Red Light, Green Light”. If the Esp32-Cam detects any movement during the Red Light phase, it will take a photo and declare that you’ve lost. To play, simply run the code and make sure that your whole body is in the frame.
Now let’s start the game!
- Designer: HowToElectronics
- Project pages: HowToElectronics, YouTube
- Core components: Esp32-Cam
Drone
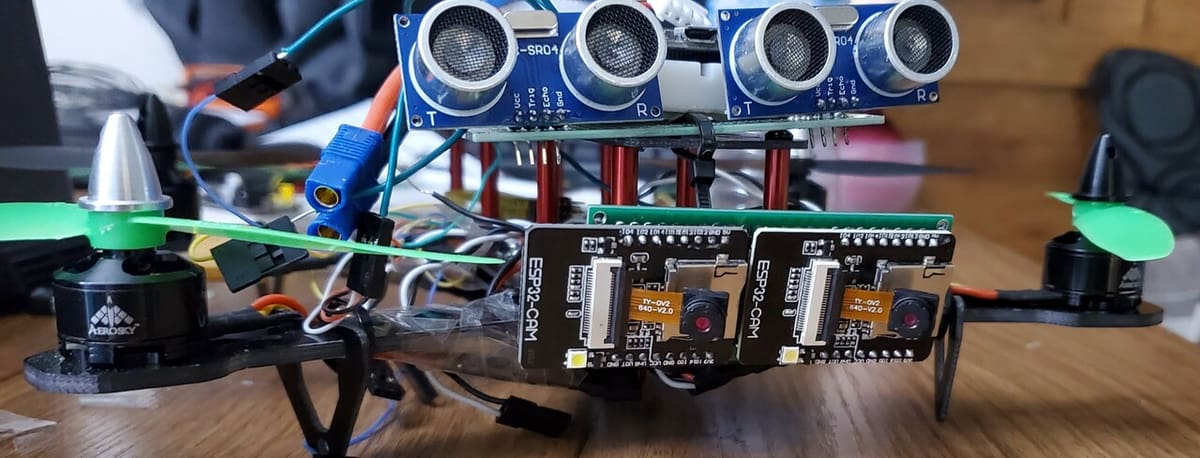
For this project, you can create an incredible intelligent drone that can see, track, and follow you as you move through the world! The drone uses two Esp32-Cam microcontrollers for true stereoscopic vision and better distance calculations. A regular Esp32 development board is used to send data to the CC3D flight controller through a Tornado server.
The drone is then controllable through an Android app, where you can use a traditional joystick for flight or set it to follow the user through the cameras. While this project is a work in progress by Kevin Omanwa, you can also check out a similar project with example code and files.
- Designer: impatientchip
- Project page: Hackaday
- Core components: Esp32-Cam, Esp32 development boards, CC3D flight controller, Zmr250 drone kit, GT-U7 GPS module
License: The text of "14 Cool Esp32-Cam Projects for All Levels of Experience" by All3DP is licensed under a Creative Commons Attribution 4.0 International License.
CERTAIN CONTENT THAT APPEARS ON THIS SITE COMES FROM AMAZON. THIS CONTENT IS PROVIDED ‘AS IS’ AND IS SUBJECT TO CHANGE OR REMOVAL AT ANY TIME.