10 Incredible HueForge 3D Prints You’ll Want to Try

HueForge's popularity has skyrocketed, and for good reason. Check out our list of the coolest HueForge 3D prints!
HueForge is unique software that allows you to bring multicolor images and photos to life without the need for a multicolor unit. In fact, using transmission distance (TD), HueForge can calculate where to swap filaments to obtain the desired color blends. The TD measures how much light can pass through the filament, or simply said, how transparent a spool is. This allows you to combine colors by tweaking how many layers to use for each.
HueForge creates a 3D model from the imported image and lets you preview the final result by adjusting the filament sliders. You can then export both the model and the slicing instructions that you have to follow in order to create your HueForge print.
In this article, we want to bring you the coolest HueForge models out there. These can be useful for different reasons. First of all, since HueForge is a paid program, they allow you to check out the effect so you can decide if you like it and if the price is worth it for your use case. Then, you can certify that your printer is able to produce these kinds of prints since it needs to pause at a layer. Finally, these projects can be useful not only for inspiration, but also to master the art of HueForge by analyzing the results of expert users.
Let’s get right into it!

Hummingbird
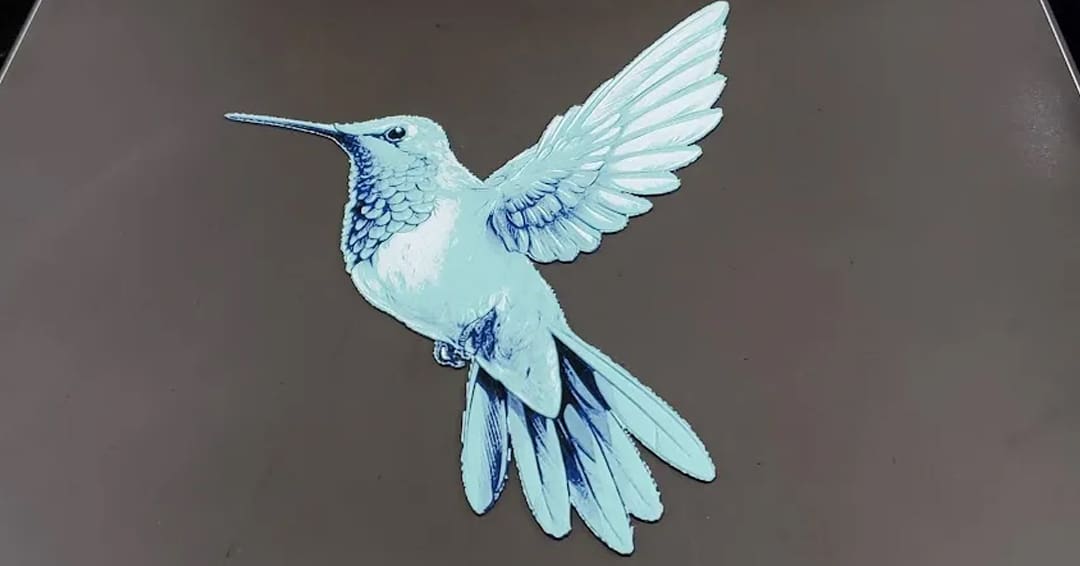
Let’s start with a classic. The Hummingbird is one of the most famous HueForge prints that you can find out there, and for good reason: it’s one of the most realistic prints that can be created. It’s a perfect model to try out the stunning effects provided by HueForge and to dip your toes into the program.
To replicate the creator’s original effect, you’ll need four spools of Polymaker PLA, in particular black, blue, yellow, and white. The designer has also reported the TD values for each filament, so you can use other brands with similar TDs. Alternatively, you can customize the color palette as many other users did with their makes, the one pictured above included.
- Who designed it? ZombieHedgehog
- How printable/popular is it? Between the repositories, it can brag over 1,500 downloads, with 48 makes shared on Printables alone!
- Where to find it? Printables, MakerWorld
Super Mario
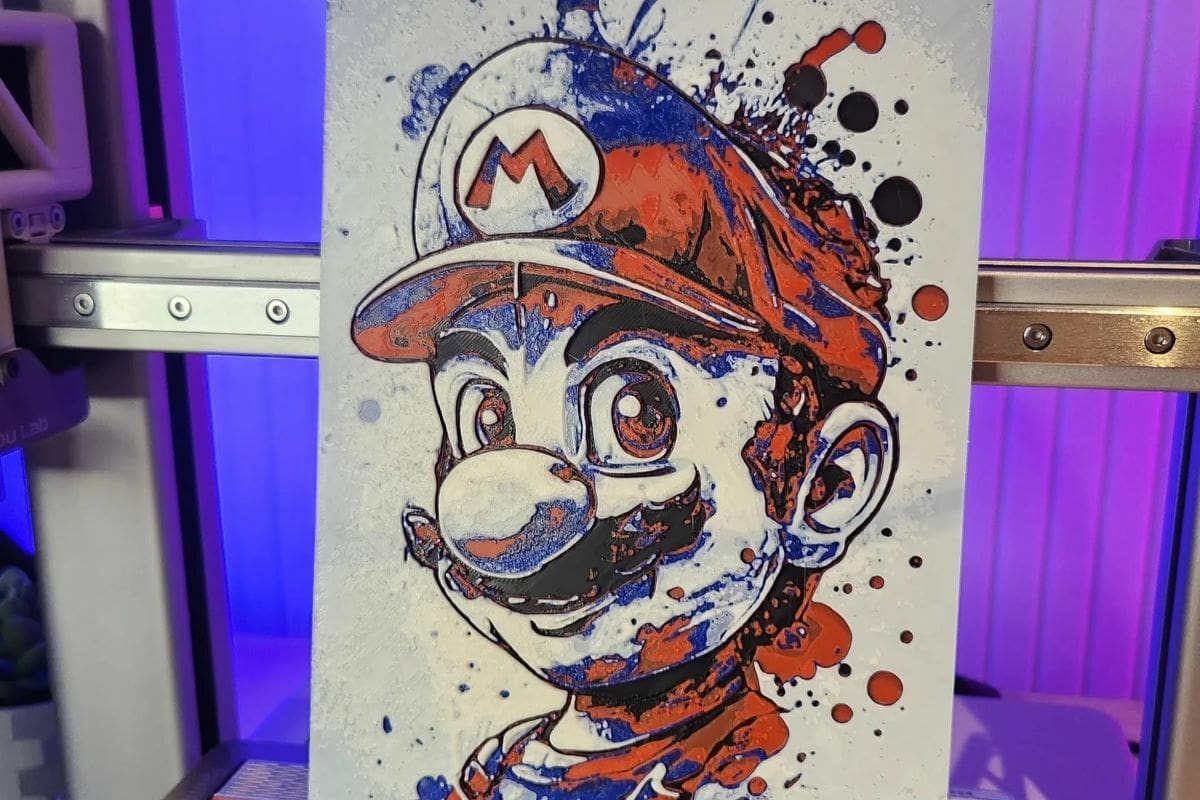
If you’re a fan of the Nintendo world, you’ll love this print. This HueForge design features a Super Mario drawing in a really cool style. The character is created with black lines and blue and red splashes of color. You can also pair it with the Luigi HueForge model from the same author, or you can check out our article on the best Mario models out there for varied designs.
The base layer is set to 0.16 mm and the rest of the model features 0.08-mm layer height. You can find premade print profiles for different printers and size nozzles on MakerWorld, which you can directly send to your machine. Load some black, red, blue, and white and you’re ready to go! Make sure to use the same spools as the creator or find filaments with similar TDs.
- Who designed it? Teixi3D
- How printable/popular is it? MakerWorld reports that over 2,500 makers have downloaded this model, with 1,300 having made their own creations.
- Where to find it? MakerWorld
City Coasters
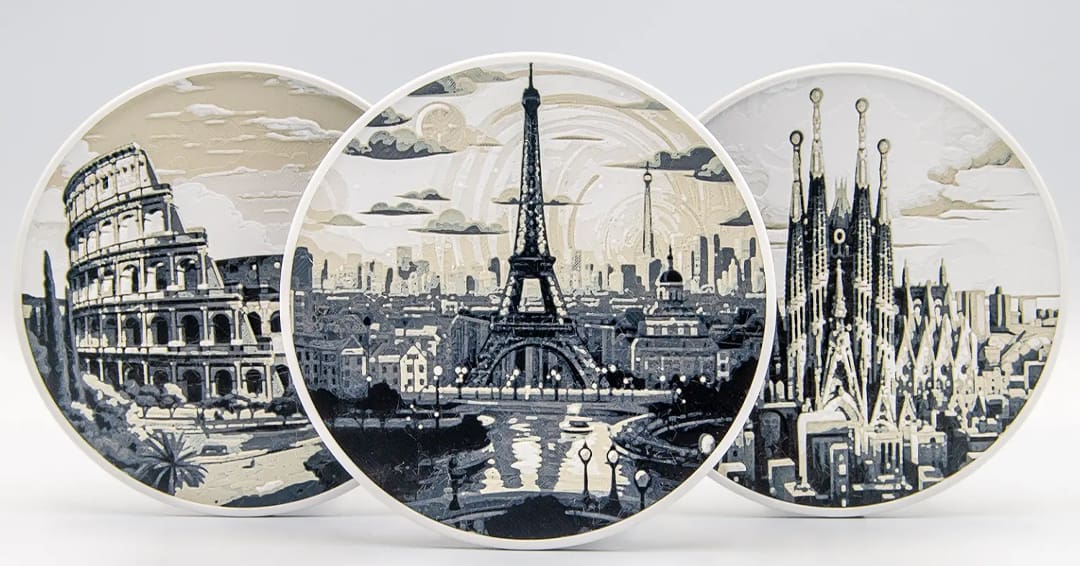
HueForge prints can be functional too. Here is a perfect example of that: a series of city-themed coasters. The creator has transformed some of the most iconic cities in the world into a beautiful set with a vintage style. The set includes Paris, Rome, and Barcelona, portraying their most famous buildings. You can also take inspiration from it and create customized coasters with your favorite cities in the world.
To print it, you’ll need a black layer for the base, then swap to gray, change to light gray, and finish with white. If you want to obtain the same effect as the model creator, swap the light gray with a light khaki.
The designer has shared not only the STL with the written instructions, but also the print profiles for the X1, P1, and A1 Bambu Lab machines, and the 3MF files.
- Who designed it? Bamingo Design
- How printable/popular is it? Over 260 people have downloaded this useful design – you can take a look at some prints on MakerWorld with different color combinations.
- Where to find it? Cults, Thangs, MakerWorld
The Starry Night
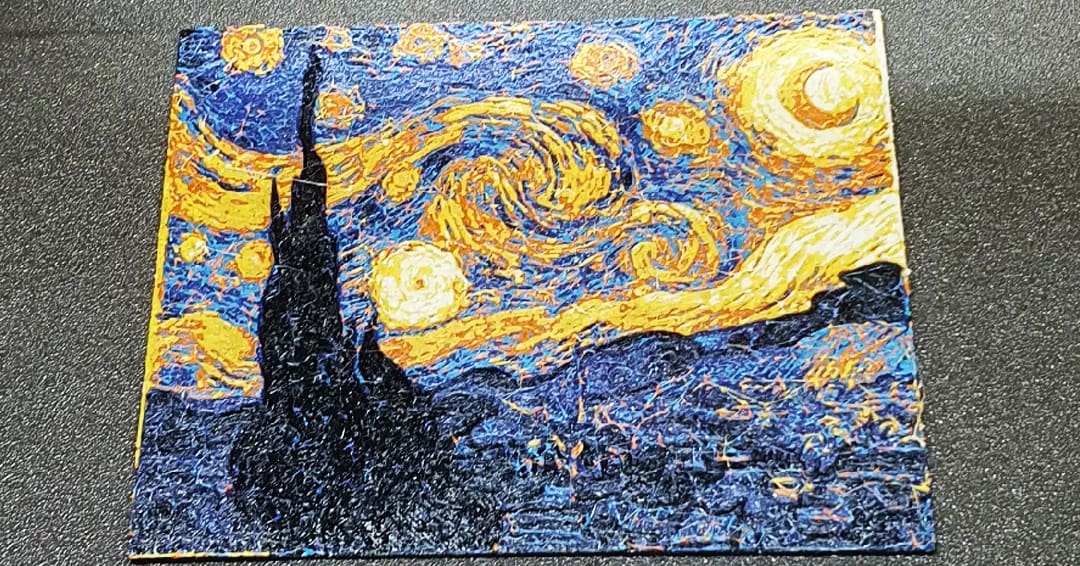
Some pieces of art are immortal. La Gioconda by Leonardo Da Vinci, Pablo Picasso’s Guernica, The Persistence of Memory by Salvador Dalí, and many more. One of these worldwide famous paintings is The Starry Night by Vincent van Gogh. With this HueForge print, you can recreate the magic of this masterpiece at home.
For this model, you’ll need six colors in total. If you want to match the designer’s print, you should use Hatchbox filaments. Pay attention to the designer’s instructions because he opted for a layer height of 0.2 mm instead of the more common 0.08 mm one.
The provided STL measures 200 x 158 mm, but you can scale it up or down based on your needs and your printer’s build plate. When doing so, make sure to scale the design only on the X- and Y-axes, while keeping the Z height the same to maintain the result as seen above. A user has already scaled it down to stunning results.
- Who designed it? jdlg2065
- How printable/popular is it? Almost 700 makers have downloaded this model and 18 of them have shared their versions of this masterpiece.
- Where to find it? Printables
Rooted in the Frame
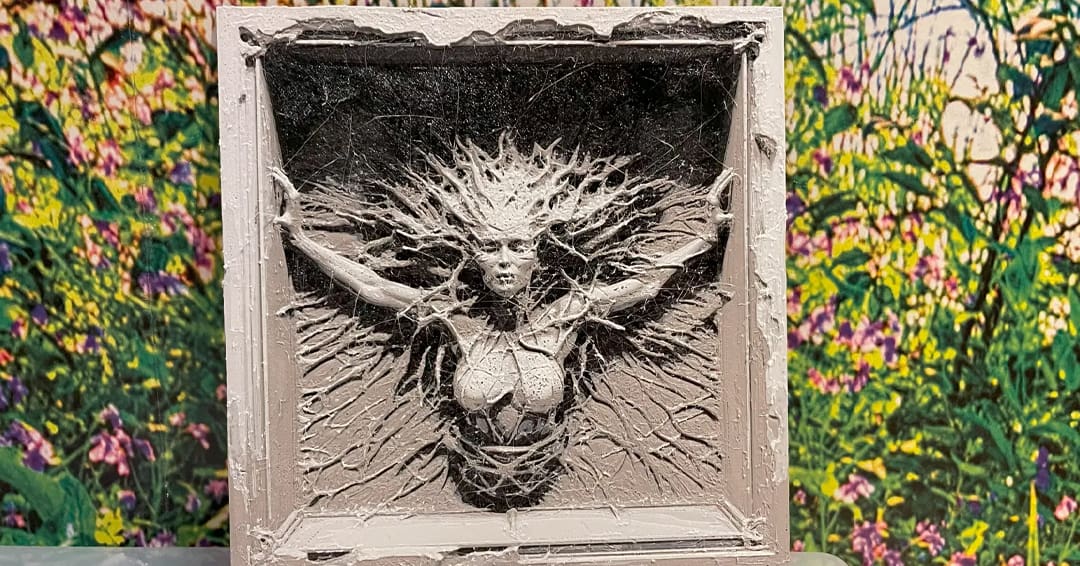
You don’t need colors to create breathtaking artwork. This model is proof. “Rooted in the Frame” is the first piece of the “Living-in-the-frame” series designed by DonMatis. This model uses gray-scale filaments to create a unique 3D effect, similar to a sculpture.
You can choose between a 2-mm thick version or a 6-mm one. Although the second option will naturally take longer – about 11 hours more – the depth illusion will be even more evident.
As for the model, this print needs six colors, all in the grayscale range. Of course, you can always make the model more unique by adding color, and some makers have also tried using fewer filaments – you can find three- and four-color versions on MakerWorld.
- Who designed it? DonMatis
- How printable/popular is it? This model is quite popular with almost 6,500 downloads and 32 makes shared Printables alone.
- Where to find it? MakerWorld, Printables
Flowers Bookmark
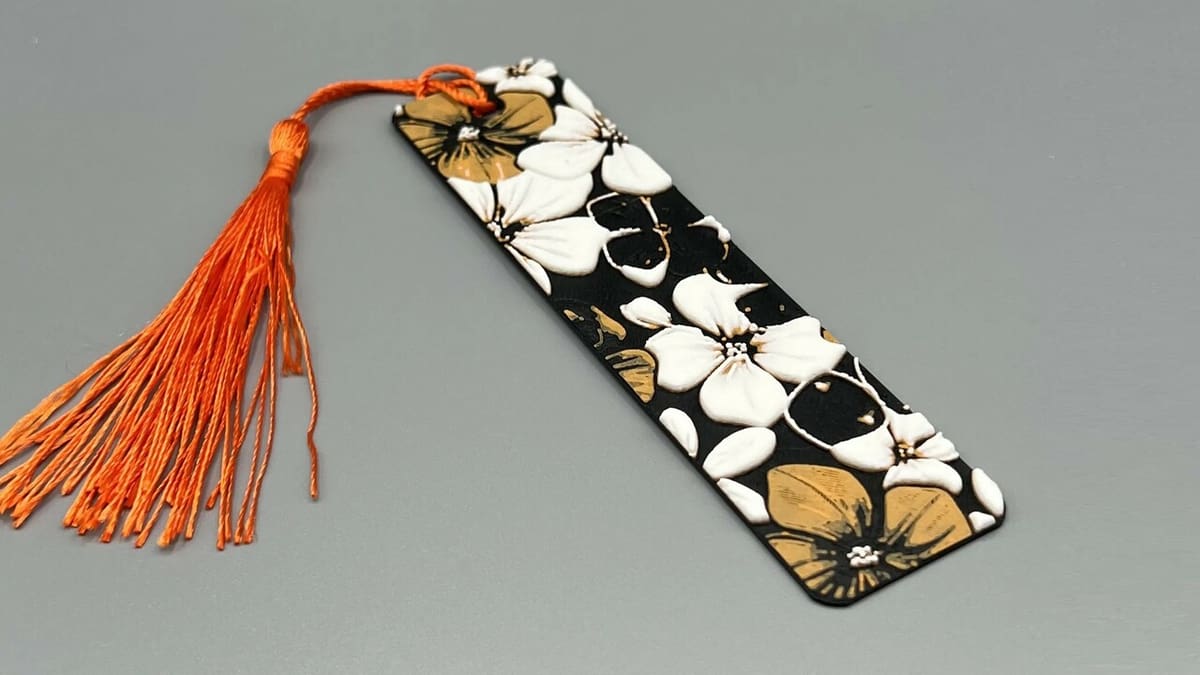
If you’re a reader, you know how easy is to lose bookmarks. With HueForge, you can create a new one whenever you want. This model is a great example of the stunning bookmarks that you can produce. The design is simple yet elegant, with numerous flowers of different colors.
This model takes only a little more than an hour and three filaments to be created. The creator has opted for black, red, and white, but there are numerous examples of other color combinations in the makes shared by the community, as can be seen above. You can take a look at a blue version by RoHeryn or a green one by vatermitbart among the makes shared.
- Who designed it? CoNcLuZiOn
- How printable/popular is it? MakerWorld reports that over 500 makers have printed this bookmark, and around 30 have shared their awesome results!
- Where to find it? MakerWorld
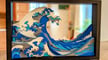
Wave Wall Art
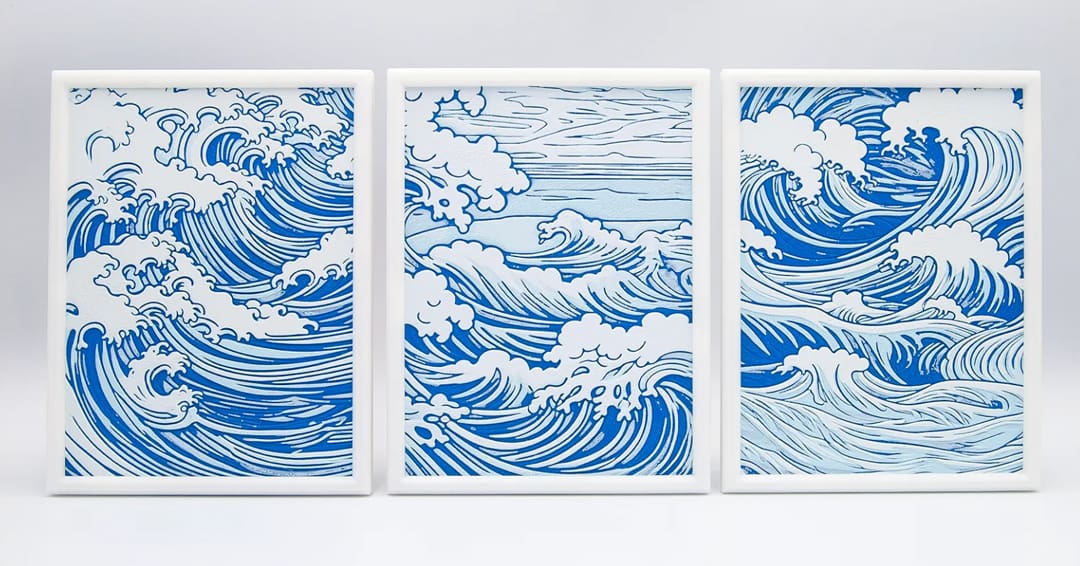
The sea fascinates everyone. The blue water, the creatures that swim and live in it, and the calm sound of the waves are all elements that make this landscape awesome. With this wall art, you can bring some of the sea magic into your home. This model is made up of three parts with their corresponding frame, to create a unique piece with blue shades.
You can print the frame with 15% infill at a 0.20-mm layer height to make it sturdy. On the other hand, use a 0.08-mm layer height for the HueForge print with a base layer of 0.16 mm.
This filament painting only uses three colors: dark blue for the base, light blue, and white. It should fit most of the machines out there since a single panel measures 12 x 16 cm. However, you can scale it down as 3DChihuahua has shown in the makes shared on MakerWorld.
- Who designed it? bamingodesign
- How printable/popular is it? With over 600 downloads so far combined from all sites, this model is gaining popularity. You can admire some prints on MakerWorld, but you can be the first to share a make on Cults and Thingiverse.
- Where to find it? Thingiverse, MakerWorld, Cults
GrinchTree
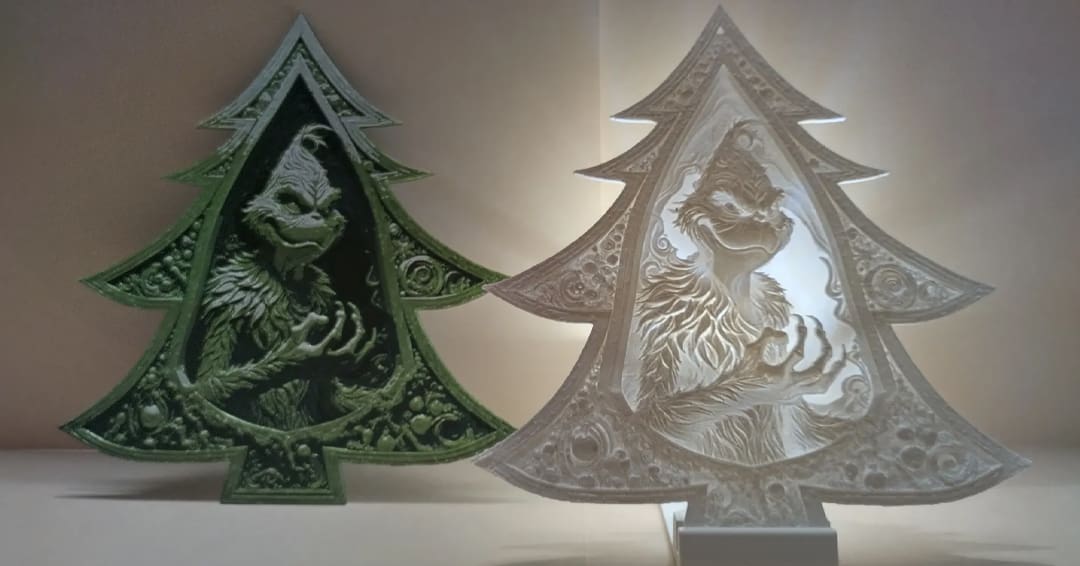
The Grinch is a classic Christmas film, with a super famous character. This HueForge allows you to print a Grinch-themed Christmas tree by printing a Grinch HueForge and the half-tree model and gluing them together. Alternatively, you can create a wall decoration by printing only the Grinch.
You can choose between a colorful and a grayscale version. If you opt for the green Grinch and you own a Bambu Lab printer, make sure to download the 3MF file that provides the project already set up for Bambu Studio. You can download the 3MF for the grayscale version as well.
If you’re feeling especially creative, you can even follow Klabbis’ example by printing the HueForge model with only white filament to create a stunning lithophane!
- Who designed it? DonMatis
- How printable/popular is it? This model has been saved in more than 1,200 collections and 16 people have shared their Christmas decorations so far.
- Where to find it? Printables
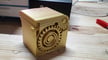
Gift Box
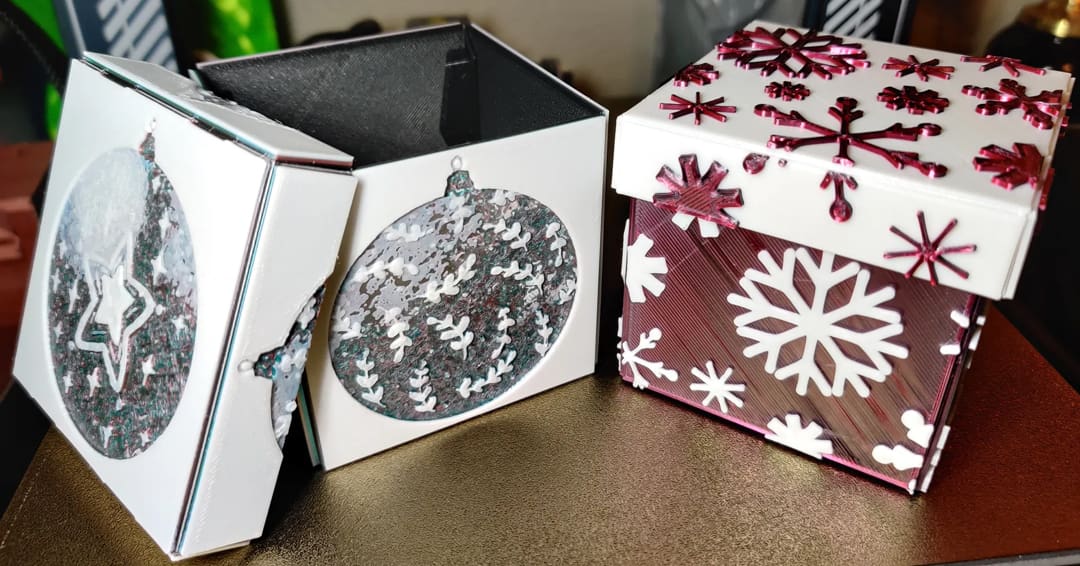
If you own a 3D printer, you may already have printed a gift box, but with this model, you can take it to the next level! This box is printed flat and then folded to create a cube. This allows you to print HueForge artwork on the top layers. You can even choose between multiple designs and dimensions.
The creator has uploaded as many as 52 files with 12 different HueForge graphics that you can select! Some examples are a heart design, a marble pattern, and a watercolor snowflake. Simply print a base and a lid and you’re good to go.
There are also different sizes available: a normal, a “medium”, and a small one that can fit even on smaller printers, such as the Prusa Mini or the BambuLab A1 Mini. The important thing is to make sure that your printer can handle 0.15-mm tolerance, otherwise, hinges may not work as planned.
- Who designed it? ProcsDesign
- How printable/popular is it? 14 people have already printed this box and shared their versions, so you can find plenty of inspiration if you’re not sure which one to go for and what colors to choose.
- Where to find it? Printables
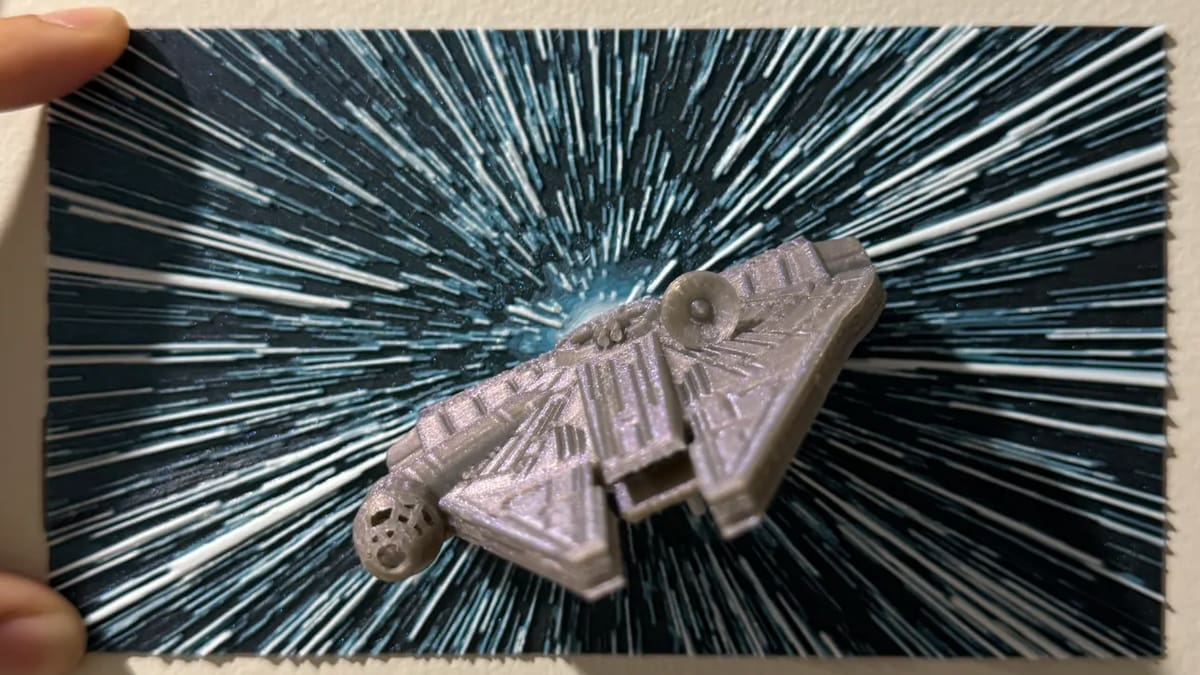
3D Millenium Falcon
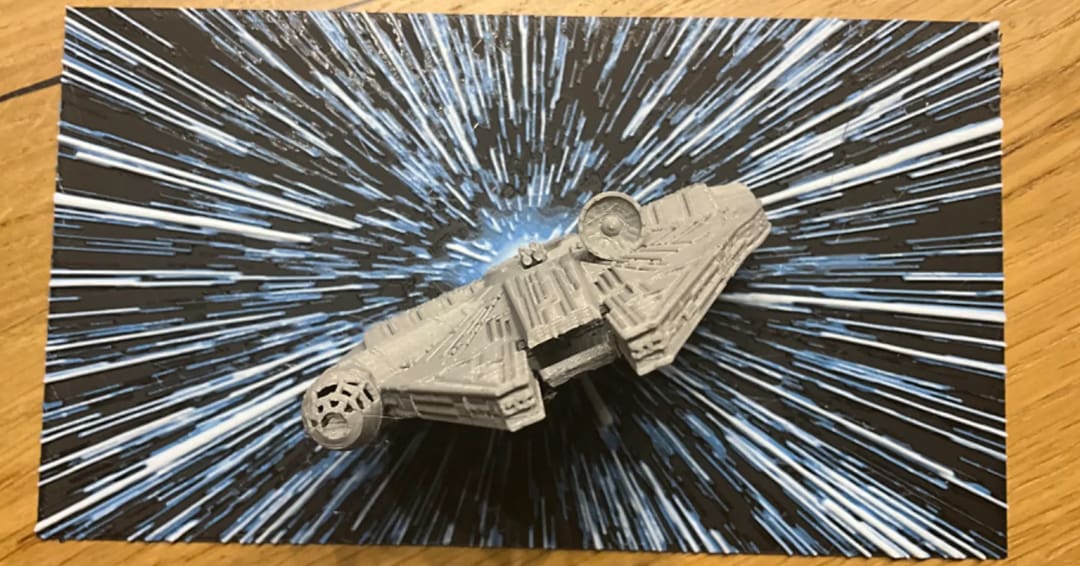
Let’s switch universes and talk about films – in particular, Star Wars. If you’re a fan of the saga, you can’t miss this model! This creation joins the filament painting art of HueForge with a 3D model of the Millennium Falcon. The result is unique!
Since it combines a HueForge file with a “traditional” model, you have to slice it following the creator’s instructions. The filament painting should be printed at a 0.08-mm layer height with a base of 0.16 mm and 100% infill, while the Millennium Falcon model should be sliced at 10% infill with 3 walls, and 3 bottom and 3 top layers.
You can find premade print profiles and set up 3MF files for Bambu Lab machines on MakerWorld. You can use the same filament as the creator, or get creative like merophosis did and add glow-in-the-dark filament!
- Who designed it? cyanidesugar
- How printable/popular is it? Over 2,500 people have downloaded this model and 1,500 makers have printed it according to MakerWorld.
- Where to find it? Thangs, MakerWorld
License: The text of "10 Incredible HueForge 3D Prints You’ll Want to Try" by All3DP is licensed under a Creative Commons Attribution 4.0 International License.