The Best Raspberry Pi 3D Printer Projects

A 3D printer and a Raspberry Pi are a match made in maker heaven. Here are some great Raspberry Pi 3D printer projects you can build yourself.
With Raspberry Pi, the choices are endless. And with 3D printing, the choices are endless. So what do we get when we put the two together? A whole new universe.
You can create Raspberry Pi organizers, robots, drones, computers, gaming consoles, cameras, and more. The only thing that could limit you would be the mechanical parts needed to connect to the Pi, but with 3D printing, that limitation goes away. So really, now the only limit is your own ambition.
Even if you don’t have a 3D printer, you can always try Craftcloud. The 3D printed parts you need will be delivered to your doorstep, and you’ll be tinkering in no time.
You can start by trying out these awesome projects, but don’t stop there: you can then create your own!
Raspberry Pi Accessories
When you get a Raspberry Pi, it’s like when you get a baby: your first concern for the first few months is to keep it safe. The following 3D printing projects are aimed at organizing your Raspberry Pi and a few peripherals, whether it be to store them safely or to use them in projects in a practical manner.
As they mostly consist of printing some kind of enclosure and putting the Raspberry Pi inside, most are classified as an easy difficulty level. They don’t require any knowledge of electronics, and rarely even need supports. If you’ve just gotten your first Raspberry Pi, this is a good place to start.
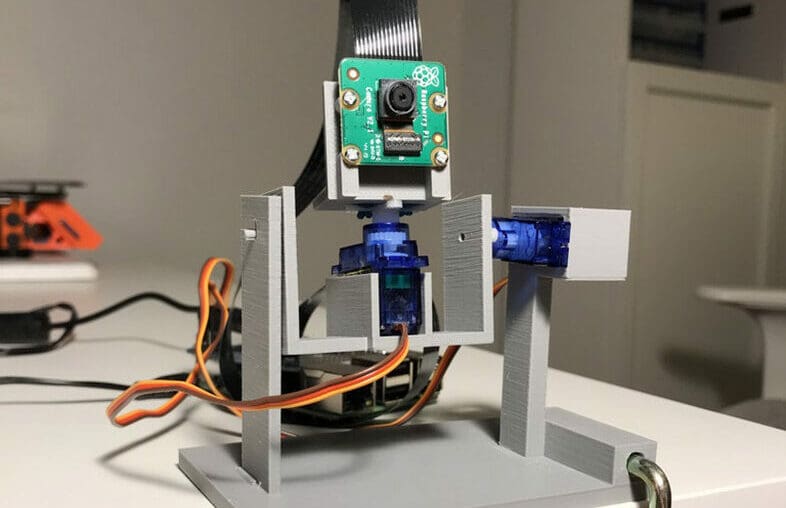
Camera Mount
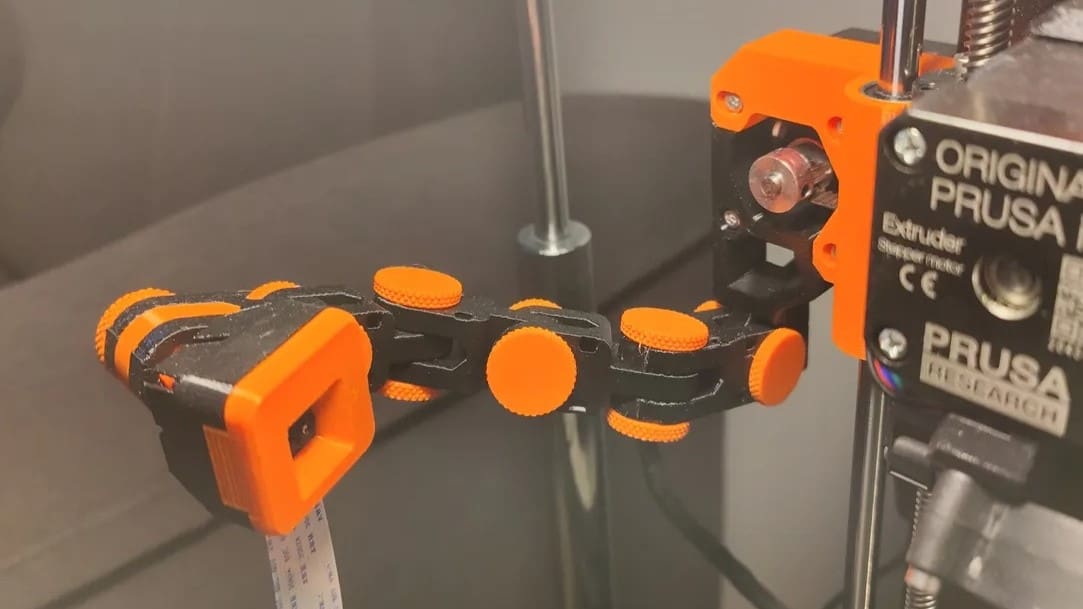
Putting a camera on your 3D printer offers many advantages, such as being able to observe your print remotely or even create time-lapses. This articulated model was developed for the Prusa MK3 and MK2, but considering that the base fitting fits 2020 aluminum profiles, it’s also compatible with several other printers. It’s maneuverable when needed, but also locks securely into place.
The joint screws are made of plastic and it’s normal for them to break under the vibration and work of the printer. To avoid this, the designer recommends making the screw with more resistant materials, such as PETG, increasing the infill, or adding more perimeters.
- Who designed it? Sneaks
- How difficult is it? Easy
- What are the core components? Raspberry Pi HQ camera module
- How printable/popular is it? This nice project has 571 makes and over 19,000 downloads, clearly showing its popularity.
- Where to find it? Printables
HQ Camera Case
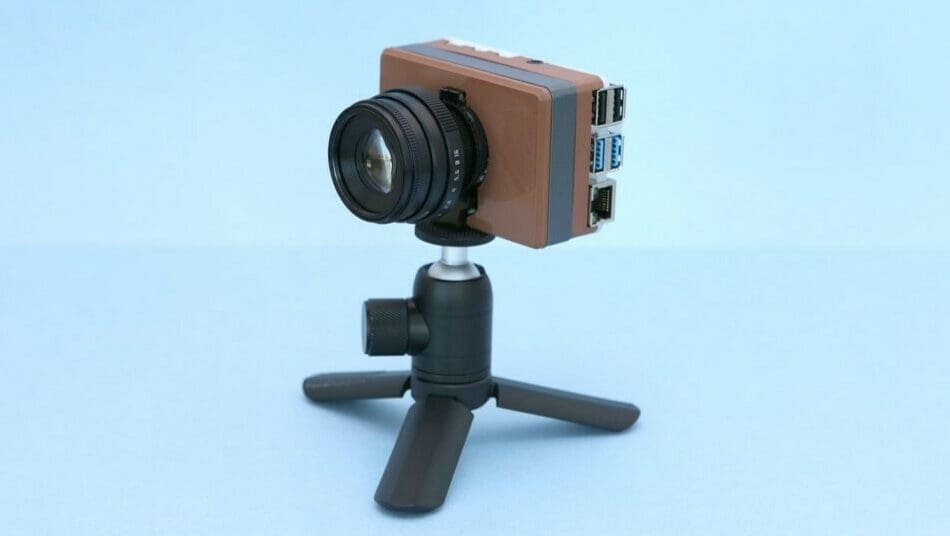
Among the many cool things about the Raspberry Pi, flexibility is one of the top features. With a few modules and parts, you can even build a professional imaging camera like this one and be in full control of your image quality. With 12.3 MP, the Sony IM477R sensor also has an IR CUT filter, which is an excellent tool for your images to have good color quality.
You might think that the price is not worth it, but the sensor module costs around $50, and you can use C- and CS-mount interchangeable lens sets with manual focus and aperture adjustment. It’s also possible to use lens sets from third parties, as long as you use an adapter for the fitting.
Whether as a magic mirror or for impressive time-lapses and other projects, this 3D printed case will protect your Raspberry Pi camera module with style.
- Who designed it? Adafruit
- How difficult is it? Easy
- What are the core components? Raspberry Pi 4B, Raspberry Pi HQ camera module, 35-mm C- or CS-mount lens
- How printable/popular is it? With six makes, three remixes, and detailed instructions, you can easily make one for yourself.
- Where to find it? Thingiverse, Adafruit

7" Inch Touchscreen Case
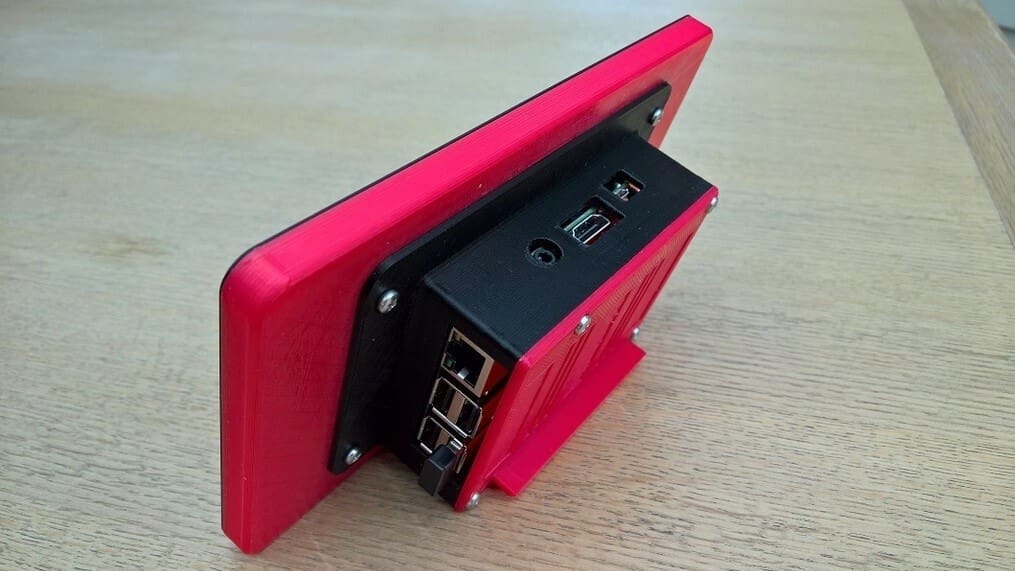
Projects with a Raspberry Pi are good by themselves, but giving the board a nice finish is also important to protect it and add a beautiful look. A case that accommodates a touchscreen can make a difference and add a lot of practicality and style.
This simple yet elegant touchscreen display case fits perfectly in many projects and can be used to make a media center, host your OctoPrint, or make a digital photo frame, just to name a few. You can use it on a table or even fix it in place; either way, this case can be the finishing touch to your project or just a good idea for your Raspberry Pi touchscreen.
- Who designed it? luc_e
- How difficult is it? Easy
- What are the core components? Raspberry Pi 2 or 3B (check out remixes for compatibility with Pi 4s), Raspberry Pi 7″ touchscreen
- How printable/popular is it? With an incredible 51 makes and 47 remixes, this case is certainly easy to print and assemble.
- Where to find it? Thingiverse
Raspberry Pi 5 NVMe SSD Case
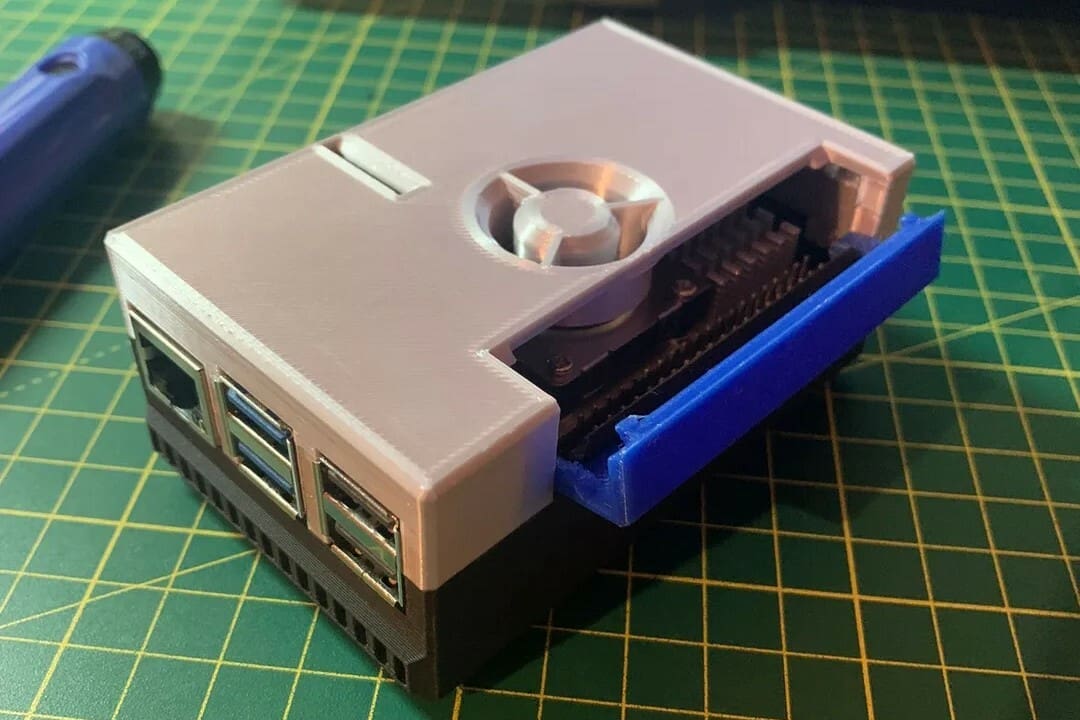
There are many fun yet demanding Raspberry Pi projects out there that require an NVMe hat drive to boost storage. Having a few add-ons to your Pi is only more reason to protect it with a printable, customizable case. This screwless design is meant to snap together seamlessly and provide plenty of cutouts for the camera, GPIO inputs, air intake, and more.
The author reports that good results were obtained with PETG and a layer height of 0.2 mm, but makers also reported success with ASA. Several users praised and commented on the case being very easy to make and assemble, taking only around 90 minutes.
- Who designed it? Rasmussen
- How difficult is it? Easy
- What are the core components? Raspberry Pi 5
- How printable/popular is it? With around 760 downloads, 22 makes, and 4 remixes, printing this case is an easy choice.
- Where to find it? Printables
Raspberry Pi 4 Case

Home computers are getting smaller and smaller, but anyone who lived through the days of big, heavy beige towers knows that almost all of them looked like this. This design recalls the retro style of early home computers, although it’s a case for the much smaller and more powerful Raspberry Pi 4. The designer has also remixed the design to make it suitable for a Pi 5 as well.
The assembly of this model is not so simple. Different adapters are necessary to make the slots and details perfect, but it’s nothing that a little patience and dedication can’t solve. You’ll also need a lot of parts, tools, and components, but the detailed list and assembly instructions on Printables will help you through the process.
- Who designed it? Xavior93
- How difficult is it? Intermediate
- What are the core components? Raspberry Pi 4B or 5, 5V fan, CPU cooling tower
- How printable/popular is it? This nostalgic case has around 300 downloads, 1 make, and 475 likes.
- Where to find it? Printables
Mechatronics
Mechatronics is the symbiotic combination of electronics and mechanics to create automated machines capable of analyzing situations, making decisions, and executing actions with reduced help from a human. For example, what is the difference between a traditional lathe and a CNC lathe? It’s all about computation and automation.
Some examples of mechatronics are CNC machines or robots. A camera, for example, is an electronic device and not a mechatronic one, since it doesn’t really move on its own and relies more on electronic parts than on the mechanics, which are mostly just the button.
With a 3D printer and a Raspberry Pi, you’ll be able to replicate the following mechatronic projects!
DIY Companion Robot
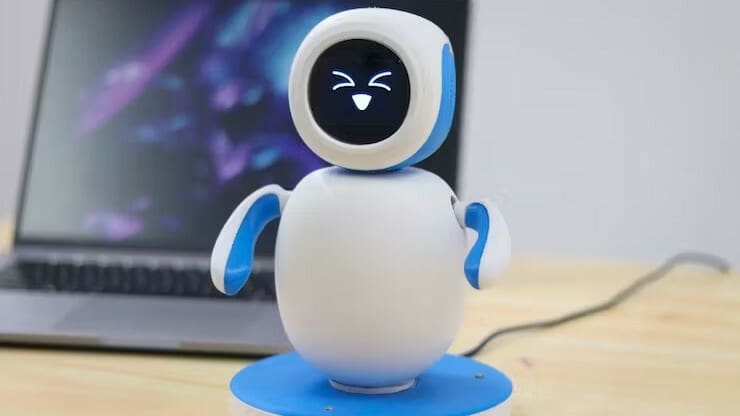
Want some company? If you have a Raspberry Pi, electronic parts, and some free time, you can build a little robot friend in the comfort of your home. Watch the video to see this companion robot in action.
It may seem like too advanced of a task to make at home if you’ve never attempted a project like this before, but there are complete, step-by-step instructions to make assembly simple. Both Instructables and Hackster have lots of details on how to build your new little friend. You will need some tools like a soldering iron, hot glue, and a small piece of round acrylic to finish the face.
- Who designed it? CodersCafeTech
- How difficult is it? Advanced
- What are the core components? Raspberry Pi 4B, 2-inch LCD display module, servo motors and drivers, speaker, sensors
- How printable/popular is it? With over 15,000 views and 46 likes on Hackster, this little robot has plenty of fans.
- Where to find it? Instructables, Hackster
Rolling Robot with Camera
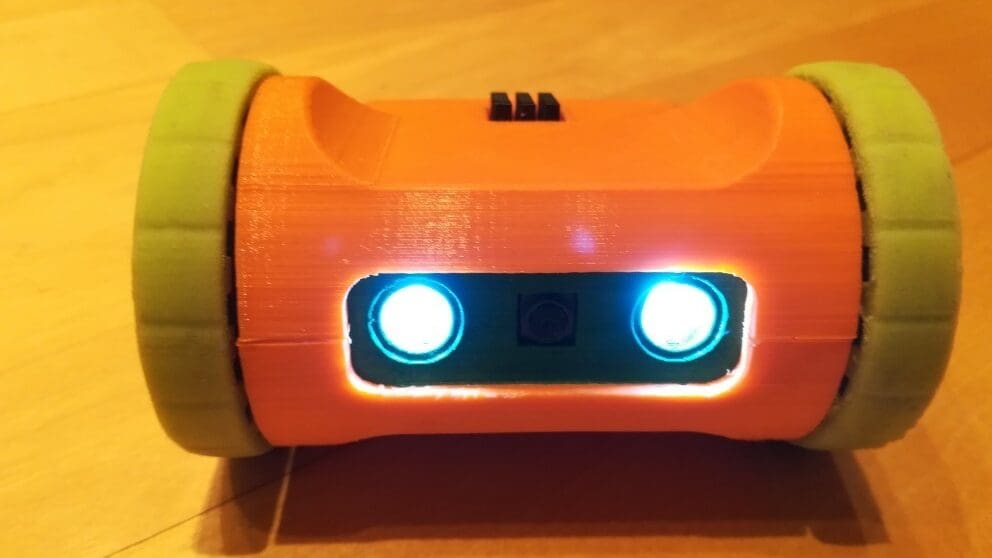
Time for some fun robots! This is a remote-controlled, 2-wheeled robot that you can control via your laptop or smartphone. You communicate with it through Wi-Fi, and it has a camera so you can monitor its whereabouts without needing to be there. It even has cameras for night vision, which you can remotely turn on, and can be charged via a charging port.
Time to live in the future and send your robot to run some errands for you!
- Who designed it? Wingman94
- How difficult is it? Advanced
- What are the core components? Raspberry Pi Zero W, Raspberry Pi camera module, dual-axis gear motor and driver
- How printable/popular is it? 16 people have shared their make of this robot on both Thingiverse and Printables.
- Where to find it? Thingiverse, Hackaday, Printables
Spider Robot
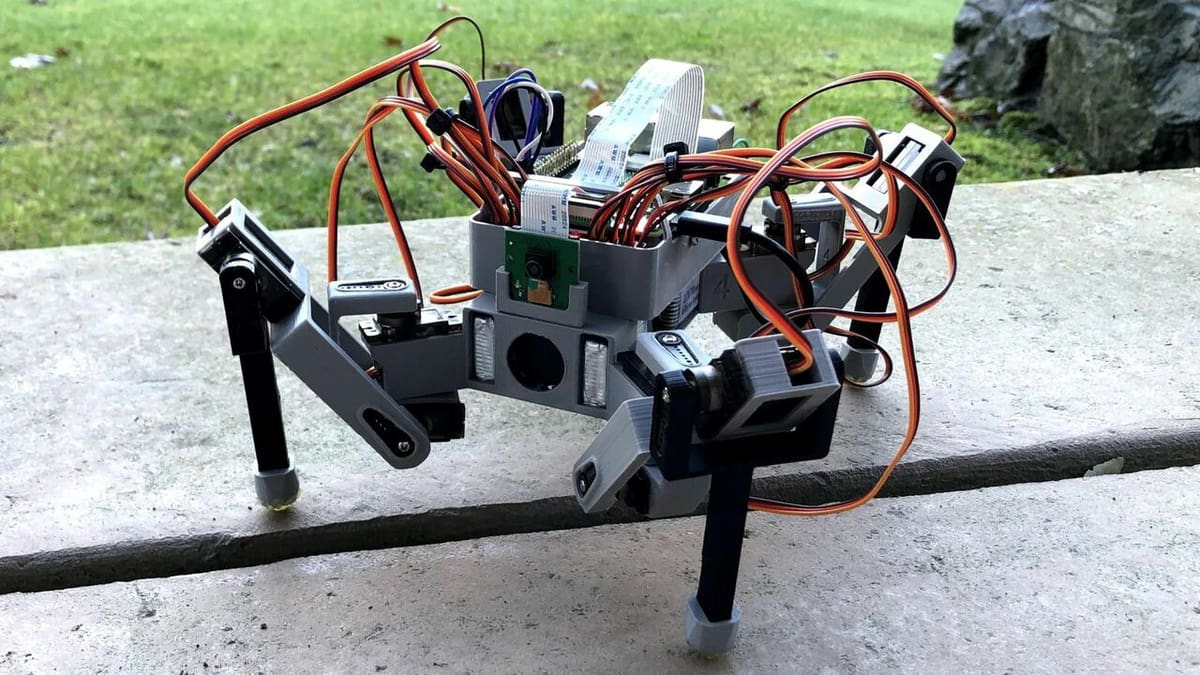
Whoever said that making your own spider robot is something extremely complex – and categorically requires eight legs – didn’t count on this little creature. With resistant parts made by 3D printing, in addition to being robust, it can be very valuable for learning if it’s your first adventure in this regard. The camera also adds good functionality, and you can operate this little critter from your laptop via Wi-Fi to take pictures and videos.
With detailed step-by-step instructions, you may feel encouraged to even add sensor upgrades, but an important thing to do before all that is to give this guy some shoes to prevent it from slipping on very smooth surfaces. The creator shows you how to make one with hot glue in the videos.
- Who designed it? Morrisl4
- How difficult is it? Advanced
- What are the core components? Raspberry Pi 3B+, camera module, servo motors and driver
- How printable/popular is it? This friendly robot, which has over 15,000 views and around 156 likes, won second prize in the Battery Powered Contest from Instructables!
- Where to find it? Instructables, YouTube
Gaming
In the prime era of gaming, game consoles were all the rage. We’re talking SNES, GBA, N64, Game Cube, Atari, and more. Nowadays, game consoles are more sophisticated and games more complex, yes, but there’s nothing like the feeling of playing a retro game on a handheld console or with wired controllers.
You can go the collector’s route of thrifting for original retro consoles or go the maker’s route of creating your own!
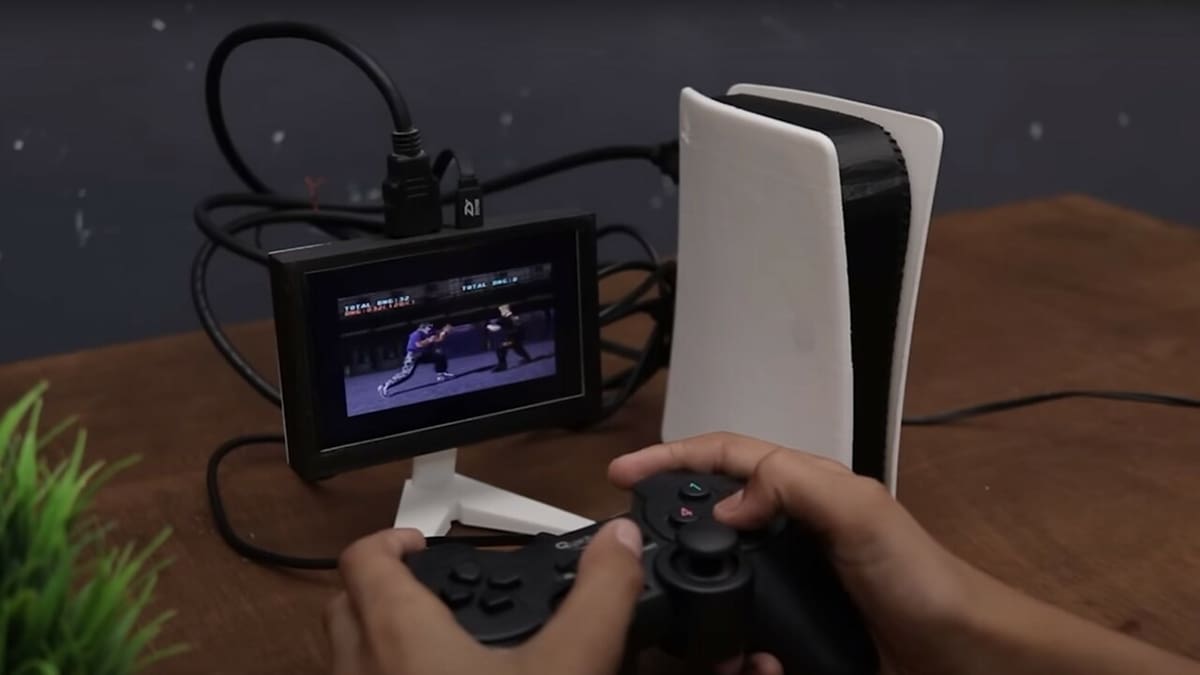
PlayStation 5 Case
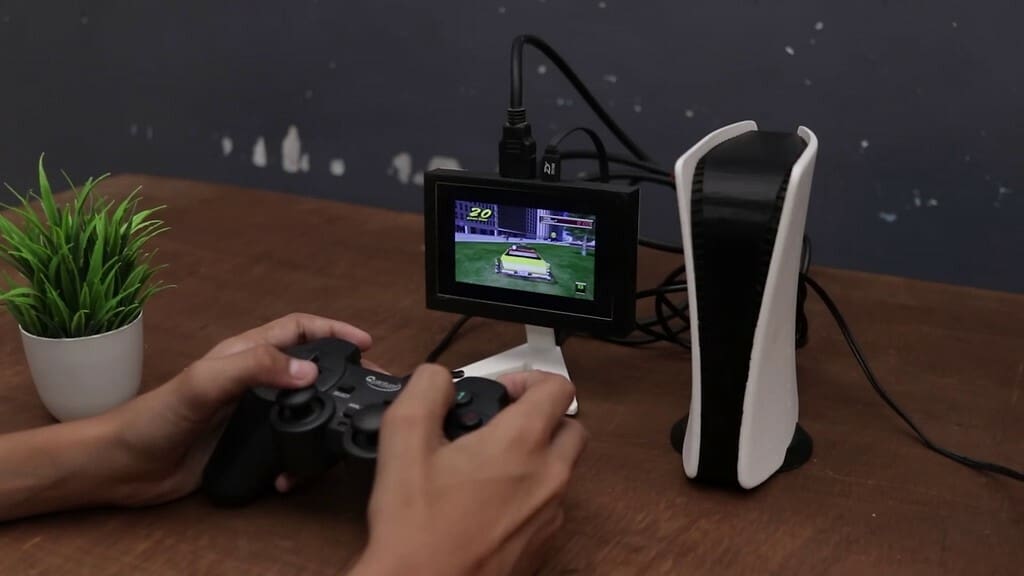
How about giving your gaming station a new look? With this miniature PlayStation 5-style case, you’ll be able to protect your Raspberry Pi, as well as sport a sleek style that is on theme with your Pi projects! Although modern games are too demanding for current Pis, this little dock is an ironic approach to creating a RetroPi gaming system.
The case was designed to provide easy access to the power and headphone ports. Use a rigid filament like PLA to ensure durability and a layer height of at least 0.2 mm for a smooth surface finish. To really make the case look off-the-shelf, try smoothing techniques like sanding and a clear coat. You’ll only need screws to fix the Raspberry as the other parts are either fitted or glued.
- Who designed it? The Wrench
- How difficult is it? Easy
- What are the core components? Raspberry Pi 4
- How printable/popular is it? This awesome case has almost 60 likes and has been a featured project on Instructables.
- Where to find it? Instructables
Picade
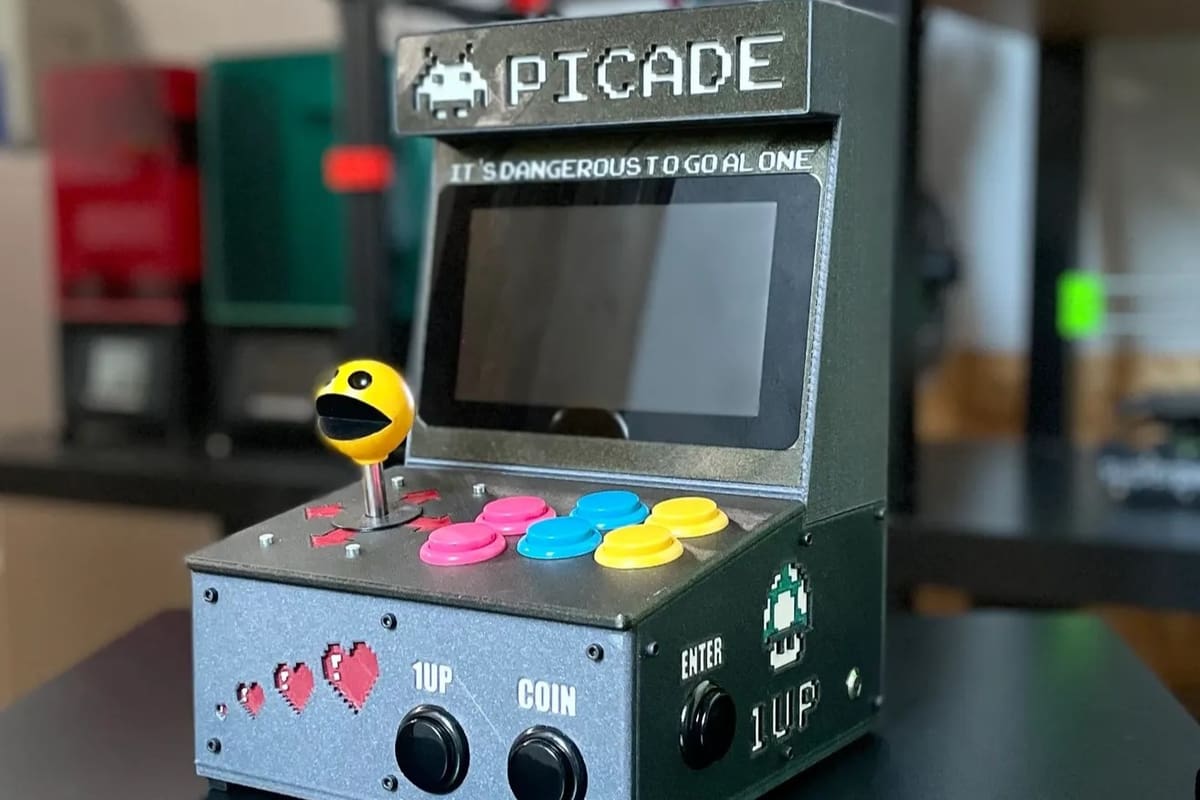
This is another wonderful example of how much fun it is to mix 3D printing and Raspberry Pi! Having your own custom mini arcade can make you lose track of time while breaking records. It’s the small details everywhere that make this design easy to crave, with your favorite games waiting for you.
One really cool thing about this project is that it doesn’t use wood – it’s totally 3D printed, so you don’t have to worry about woodworking skills and tools. Of course, if a wood look is what you’re after, wood PLA might come in handy. You’ll only need a few tools, such as a soldering iron, pliers, tweezers, and the like, but don’t worry because there’s an illustrated and detailed assembly manual to guide you step by step.
- Who designed it? super_perf
- How difficult is it? Advanced
- What are the core components? Raspberry Pi 3B+ or 4 (4GB), Raspberry Pi 7″ touchscreen, Picade X HAT, arcade parts
- How printable/popular is it? While still growing in number of downloads and likes, five makes and great feedback might encourage you to have one just for you.
- Where to find it? Printables, Instructables
T3rminal Cyberdeck
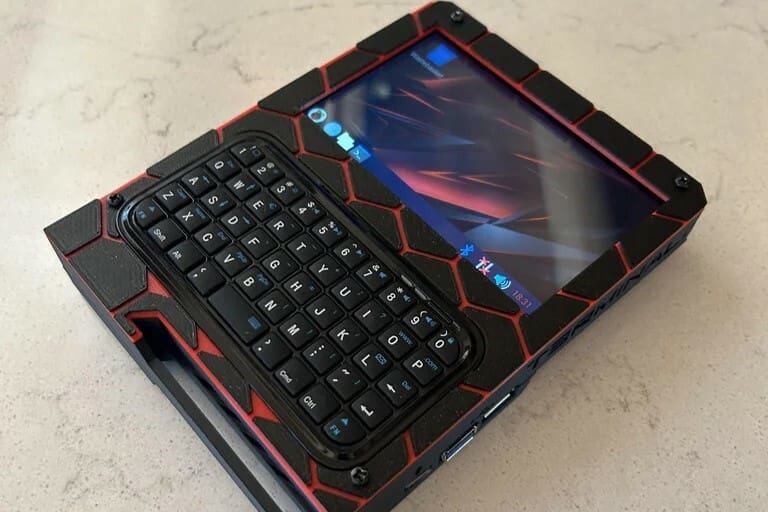
If you’re up for a challenge, the T3rminal is an open-source 3D printed CyberDeck project that would be very rewarding once complete. Inspired by other DIY devices such as Decktility and YARH, the project can be followed on the author’s GitHub as they continuously make improvements.
The case was printed in PLA on a Bambu Lab P1P printer, with support used only at the bottom. Assembling the case involves gluing the two halves together, using some screws for alignment and superglue for fixing, followed by soldering components such as the power switch and the USB-C extension.
The project as a whole involves advanced steps, such as modifying the Raspberry Pi board and carefully installing the display. It’s recommended to follow the instructions closely, especially if you’re new to electronics projects. Once assembly is complete, CyberDeck is ready to use as a portable PC device!
- Who designed it? calebholloway08
- How difficult is it? Advanced
- What are the core components? Raspberry Pi 4, battery module, LCD touchscreen display, keyboard
- How printable/popular is it? This cyberdeck has more than 7,800 views and 100 likes on Instructables.
- Where to find it? Instructables
Electronics
Now going into electronics, these are projects that rely on 3D printing and electronic components but do not move. Some examples include cameras, watches, smart home lights, and similar.
In all these projects, you may note that although they have some mechanical parts, like a switch or a button, these elements aren’t integral to the working principle of the project.
Mini Server Box & Rack
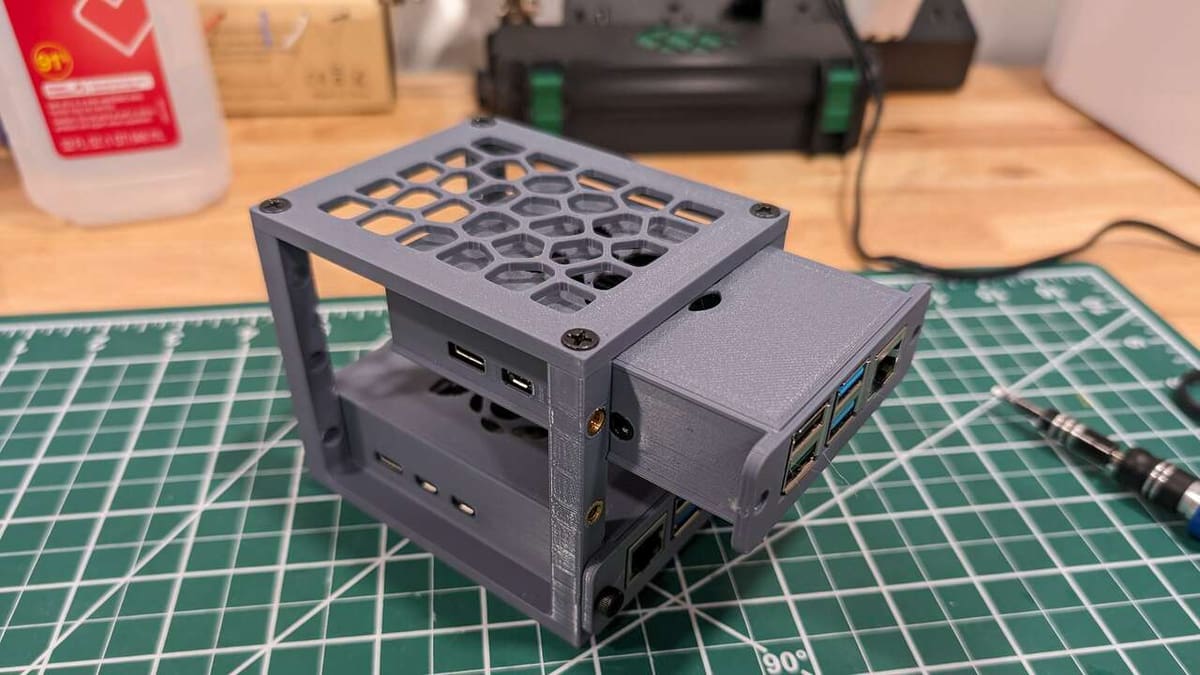
For DIY enthusiasts, replicating this project offers a cost-effective and efficient way to create a custom server rack tailored to Raspberry Pi projects, and it can even be attached to a wall. Each stand accommodates up to three Raspberry Pis, sized to fit either a Pi 4B or a Pi 5, with accessible I/O ports on the front and sides.
A few versions of the rack are available: one using heat-set threaded inserts and another for those who prefer to thread screws directly into the plastic. A version without I/O input cutouts is also available if you want to customize the drawer.
In the comments, several other users report their success with replicating the design. No supports were needed and it took approximately eight hours to print the parts. While some used PLA, others also reported that they achieved good results with PETG.
- Who designed it? jonthemiller
- How difficult is it? Easy
- What are the core components? Raspberry Pi 4B or 5
- How printable/popular is it? A couple of successful makes have been shared in the comments and 254 others have downloaded this popular solution.
- Where to find it? MakerWorld
Desktop Case
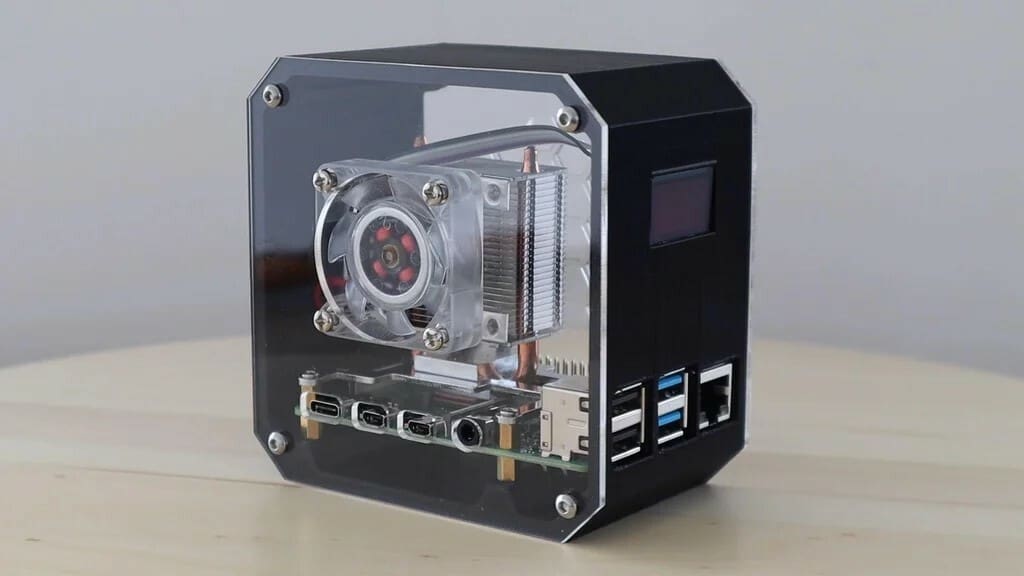
This detailed guide will walk you through how to build a miniature desktop PC-esque case for a Raspberry Pi 4. The case features a 3D printed body with clear acrylic sides, giving visibility to its internal components, particularly the Ice Tower fan. An OLED I2C display on the front provides real-time stats such as CPU usage, temperature, memory, and storage usage.
The tutorial and YouTube video include step-by-step instructions for assembling the case and programming the OLED display using Python scripts to monitor system statistics. Feedback from makers highlights the creativity and functionality of the design, with suggestions for a microSD extension cable to make this port more accessible.
- Who designed it? thediylife
- How difficult is it? Intermediate
- What are the core components? Raspberry Pi 4B, Ice Tower, I2C OLED display, acrylic panels
- How printable/popular is it? This beautiful case has more than 29,700 views and 300 likes
- Where to find it? Instructables
PiNAS
A network storage service is something that is being used more and more these days. We always have a lot of files to store, and buying a NAS can be expensive. If you have a stationary Raspberry Pi or some of the components, it might be a good option to make your own fully customized one.
Assembling this project is somewhat complex, as you will need to solder some wires directly to the Raspberry Pi, but all parts can be 3D printed without brackets. You can do this in either PLA or ABS, however, the designer chose ABS to facilitate the bedding, which requires sanding. One of the things that makes this model interesting is that it’s easy to open for routine maintenance.
- Who designed it? araymbox
- How difficult is it? Advanced
- What are the core components? Raspberry Pi 2B, 3B, or 4B, micro USB breakout board, 2.5″ hard drives
- How printable/popular is it? With almost 375,700 views on Instructables and 5 makes and 9 remixes on Thingiverse, this project is enjoying a good amount of popularity.
- Where to find it? Thingiverse, Instructables
Optics
Optics, under the umbrella of physics, is related to electronics. And, as you can probably guess, we’ll focus on projects that handle visual signals.
Some examples of this are cameras and scanners. Projects in this category mainly differ from each other in application, resolution of images captured, or accessories added via 3D printing to bring new functions.

OctoPrint Raspberry Pi Touch Display
Whether to monitor one printer or several, having a case for your OctoPrint is important to protect the Raspberry Pi and make your workspace more organized, especially if you have a small table and lack extra room. With this modern and simple-to-build project, you’ll quickly be able to construct your own desktop OctoPrint touch display.
In this project, you have the possibility to use a 3.5-inch touchscreen, and you’ll be able to fit everything together easily without any soldering or complicated assembly. There’s also a slot on the top half for the Raspberry Pi camera module.
- Who designed it? Adafruit
- How difficult is it? Easy
- What are the core components? Raspberry Pi 2B or 3B, Adafruit PiTFT touchscreen
- How printable/popular is it? There are over 1,300 downloads and 7 makes of this beautiful case, so it’s sure to be easy to make one for yourself.
- Where to find it? Printables, Cults
Web-Controlled Camera Turret
As the name suggests, this is a camera that mounts on a turret! The turret spins on two axes, and it can be controlled remotely via an internet connection. You can make it start or stop recording, move around while recording or when stopped, and as the creator suggests, you can use it to spy on your cat.
Although the creator provides some code, you’ll need to set up a page to control the camera all on your own. But don’t worry, instructions showing how to achieve this part are explained in great detail.
- Who designed it? Henkeify
- How difficult is it? Intermediate
- What are the core components? Raspberry Pi 3B+, Raspberry Pi camera module, servo HAT, micro servo motors
- How printable/popular is it? No other makers have shared whether they’ve accomplished the project, but the comments show that there are some who are definitely giving it a go!
- Where to find it? Instructables
OctoPrint
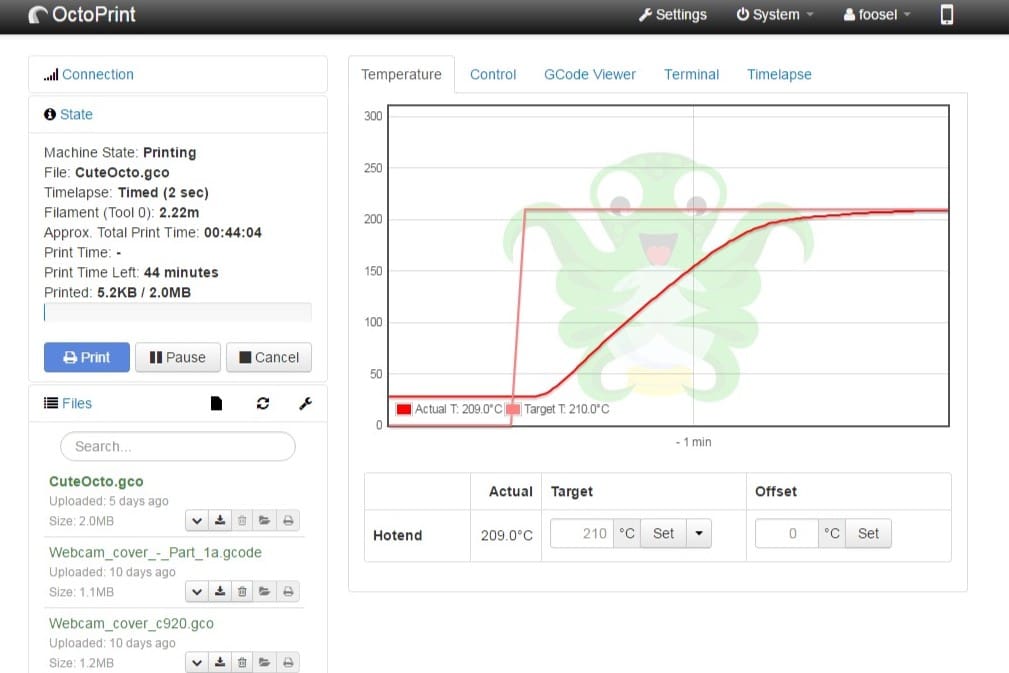
This last project doesn’t actually belong to any category, although strictly speaking, it could be classified as an electronics project. Moreover, it’s not really a 3D printed project, more like a Raspberry Pi project for your 3D printer. With OctoPrint installed on your Raspberry Pi, you can monitor your prints and temperatures, embed a webcam feed, record time-lapses, and a lot more, all remotely.
- Who designed it? Gina Häußge
- How difficult is it? Advanced
- What are the core components? Raspberry Pi 3B or 4B (also compatible with others) Raspberry Pi camera module, OctoPrint software
- How printable/popular is it? There are many many people who have successfully updated their printer with OctoPrint, and there are examples you can find on YouTube for your specific printer brand.
- Where to find it? OctoPrint
OpenScan Mini
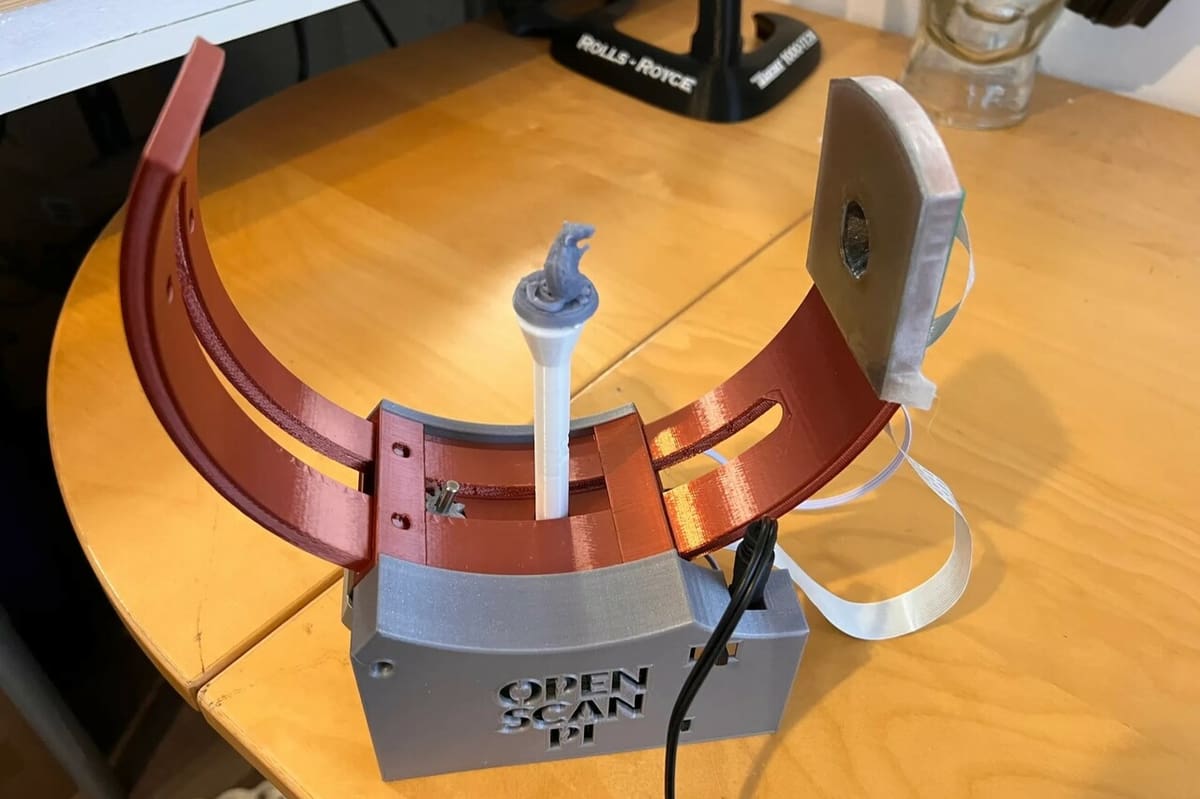
This is a must-have tool if you need to scan 3D thumbnails but don’t want to spend a lot. With the help of photogrammetry, you’ll have models with good-quality detail without having to go through very complicated and difficult manual processes.
Keep in mind that this project works like a computer peripheral, so you’ll need a machine to connect and capture the photos and then use software to render the model in 3D from the photos.
Although this project is already mature, it still has future ambitions to include cool functions and features such as cloud processing and real-time analysis, among others. This mini scanner is compatible with the Raspberry Pi HQ camera, but it lacks a suitable lens for close-range photography.
- Who designed it? openscan
- How difficult is it? Advanced
- What are the core components? Raspberry Pi 3B+ or 4B, Raspberry Pi camera v2.1, OpenScan Pi Shield, stepper motors and drivers
- How printable/popular is it? With 17 makes and 16 remixes combined from the different sites, this project has already won a significant number of fans.
- Where to find it? Printables, Thingiverse, OpenScan, GitHub
Miniature Observatory
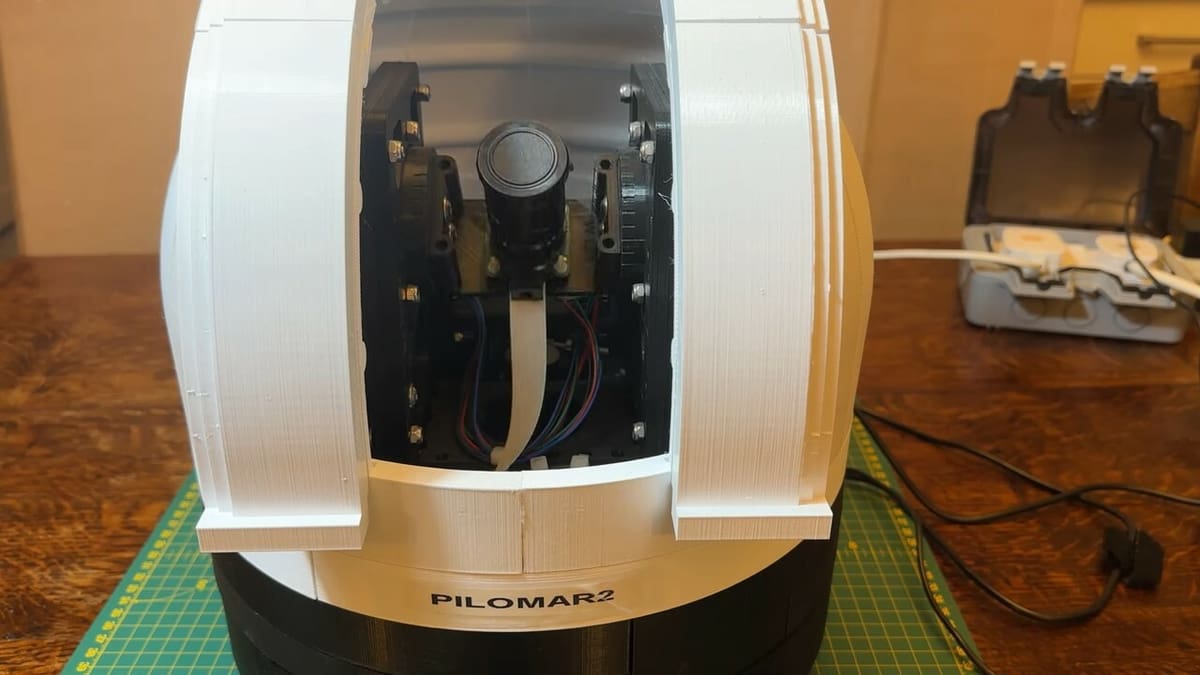
If you’re looking for a challenge that can take you to the stars, this is the right project for you. The Pi-lomar project takes you through building an automated telescope based on Raspberry Pi that’s designed for astronomical photography. It uses components such as NEMA17 motors and controller boards to move the camera in two directions: azimuth (horizontally) and altitude (vertically).
Being an advanced project, some users reported challenges during assembly, such as achieving dimensionally accurate parts and figuring out the proper configuration of the motors and electronics. However, the creator of the project has left very detailed instructions and is responsive to comments. There are several success stories in the comments as well.
For accurate assembly of the Pi-lomar, it’s essential to print the parts with whichever material you find has the best dimensional accuracy in order to ensure that all connections between components are tight. The creator used PLA.
The creator left behind many valuable nuggets of information throughout the instructions to help makers avoid common pitfalls. For example, when assembling NEMA17 motors, it is important to correctly adjust the current and check compatibility with the DRV8825 controller chips. If you’re set on creating this project for yourself, some of the best advice is simply to be patient and attentive to details when testing and making adjustments in the final stages to ensure the entire system functions correctly.
- Who designed it? MattHh
- How difficult is it? Advanced
- What are the core components? Raspberry Pi 4B, Raspberry Pi HQ camera module, 16 mm telephoto lens, Tiny2040 microcontroller, stepper motors and drivers
- How printable/popular is it? This beautiful challenge has already been viewed almost 75,000 times and more than 700 people have left their likes.
- Where to find it? Instructables
3D Scanner
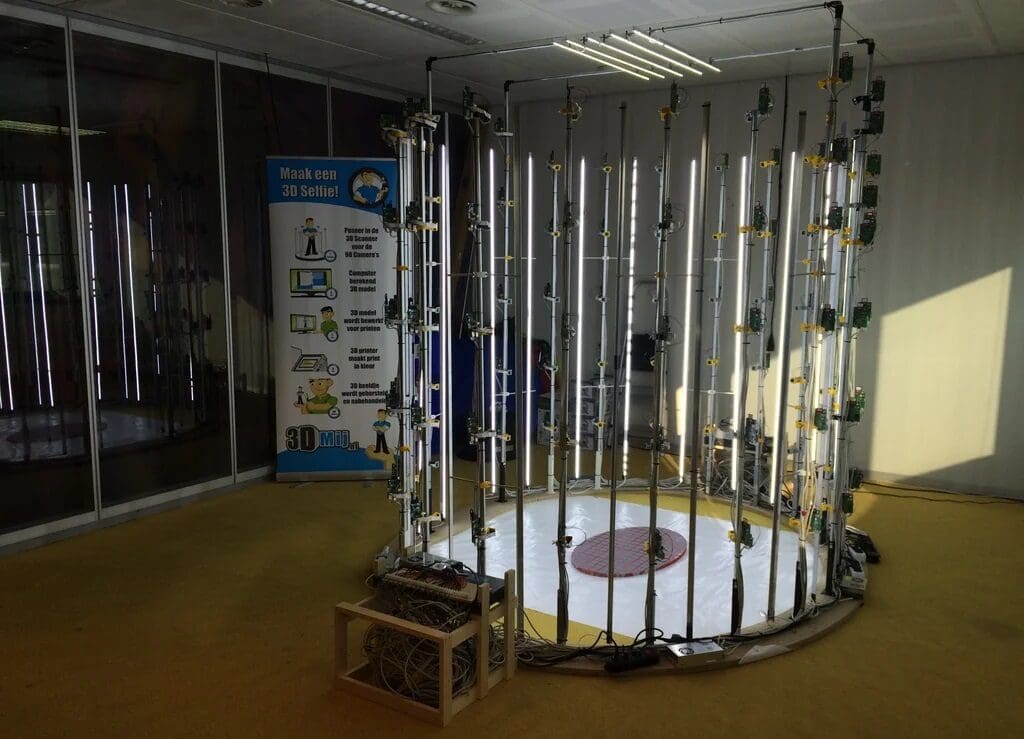
There are actually 3D printing services where you can get a full-body scan and a 3D printed replica of yourself. With a project like this, you could start such a thing on your own.
It’s a large-scale project for which you’ll need multiple Raspberry Pis and a wooden structure. The way this works is that there are 40 cameras forming 360° degrees of rotation, they all take a picture at the same time, and all the pictures overlap with each other to form a 3D model.
Given that this project can pose quite a challenge in time, money, and ability, make sure you’re ready to undertake it.
- Who designed it? the_anykey
- How difficult is it? Professional
- What are the core components? 40 Raspberry Pis, 40 Pi cameras, 40 SD cards, LED strips
- How printable/popular is it? This project has over 1,200 likes and a great version has been shared in the comments!
- Where to find it? Instructables
License: The text of "The Best Raspberry Pi 3D Printer Projects" by All3DP is licensed under a Creative Commons Attribution 4.0 International License.