The Best Raspberry Pi Home Automation Projects in 2025

Looking for creative Raspberry Pi projects? Home automation is a useful (and fun) way to utilize a Raspberry Pi. Read on for some ideas!
If you’re looking for ways to automate tasks around the house, look no further than Raspberry Pi single-board computers (SBCs). They’re popular and can be used for a variety of DIY projects. Cost-effective and flexible, you can use them to easily control and manage different devices and sensors. It’s ideal for automating lighting, temperature, security, and other aspects of your home using a network of interconnected devices.
In this article, we’ve found some of the best Raspberry Pi home automation projects currently available. The list includes practical and innovative projects for every experience level, from beginners to those looking for a challenge. Whether it’s helping you save money on your electric bill or making sure the air around you is safe to breathe, you’re sure to find something useful for your home.
Let’s get creating!
AI-Generated Art
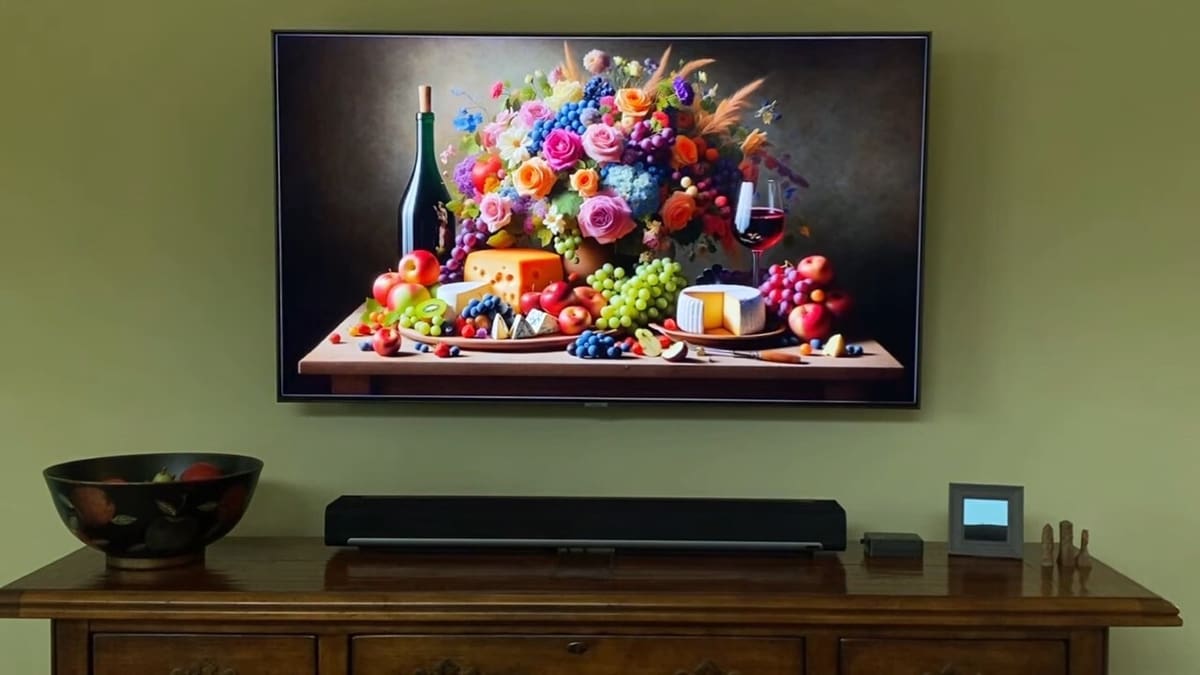
With a Raspberry Pi 4, television, microphone, and some programming, you can use voice commands to generate and display works of art. Lumina is able to generate images from detailed verbal descriptions.
Requiring only a few basic components, the project is relatively simple to replicate. The designer notes that the project requires a Raspberry Pi 4, so you can run the legacy 64-bit operating system. Older models and the newer Raspberry Pi aren’t compatible with the program. After the initial hardware setup, the necessary software and libraries are installed using terminal commands, with emphasis on the integration of the OpenAI and Picovoice APIs, responsible for image generation and speech recognition, respectively.
The flexibility of customization and ease of installation make Lumina a valuable addition to any smart home, allowing anyone to transform their space with AI-generated art.
- Difficulty: Beginner
- Designer: DevMiser
- Project page: Instructables
- Core components: Raspberry Pi 4, power supply, USB microphone, Micro HDMI to HDMI cable
DIY Alexa
Since voice assistants arrived on the market, internet searches have never been the same. It really is a game changer to be able to say what you need and get a useful answer back immediately. Of course, you could buy an Alexa and skip a few steps, but if you have a Raspberry Pi 4 or 5, speakers, and a microphone, you won’t even have to wait for delivery.
To make your own assistant, you need to create an Amazon developer account where you can access the Alexa Voice Service through the dashboard. After following a few simple steps to configure the service, you’ll only need to install it on your Raspberry Pi by cloning the AlexaPi repository. Once everything is ready, all you need to do is free up your hands and ask for your favorite song or listen to the news in style.
- Difficulty: Beginner
- Designer: Ashish Mishra
- Project page: Circuit Digest
- Core components: Raspberry Pi 4, USB Microphone, 3.5-mm line-in speaker
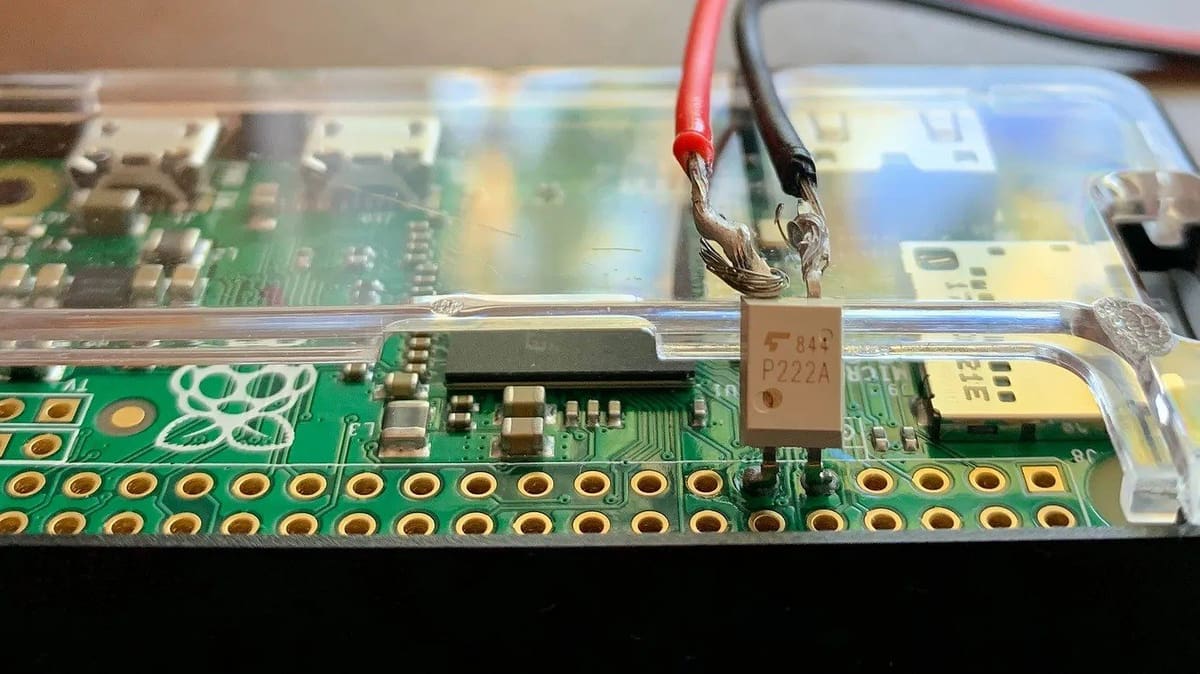
Smart Doorbell
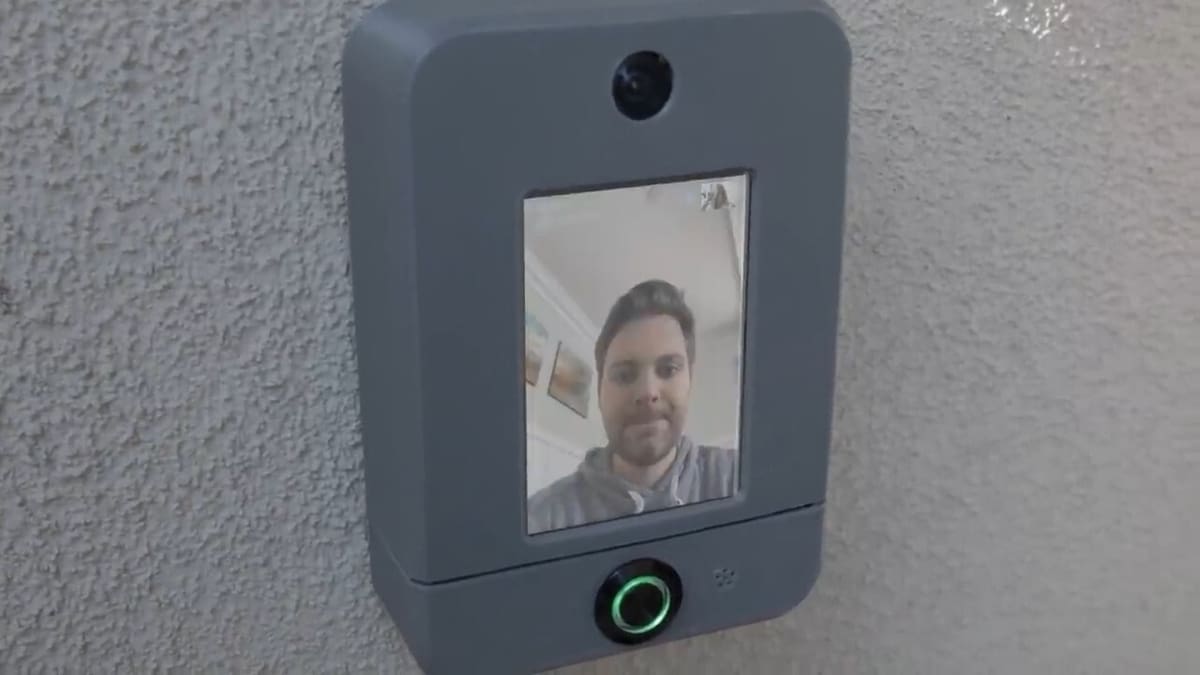
There are many types of electronic doorbells, but how about one that allows you to activate the lock remotely and even make a video call? The doorbell notifies users of the arrival of guests and allows communication via Wi-Fi over your phone, eliminating the need to go to the door. The designer notes that it’s also possible to use two of these to hold a video conference and thus not even need a smartphone, which could be useful for a variety of use cases.
The software setup –including enabling the camera and microphone, and integrating with Jitsi Meet for video calls – is detailed to ensure that users with intermediate knowledge can set up and operate the smart doorbell. This project uses a Raspberry Pi 3 Model B, but you can also try other newer versions of the Pi. 3D printable files for the project are available via Patreon.
The project designer warns users about the vulnerability of the device if its USB ports are accessed – after all, the entire network and data present would be exposed. So, it’s not recommended to store passwords or other sensitive information, as the device wasn’t designed to be particularly intrusion-proof. In any case, this is a great project to communicate with visitors and automate the opening of doors. It could prove especially useful for parties, freeing you from having to go to the door every time a guest arrives.
- Difficulty: Intermediate
- Designer: Hacker Shack
- Project page: Hackster
- Core components: Raspberry Pi 3 Model B, MicroSD card, LCD screen, camera, USB microphone, momentary button with LED, speaker with amplifier, 3D printed parts
Mailbox Sensor
Here’s an excellent way to keep tabs on when you’ve got mail. When a letter or packet is dropped into your mailbox, a sensor is triggered, automatically sending a notification via email or Microsoft Teams. The project is powered by a Raspberry Pi Zero.
To get started, you’ll need to install Python 3 and the necessary Ruuvitag libraries on your Pi. Since the creator is relatively new to Python, the script they created for the project is pretty simple. It reacts to events from the Ruuvitag sensor, which has a built-in accelerometer. You’ll tape the sensor to the mailbox, then once mail is dropped inside, it will react to Z-axis accelerations. The Raspberry Pi is pinged by the sensor, which sends a notification from Azure Logic Apps (which you’ll also need to install).
- Difficulty: Beginner
- Designer: Jussi Roine
- Project page: Jussi Roine
- Core components: Raspberry Pi Zero WH, Micro-USB adapter, Ruuvitag beacon sensor
Smart CCTV Camera
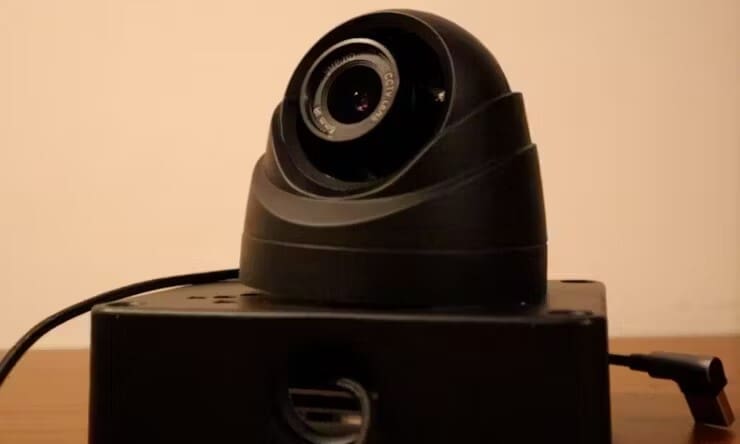
If you need something a little more intelligent than a video-enabled doorbell, this smart CCTV camera may be what you were looking for. Here, AI is used to recognize registered people and even send you email notifications so you know who is at your door.
Essentially, the CCTV captures live footage, and a lightweight web application framework is used to live stream the footage to your device. A servo motor connected to the camera allows for precise movements.
The designer recommends using a Raspberry Pi 4 with at least 2 GB of RAM or more, but you can also try newer versions such as the Raspberry Pi 5 to increase performance. A dedicated touchscreen monitor can be used to view the live stream and interact with the camera. Alternatively, you could access the URL via a smartphone connected to the same network and do the same.
One important thing to note when programming the face recognition library is to keep the maximum size of the images to 100 KB. The designer notes that this allows the face recognition to run faster.
- Difficulty: Intermediate
- Designer: Eben Kouao
- Project page: Hackster
- Core components: Raspberry Pi 4 Model B, high-quality camera, Raspberry Pi 6-mm lens camera, MicroSD card, 7” touchscreen, MG90S servo motor
Standing Desk
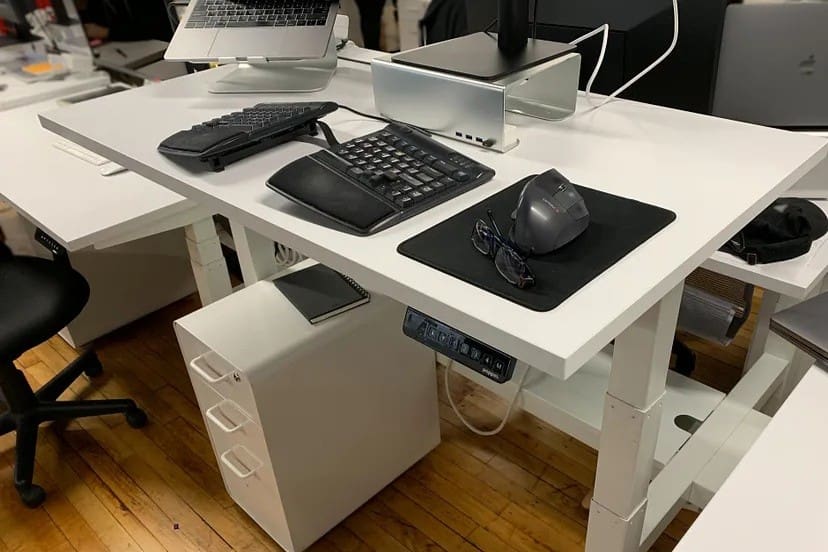
If you often forget to use your standing desk to actually stand, here’s a perfect solution. This automated standing desk project makes the desk rise right on schedule, so users will have the motivation to use it for its intended purpose!
The project is simple and straightforward as well as great for beginners. It calls for programming a Raspberry Pi Zero to send signals to the desk on an automated schedule. When the desk receives the signal via a timer and relays, it rises on cue. The project creator programmed the desk to rise every 45 to 60 minutes, but you can tweak the provided Python script to a different time frame, if desired.
For the hardware setup, the creator soldered two wires from the desk’s control board to the two output pins of the relay. Following this, the two relay control pins were soldered onto the Pi. The creator opted to secure the Pi on the underside of their desk with some tape.
- Difficulty: Beginner
- Designer: David Kong
- Project page: Medium
- Core components: Raspberry Pi Zero, Pi Zero case, MicroSD card, USB power brick
Tag-Along Trash Can

We all know at least one special person who leaves their trash in inconvenient places. Now, we can send that dear friend a friendly hint. This easy-to-build trash bin not only automatically opens its lid, but it also follows mess makers wherever they go.
The secret behind this tag-along trash bin lies in the proximity sensors and control motors. Two infrared sensors detect movement and adjust the wheels to follow your movement. Ultrasonic sensors maintain a constant distance of up to 20 cm. This ensures the trash can is always nearby, and thanks to a strategically placed servo motor, the bin lid opens automatically with a simple movement.
While this isn’t the prettiest of builds, the idea is lovely, especially for us neat freaks.
- Difficulty: Beginner
- Designer: Elecrow
- Project page: Instructables
- Core components: Raspberry Pi Pico, infrared and ultrasonic sensors, robot car chassis, servo motor, motor driver module
Plant Watering System
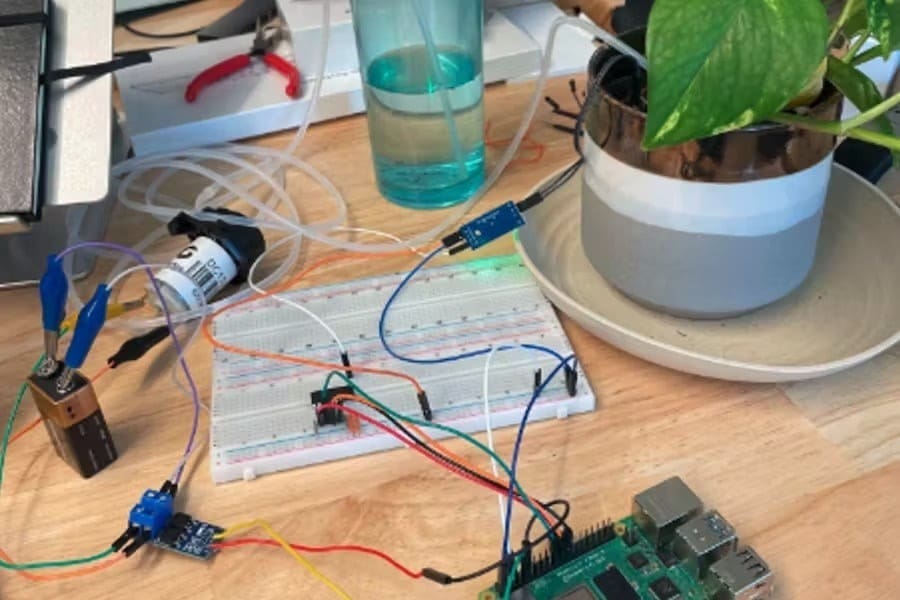
When folks go out of town and need to make sure that the house plants survive, this Raspberry Pi-operated system is here to help. The first step in the project is wiring the various components together to set up the plant-watering robot. A wiring diagram is provided on the project page.
When Serial Peripheral Interface (SPI) is enabled on the Raspberry Pi, it communicates with the sensor to help monitor water levels. The soil moisture sensor provides signals to the robot, triggering the peristaltic pump to send water to the plant. You can tinker with the Python code to specify how much water should be used or the exact moisture levels of the soil.
The Raspberry Pi must be able to work with a Viam-compatible operating system. After setting up the hardware and SPI, the next step is to register on the Viam app. Once the app is up and running, the Raspberry Pi and pump get added as board and motor components. From here, you can monitor and control the system to ensure your plants stay hydrated.
- Difficulty: Intermediate
- Designer: Sierra Guequierre
- Project page: Hackster
- Core components: Raspberry Pi 3B/4B, Seeed Studio 4-Channel 16-Bit ADC for Raspberry Pi, breadboard, 9-V battery, jumper wires, capacitive soil moisture sensor, peristaltic pump motor, tubing, Adafruit MCP3008 ADC, motor speed controller, planter box or flower pot, water container
Cocktail Pi
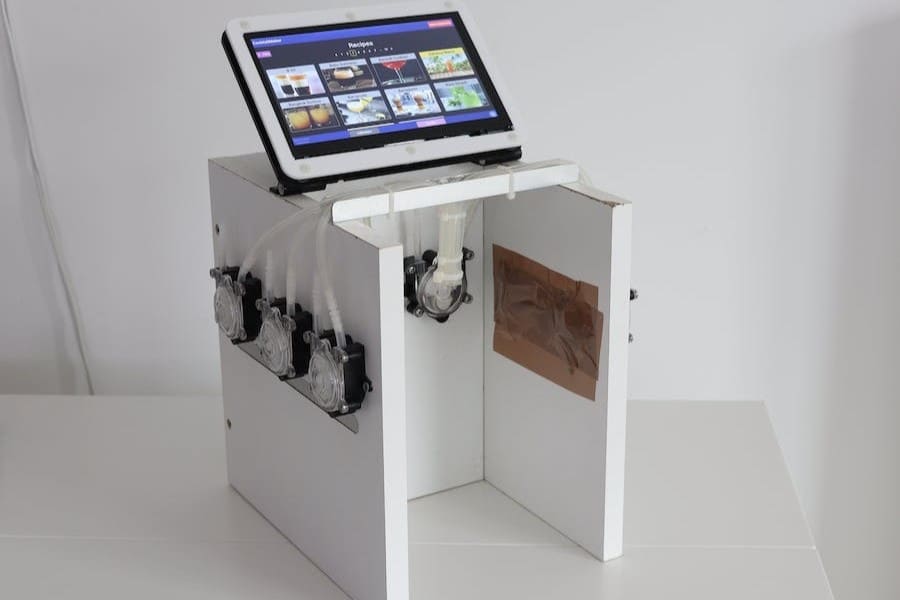
Amateur mixologists will love this open-source project. It allows users to create their own at-home bartender. CocktailPi is a web interface and controlling software for this Raspberry Pi-based cocktail maker.
CocktailPi features a relay board, which is in charge of opening and closing an electronic circuit. This pumps and mixes various liquids into a cocktail glass, creating the drink of your choice. Once it’s all set up, users can control CocktailPi with a local touchscreen, their network-attached device, or the Android app.
There are three setup options for CocktailPi. Users can opt for a basic setup with just a Raspberry Pi and the basic components. The other options include a reverse-pumping setup a complex setup. The former lets you pump liquids back into their containers, while the latter includes a GPIO expander from which eight additional units can be connected. Unique features include recipe customizations, virtual stirring, and an event system to play sounds at certain events.
You’ll find an active community on Discord and GitHub.
- Difficulty: Advanced
- Designer: Alexander Liggesmeyer
- Project page: CocktailPi
- Core components: Raspberry Pi, relay board, dosing pumps, diodes, power supply, silicone hose
Fruit Ripeness Detector
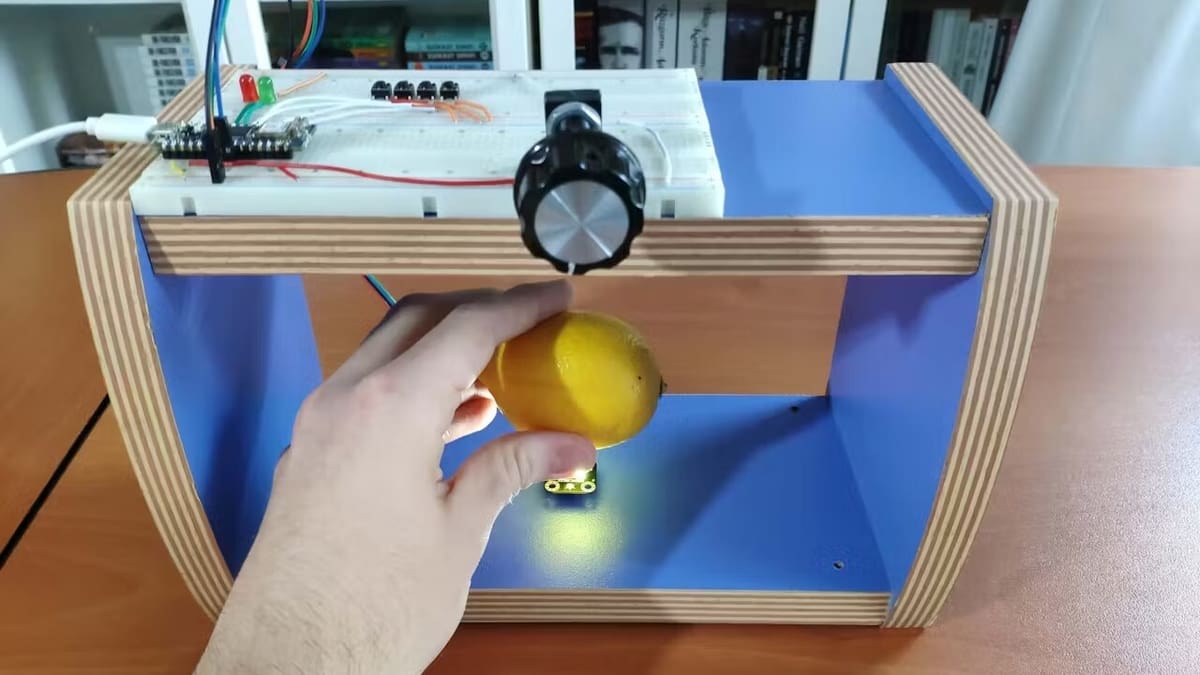
This project uses AI to accurately determine the ripeness stage of fruits and vegetables. Developed by Kutluhan Aktar, the system integrates light sensors, microcontrollers, and artificial neural networks to analyze the spectral colors of food. This analysis identifes whether the food is ripe, partially ripe, early ripe, or decaying, ensuring an accurate and efficient assessment.
Using TensorFlow, a neural network is trained to recognize color patterns associated with different stages of ripeness. On the practical side, this helps to identify the ideal point of consumption for foods, especially for those of us not schooled in the art of picking ripe fruits and veggies.
For this project, the designer used a couple of Raspberry Pis and recommends either Raspberry Pi 3B+ or 4B, but you could also give this a try with the Pi 5.
- Difficulty: Expert
- Designer: Kutluhan Aktar
- Project page: Hackster
- Core components: Raspberry Pi 4 Model B or 3 Model B+, DFRobot AS7341 11-Channel visible light sensor, Arduino Nano 33 IoT, solderless breadboard
Automatic Cereal Dispenser
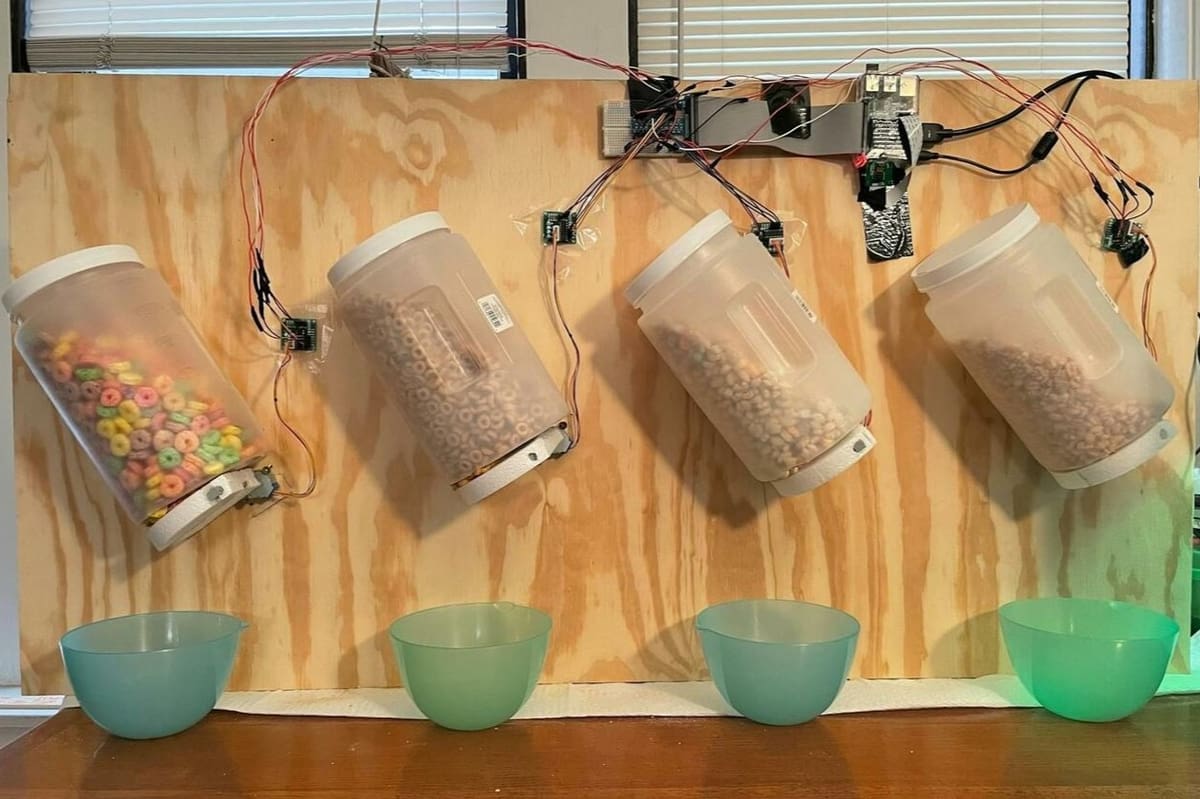
Talk about a creative idea! This next project is an automation-based cereal dispenser. Users can put a bowl under a cereal dispenser and, with the help of a Raspberry Pi camera running OpenCV, the dispenser will “recognize” the user and pour out the cereal automatically.
The cereal containers are wired to a Raspberry Pi Model 2 B or higher, and a hinge that will release the cereal is created with the help of a stepper motor and dowel. The creator notes that the circuitry is slightly complex due to the wiring of four separate stepper motors, but helpful instructions are provided.
After the Pi is set up and Python is installed, you’ll need to install OpenCV, which is an open-source AI library with the capability to track and recognize faces. From here, you’ll train the model by uploading facial images with the Pi camera module. The creator recommends taking at least 1,000 images! Within the dataset folder, users can create multiple folders with names so the algorithm can correctly identify different people. This way, a personalized cereal order for each person using the dispenser is possible.
Breakfast has never been easier or more fun!
- Difficulty: Intermediate
- Designer: Johan Sandoval
- Project page: Hackster
- Core components: Raspberry Pi 2 Model B, Raspberry Pi Camera Module, stepper motor, jumper wires, GPIO ribbon cable, plastic containers, dowels, foam disk
Sunrise Alarm Clock
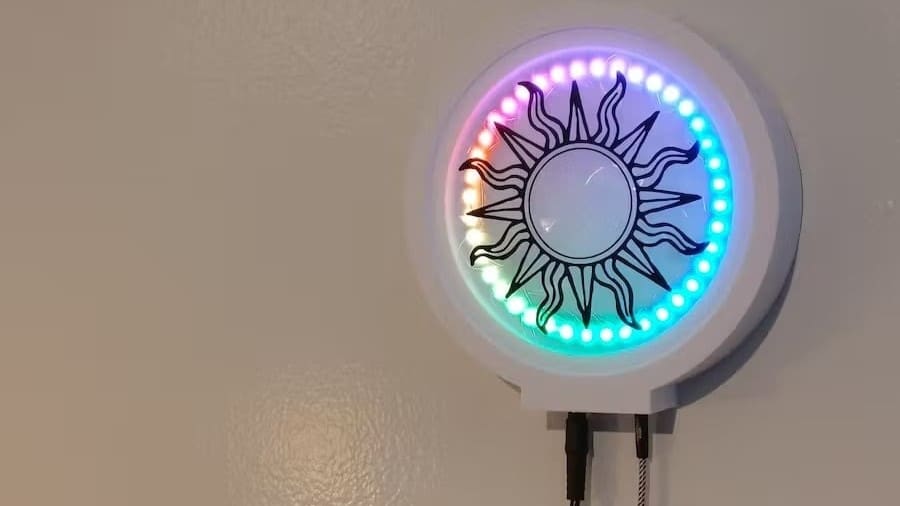
Simulating a gentle sunrise 15 minutes before your alarm, this clock project is a calming way to start your day. The clock features a 3D printable enclosure with 40 RGB LEDs, which are are capable of displaying some nice animations.
The project calls for a Raspberry Pi to host a webserver that is used to configure the light and alarm. Using an RS232 connection, the Pi connects to the Itsy Bitsy M4 Express that powers the LED ring with a simple Python script. Detailed instructions about the necessary electronic components and how to assemble them are provided on the project page. Once everything is set up, users can modify the clock’s color, brightness, alarm, and mode using the web application.
- Difficulty: Intermediate
- Designer: Greg’s Builds
- Project page: Hackster
- Core components: Raspberry Pi, LED ring, Adafruit ItsyBitsy M4 Express, MAX3232 Breakout, audio jack, cable, acrylic disk, decal
Temperature & CO2 Monitor
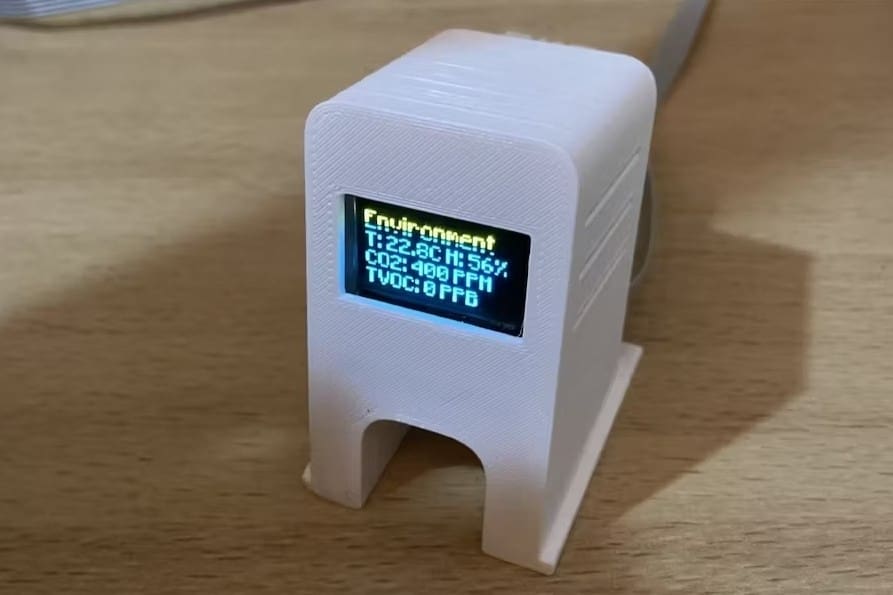
When it comes to safety in the home, having a temperature and air quality monitor is a great way to breathe easier. This compact monitor can help you ensure that a room is safe to breathe in. While a Raspberry Pi 3 Model B was used for the project, it can be carried out with any Raspberry Pi model.
To start, you’ll wire all of the hardware components together with a soldering iron, following instructions provided by the creator. You’ll then need to set up and install the necessary libraries onto your Pi. Following this, the program should run automatically when the Pi turns on. The temperature and air quality sensors provide input that’s displayed on a status screen, including room temperature and CO2 levels.
A 3D printer is needed to print the case, which features space for the status screen.
Automated Solar Energy Distribution
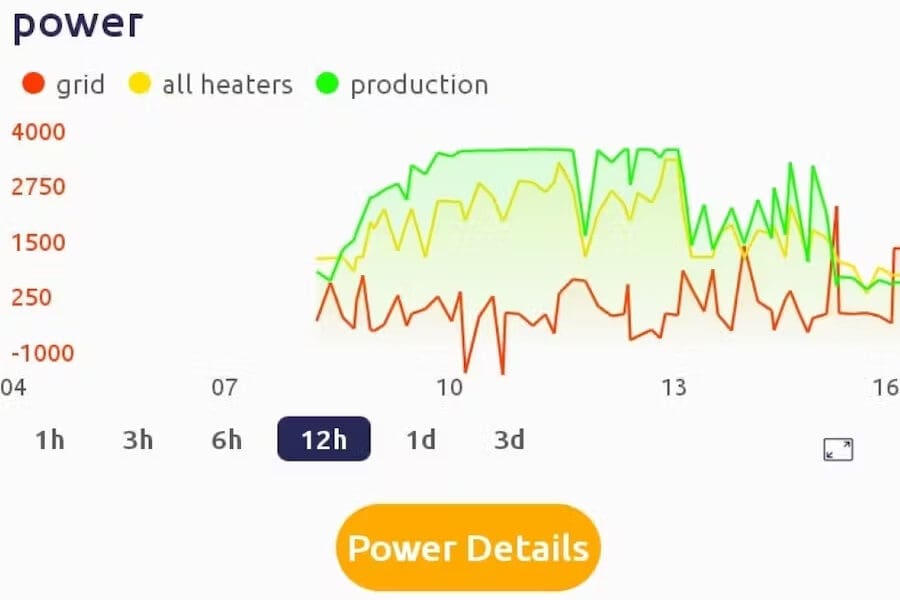
For homeowners using solar energy, this next project will help you save money and fuel. Depending on where you live, excess solar energy typically goes straight to the grid. However, with this distribution system, extra solar energy is fed into electric heaters, maximizing your energy and ensuring none is exported to the grid.
The creator created the automation application solar2heater to solve this problem in their own home. When the application detects solar energy being injected into the grid, it turns on a heater using a Wi-Fi relay. After the solar production lowers, the application turns heaters off. In order to function properly, the application needs to know the direction and intensity of the current. You can obtain this information by using a clamp, a consumer unit meter, or a monitoring device if one comes with your solar installation.
To monitor the system in real-time, the creator made a smartphone application using the Blynk platform. The Raspberry Pi is monitored by Monit, which helps keep track of system health and takes automated actions in case of error.
- Difficulty: Advanced
- Designer: pascal boudalier
- Project page: Hackster
- Core components: Raspberry Pi 3 Model B+, PCB, voltage sensor, Wi-Fi enabled relays, diode, dedicated current clamp
License: The text of "The Best Raspberry Pi Home Automation Projects in 2025" by All3DP is licensed under a Creative Commons Attribution 4.0 International License.