When comparing the different types of 3D printing, resin printing easily sets itself apart from the rest. In terms of hobbyist uses, resin-based printing is the second-most common method behind fused deposition modeling (FDM) printing, which extrudes plastic filament through a heated nozzle. Resin printing uses a light source to flash-cure layers of liquid photopolymer resin to print models. Due to the printing process and resin properties, the finished model also needs to be washed and cured during post-processing.
There are different resin printing technologies, and they’re differentiated by the light source used. For example, stereolithography (SLA) uses a laser beam guided by rotating mirrors to draw out each layer, digital light processing (DLP) uses a projector to shine images of the layers onto the resin tank, and liquid crystal display-based (LCD) printing displays images of each layer directly from a screen. Despite their differences, all resin printing relies on common settings and factors for a good print, namely exposure time, resolution, layer adhesion, anti-aliasing, and resin quality.
A calibration model is a great way to test your settings and determine if you need to adjust them. Each model tests specific settings, and there are many options to choose from. In this article, we’ll go over 10 of the most useful calibration models out there.

Interpreting Results
Before we get to all of the models out there, it’s important to know what to look for when assessing a printed calibration model. Printer and resin manufacturers agree that it’s most important to dial in your exposure settings when working with a new resin. While preset profiles for your particular resin-printer combination provide a decent starting point, the ideal settings may vary on your setup due to the age of the equipment, temperature, and other difficult-to-control factors.
Dialing in the exposure settings will allow you to achieve the sharpest details possible out of the resin. Calibration models usually use up only small amounts of resin, so they can be great for checking if your settings are suitable for your resin or evaluating the shrinkage of prints before starting with larger or more detailed models.
While the calibration models on this list look quite different, issues like over- or under-exposure are readily noticeable on many different features. Raised features and embossed text may appear closer together or bloated when over-exposed, whereas thin pillars and fine detail may get lost or not form at all when under-exposure is at fault. A few resin manufacturers have shared more in-depth guides for interpreting the results of calibration tests – the ones from Anycubic and Phrozen are definitely worth checking out.
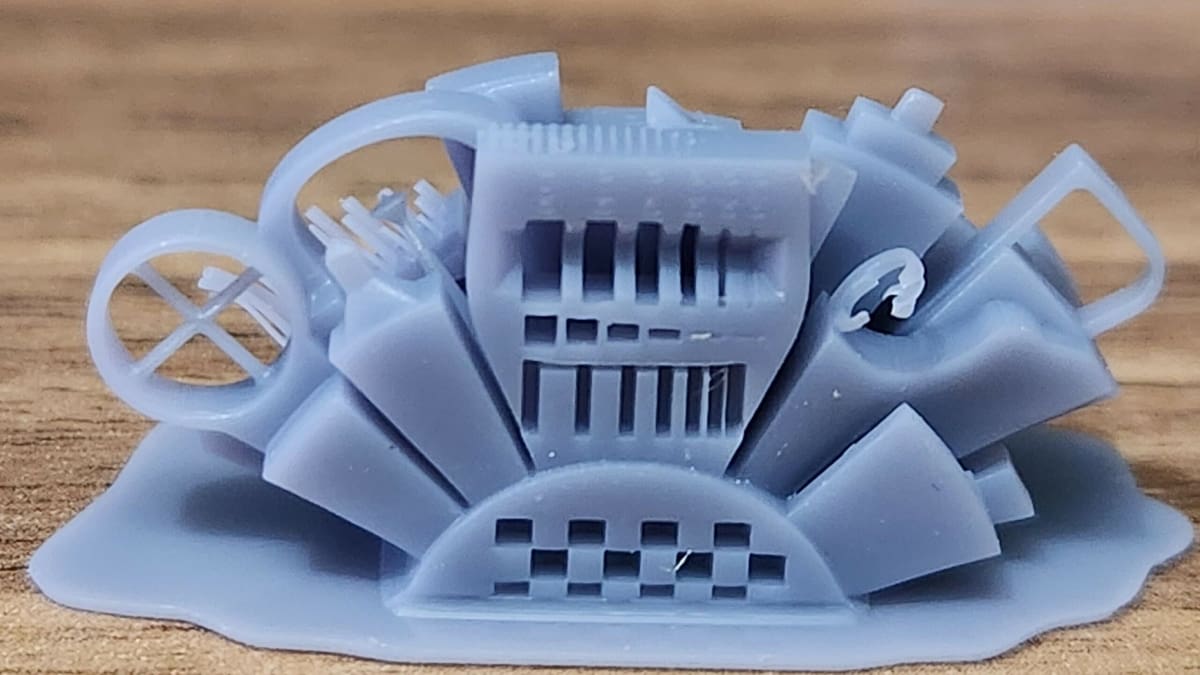
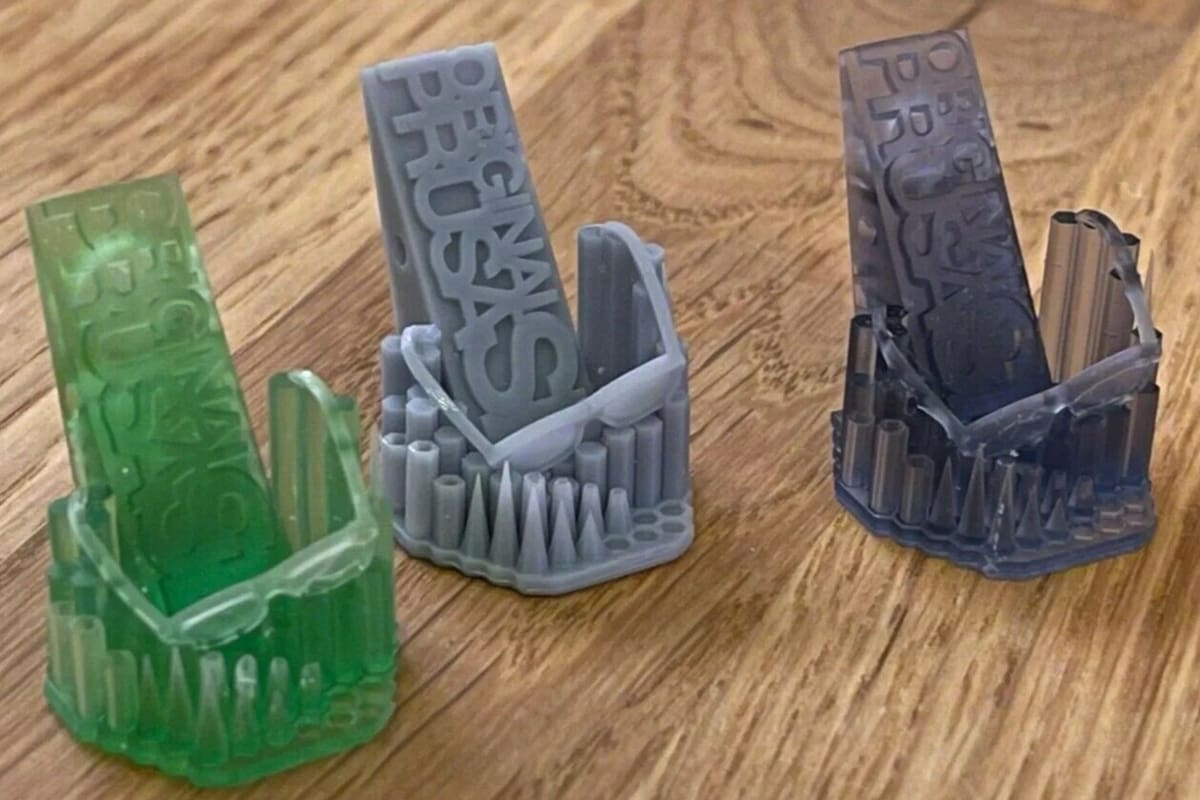
AmeraLabs Town

Designed by AmeraLabs, a Lithuanian resin manufacturer, the Town is an all-purpose calibration part that tests printer settings and resin quality. In total, there are 10 different tests integrated into the model, as indicated by the various buildings protruding at various angles. Its effectiveness makes it the frequent subject of resin printing videos and tutorials.
The first test consists of varying slot widths, ranging between 0.1 and 1 mm, that test the quality of the printer’s light source as well as exposure times for curing each layer. The second test has various opening heights that test for exposure time and layer adhesion based on the visibility of the openings. The third test is a cross-shaped bridge formed by two intersecting pillars. If this part of the model shows any deformations or inconsistencies, it may point to potential issues with the layer height or even the resin being used. These are only 3 of the 10 tests, and already, they tell you a lot about your resin printer’s performance.
- Who designed it? AmeraLabs
- How printable/popular is it? The Town model has 13 makes and over 43,000 downloads combined from Thingiverse and MyMiniFactory – it’s definitely popular.
- Where to find it? AmeraLabs, Thingiverse, MyMiniFactory
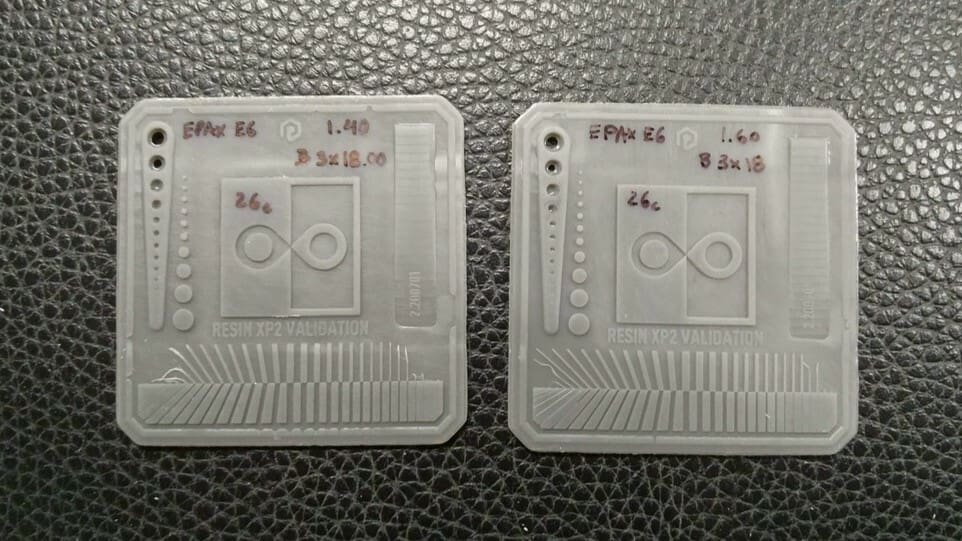
Siraya Tech
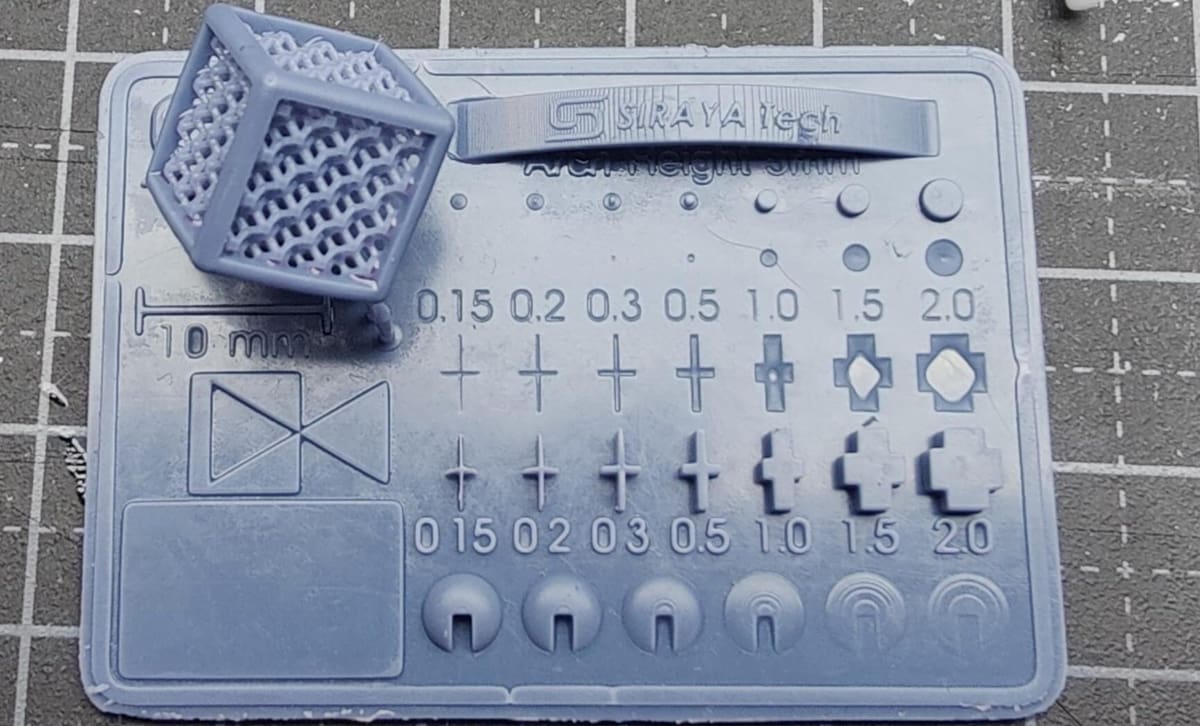
Siraya Tech, a Hong Kong-based resin manufacturer (formerly part of Peopoly), designed their own test model, which contains five sections, three of which test the printer’s exposure settings. As a quick troubleshooting tool, both exposure and resolution can be tested even when the model isn’t completely printed.
Already at 3.5-mm height, the pinhole, recessed texts, and the triangular and circular objects should be visible. If you allow the rest of the model to print, the remaining features (the cube and the arch) test for printability and anti-aliasing properties.
- Who designed it? Siraya Tech
- How printable/popular is it? This model has over 35,400 views and more than 5,000 downloads on Cults.
- Where to find it? Siraya Tech, Cults
Make: Rook
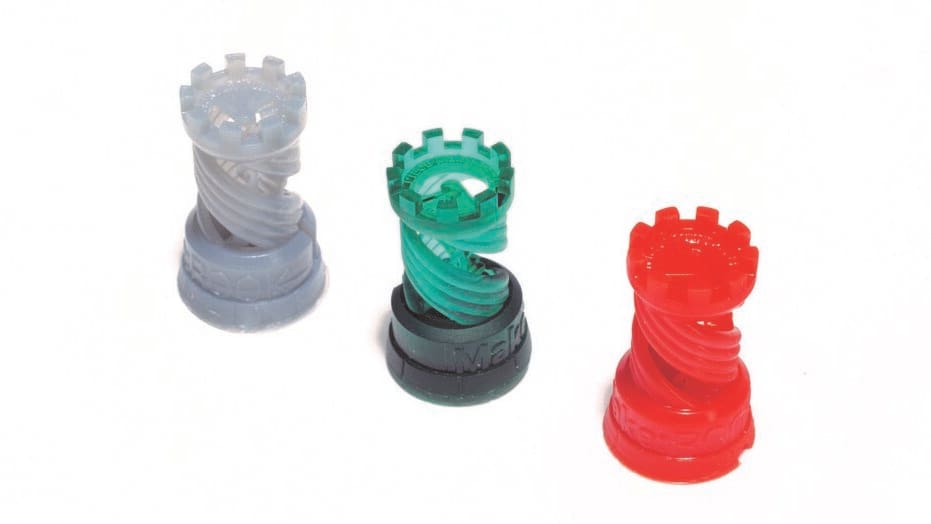
Chances are you’ve seen the Make: Rook while browsing any 3D printing content online. It’s fundamentally a chess rook but with twists, overhangs, and fine details, including a staircase and visible text. These features make it a classic “torture test” to push the limits of your printer.
Although there aren’t any specific parameters indicated by the model, this aesthetically pleasing print tests for resolution and exposure times.
- Who designed it? Make
- How printable/popular is it? As one of the oldest and most popular test prints for all types of printers, the Make: Rook has 84 makes and has been downloaded over 62,000 times from both sites combined.
- Where to find it? Thingiverse, Cults
Hidden City Calibration Cube
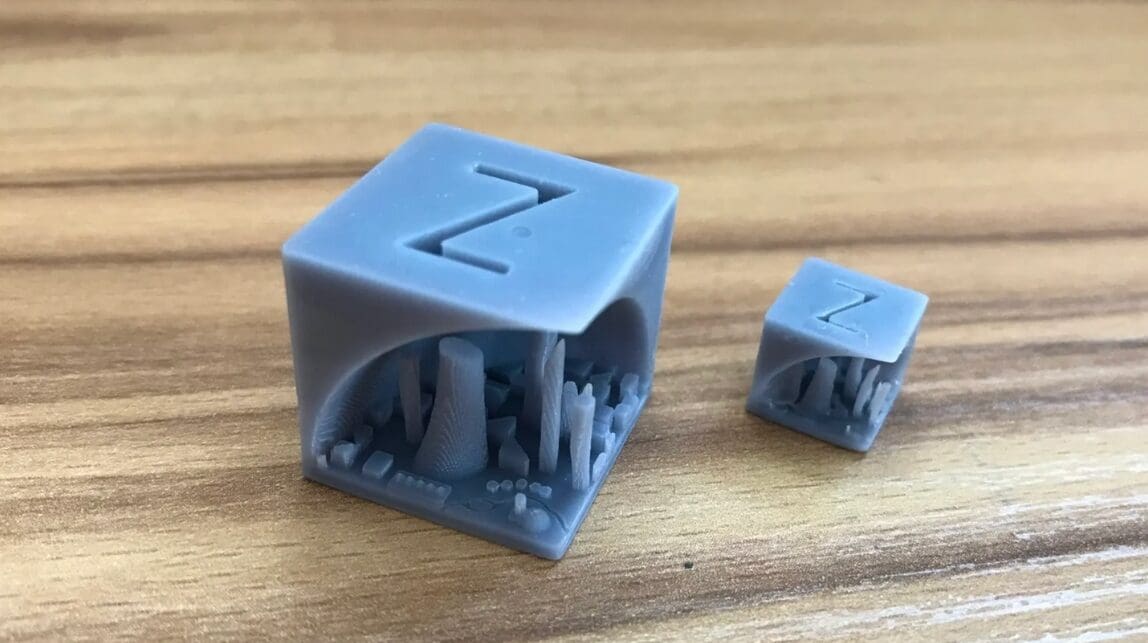
In 3D printing, calibration cubes are popular for fine-tuning printer settings. But what if a calibration cube held a secret? Take a look at the Hidden City Calibration Cube – a creation that cleverly hides a cityscape within. The designer combined a calibration cube with a skyline model, ingeniously hiding the intricate cityscape within the cube’s standard 20-mm size.
Initially designed for printing in PLA, the designer suggests trying the test with resin. With its remarkable property for capturing intricate details, resin elevates the fine details of the cityscape. When tested by enthusiasts like Bastock on a resin printer, the results were excellent, with great detail and depth on the first attempt.
The compact buildings inside the city allow for testing tolerances and resin viscosity, providing insights for adjustments. Also, as buildings are closely packed within this compact cube, you can see how resin behaves in complex spaces. By observing the results, adjustments to pigment concentration or exposure settings can be made to achieve sharper, more defined building structures.
- Who designed it? jq910
- How printable/popular is it? This model has been downloaded around 2,400 times and 9 makes have been shared on both sites combined.
- Where to find it? Thingiverse, Printables
Prusa SL1 Calibration Object
Although Prusa, a mainstay in the FDM printing community, came a little late to the resin printing scene, they’ve developed their own unique calibration model for the Prusa SL1 and SL1S. The model even comes preloaded on all SL1 printers. After printing it, users should look for issues such as missing elements and geometry, merged parts, deformations, or holes.
Collectively, any of these visible imperfections can help you troubleshoot basic settings such as exposure time, layer height, and layer adhesion. For example, the model’s letters or numbers will indicate overexposure if they appear too thick or merge together. In contrast, the lenses on the glasses frames won’t print if the model is underexposed. You can adjust your settings and re-print to gauge your progress.
- Who designed it? Prusa3D
- How printable/popular is it? Prusa’s SL1 Calibration has 11 makes and over 2,500 downloads.
- Where to find it? Printables
Validation Matrix
The Validation Matrix is the fastest test model to print on this list and uses the least amount of resin. It contains four different features, all of which are for testing exposure balance. To successfully print this model with accurate results, a bottom layer count of four is highly recommended by the designer. Its compact form factor and fast print times make the Matrix popular for YouTube videos and tutorials aimed at those new to resin printing.
In terms of the tests, there should be the same number of pins and holes on the left-hand side of the Matrix. In the center is a square with two teardrops that should barely meet in the middle of the square. The square itself should be 20 mm in length and width, with a 1-mm edge on the righthand side.
- Who designed it? Photonsters
- How printable/popular is it? The validation matrix has 12 makes on Printables and there are almost 166,000 views of Slice Print Roleplay’s YouTube tutorial.
- Where to find it? GitHub, Cults (shared by X3MSnake), Printables (shared by RedNightPrinting)
Michael's Calibration Matrix
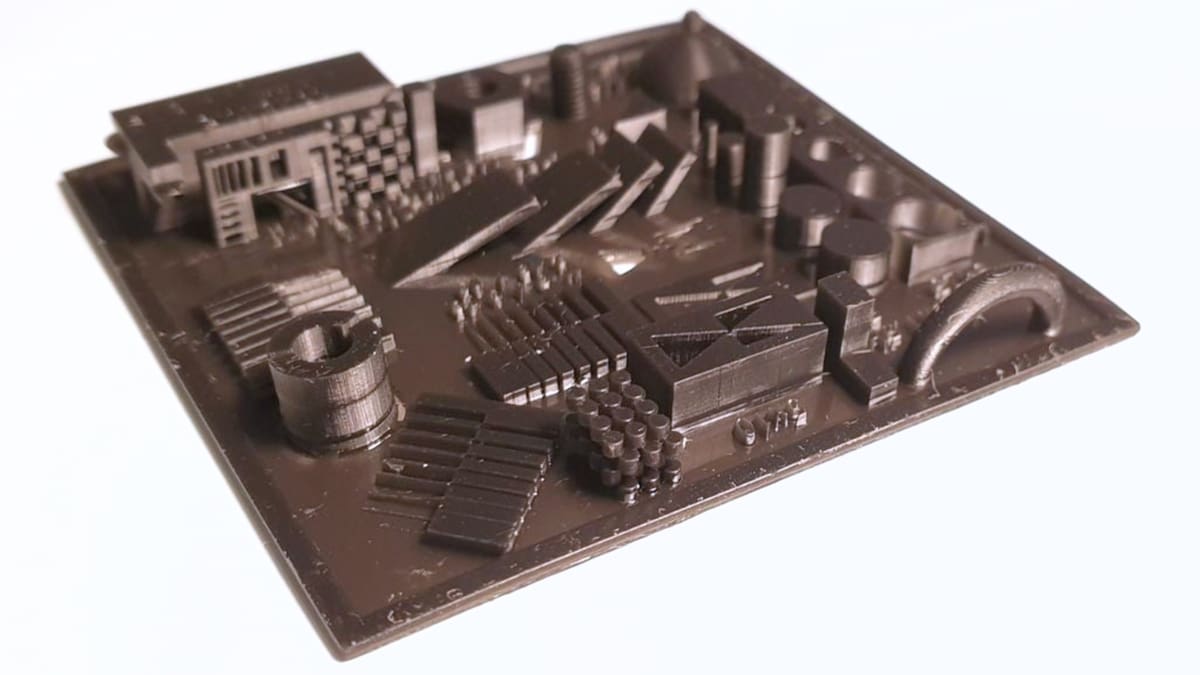
Michael’s Calibration Matrix is a combination of tests put together by the designer to take resin printer calibration to new heights. Inspired by Phrozen’s validation matrix and Tableflips’s Cones of Calibration, this remix combines them and adds more detail for testing resin printers. Included are exposure triangles, varying cones, checkerboards, depth elements, slits, and more.
Each element is crucial, whether for testing printability, resolution, or dimensional accuracy. For starters, the cones, cylinders, and slits let you examine the minimum width and height of openings, letting you fine-tune exposure settings and pigment quantities. Additionally, the Matrix incorporates free-standing exposure tests and flat overhang assessments to evaluate layer rigidity, a key factor in achieving robust and durable prints.
Furthermore, it has elements for shrinkage and resin cleaning assessment. For example, the three-layered stacked cylinders allow for shrinkage analysis and evaluation of how well resin can drain out of spaces. Moreover, the Matrix has an M3 thread and nut for leveling or thread-cutting evaluation. With a diverse range of components, the Calibration Matrix serves as a comprehensive test print for resin.
- Who designed it? biolippi
- How printable/popular is it? This model has only one published make and around 5,800 downloads but it’s one of the most comprehensive tests for resin printers. It’s received over 385 likes on Thingiverse.
- Where to find it? Thingiverse
Shrinkage & Exposure Calibration Piece
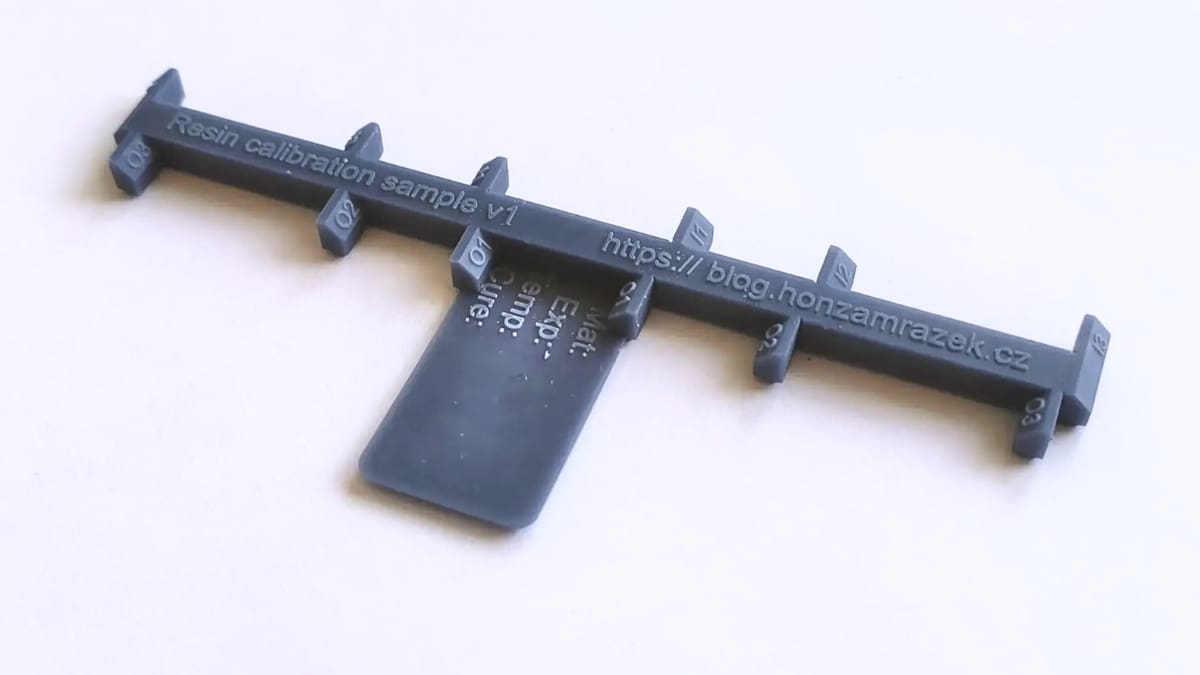
Want your resin prints to meet precise dimensions? The Shrinkage and Exposure Calibration Piece is designed to help you estimate and counteract resin shrinkage. Resin naturally shrinks by approximately 1-2% in total volume as it cures. This calibration piece provides a practical way to measure a particular material’s shrinkage accurately.
The suggestion from the designer is to print this using standard settings. It should be placed flat on the build plate and left to cure. Once completed, it becomes a useful test print for measuring the degree of shrinkage. Jan Mrázek created the resin test print, which comes in two variations: one for direct printing and another that can be used as a mold for crafting a silicone model.
This model is useful for anyone who wants to learn about resin shrinkage as well as exposure bleeding through a small test print and some calculations. Once you have measured the calibration piece, there’s no need to calculate the shrinkage manually. Simply use the companion calculator, which provides two essential values: “XY model scale for compensation” and “tolerance compensation”. With these figures, you can input the required adjustments into the slicer to counteract shrinkage and effectively achieve accurate resin prints.
- Who designed it? yaqwsx
- How printable/popular is it? This model has 3 published makes and around 1,600 downloads.
- Where to find it? Printables
Calibration Measurement
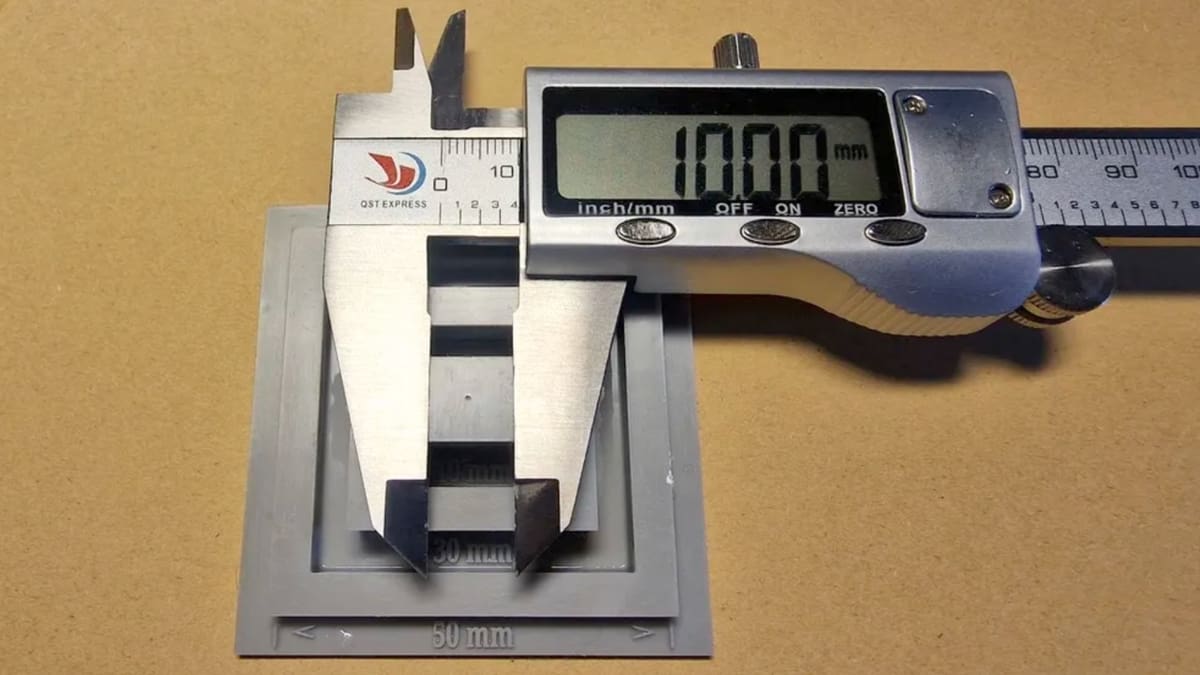
In the quest for accurate 3D prints, calibration plays a crucial role, and this calibration measurement print for resin is here to help you achieve exactly that. The key objective is to validate the printer’s accuracy by measuring five distinct lengths ranging from 10 to 50 mm. You’ll need a Vernier or a digital caliper, which will become your essential tool in this calibration journey.
This test print comes in two height variants. You can choose between the two depending on your preference for printing speed or ease of use. The first variant, the longer one, has a total vertical height of 17 mm, while the second, faster printing option stands at 7 mm. This height difference influences the ease of measurement, making the longer variant more accessible.
To obtain the measurements, you can use the external jaws of a caliper to measure 50 mm, 30 mm, and 10 mm with ease. For precise measurements of 20 mm and 40 mm, the internal jaws of the caliper should be used to ensure accuracy in each calibration measurement.
- Who designed it? DidaW
- How printable/popular is it? Although this model has just over 850 downloads and 1 published make, the original print of this model looks good and is as useful for measuring calibration as can be.
- Where to find it? Printables, Thingiverse
Lattice Benchy 1
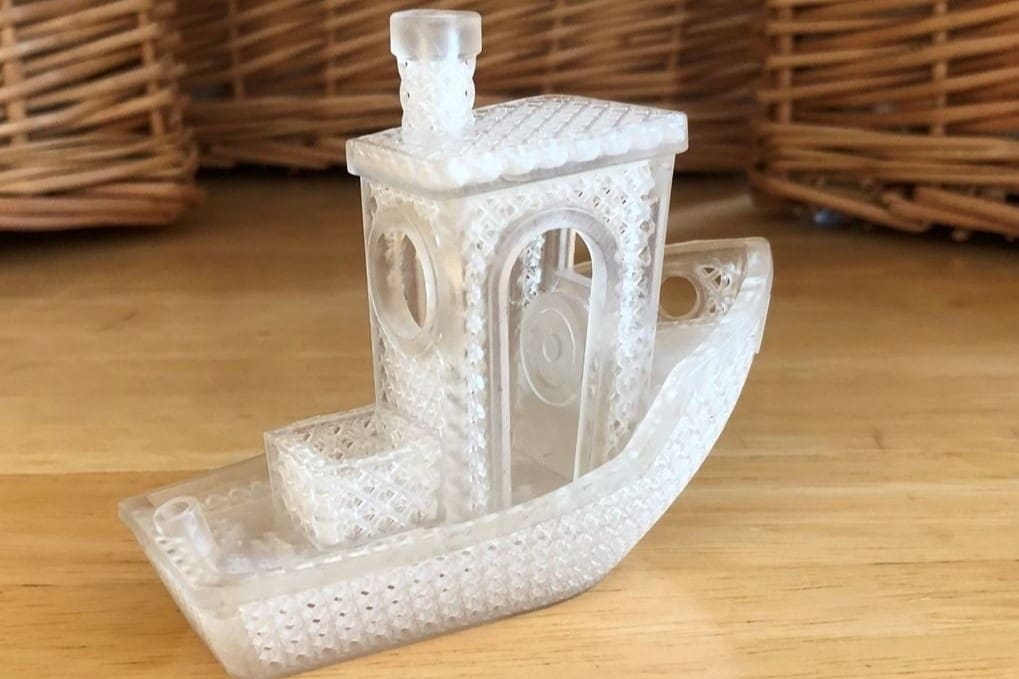
Looking to test the limits of your printer’s resolution and display the intricate design elements that a resin printer can produce? For that, the Lattice Benchy 1, a remix of the renowned 3DBenchy test model, is an ideal test print. Its smooth curves, small holes, and complex features offer an excellent opportunity for testing and refining the resolution of resin printers.
By printing this model, you can examine the printer’s performance in multiple aspects. From surface quality to dimensional accuracy, the Lattice Benchy 1 also evaluates the printer’s precision and capability to produce intricate structures. Moreover, this test print showcases the entire printing system’s capabilities, including the printing material’s viscosity to the final result.
More than a beautiful little tug boat, the Lattice Benchy 1 offers a glimpse into resin printing precision. This print is 100 mm long and features lattice structures as small as 1 mm in diameter, showcasing the remarkable precision of resin printers.
- Who designed it? DaveMakesStuff
- How printable/popular is it? This model has 2 published makes and has earned around 290 likes on Thingiverse – numbers that will surely keep on growing.
- Where to find it? Thingiverse
License: The text of "Resin Test Print: 10 Models to Test Your Resin Printer" by All3DP is licensed under a Creative Commons Attribution 4.0 International License.