
Blender Hair Tutorial: How to Make Hair in Blender

Modeling hair accurately can be difficult. Learn how to use the Blender 2.8 hair particle system, which makes creating hair a breeze!
Blender's Particle System
In Blender, the most efficient way to create hair is through the particle system. Once the hair strands are established as particles, the settings can be altered in different ways to get different results.
Hair can also be modeled in Particle Edit Mode using the available set of tools. Read on to find out more!
Creating a Vertex Group
Meet Suzanne
First off, you’ll need a proper mesh to add hair to. A great model to practice with is Suzanne, the Blender monkey.
- Create a new project and delete the preset cube.
- Click “Add” in the top left, or press Shift + A.
- From the “Mesh” sheet, choose “Monkey”.
Setting Some Roots
Once you’ve summoned Suzanne, it’s time to define a scalp for her. With this in place, the hair will only grow from her scalp and not all over her face.
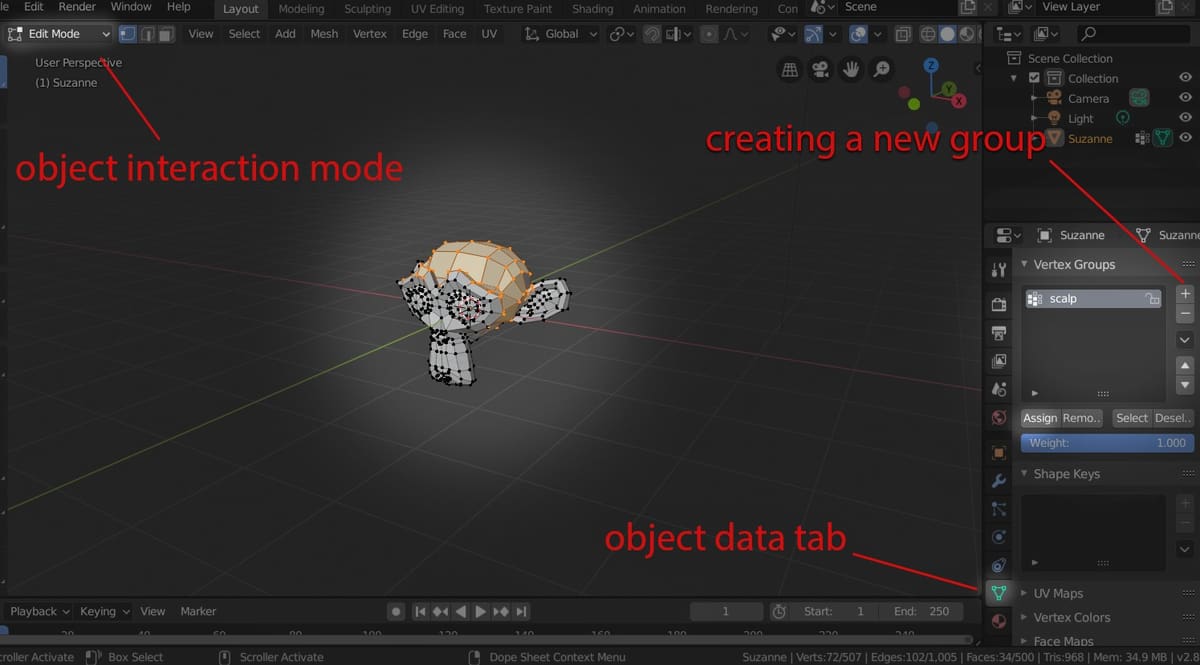
- Go to Edit Mode (by choosing it from the top left or pressing Tab).
- Press C on your keyboard and then select the part you want hair to grow from. If you made a mistake, you can deselect while holding Shift.
- Open the “Object Data” tab and click the ‘+’ sign below “Vertex Groups” to create a new vertex group.
- While the scalp is still selected, click “Assign” to assign the scalp to the new vertex group. You can double-click the name to change it.
- Press Tab to switch back to Object Mode.
Adding Particles
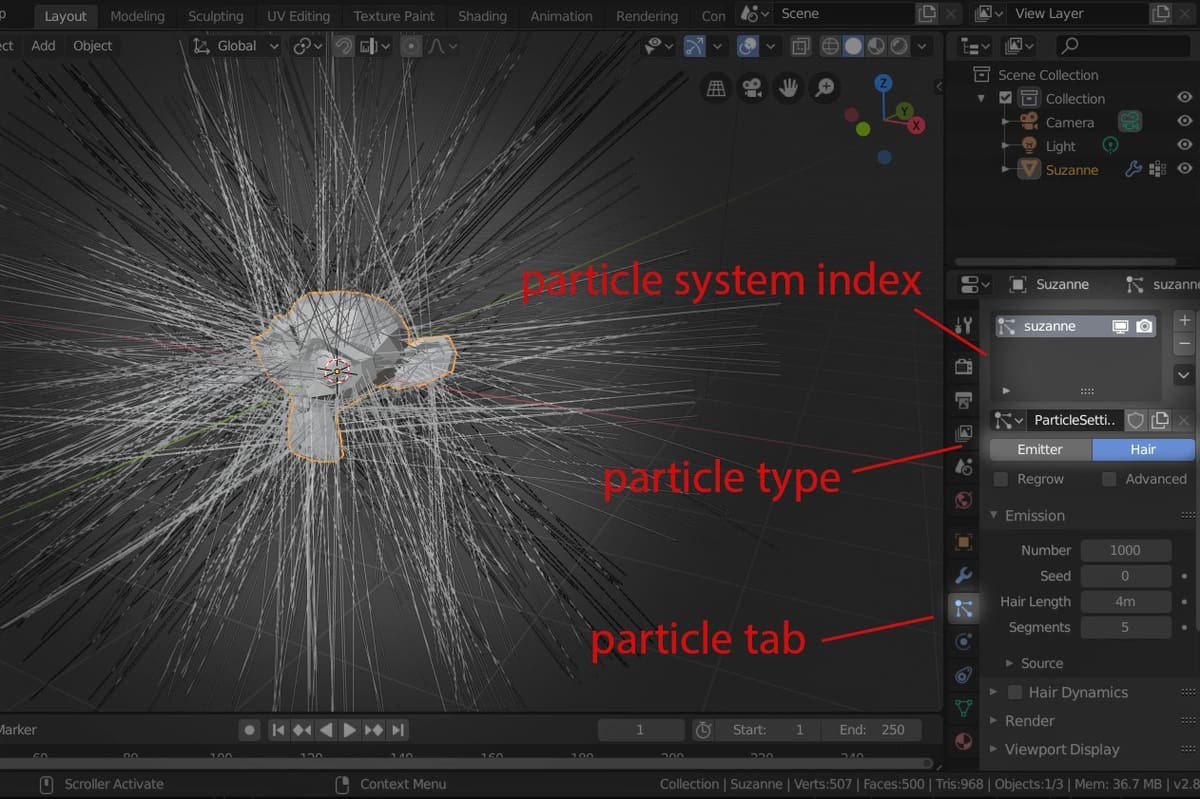
Now that the scalp is ready, it’s time to grow some hair on it. We’re going to do this by defining a particle group and setting it as hair.
- Open the “Particles” tab and click the ‘+’ to create a particle system. You can rename it by double-clicking and typing in the name you want.
- From just below the particle system index, change the particle type from “Emitter” to “Hair”.
You should see spikes sprouting out of Suzanne now. Those are the parent hair strands we’ll be working with, but don’t worry – they’re going to look more hair and less spike in just a bit. We want the hair to grow from the scalp and not the entire mesh, and to do this, we have to limit the density to the vertex group we created not long ago.
- Scroll down in the particles tab and open the tab “Vertex Groups”.
- Click the box in front of “Density” and select the scalp vertex group.
Configuring Basic Settings and Adding Children

A Quick Trim
There are infinite settings to tweak within the particle system, however, we’re going to cover the very basics. Right now, the hair strands are unusually long and also scarce. To do this, we’ll first need to reduce the hair length:
- From the “Emission” tab, reduce “Hair Length” to 1 m. This will give you a better view.
- You can also change the number of hairs by altering “Number”. Just keep in mind that a high number will require a powerful computer to render.
Growing the Family
Next, we’re going add children to the parent strands, which will increase the hair density significantly:
- From the “Children” tab, select “Interpolated”. Immediately after, you should see many strands appear, and the overall image should be much more hair-like.
- You can change the number of children by altering the “Render Amount”, which is the actual amount. The displayed amount is the amount that will be displayed in the workspace. It’s best to have them set to the same amount to get a better picture. Again, keep in mind that a high number of children can crash your computer if your system isn’t powerful enough.
- You can also change the length of the child strands by altering the length value.
Particle Edit Mode
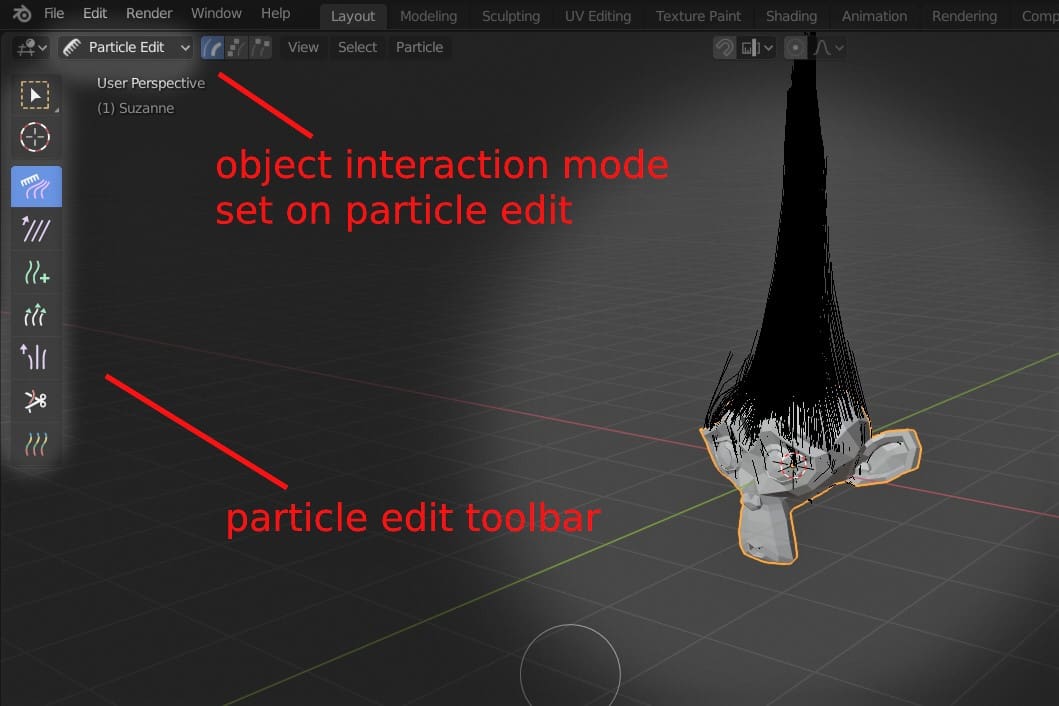
Now for the most important part: styling the hair to get that sweet look!
Switch to “Particle” edit mode from the object interaction modes menu. Once you do this, the child strands should vanish, and only the original parent strands will be visible. On the left are tools to style the hair:
- Comb: This tool, well, combs the hair. It’s the main way to style hair.
- Smooth: This will untangle the hair and make all strands go in one direction.
- Add: This tool adds new strands wherever you click, allowing you to fill empty patches.
- Length: Extends the hair strands and makes them longer. Conversely, the Cut shortens hair.
- Puff: This tool simply puffs up the hair and gives it more volume.
- Weight: This is mostly used in animating, as it adds heaviness to the hair.
Rendering & Final Results
Once everything’s set up and you’re content with the hairstyle, place your camera and then press F12 to see the final look!
That’s it! Happy styling!
(Lead image source: CGCookie)
License: The text of "Blender Hair Tutorial: How to Make Hair in Blender" by All3DP is licensed under a Creative Commons Attribution 4.0 International License.