Blender: Minecraft Add-on – A Simple Guide

Start your journey as a Minecraft MV animator with the Blender Minecraft add-on. You can even print some cool Minecraft mods!
If you’re a Minecraft fan, you probably already know that it’s the best-selling video game of all time. With a monthly player base of over 120,000, there’s a host of third-party platforms supporting an entire ecosystem of Minecraft-related activities.
One such platform is MCprep, an add-on for Blender developed with Python by TheDuckCow. The purpose of this add-on is to make Minecraft animations. Of course, if you want to animate a Minecraft character, you can always model it yourself, but this add-on saves you the trouble by providing you with characters, mobs, and sceneries that are already modeled, rigged, and ready to be animated. It also allows one to use different skins and texture packs.
As a specific form of animation, MCprep can be used to create Minecraft music videos, where your character moves, talks, and dances. There are a lot of possibilities, including moving mobs around in a non-standard way, animating blocks being destroyed, and giving tools to your character to hold and use.
If you need inspiration, MCprep has a hall of fame where you can check out works by other creators. Additionally, if you want to print Minecraft models, you can also get them there. The add-on, which is being constantly updated, works for Blender versions 2.7 and later, including the recent 2.9.
For this article, we won’t explain Blender basics. Instead, we’ll assume you already have an understanding of the Blender interface and focus on how to work with the add-on. Specifically, we’ll cover the more general aspects of the add-on, rather than focusing on details like texture packs or skins.

Installation
To install MCprep, you first have to download it via the “Free Download” page on TheDuckCow’s website. This will give you a .zip file. Do not unzip it.
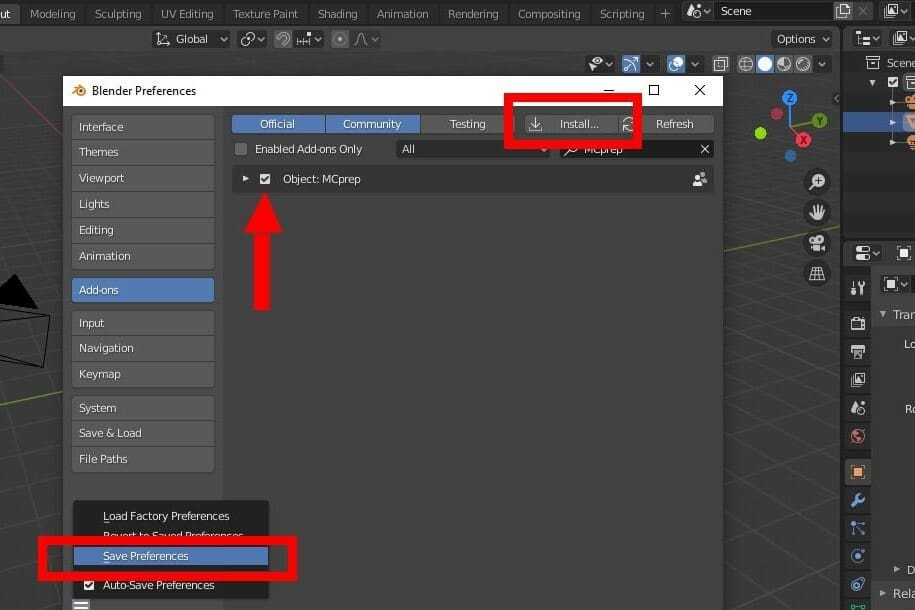
Instead, open Blender, and in the Menu, navigate to “Edit > Preferences > Add ons”. This will open a window that shows you your current add-ons (if you have any). Click “Install” on the top menu, and choose the zip file you just downloaded. In a few seconds, it’ll load.
Once this is done, go back to the Preferences window, where the add-on should now appear. Check the MCprep box. On the bottom left menu of the Preferences window, select “Save Preferences”.
Now, when you open the quick menu to the right (N for the hotkey), the add-on’s options will show up.
Main Features
To give you a head-start, below are some of the main features you can expect to enjoy in MCprep.
Importing Worlds
With the add-on, you’ll be able to import worlds from Minecraft and export them into models or videos. To state the obvious, importing a world from Minecraft is possible only if you’ve already installed Minecraft and created the world.
In other words, MCprep doesn’t create the world for you, it only takes the world’s map and imports that information into Blender. It’s also worth noting that, to import existing worlds, you’ll need to install an additional complement into MCprep.
The world map refers to all that encompasses your Minecraft world (biomes, underground blocks, mines, villages, mansions, etc.) Each world has its own seed with its unique, specific map. Minecraft worlds are infinite, but for MCprep, you can use only a section of it.
Adding Skies
MCprep also allows you to add animated skies and clouds into your in-Blender world, with different illuminations. This is a feature integrated into MCprep and requires no additional setup. You’ll have the option for cloud configurations and adjusting the time of the day, which will also change the color of the sky.
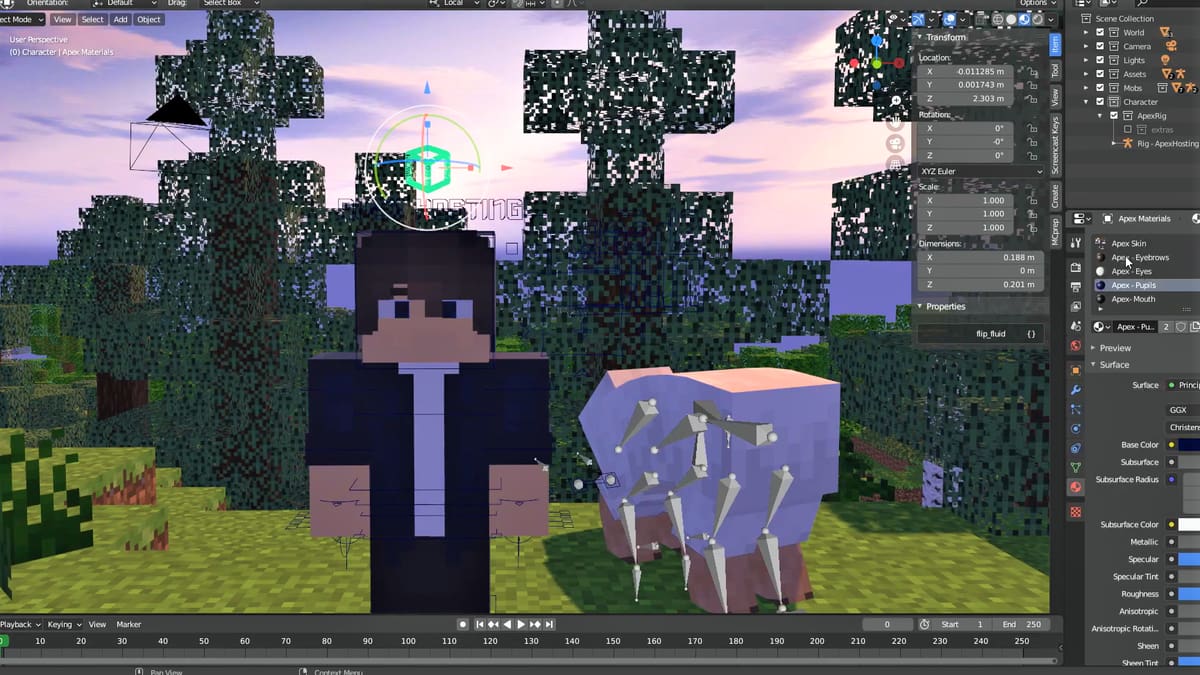
Adding Characters
With MCprep, you’ll have the ability to add spawning mobs and characters that already have rigging and can be animated. Additionally, you can include individual blocks, special blocks, and items from the game. These items are non-functioning, so for example, if you add and want to open a chest, you’ll have to also make an animation mimicking the in-game effect.
Other Features
- Skins and texture packs: Texture packs are included with the add-on, although personalized skins will have to be imported.
- Default animations: Peaceful mobs like bats, turtles, and dolphins come with default animations of their natural movement. That way, your only job when animating is to move them around.
- Holding objects: You can make your character wear armor as well as hold a shield, objects, tools, and blocks.
- Animating textures: This is for things like water, fire, and smoke, so you can animate their movements.
Getting Started
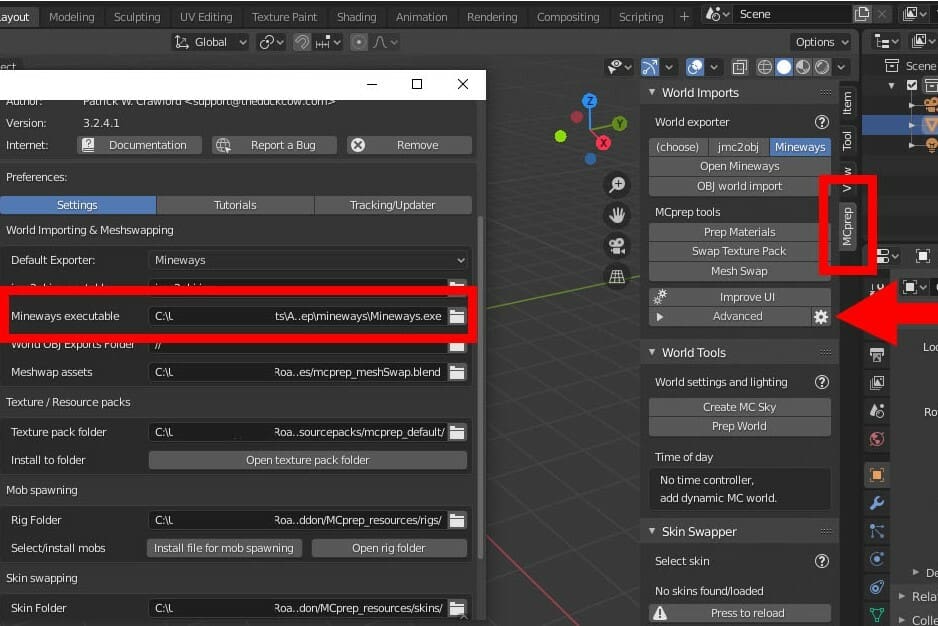
Before you start importing worlds, you’ll need to set up a complement for Blender. You have two options depending on your OS, but they’re both pretty similar. (You should import an already existing Minecraft world because trying to create one directly in Blender would be time-consuming and defeats the purpose of the add-on.) With that, when importing, you’ll want to have an idea of which Minecraft world and the approximate coordinates of the section of the map you’re after.
The two tools for importing Minecraft worlds into Blender are Mineways for .zip files and jMC2obj for .jar files.
When you open the quick menu on the right, by pressing ‘N’, you’ll have access to MCprep’s menu. Here, you’ll see the buttons for Mineways and jMC2obj. Since you won’t initially have them installed, clicking on either one will take you to a webpage where you can set it up.
From there, download a .zip file. This you’ll have to unzip since the executable is inside. Once unzipped, click the gear next to the advanced options in the MCprep quick menu and add the complement.
When this is done, if you click on Mineways or jMC2obj again, the program will open and allow you to select a world and a region of the map.
Importing a World
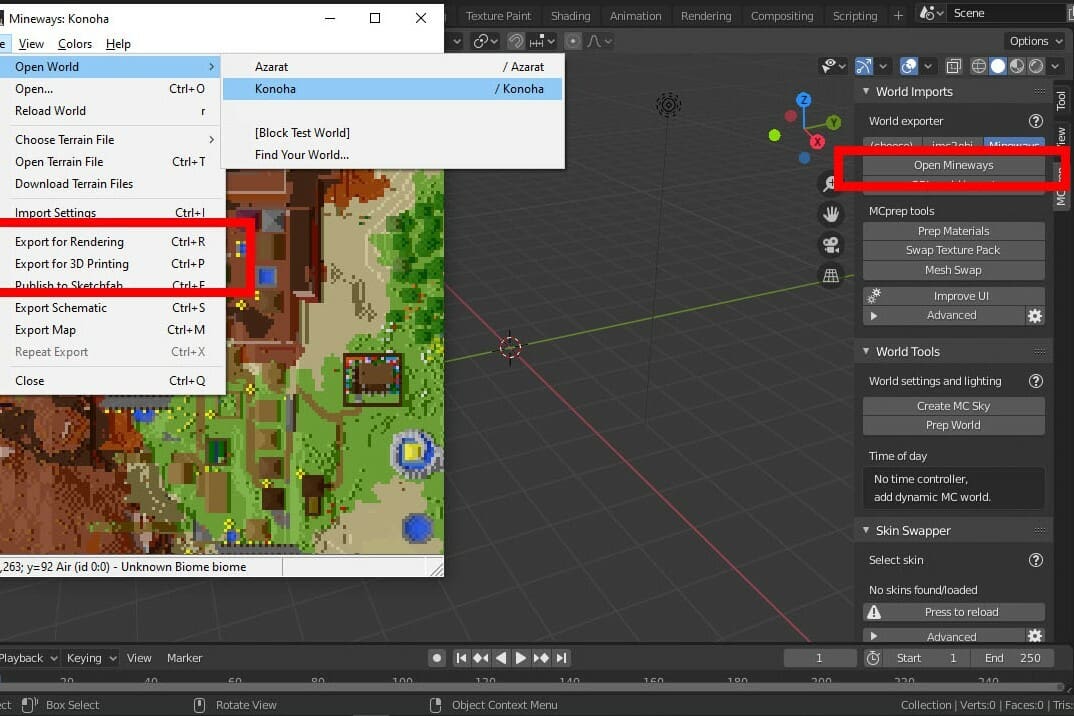
This may be a bit obvious but, before importing a world, the first thing you should do is delete Blender’s default block – the one that appears in a new document.
With your workspace empty, select “Open Mineways” (or jMC2obj) in MCprep’s quick menu, and the app will open. To select a world, go to “File > open world”, and you’ll see the Minecraft worlds available on your computer. Once one is selected, your map will load with all and any modifications you’ve made to it.
“Height and Depth” refers to the desired top and bottom block count of your map. You can zoom in with your mouse wheel and move around with left-click. Once you’ve found a region you’d like to take, draw a square around it by holding right-click. You can choose as big of an area as you like, but the bigger your world is, the more time it’ll take to load.
As you can see in the image, you can choose to export for rendering or for 3D printing. In this case, we’ll go with rendering. According to TheDuckCow, you should make sure the settings “Split by Block type” and “Material per family” are activated and enter 1000 mm for block height. If you’re an advanced user, he also recommends checking “export tiles for textures”.
Setting Up Your Imported World
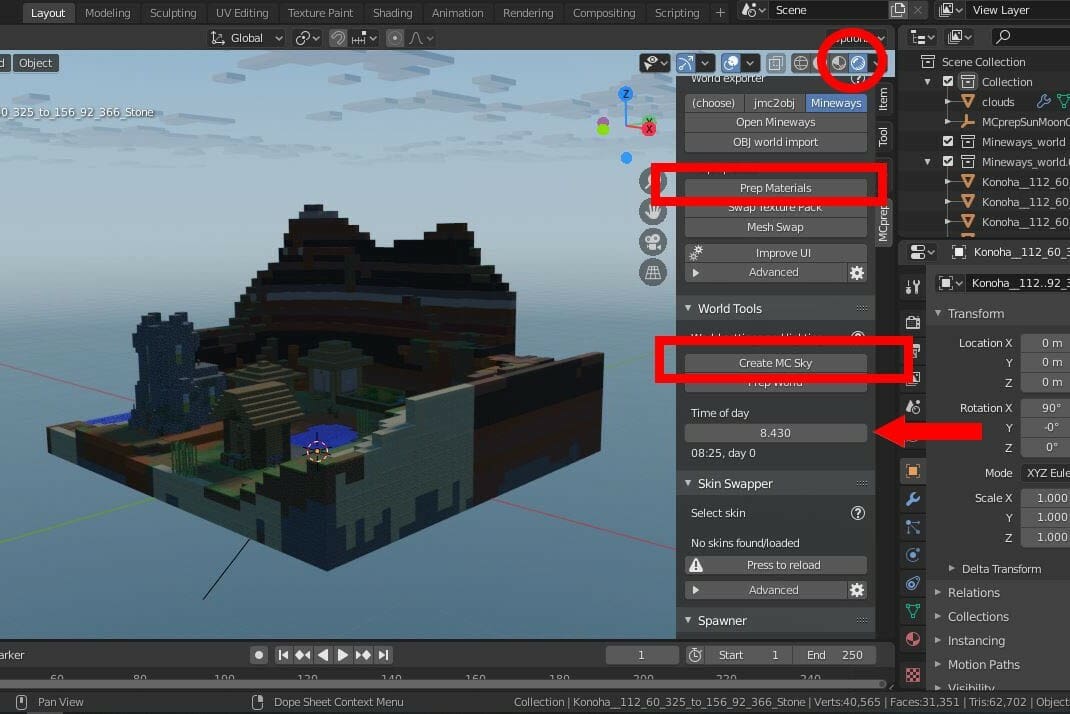
When you’ve exported your Minecraft world, you’ll have to select a location in your computer and name for the map section you chose. This will save as an OBJ file. Back in Blender, select “OBJ World Import” and find your OBJ file. Your map will appear! (This could take a few minutes if you selected a large region.) Once it’s done loading, you’ll see your map in grey.
To see it in full color, simply switch over to material or render view, where you can check that it not only loads your world’s geometry, but also recognizes each type of block and its texture. Additionally, to have good quality in said textures, select everything with ‘A’ and click “Prep Material” in the MCprep menu. This will bring the texture to a better quality. Otherwise, it’ll look distorted, and some of the blocks could even appear in the wrong color.
Finally, to set up the sky, in the MCprep menu, select “Create MC Sky”. Below it, there’s a scroll bar to change the time of day, but you’ll only notice its effects if you’re in render mode. Just to be clear, this affects only your Blender model.
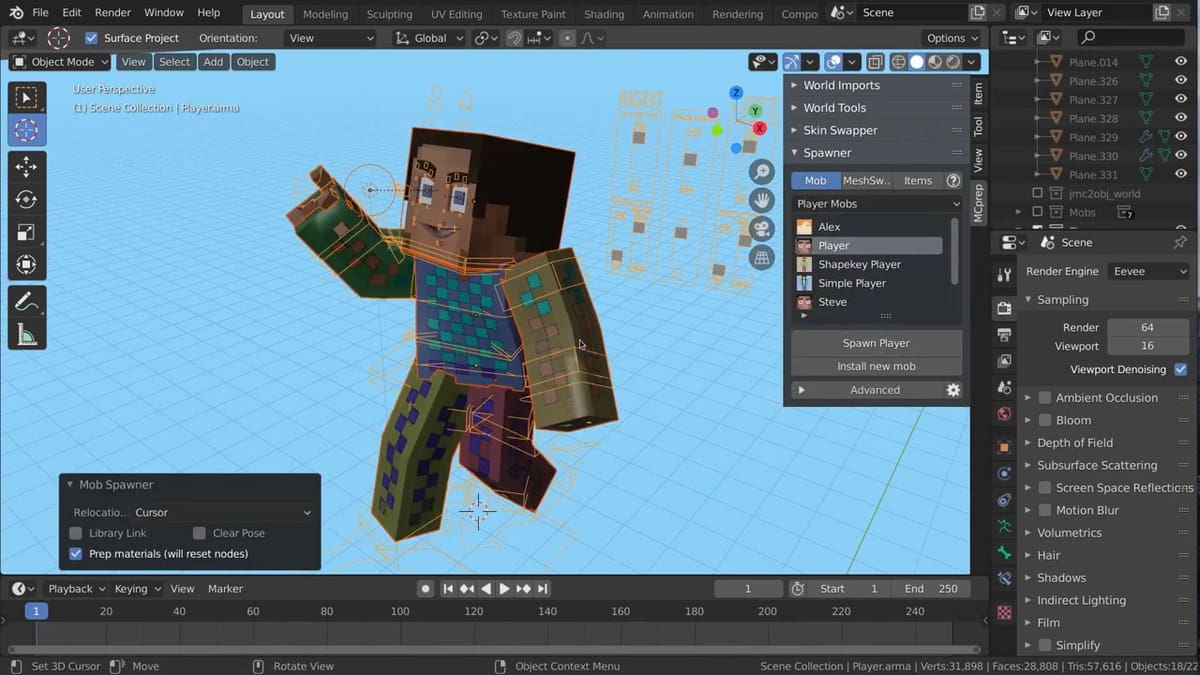
Adding Characters & Mobs
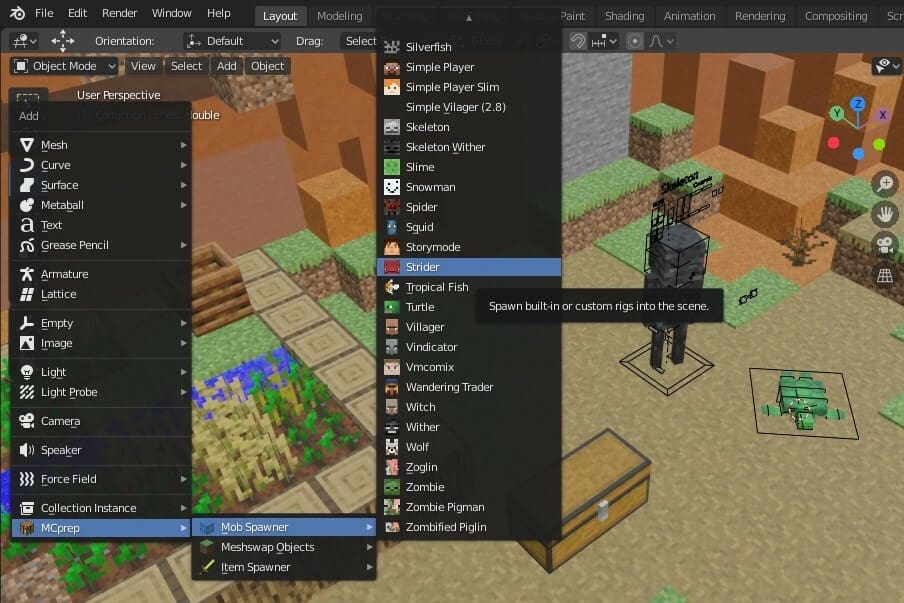
Adding characters or mobs is pretty much the same as adding any other object you would in Blender. To do so, just go to the add menu! At the bottom of the add menu, there’s an MCprep section. When you’re doing this for the first time, you’ll have to load the objects provided by MCprep, but after that, the complete menu of possible objects to choose from will appear.
Characters will show up in the default pose, with their limbs ready rigged to be animated. In fact, when setting one up and before animating it, you can rotate its whole body or just certain parts of it, as it’s already rigged. Additionally, some mobs come with default animations, like bats, which already have moving wings.
The animation process works the same as the normal animation process in Blender for any other rigged models. You just move, rotate, or translate the parts of your model you want to animate until you’re done.
We also invite you to check out the original creator, TheDuckCow, on YouTube, as he gives advanced tutorials on skins, texture packs, and shaders.
License: The text of "Blender: Minecraft Add-on – A Simple Guide" by All3DP is licensed under a Creative Commons Attribution 4.0 International License.