Blender: Particle System – Simply Explained

Check out the most important settings and a step-by-step guide to creating magical effects with the Blender Particle System!
Particles in the digital realm are small simulated objects used to create a vast amount of effects such as flames, smoke, dust, rain, snow, and more.
These particles usually follow known physics models to create realistic simulations of how we would expect them to behave. With Blender, there’s the added twist that we are the master of the universe and therefore can define our own physics rules to create awesome effects that simply wouldn’t be possible to do in real life.
Blender is an incredibly powerful 3D modeling tool that allows you to create and play with complex particle systems, and unlike most other software out there, it’s completely free to use. If you’re not already familiar with Blender, be sure to check out our introduction to it before continuing.
In this article, we will go through the fundamentals of Blender’s particle system. Then we’ll guide you through the process of creating a simple particle simulation that you can use as a foundation for your own particle system. Like most things, getting the hang of all the settings and parameters will take some practice, so without any further ado, let’s get started!
Particle Types
Before diving into a step-by-step tutorial, it’s important to get familiar with the two main types of particle systems in Blender, “Hair” and “Emitter”.
While both share certain settings and parameters, Hair particles are typically lines, primarily used as hair and fur for your 3D models. They can also be used to create procedurally generated forests or cityscapes.
In this article, we’ll be focusing on the Emitter particles. This type of particle system can take on abstract shapes and is often used for weather effects such as rain, snow, dust, and so on. Emitter particles provide scenes with a touch of realism that wouldn’t be possible (or painstakingly tedious) to do by hand.
Emitter particles are incredibly versatile, so let’s go over the most important settings you should know.
Particle Properties
Now that we understand the two main particle systems in Blender, it’s time we learn how particles are defined with settings in the Properties menu. You can find this on the right-hand side of the Blender UI, just below the Outliner. Clicking on the Particles Properties icon (the symbol with four inter-connected dots) and creating a new Particle System with the ‘+’ icon will expose several settings tabs.
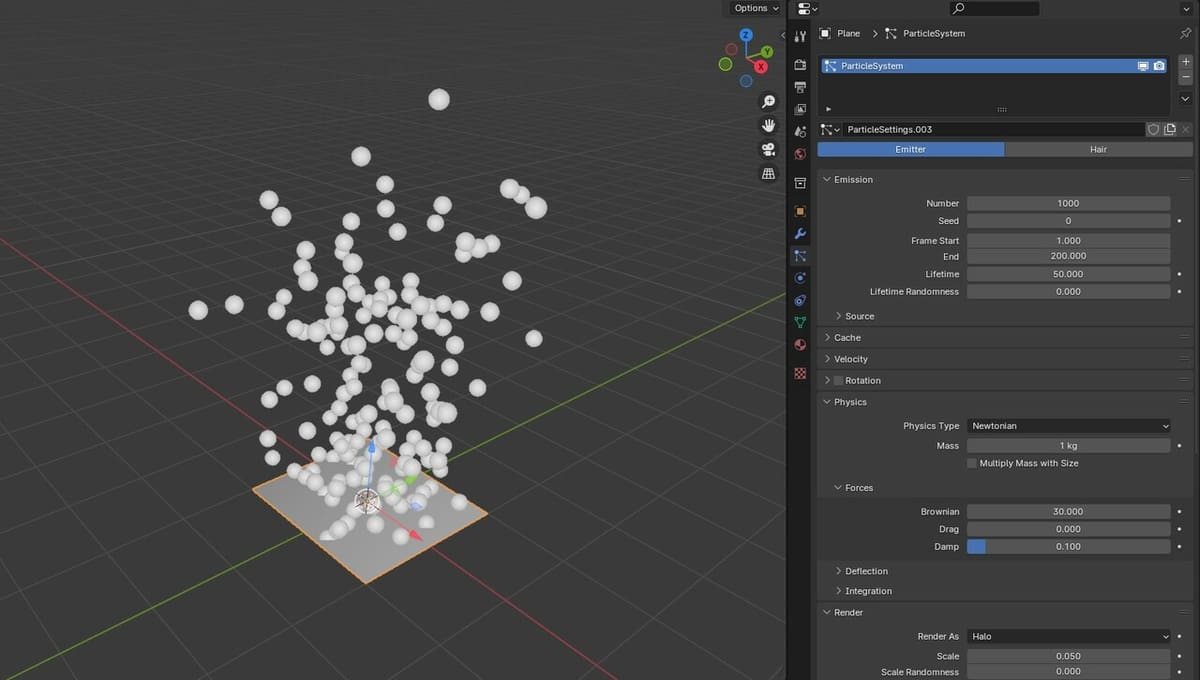
Emission
The Emission settings are where you can control aspects like how many particles you want to have in your scene, for how long they will appear, and at which point in time they start spawning. It’s good to set an approximate value to get started, but it’s easy to come back and adjust as needed.
- Number: Defines the number of particles to spawn from your object
- Seed: An arbitrary value used as the starting point for the random location of the particles created
- Frame Start and End: Defines the frame where particles start and finish spawning
- Lifetime: The number of frames that the particles will remain in the scene for
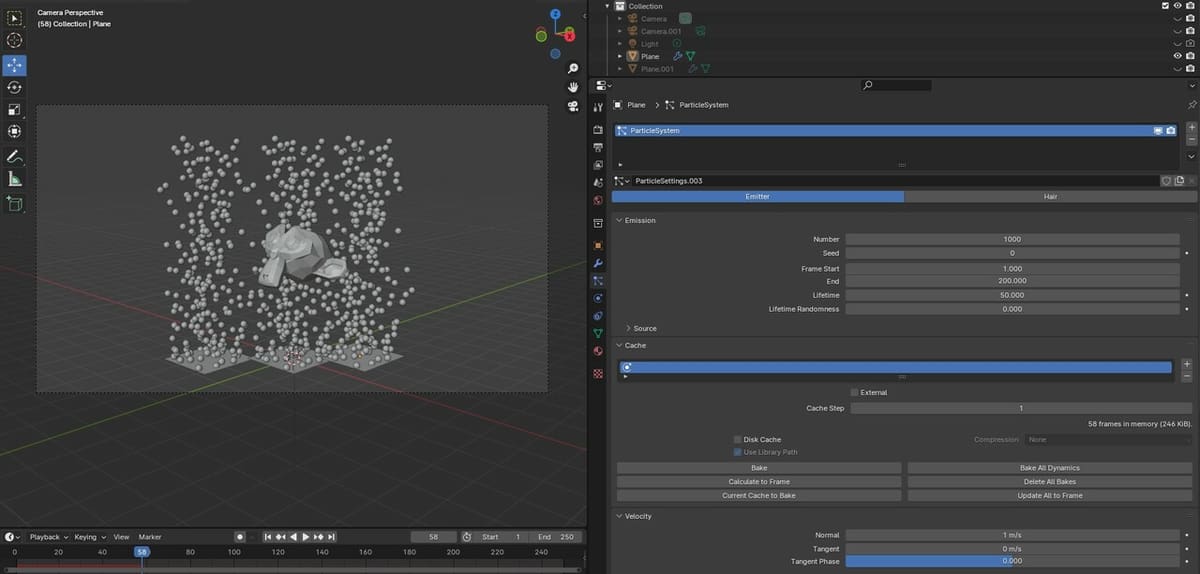
Cache
Caching allows you to save the simulation of your generated particles so that your computer doesn’t have to recalculate it each time you press play or move the timeline. For most use cases, you will simply need to open the Cache tab and press “Bake”.
Note that after baking the simulation, you’ll no longer be able to change most particle settings. If you need to tweak any particle parameters or move or edit the object that particles emit from, you will need to press “Delete Bake”. Once you’ve completed the changes, you can then Bake again.
Velocity
Particles are emitted from an object at a default velocity of 1 m/s but are quickly overwhelmed by gravity, which we will touch on shortly. Adjusting the Velocity parameters will change the speed and direction at which particles are emitted.
- Normal: Defines the starting outward speed in m/s that the particles will be emitted from the surface of the object
- Object Aligned X, Y, and Z: Used to set starting speed on particular axes
- Randomize: Randomizes the velocity (speed and direction) at which particles are emitted, with higher numbers giving more variation
Render
Render properties are one of the most straightforward yet critical settings when it comes to particles as it defines what your particles actually are. By default, Blender renders the particles as a “Halo”, which are faintly glowing specks that always face the camera.
You’ll likely be most interested in rendering your particles as an object that you can define and modify. This way you can create things such as a banana rain by defining a simple rain motion and then having all the particles be replaced with the banana object.
In this tab, you’ll also be able to scale and define the randomness of the particle’s size.
Particle Physics
Staying in the Particle Properties menu, let’s take a look at the main settings that define the behavior and movement of our particles. Depending on the simulation you are looking to create, physics can play an important role in achieving the desired effect. Blender allows you to modify the way particles are affected by physics and other invisible forces.
Physics
The Physics tab allows you to set the type of physics you want the particles to follow. The options include Newtonian, Keyed, Boids, and Fluid. Newtonian is the primary one of interest as it follows our basic laws of physics, but Fluid may also be interesting to advanced users who would like to define a more complex relationship between the particles and their environment.
Inside the Physics menu, there are three Force parameters that you can modify:
- Brownian: Defines the amount of random movement of the particle system, mimicking natural airflow
- Drag: Defines the effect of air resistance, i.e. larger and heavier particles slow down faster (only applicable when working with Force Fields)
- Damp: Defines the amount of damping, where higher numbers will make the particles more “sluggish”
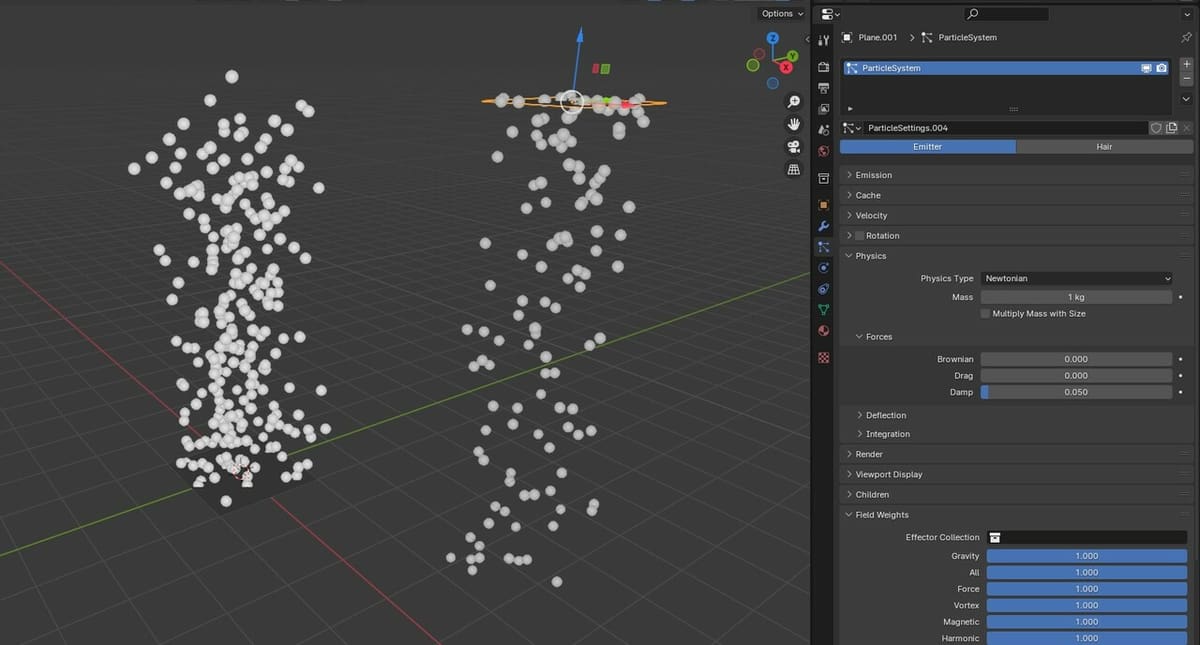
Field Weights
Remember how we mentioned gravity earlier? In the Field Weights tab, you can define how readily the particles are affected by various forces in the world around them, including gravity. This shouldn’t be confused with Force Fields, which simulate different types of forces around your particles and go beyond the scope of this article.
Among the 15 options displayed, “Gravity” appears first and is the only option that will directly affect particle behavior. Setting a negative value will “reverse” gravity and make the particles fall upwards.
The other field weights, such as “Wind”, should be used in combination with defined Force Fields.
Tutorial
Now that we’ve covered the most important settings, it’s time to apply these to a particle system.
The first step will be to install Blender 4.0 (the latest version at time of writing). However, this new version of Blender hasn’t changed too much about particle systems, so if you’re using an earlier setup, the steps should generally be the same.
If you find any issues installing or setting up Blender, make sure to check the Support section on their official website as they have lots of documentation to help troubleshoot any issues you may come across.
Creating a Particle System
In this tutorial, we’ll be demonstrating how easy it is to alter particle settings to create a wide variety of effects. We’ll cover the fundamentals of creating a particle system so that you have the knowledge to customize and create your own!
With Blender open and the default cube removed so we can start on a clean slate, let’s kick things off by creating a particle system:
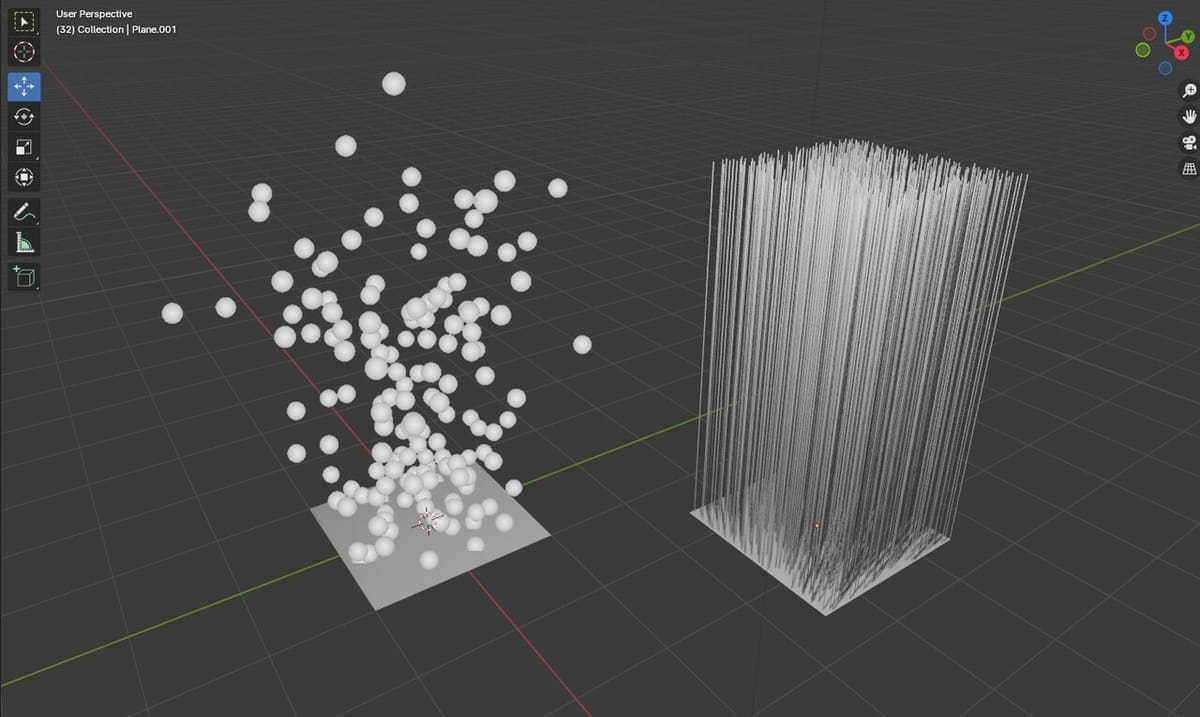
- Create a flat plane by pressing “Shift + A” on your keyboard, then selecting “Mesh > Plane”.
- With the plane selected, navigate to and click the Particles icon in the right-hand side Properties menu.
- Click ‘+’ box to add a new particle system to be emitted from this plane.
- Rename this new particle system to anything you want to better keep track of your assets inside your scene.
- Preview the default settings by pressing Play Animation on the timeline directly below the 3D viewport.
Now that we’ve created the base for our particle system, it’s time we modify some parameters to achieve the desired effect.
Defining Particle Behavior
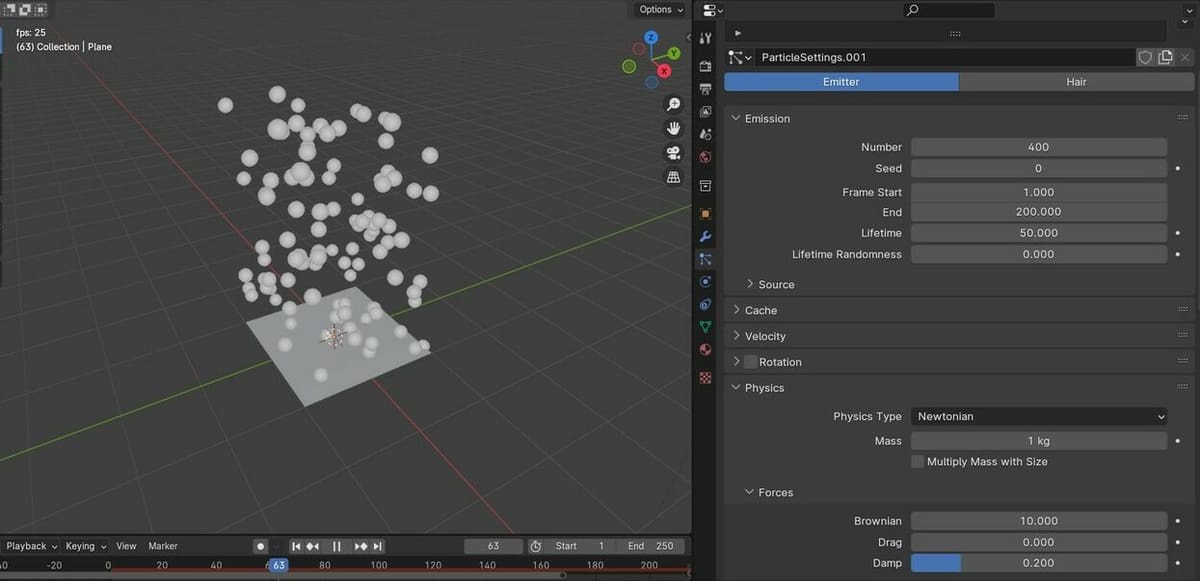
There’s no right or wrong combination when playing with particle settings. As a reference, we’ll aim to recreate a gentle bubble-like motion.
- In the Particle Properties menu, open the Emission tab and reduce the Number to “400”.
- Since we want the particles to flow up rather than down, it’ll help to start with reversing gravity, so head to the Field Weights tab and set Gravity to “-1”.
- Next, navigate to the Velocity tab and set Randomize to “0.5” to give us unique spawning points.
- In the Physics tab, we’ll set Brownian to “10” to provide some jitter to the particle movement and Damp to “0.2” to slow them down.
Experiment on your own with these settings to get familiar with how the values correlate with the behavior of the particles.
Defining Particle Object & Material
Now that we’ve defined the movement of our particles, it’s time to define our particles as an object and give them some color.
To do so, there are just a few simple steps:
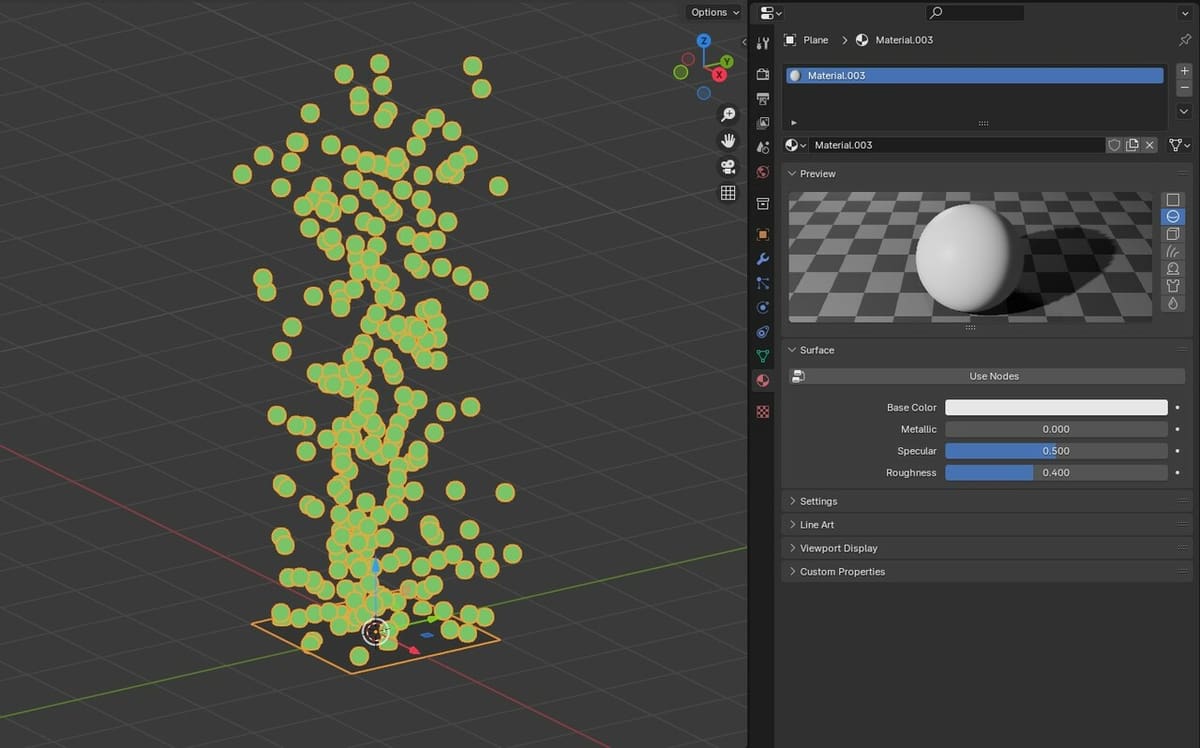
- Create a new UV Sphere by pressing “Shift + A” on your keyboard, then selecting “Mesh > UV Sphere”. You can place it where you’d like in the viewport by pressing ‘G’ and, once it’s where you want it to be, click on it again.
- With the sphere selected, go to “Material” in the right-hand side Properties menu (the round logo with different areas marked) and press the ‘+’ icon to assign a new material to the sphere.
- Click on the Surface option and change the material type from “Principled BSDF” to “Emission”.
- You can then change the color from white to any of your liking. In our case, we will be using a bright green.
Next, we have to set our particles to render as that sphere.
- Select the plane where the particles spawn from.
- Head to its Particles settings in the Properties menu and open the Render tab.
- Change the Render As option from “Halo” to “Object”.
- With Object properties now visible, select the empty field next to “Instance object” and choose the sphere you just created.
- You can further tweak its size by changing the “Scale” and “Scale Randomness” inside the render settings. For now, we’ll keep them as the default values.
To add some variation, you can repeat steps 1-3, creating two new planes and spheres with slightly different settings.
Depending on your scene, you may want to make the emission plane invisible in the rendered image. You can either move it out of frame or assign a transparent material to it. For the latter approach, you’ll simply have to head to the Material Properties of the plane, add a new material, then select “Translucent BSDF” for Eevee or “Transparent BSDF” for Cycles.
Rendering
Once we have a simulation of colorful particles floating about that we are happy with, it’s time for the last step: setting up our camera and rendering our particles. Whether you’ll be going for a full animation or a still shot, it’s important to bake your simulations before rendering, or else you could run into some major headaches and wonky renders.
Here are the final steps:
- Select the camera and place it in a spot you are happy with. Check our article on how to move the camera in Blender for more insight on cameras and viewports.
- Once you’re satisfied with your particle settings, head to the Cache tab in the Particle Properties menu and press “Bake”.
- For still shots, simply navigate to the frame you want to render your particles from and press F12, then save the file to your computer.
If you’re including your particle system in an amination, we recommend rendering each frame as a PNG, then using free software such as DaVinci Resolve to composite all the frames together. You’ll just need to follow a few extra steps:
- In the right-hand side Properties menu, head to the Output tab (third from the top).
- Under the Output subsection, choose a folder to save your exported frames.
- Set the File Format as “PNG” if you want to render alpha.
- Press “CTRL + F12” to render the full animation.
- Once the rendering is finished, you can use video editing software to composite the video together into a single file.
Do keep in mind that Eevee and Cycles have their differences when rendering so you may find one to be better than the other depending on the finish you’re looking to achieve. Be sure to experiment with both if you’re not sure.
Time to Practice

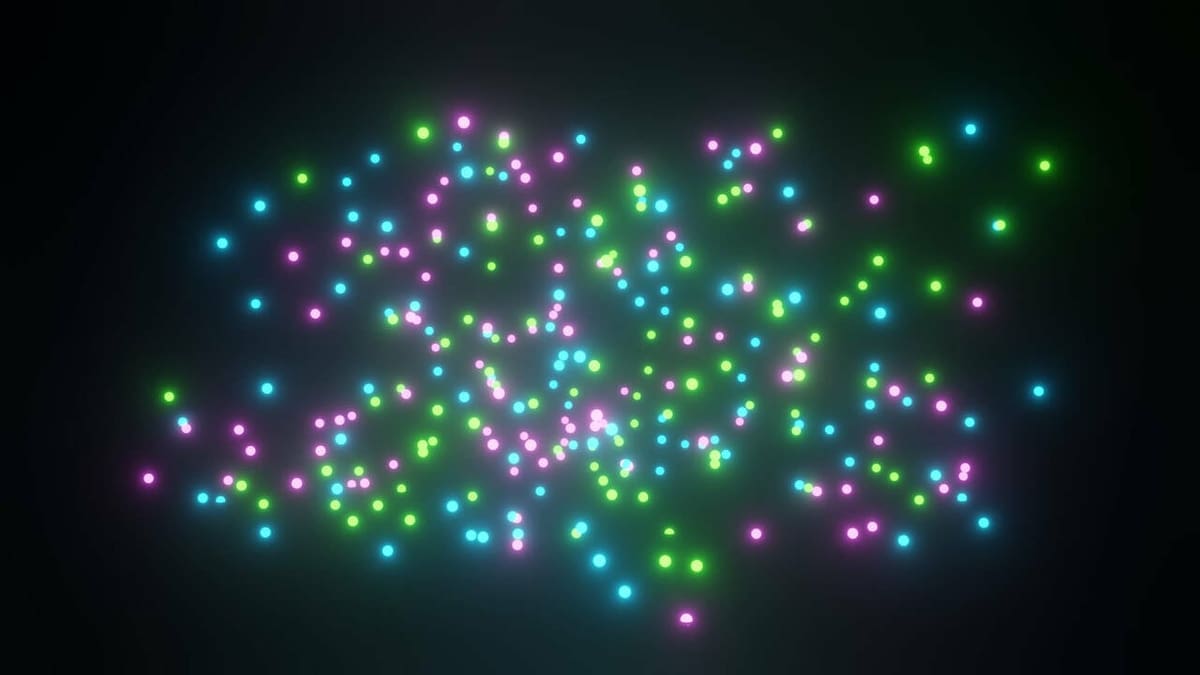
Although it’s difficult to convey the vast amount of possibilities there are with Blender’s particle system, you should now have a good foundation to begin experimenting on your own.
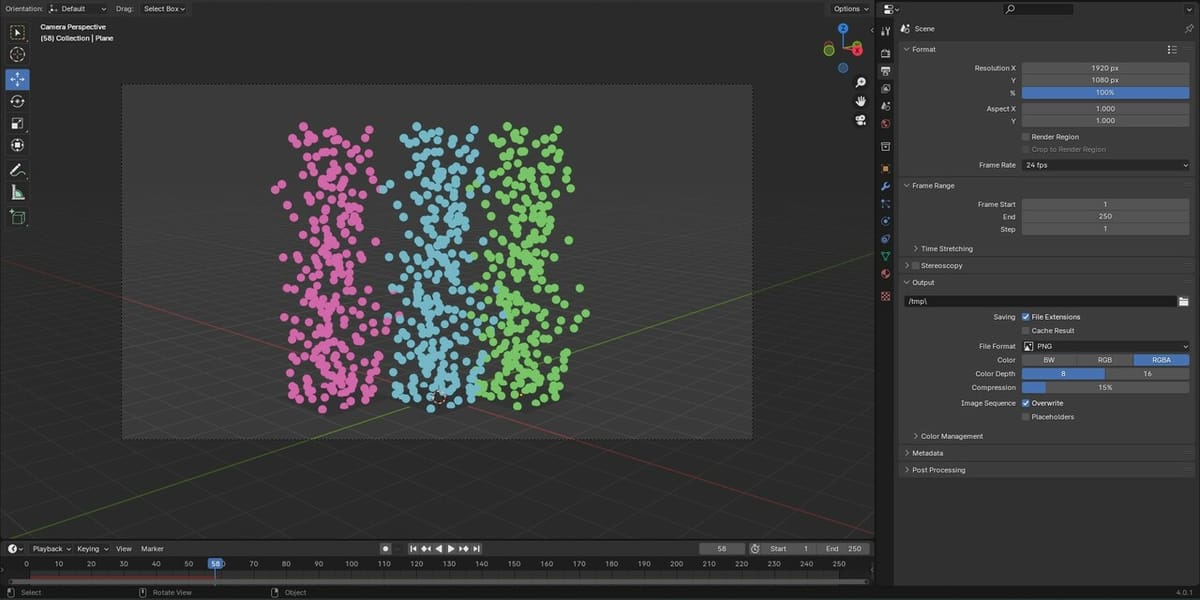
In the image above you can see three distinct particle systems as a fun backdrop, but you can also choose to overlap particle systems to create just the right balance of size, color, and velocity variation. The most important thing is to remember to bake each particle system before rendering!
As a small challenge, would you be able to create the banana rain that we mentioned earlier? You can find 3D models to use on repository sites such as Sketchfab or CGTrader. These are great resources to browse through a vast amount of 3D models to use as particles or other aspects of your projects, some of which are free and some are paid. If you do end up using someone else’s models make sure to credit them!
License: The text of "Blender: Particle System – Simply Explained" by All3DP is licensed under a Creative Commons Attribution 4.0 International License.