Blender Text Tutorial: How to Add Text in Blender

In Blender, text is easy. Read on to learn some tips and tricks for creating and editing stylish looking text in Blender!
In 3D graphics and animation, creating text that pops out of the screen is a common technique. You’re likely to see it just about everywhere: video games, movies, television, advertisements, and more.
Often, we see 3D text as eye-catching logos and graphics that stand out from a scene. Popular 3D modeling software suites allow users to create such effects very easily. With Blender, users have great control over the text’s shape by turning it into a mesh. Additionally, modifiers and node manipulations can be applied, leading to stunning text effects.
In this article, we’ll explore the process of creating and editing text objects in Blender. We’ll show you how to create text in the software, as well as how to edit it with various settings. Let’s get to scribbling!

Creating & Editing Text Objects
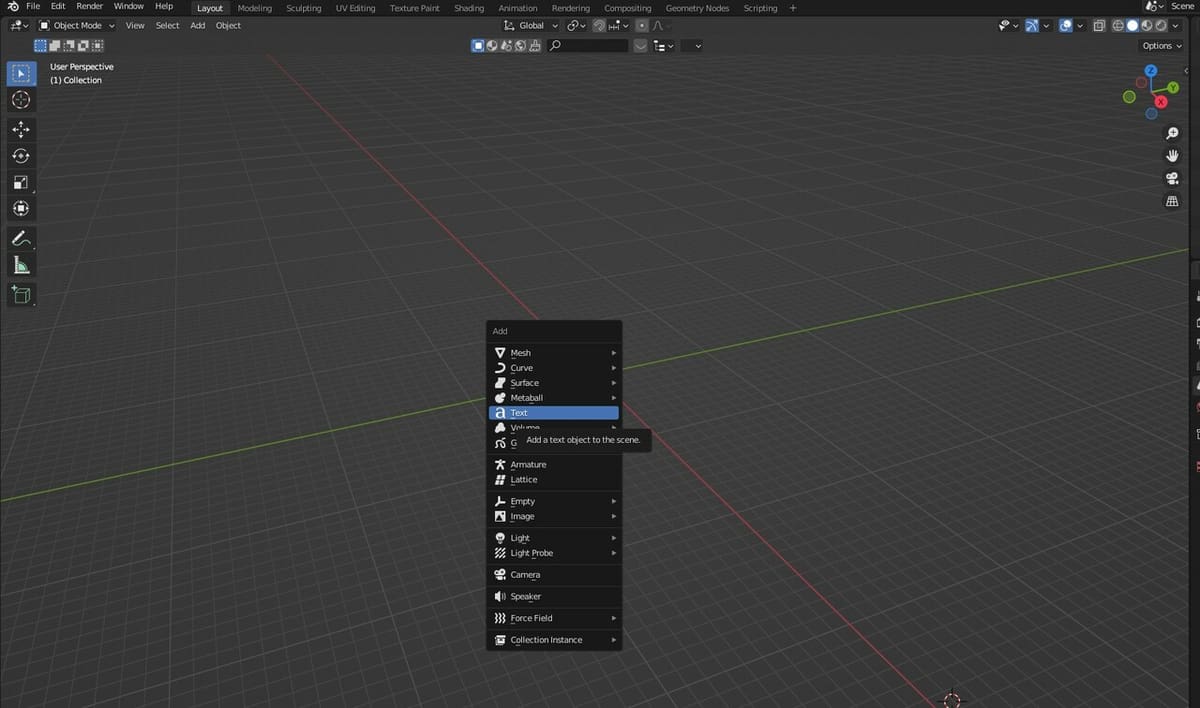
Creating text in Blender is a cinch. It’s as simple as pressing “Shift + A”, then selecting “Text” from the menu. This will create a new text object in the scene.
Now, the big question is how to manipulate the newly created text to your heart’s content. In Blender, the Object and Edit modes are used to manipulate objects and their components. The former is commonly used to manipulate the overall text object – for instance, moving, rotating, and scaling it. The latter is used to change the individual components of the text, such as the characters that make up a word. You can press “Tab” to swap between both modes or select your choice from the drop-down menu at the top left, right beneath the main menus.
From here, you could transform the text into a mesh, which would allow for further manipulations, such as adding materials, textures, modifiers, animations, and more. However, you don’t have to convert text to mesh to be able to add cool modifications. There are various options available on the Properties Editor, specifically the Text Object Data Properties tab.
This is where you can adjust various properties, such as size, font, spacing, and alignment. In addition, you can apply effects such as bevels, shadows, and outlines, among many other features, to further customize the appearance of the text. In the sections below, we’ll discuss three of the most useful panels – Shape, Geometry, and Font – for creating stylized and professional-looking text in Blender.
So, go ahead and select your text object, then navigate to it on the Properties Editor. The tab with a lowercase ‘a’ icon has all of the Text Object Data Properties settings.
Text Object Data Properties
Shape Panel
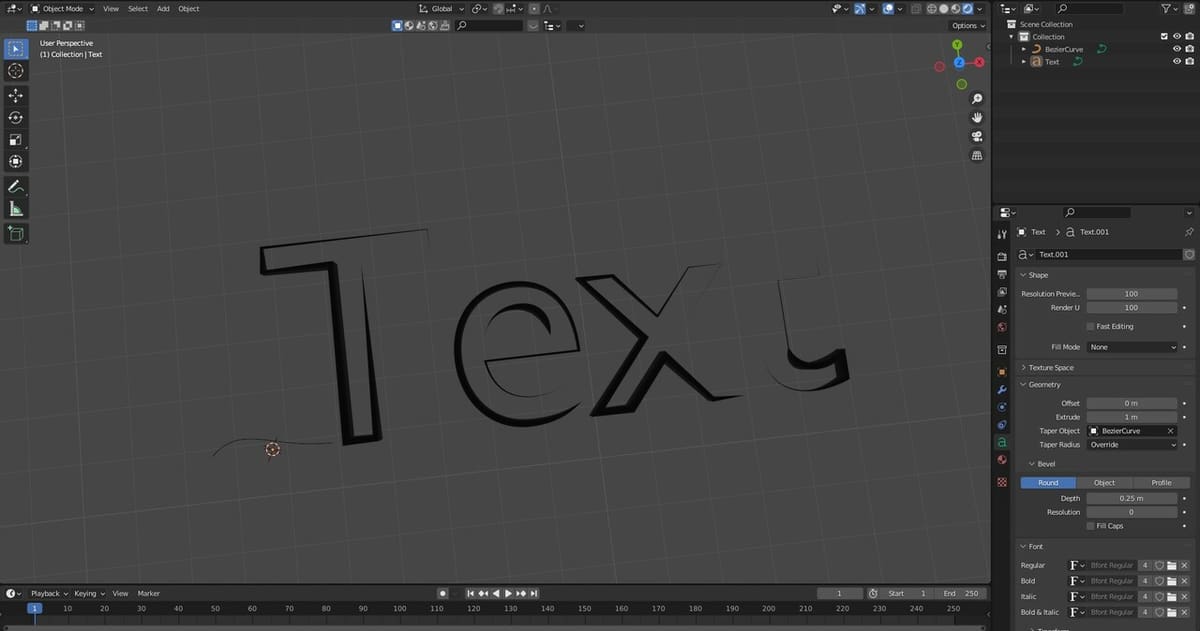
When a text object is selected, the Shape panel should show up in the Properties Editor. In this panel, there are tools to add depth and smooth the edges of the text object. Here are some noteworthy settings:
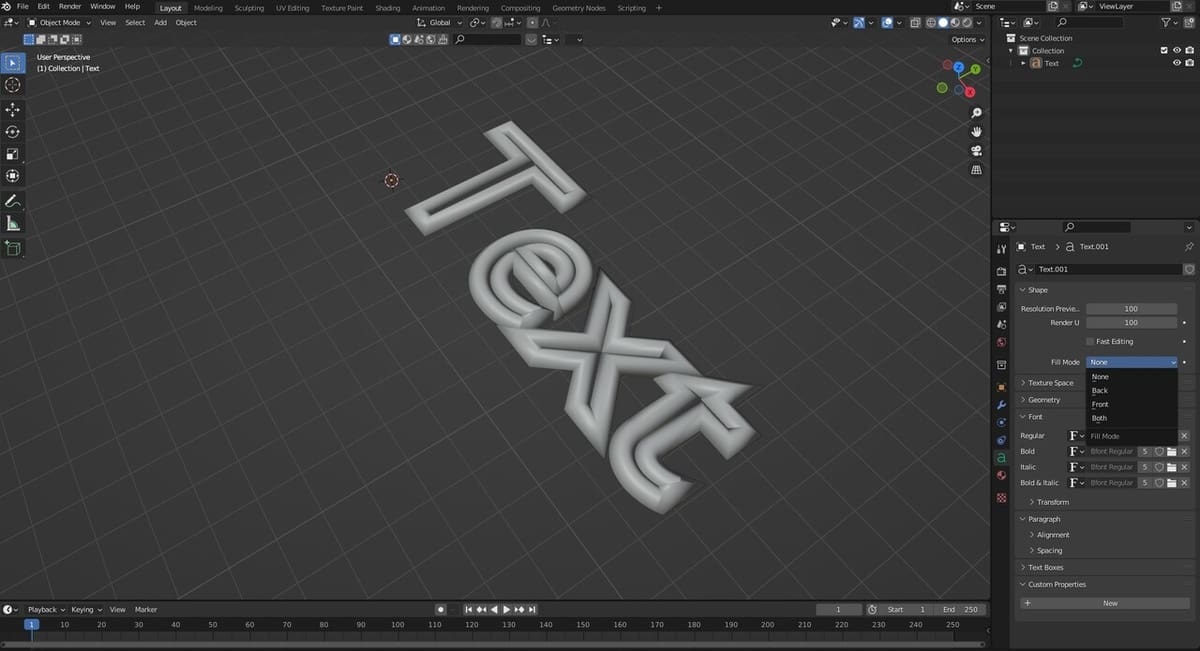
- Resolution Preview: Text in Blender is a type of curved object that uses polygons, and this setting determines the number of polygons used to create the text object. A higher value produces smoother-looking objects, while a lower value produces a more block-like appearance. In the image above, we’ve opted for a higher value.
- Fill Mode: This setting determines how the object is filled. When set to “None”, as we have in the image above, the object is hollow.
- Fast Editing: When this box is checked, the text will not be filled while editing, and also, none of the modifications made in the other panels are displayed.
Geometry Panel
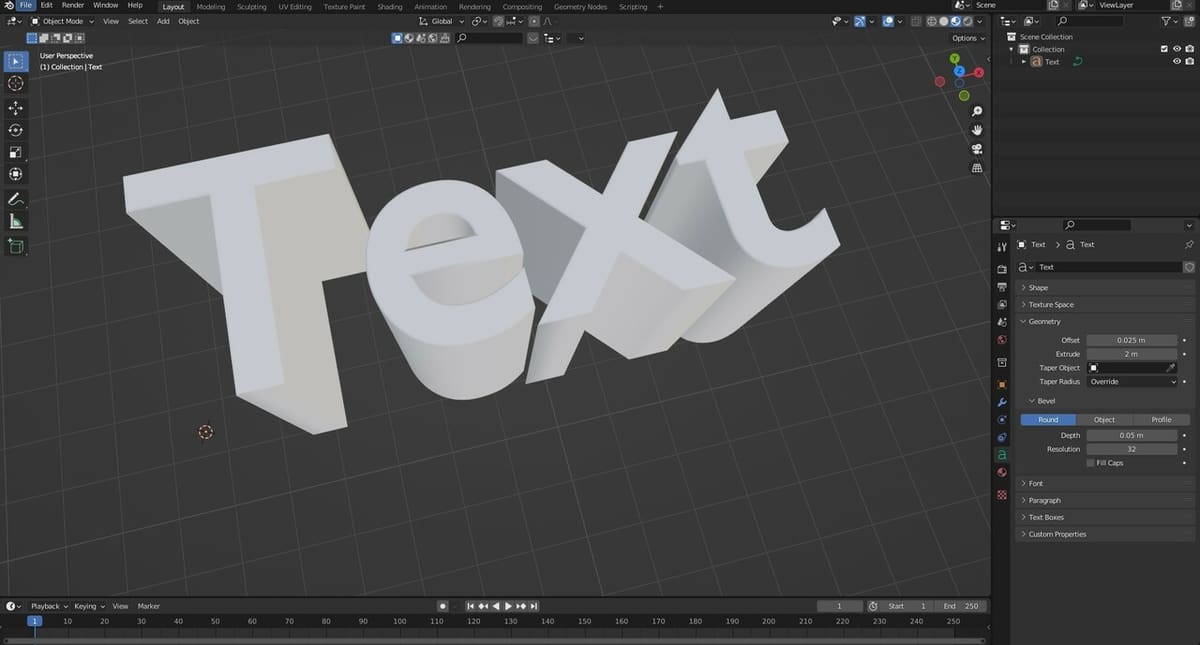
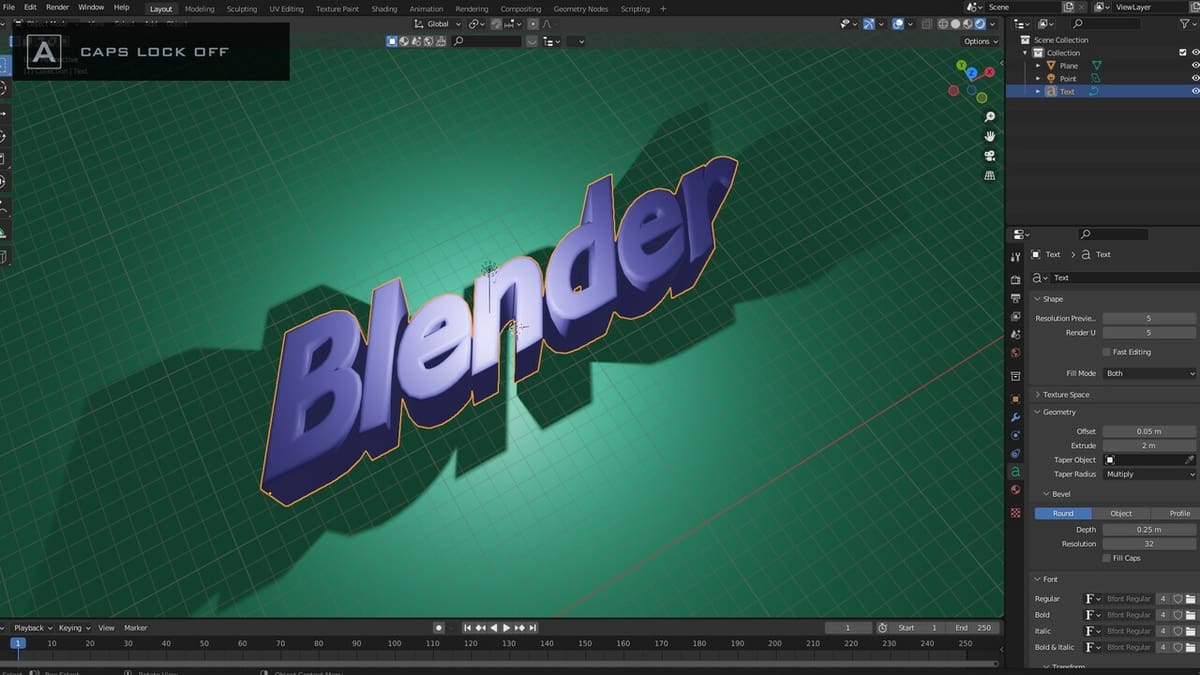
The Geometry panel is used to adjust various properties related to an object’s geometry, allowing you to fine-tune the object’s shape. Extrude is one of the most important settings on the panel; it gives text objects depth, making them appear three-dimensional. This setting can be adjusted by either dragging the value in the field or entering a value. Increasing its value adds more depth along the text object’s Z-axis.
As mentioned before, text objects are represented as curve objects in Blender. These objects have control points, which are the anchor points that define the shape of the curve. The Offset setting allows you to offset the curve from the control points. In other words, it’s used to move text characters away from their original position along the curve – which can be useful when creating different effects. Above, the value is set to 0.025 m.
However, you should be careful with this setting, as Blender doesn’t dynamically add or remove control points as you adjust the Offset value. So, it can be easy to create self-intersecting geometry.
Taper
The Taper setting can be used to add a curve that controls the shape or taper of the text. Manipulating the curve will affect the text. The effect is most dramatic with extruded text, but it’s also possible with non-extruded text.
You can use many types of curves, but here, we demonstrate with a Bezier curve:
- Press “Shift + A”.
- Navigate to “Curve > Bezier Curve”.
- Click on the Text object.
- In the Text Object Data Properties tab, select the Bezier Curve with the eyedropper tool found next to the Taper Object setting.
The Taper Radius setting can also be adjusted. It controls the amount of tapering that’s applied to the text object.
Bevel
The Bevel setting rounds the edges of the text by creating a smoother appearance. There are three types of bevel options in Blender: Round, Object, and Profile. The Round option creates uniform roundness, Object lets you use a separate object to define the shape of the beveled edges, and Profile enables the use of a custom curve to define the shape of the beveled edges.
For thicker beveled edges, increase the Depth value. Resolution determines the number of segments in the bevel. A higher value makes the geometry appear smoother.
Font Panel
The Font Panel lets you adjust the font and styling of your text object. The default font is called “Bfont”, but you can easily import new fonts into Blender:
- Simply click on the folder icon next to Regular, Bold, Italic, and Italic & Bold.
- Choose the font file on your computer.
Doing so, you’ll have more control over the appearance of the typography.
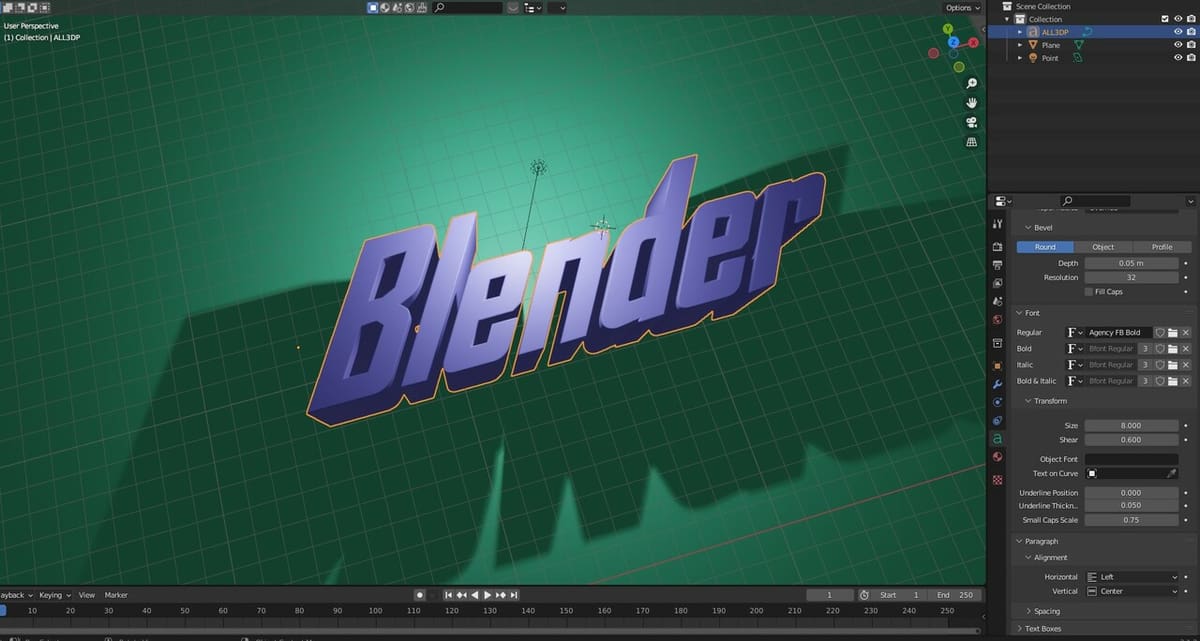
Transform
Additionally, take a look at the Transform section. Here, you can also increase the text to whatever size you desire by using the Size setting. You can also change its angle by adjusting the Shear value. In the image above, we’ve set the Font to be Agency FB Bold, Size 8.000, and a Shear value of 0.600.
Under Transform, you also have the ability to set the text to follow a curve. To give this a try, follow the steps below:
- Create the curve object by pressing “Shift + A”, then navigating to Curve.
- Select a curve type. This time, try the Nurbs Curve.
- Scale the Nurbs Curve by pressing ‘S’ and expanding it.
- In the Transform section of the Font panel, click on the eyedropper tool found next to Text on Curve.
- Select the Nurbs Curve, and now, you should see the text along a curve.
Imagine all the creative possibilities!
License: The text of "Blender Text Tutorial: How to Add Text in Blender" by All3DP is licensed under a Creative Commons Attribution 4.0 International License.