How to Clean Up 3D Scans in Blender

3D scans often don't go *exactly* as we'd like them to, and some modification is needed. Here's how to clean up a 3D scan in Blender.
3D scanners and photogrammetric scanning tools are useful for making digital twins of existing technology, cute little trinket versions of real-life objects, and all things in-between.
While 3D scanning technology has made several strides toward being available for hobbyists, everyday makers often have to use photogrammetry. This is known for sometimes producing scans that might need to be modified before they’ll be useful for their intended purpose.
Even with a 3D scanner, sometimes a scan’s quality is compromised by subpar scanning conditions, such as poor lighting, fog, or a busy background – think about scanning a statue in front of a busy museum with people constantly walking through the scan.
Or, perhaps, it might be necessary to take a great scan and add a little bit of digital modification to fit the purposes of the design! I’m certainly guilty of doing this once or twice to shrink my nose in my first experiments with photogrammetry (which was definitely for printability reasons and totally definitely not to make myself look more like a runway model).
Anyhow, there are multiple ways to modify a 3D scan on the computer, as virtually all scanning methods export scans as meshes. Blender, a completely free, open-source, and robust 3D modeling tool is a one-stop-shop that is capable of fixing up the mesh, color, and form of most 3D scans, and is the focus of this article.

Starting Strong: Getting a Good 3D Scan
It’s much easier to take very good 3D scans of the object than it is to modify a low-quality 3D scan. For example, if the 3D scan doesn’t pick up the underside of an object, post-processing might involve hours of manual reconstruction of the underside mesh.
All-in-all, it’s best to just have a fabulous scan, which will minimize the headaches that might arise from post-processing in Blender. To figure out how to avoid common scanning mishaps when taking scans, it’s important to first understand the tools used to make 3D scans.
Scanning Technologies
There are several different scanning technologies available, from free to costing tens of thousands of dollars. That said, small-scale 3D scanner users will typically either use image-based photogrammetry tools, lidar-based or photogrammetry-based scanning apps, or budget-level or DIY dedicated 3D scanners.
Image-Based Photogrammetry Tools
These desktop programs take photo or video data of an object and calculate the 3D position of the scene’s components. This is based on the different perspectives of the object from images taken at different positions. A camera or other form of photo or video data is needed to upload high-quality photo or video of the scanned object for best results.
Mobile Phone Scanning Apps
Several apps exist for both iOS and Android that take advantage of the phone’s camera or lidar to generate 3D scans, as if the phone itself were a 3D scanner. Phones with lidar sensors and using lidar-based scanning apps can generate scans with better accuracy than photogrammetry. That said, most apps stick to photogrammetric methods, so the quality will be similar to that of computer-based photogrammetry tools (albeit the user experience will be smoother).
Dedicated 3D Scanners
These can either be affordable 3D scanners (such as the Creality Scan Ferret) or DIY solutions, and they’re tools that are purpose-built for scanning 3D objects of various sizes and types. A dedicated 3D scanner isn’t a light investment for most makers, but will typically deliver better results (without post-processing) than a mobile phone or open-source photogrammetry software.
What Can Go Wrong with a 3D Scan (& How to Fix It During Scanning)
All of these 3D scanning technologies, in theory, can take complete scans of the object in high quality. While there are several artefacts that can appear in a scan, careful scanning practices can reduce or altogether eliminate them.
Here’s how to avoid the most common scanning artefacts that might reduce the quality of your scan and increase the amount of time you’d have to spend fixing up the scan in Blender:
- Inclusions/exclusions: Especially with photogrammetry, sometimes the mesh will have additional, unwanted objects, or it won’t include parts of the scanning target. This is usually caused by too little time spent scanning the object or scanning the object from too few angles or positions.
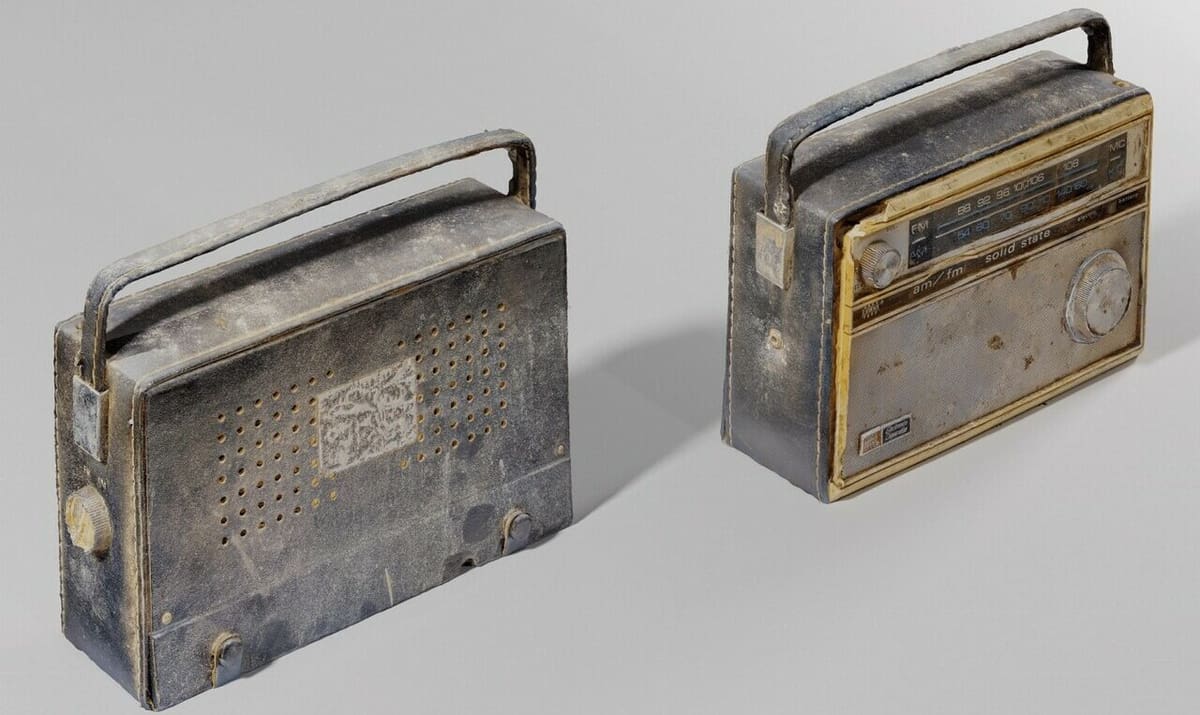
- Color inconsistencies: 3D scans, especially using photogrammetric methods, are able to preserve the color of the object during the 3D scan, as long as there is lighting of sufficient quality. Trnio, an iOS 3D scanner app that’s been retired, recommends taking scans outdoors in cloudy weather, which diffuses sunlight and provides sufficient brightness to capture all the colors without the interference of dark shadows in the scan.
- Lack of detail: Usually, when the 3D scan doesn’t generate in enough detail, the issue is that too little time has been spent scanning the object. To increase the detail of the scan, take a longer scan from more angles, or, if using photogrammetry software, increase the number of pictures of the object.
Step #1: Importing the Scan
Once the 3D scanning software has generated the scan, it might be acceptable as-is! Simply download it in your filetype of choice and use it as intended.
However, if the scan needs to be modified in any way, Blender is a versatile software tool that can clean up the mesh, the form, and the color all in one application. Blender’s latest version can be downloaded and quickly installed.
Importing a scan into Blender is relatively routine; however, different filetypes are better suited for monochromatic or color scans. For full-color scans, if possible, export the scan as an OBJ file from the scanning software, which will preserve all color detail captured by the scan. Conversely, for monochromatic scans, an STL file is recommended, because it doesn’t store color information and therefore takes up less memory.
Once these files are downloaded to the file explorer, they can be imported into Blender using the “Import” button under the “File” tab.
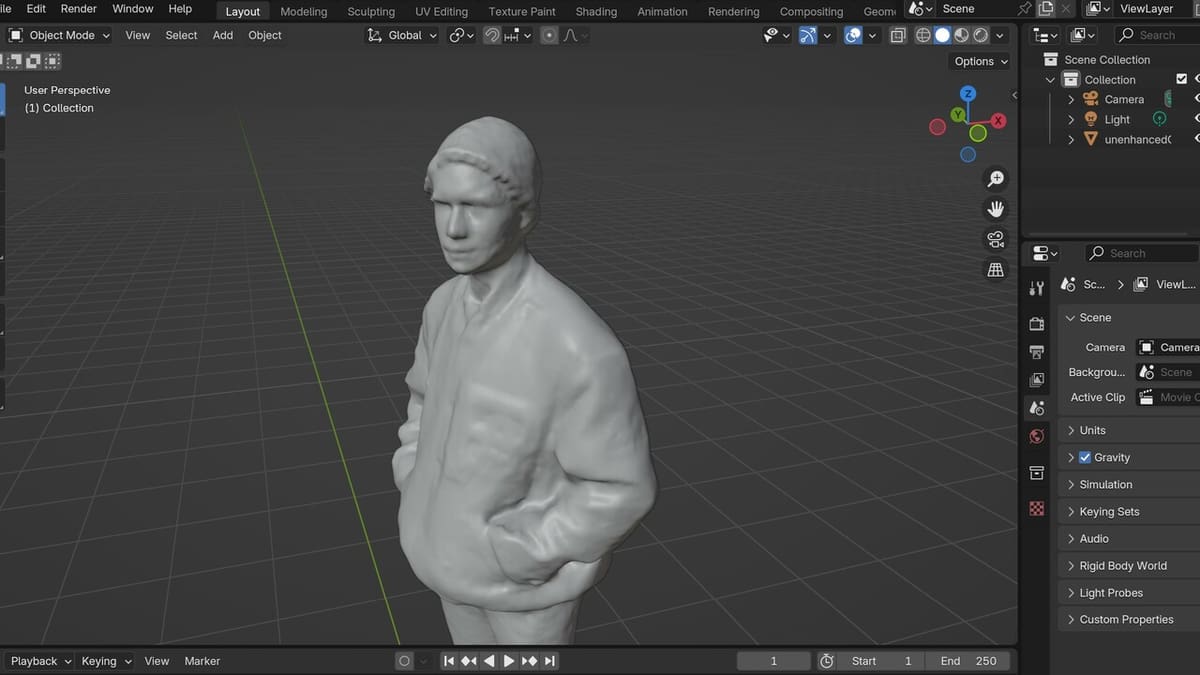
Step #2: Cleaning Up the Mesh
As mentioned, mesh errors are common in 3D scans, typically because photogrammetry software and 3D scanners can’t represent the underside of objects, such as the sole of someone’s shoe or the base of a planter. That, mainly, as well as other non-manifold features that creep into the 3D scan from scanning artefacts, typically create the need for mesh modification. Non-manifold geometries are parts that can’t be replicated in reality, such as parts without thickness or edges or faces that are disconnected.
Fortunately, Blender has an entire toolset dedicated to mesh modeling, and several schemes for fixing mesh issues, from non-manifold geometry to included or excluded vertices that need to be eliminated or added.
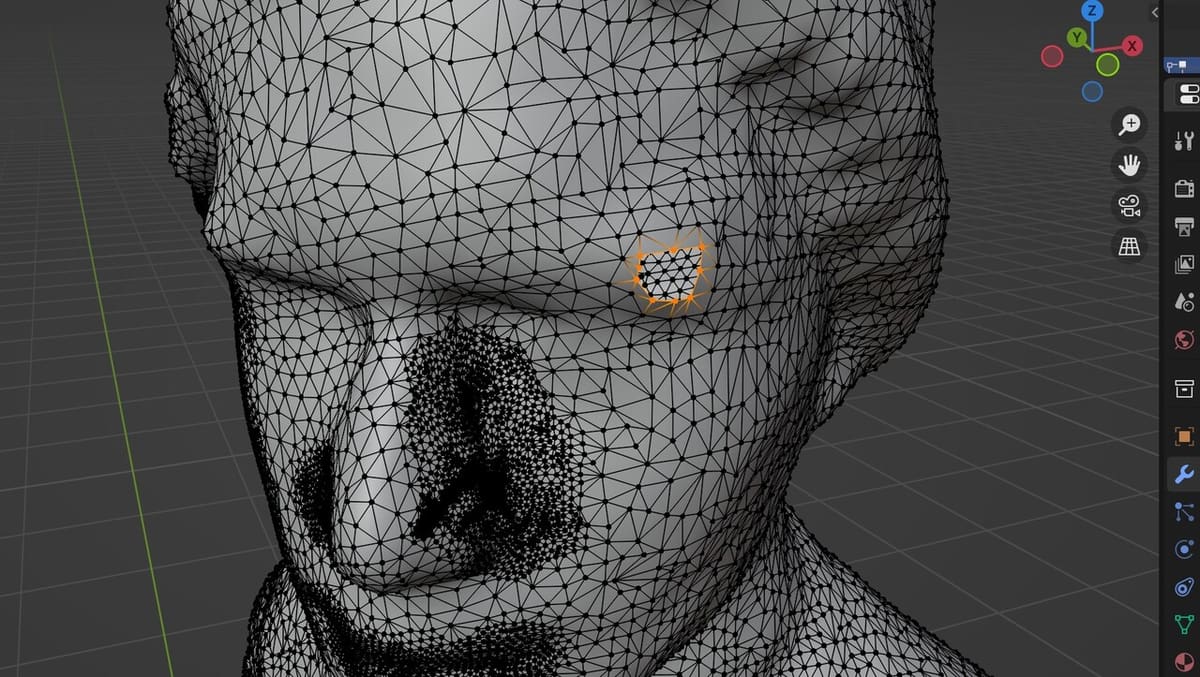
Firstly, to fix all non-manifold geometry at once, the easiest thing to do would be to follow the advice of Redditor emoUberNoob. This includes being in Edit Mode, not having anything selected, and, just under the top menu bar, going to “Select > Select All by Trait > Non-Manifold”. This will highlight all loops of non-manifold edges, so that it is easy to identify where the mesh might be not manifold. If Blender doesn’t automatically select any loops at this point, then congratulations! Your mesh is manifold, and you can skip any steps related to non-manifold mesh fixing.
Once all non-manifold geometries are selected, deselect all but one and press the ‘F’ key to fill the space in the non-manifold area with a new surface (e.g. connecting edges). You can choose the select tool from the top left, so that you’re working with vertices, edges, or faces. Repeating this process for all non-manifold areas on the 3D print will create a manifold mesh, which means that it can be used as a solid model and be 3D printed.
For inclusions or exclusions of one line or one or two points, first you’ll want to switch to the “Modeling” tab at the top (ribbon bar). The mesh tools that appear allow for the manipulation of vertices, lines, or faces depending on tool type and selection, and are very useful for getting rid of pesky out-of-line points. For example, you can extrude regions to make them meet other points if they’re disconnected from the rest of the model, or you can insert faces as needed.
Beware, though, that deleting parts of the mesh will create new non-manifold geometries that will need to be fixed before treating the mesh as a solid object.
Check out this article for a full run-down of mesh editing in Blender.
Step #3: Cleaning Up the Form
Once all individual mesh issues are addressed, mesh sculpting can be used to change the form of the 3D scan, almost like an artist manipulates clay.
Blender offers several unique mesh sculpting tools, which can be used to modify a 3D scan in areas where it was shaped incorrectly or where the scan’s intended use-case means it should be re-shaped. These tools can be accessed from the “Sculpting” menu on the ribbon bar.
Some useful sculpting tools for scan-cleaning are as follows:
- Smooth: This tool is the first red-highlighted sculpting tool in the sculpting tool menu (left of the workspace), and can be used to smooth out inclusions in the scan. Be careful not to accidentally remove detail that should be preserved when using this tool! When in doubt, “Ctrl + Z” (the “undo” hotkey) is a good friend.
- Blob: The second-last blue tool pushes vertices outwards, creating a spherical curvature. This can be useful if there are round parts of a scan that haven’t been properly replicated.
- Pinch: This tool (the first in yellow from the sculpting tool menu) is useful for adding detail by highlighting boundaries between two parts of a scan. Did the raised letters on a jacket not show up properly in the scan? Tracing the boundaries of those letters with the “Pinch” tool will create a crease that increases the visibility of small features that are sometimes poorly-separated from nearby objects.
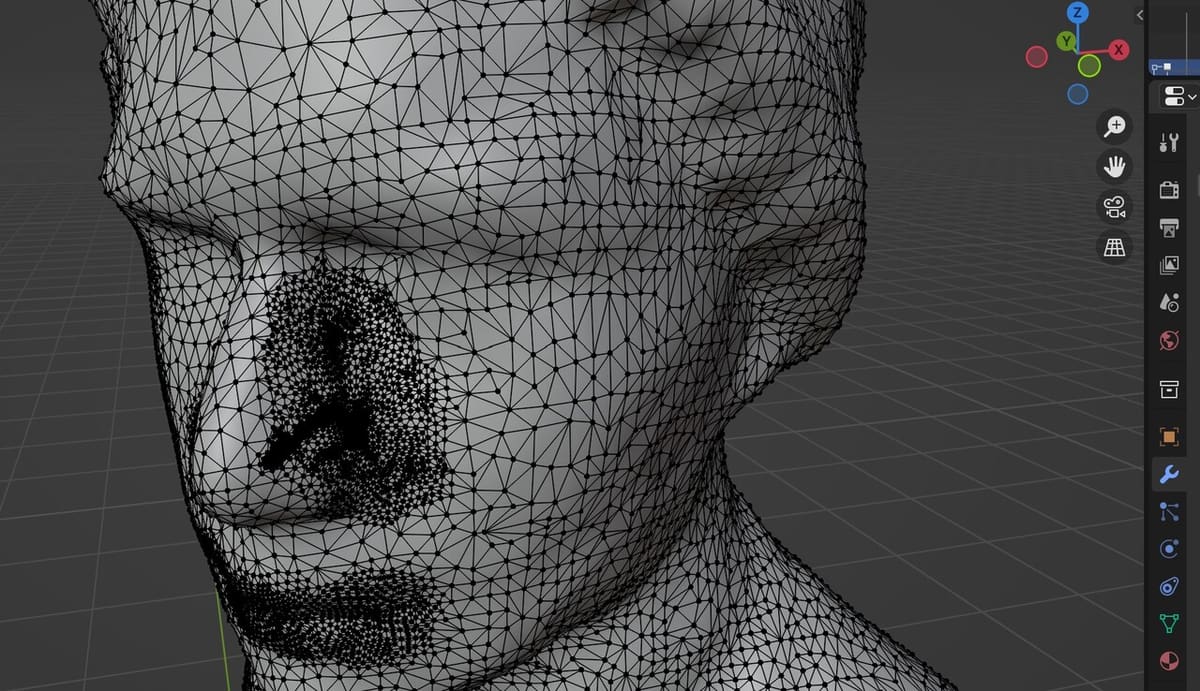
- Simplify: This tool (right beneath the purple “Cloth” feature) is useful for reducing file size, especially because some 3D scanners will go into very high detail in areas where high detail isn’t strictly necessary. Reducing the polygon count in these areas (which in scans of persons is often near the sides of the nose) will increase performance and make it easier to store and e-mail the finished scan.
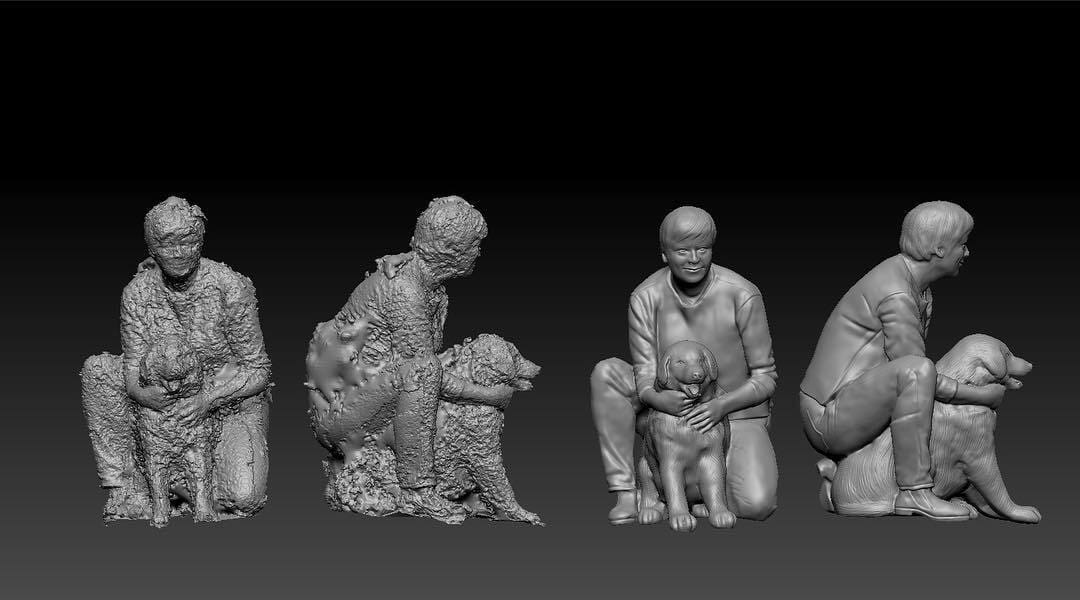
These sculpting tools are very helpful for addressing inclusions and exclusions made from extraneous activity in 3D scans. If you’re scanning someone using photogrammetry and their head turns during the scan, parts of their face will be left out. These features can be reconstructed relatively faithfully with the blob, clay, and pinch tools to respectively build, even out, and shape the mesh features.
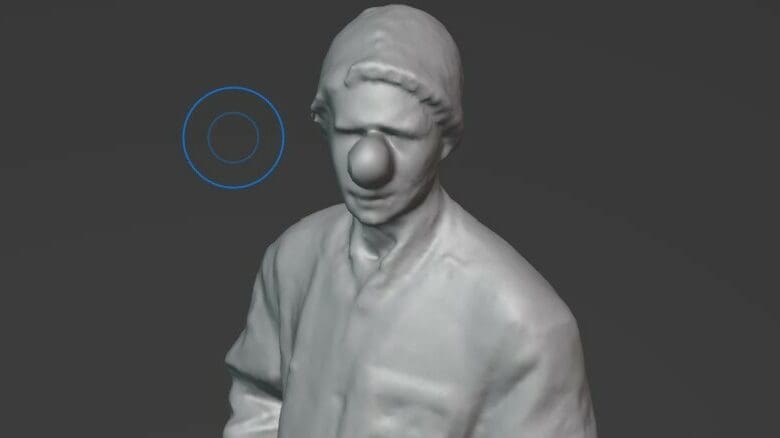
Lastly, it’s important to note that sculpt tools are designed to manipulate several mesh triangles at once, and it can cause sharp features to get lost in the sculpting process. Don’t be afraid to go back and use mesh editing tools to move individual edges and vertices around to preserve sharp corners in the scan. In the image above, the “blob” tool smoothed out the eyes in order to make the blob. This is an example of what could be corrected with the aforementioned mesh editing tools.
Step #4: Cleaning Up the Color
For full-color scans, sculpting tools can create unintended color deformations. That, coupled with color artefacts from scanning, means that full-color scans often need to be color-edited. Even more so, monochromatic scans can be colored somewhat easily, should the designer want to add three or four hues for multicolor printing.
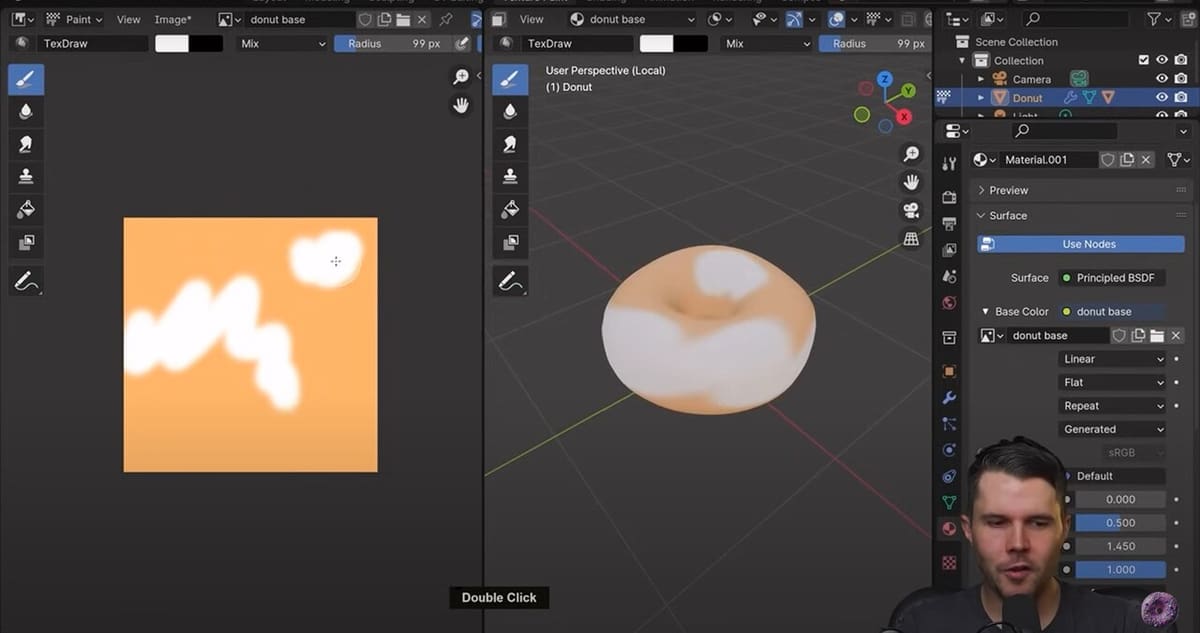
It’s not uncommon for photogrammetry software to apply background colors to the scanned object, which can be fixed relatively quickly using Texture Painting. This is a feature for editing the color of a mesh that involves “unwrapping” the mesh so that it is a flat surface, painting on it as if it were a program like MS Paint, and then “rewrapping” that surface back around the object. A good illustration of how to do this is Blender Guru’s Blender Donut tutorial. Texture painting is a rather advanced tool, but it’s very effective at fixing small color issues that might affect a 3D scan.
Additionally, to automatically add color (or even to extract textures from full-color scans), Blender has a feature called UV mapping that can add a pre-built image onto a monochromatic scan, which can be used in reverse to extract the color map of a 3D scan into an image that can be used for other purposes. These can be used when a monochromatic scan of a particular object should have a pattern added to it (perhaps a plaid couch) or in instances where logos should be added. It is functionally the same as putting a Minecraft Skin on a blank Minecraft character from an unwrapped Minecraft character skin image.
License: The text of "How to Clean Up 3D Scans in Blender" by All3DP is licensed under a Creative Commons Attribution 4.0 International License.