Color Lithophane: How to 3D Print One

Lithophanes are stunning on their own, but adding color takes them to the next level. Read on to make color lithophanes with your 3D printer!
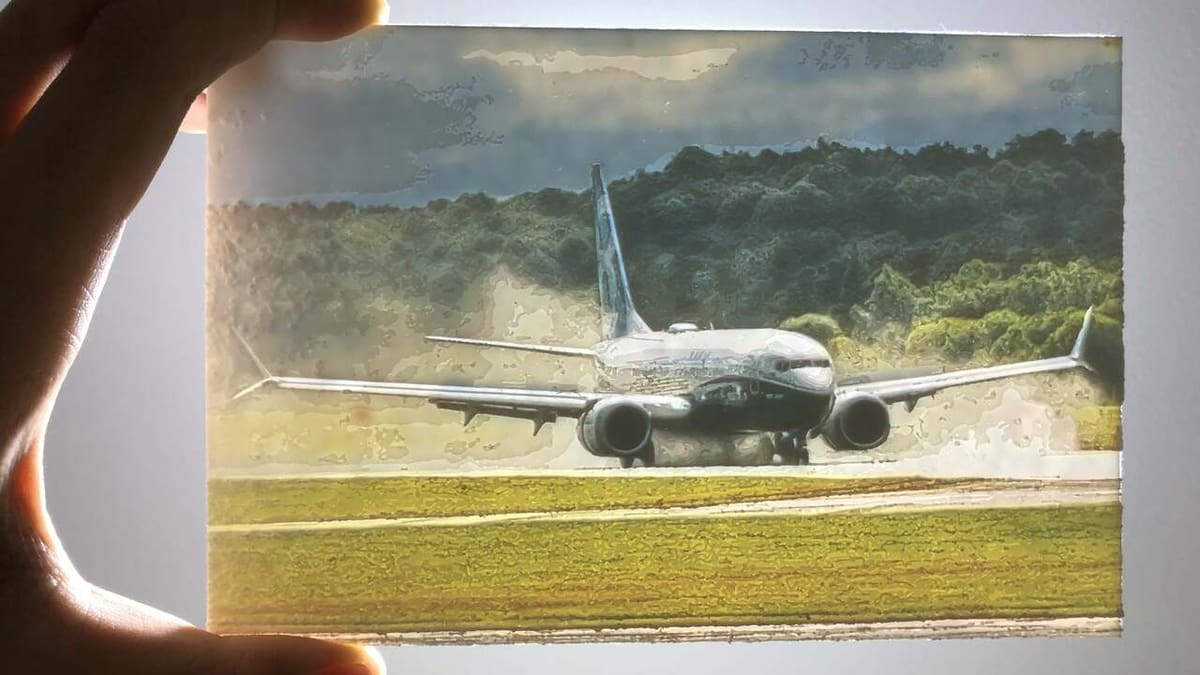
A lithophane may look rather dull under normal light but shine a light through it, and suddenly a beautiful, detailed image appears. Lithophanes are embossed photos that you can create quickly and affordably with your 3D printer. 3D printing pairs perfectly with lithophanes, as the layer-by-layer process ensures accurate variation in material thickness.
Lithophanes use translucent material with different thicknesses. When lit from behind, the thicker parts look darker, as less light passes through. The thinner parts look brighter since more light passes through, creating a grayscale image.
But what about a color lithophane? Color adds another layer of uniqueness and complexity to a lithophane, making it even more stunning.
In this article, we’ll take a look at how to create a color lithophane by adding a color picture behind a 3D printed lithophane. Note that there are several different ways to 3D print a color lithophane, which we’ll cover below. However, in this guide, we’ll focus on the simplest and most cost-effective method that works with any FDM 3D printer. Let’s get started!
Materials
Before getting started, let’s cover what to keep in mind when selecting an image for your color lithophane and the materials you’ll need.
Although all images can be converted and printed into a color lithophane, it’s best to choose an image with higher contrast for nice results. You’ll also want to select a simpler image without lots of objects and colors. If your image choice is too complicated, the details may look messy.
You’ll want to gather the following materials:
- White filament in your material of choice
- FDM 3D printer
- Color printer and paper
- Clear glue
With that, you’re good to go. We can now dive into making the lithophane!
Preparing the Files
For the first step, you’ll need two files: one for 2D printing the color picture with intensity levels removed and one for 3D printing the lithophane.
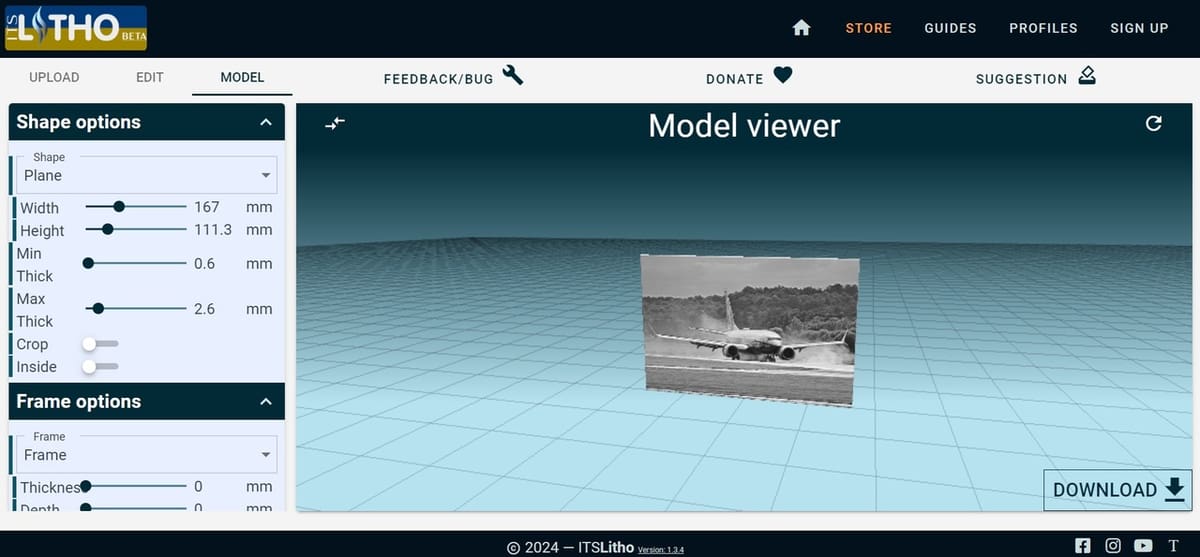
While there are several websites and methods you can use to create the lithophane file, this guide will focus on ItsLitho. We found that it’s a fantastic and easy-to-use online tool for generating the 3D lithophane model and colored picture, with a generous number of customizable parameters.
Keep in mind that the final color lithophane will be more opaque once the piece of paper is added, especially for pictures with darker colors, so it’s suggested to go for slightly thinner settings than a normal lithophane. You should also consider that a larger lithophane means more detail. While this is great, remember that it will also take significantly more time to print. Most printers can achieve a larger lithophane as long as it fits in the build volume.
Here are the steps you’ll want to follow:
- Go to ItsLitho’s website.
- Upload your desired picture using the “Upload” tab.
- Go to the “Model” tab, and choose your desired settings. We recommend a maximum thickness of 2.6 mm and a minimum thickness of 0.6 mm.
- Add final touches to the image if necessary by adjusting the contrast and grey scaling in the “Edit” tab. There is also the option to add a frame or border around your lithophane, as well as different shapes, attributes, and quality options.
- Click “Download” in the bottom right corner and then “Lithophane only”. This should download an STL file.
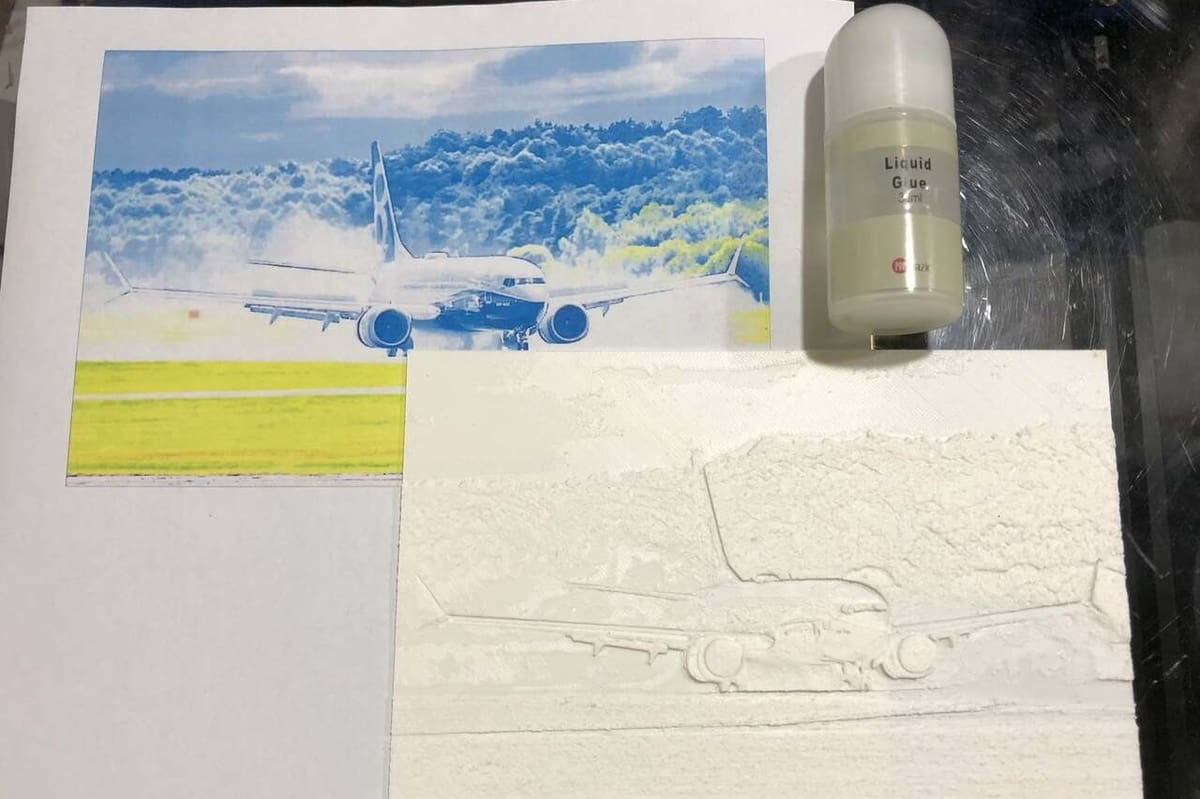
- Then, select “Color Lithophane”. This should download two image files, including your original picture (scaled to your desired size) labeled “Normal” and one with intensity levels removed labeled “Color”.
Printing the Color Picture
Next, we’ll need to print the color picture for the lithophane. We’ll use a normal (2D) color printer and print the image at the same size as we want our lithophane to be.
Note that the color picture needs to have its intensity removed, as the lithophane already provides this aspect. The color picture only needs to provide the color aspect. Together, they will create a vibrantly colored lithophane!
To print the color picture, follow these steps:
- Open the picture with intensity levels removed on your preferred software. We used Microsoft Word, but any similar program should work. Don’t worry if the image looks strange. The intensity levels are removed, so it should not look normal. The correct color will show at the end.
- Since most software has inbuilt margins that compress everything slightly, it’s difficult to 2D print a perfectly sized photo. You may need to scale up the photo a little. For Microsoft Word, we found scaling to 106% results in a rather accurate print.
- Print the photo on your color printer.
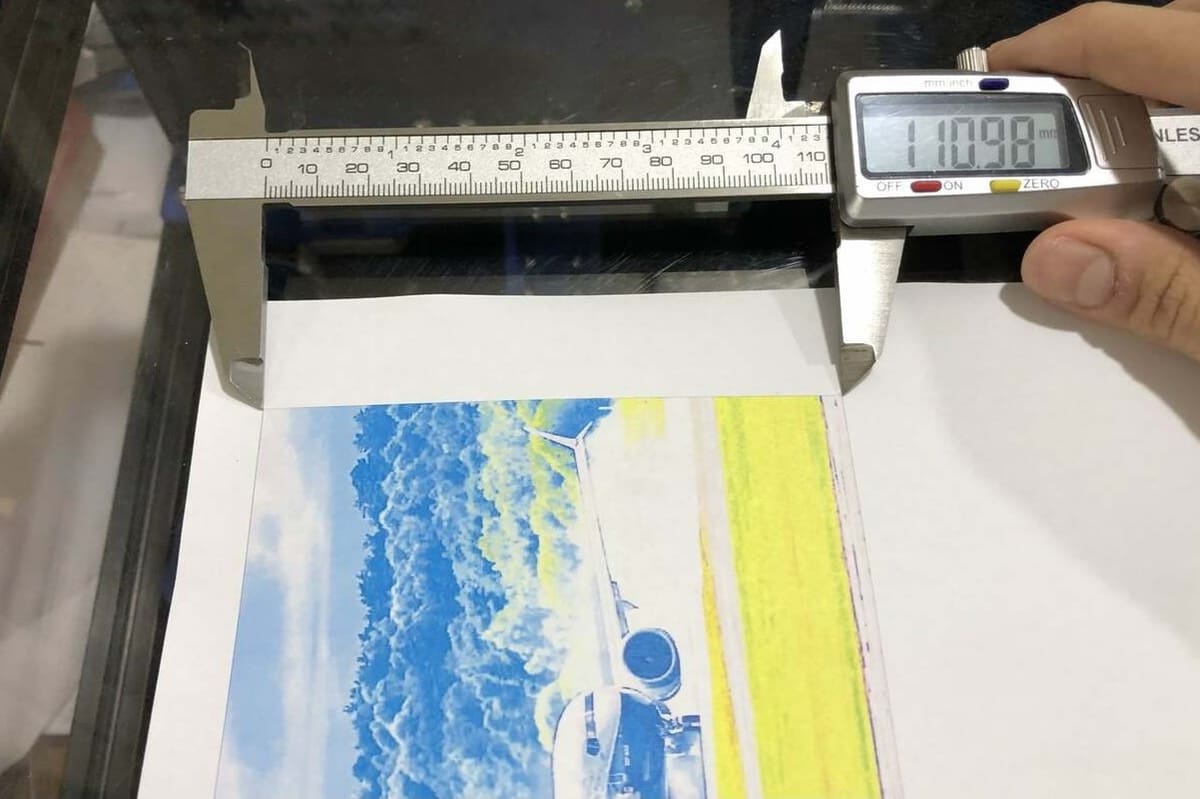
- Cut out the photo using a ruler, scissors, penknife, or your preferred tool.
- Measure any edge of the photo. This measurement will be used to scale the 3D print later.
3D Printing the Lithophane
Now, you’ll need to 3D print the lithophane. You can proceed as follows:
- In your slicer, scale the lithophane to the same size as your printed picture. Very importantly, only scale in the X- and Y-axis. Do not scale in the Z-axis, as this determines how much light passes through your lithophane.
- Set the infill to 100% with the rectilinear pattern (or set 99 top and bottom layers). This will ensure that your infill pattern does not show up in the picture.
- Load up your white filament, slice, and start the 3D print!
You can print at lower layer heights and smaller nozzle diameters for better detail. However, be aware that going too small can lead to clogging, as many retractions are needed for a lithophane print. Typically, a 0.4-mm nozzle and a 0.12-mm layer height will work well.
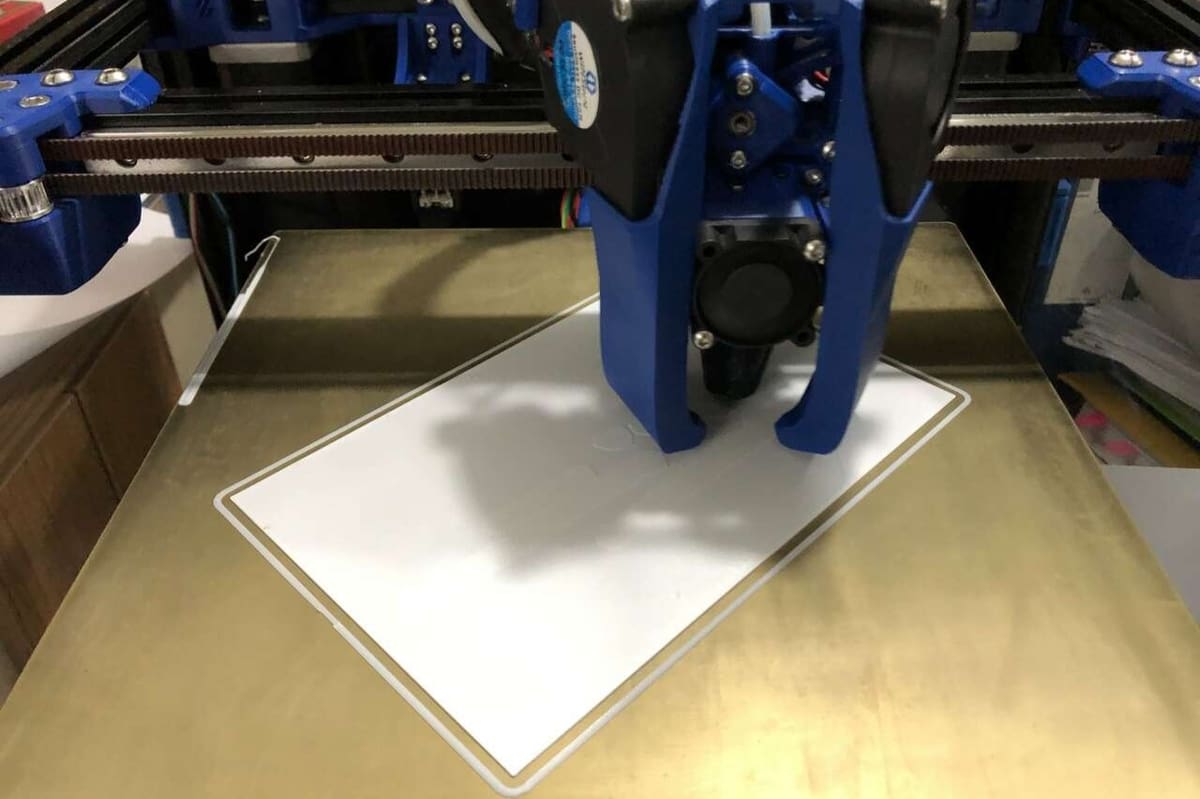
Keep in mind that the texture of your print surface will affect how your color lithophane looks. For a lithophane with a fuzzy feel, try textured PEI or satin textured sheets. For a sharper feel, go for smooth PEI or glass. Here, we’re using a smooth PEI surface for a clear look.
Assembling the Lithophane

Now that everything is ready, it’s time to put your color lithophane together. Follow these steps to assemble everything properly:
- Evenly spread a thin layer of glue on the back side of the lithophane.
- Carefully place the photo on the back side of the lithophane, making sure the color picture and lithophane are aligned.
- Firmly and evenly press the lithophane against a flat surface to ensure a good bond, and leave the glue to dry.
Your lithophane should now be ready! Put it in front of a light source, and enjoy the beautiful colors. If you want to display your lithophane on a table or wall, you can create a stand or frame with LED strips.
Alternative Methods
Keep in mind that the method covered in this guide is the simplest and most cost-effective one — you can do it with any FDM printer using white filament.
However, there are other methods that, while a little more complicated, can lead to impressive results. These alternative methods can create a color lithophane using different filament colors (and more time).
Multi-Material Printing
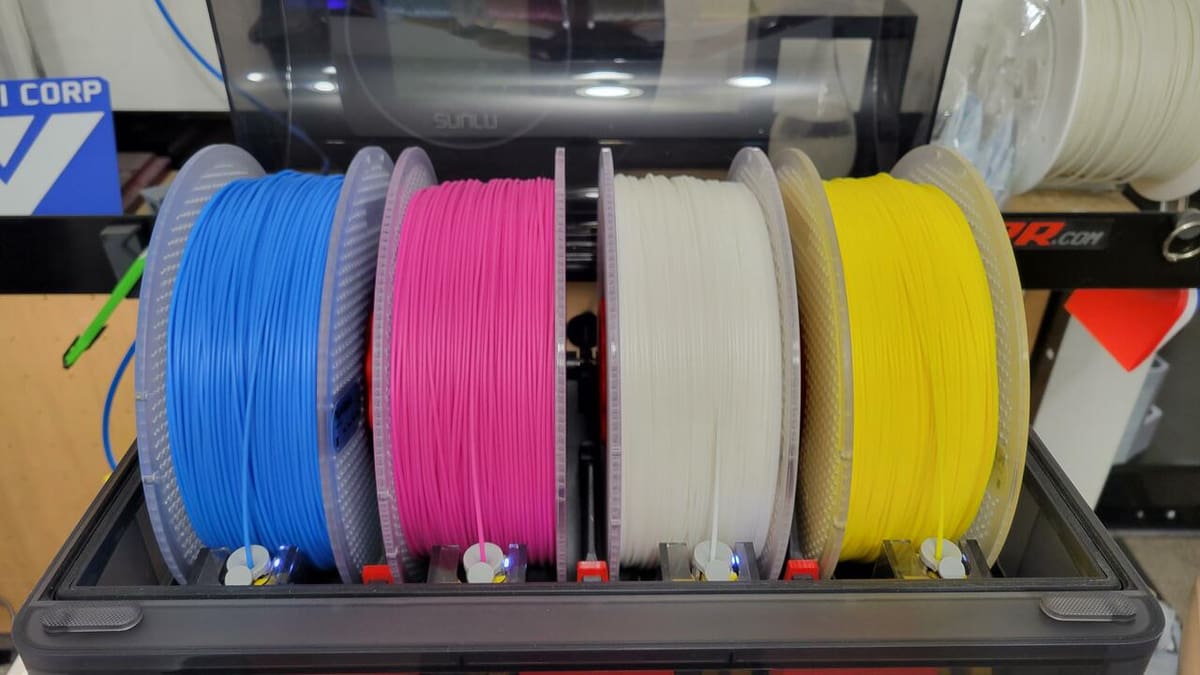
Multi-material 3D printing involves using more than one type of material within a single print. You can modify your 3D printer with accessories that enable multi-material printing, such as the Bambu Lab Automated Material System (AMS) or Prusa’s Multi-Material Upgrade (MMU).
For example, the Bambu Lab AMS is an upgrade that lets you print with four different spools of filament if you have a Bambu Lab printer. They even offer a CMYK bundle (Cyan, Magenta, Yellow, White) for creating color lithophanes with the AMS. It includes white instead of black, as a lithophane is meant to let light shine through.
Any upgrade that supports four or more filaments, such as Bambu Lab AMS, Prusa’s MMU, the Mosaic Palette, or others, will work great for making color lithophanes!
Manual Filament Swapping
This method is essentially the same as the MMU option. However, you’ll have to do the filament swaps manually by inserting special commands at specific points in a print’s G-code. This tells your printer to pause at the end of a layer so that you can manually swap the materials before continuing.
For a color lithophane, this will account for 16 filament changes in total. This method is much more time-consuming than the others mentioned, but it also means you don’t need to invest in an upgrade.
For more information about how to use this method, check out the guide to pausing at specific layer heights in Cura.
No matter which method you use, you can obtain great results. Have fun printing your color lithophanes!
License: The text of "Color Lithophane: How to 3D Print One" by All3DP is licensed under a Creative Commons Attribution 4.0 International License.