
F3D to STL: How to Convert Fusion 360 Files into STL

F3D is Fusion 360's native 3D model format, but it's not widely compatible. Read on to learn how to convert F3D to STL!
If you’ve dabbled in 3D modeling, chances are you’ve heard of Autodesk Fusion (formerly Fusion 360), the software used by everyone from hobbyists to professionals to design their own parts. It’s a hugely versatile program, including features for CAD, CAM, rendering, animation, and simulation. Fusion is subscription-based, but there’s a limited free license for personal use.
As more and more software applications have emerged, many new file formats have come into use. Fusion’s own format is called F3D, but makers who want to take their design and use it in another platform will likely need to convert to another format. One commonly used format is STL, a 3D model format popular in the realms of 3D printing and CAD.
In this article, we’ll be going over how to convert an F3D file to the STL format. However, before we get into the conversion process, let’s take a closer look at the differences between native and non-native file formats.
Native & Non-Native Formats
Native and non-native formats refer to the classification of a file type based on its usability in third-party programs.
Native Formats
Most mainstream design software has its own file format to store data specific to the application; these formats are known as native file formats. One example is the Blend format that’s native to the modeling tool Blender and which stores program-specific data. It’s usually best to save your work in the native format of the program you’re working in, as long as you don’t need to move the file to a different program.
F3D is a 3D model format native to Fusion. This type of file is primarily generated and exported from Fusion, and while it’s a very useful format to retain, its use outside of the program is limited.
Non-Native Formats
Most programs can also import and export a range of files in addition to their own. Formats that are supported in this way are called non-native formats. Using a non-native format might mean that you can’t save as much program-specific data into the file, yet what does get saved will be accepted in more places.
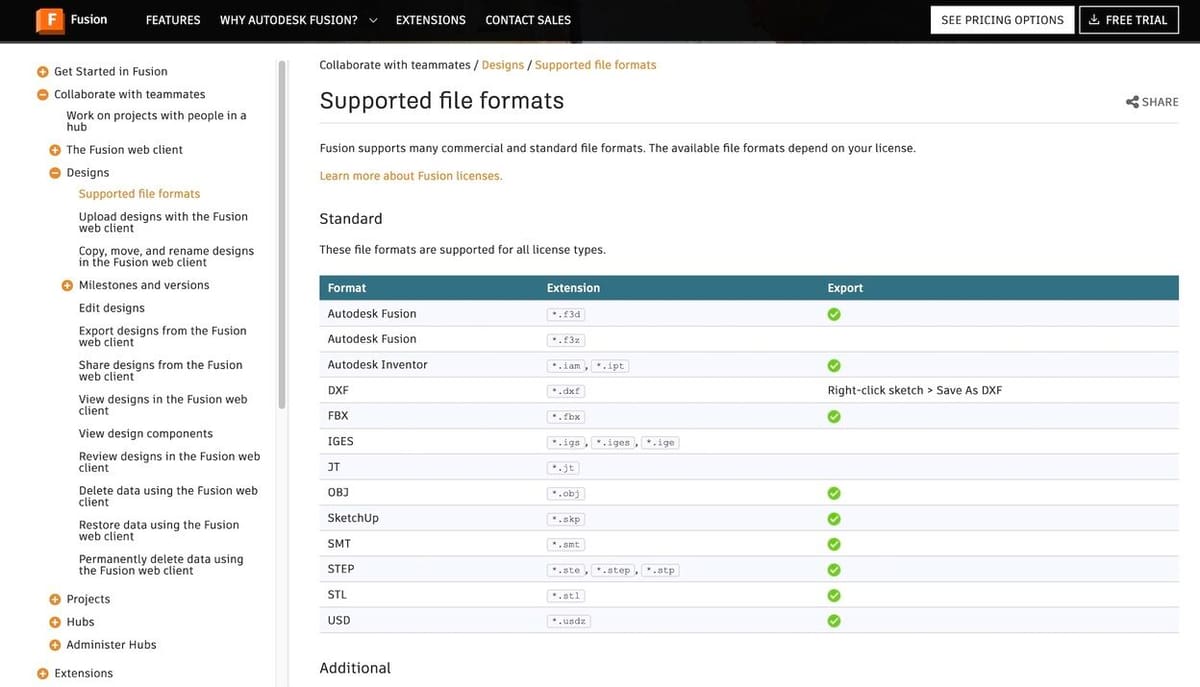
For 3D models, especially in the realms of 3D printing and CAD, the STL is a popular file format that’s compatible with many different applications, from design software to 3D slicers.
Why Convert
Making the conversion from F3D to STL (or another combination of file types) is necessary if you have a file designed in one program that you need to use in another. As F3Ds are specific to Fusion, you’ll likely need to convert any files in this format in order to use your model for any other purpose.
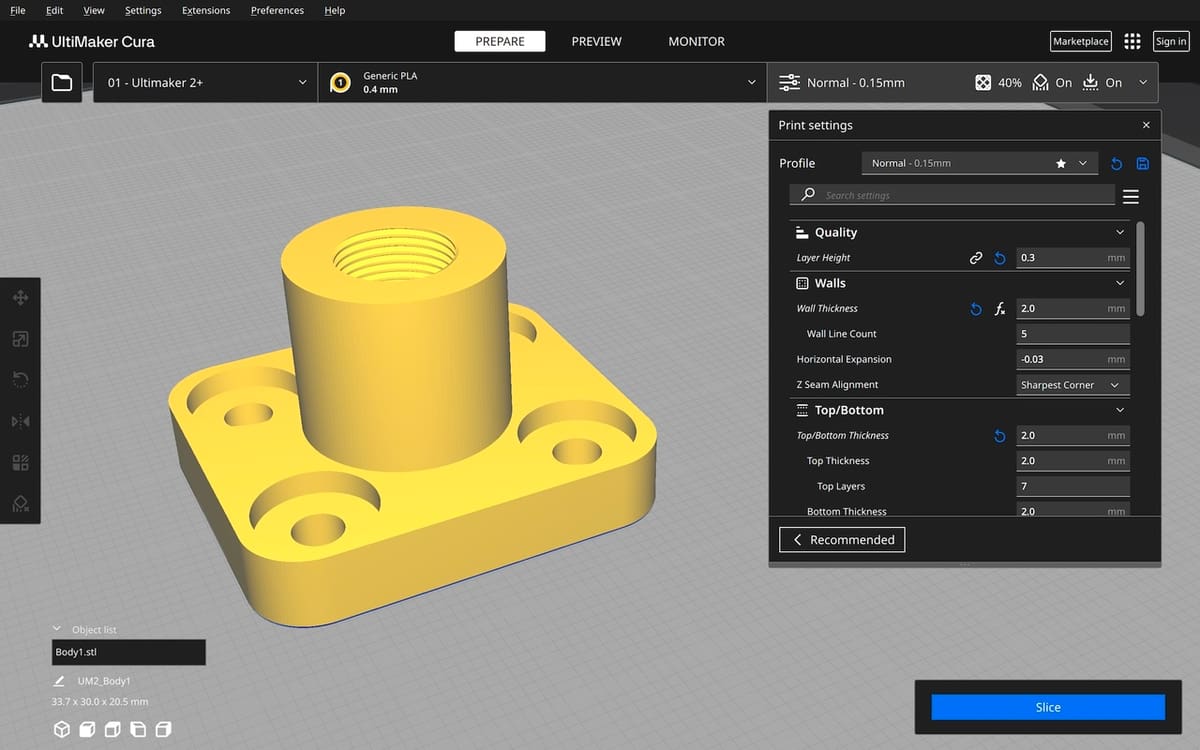
For instance, let’s say you’ve designed a part in Fusion or downloaded an F3D file from a design repository, and you want to convert the file to G-code so you can 3D print it. To do this, your model needs to be prepared for printing using a 3D slicer. Unfortunately, most 3D slicers are limited to a few major formats, like STL, OBJ, and 3MF, and won’t be able to read an F3D file or any other format native to particular software.
In this case, you’d need to convert your native F3D file to a more widely accepted format, like an STL. There are a few ways to do this, but the easiest and most reliable way is to use Fusion itself.
How to Convert
If your part was designed in Fusion, it should be a simple process to export it as an STL. Below, we’ve provided a step-by-step guide on converting your F3D model to the STL format using Fusion. If you don’t have Fusion, you can look at the different versions and download the one that’ll suit your needs best. Our tutorial will start under the assumption that you’ve downloaded and have already set up Fusion.
Exporting a Full Model
The following instructions will generate one single STL file. If your model is composed of more than one part, being that a body or a component, all parts will be exported together to and STL.
- With Fusion open, click the file icon in the top-left corner of the screen and select “Open…” from the drop-down menu (or hit “Ctrl + O”).
- Locate the F3D file you need to convert and open it.
- Ensure that the imported design is correct, then save it to Fusion by clicking the file icon and selecting “Save” (or using “Ctrl + S”). If you’re working from an F3D you found online, it can be saved, even without alterations, as you can save it from your hard drive to the Autodesk cloud. On the other hand, if you’re working on a design created by yourself from scratch, the “Save” function only works after some alteration.
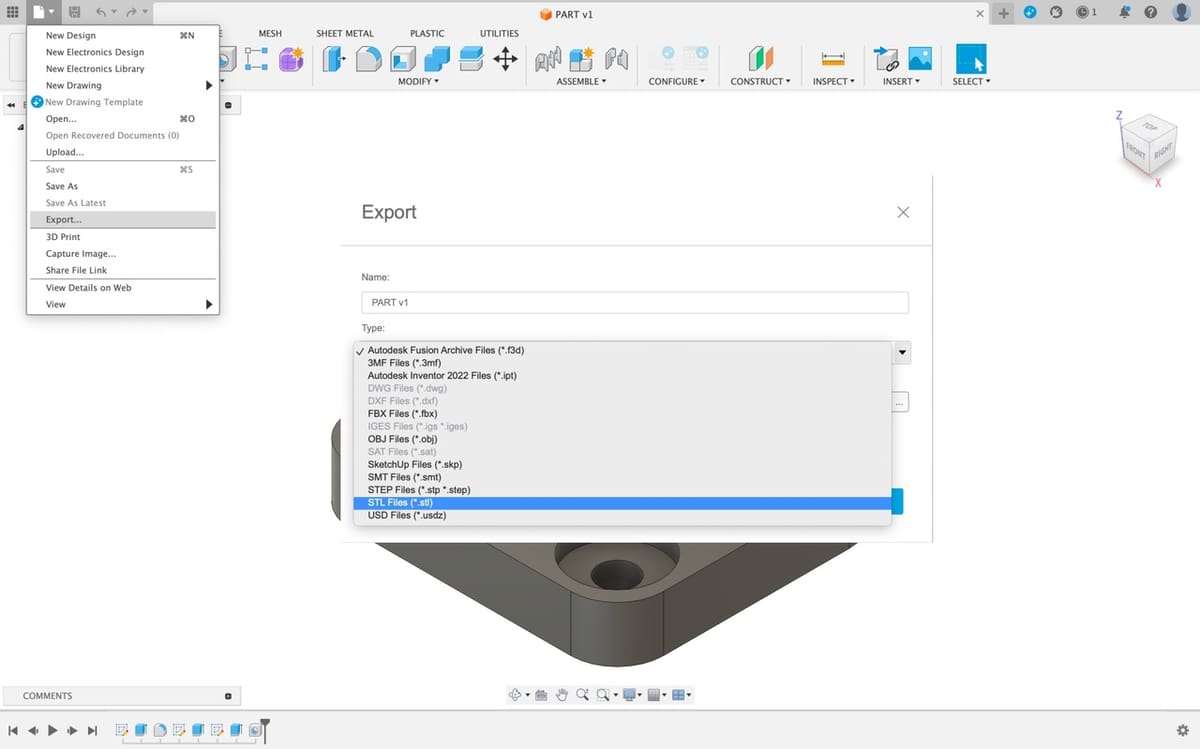
- Once again in the File menu, select “Export…” and a pop-up page should appear.
- Name your model under “Name:” and select “STL Files (*.stl)” under “Type:”.
- Choose the location of where you want the model saved and then click “Export”.
Exporting different parts of a model
If you need to export different parts on separate files for more flexibility while slicing, you have two options
Using the Export Command
- Hide or unhide the bodies or components using the eye-shaped icon on the left of the element name on the project browser.
- Having only the desired element shown on the screen, use the same steps from exporting a full model. This way only the active element will be exported.
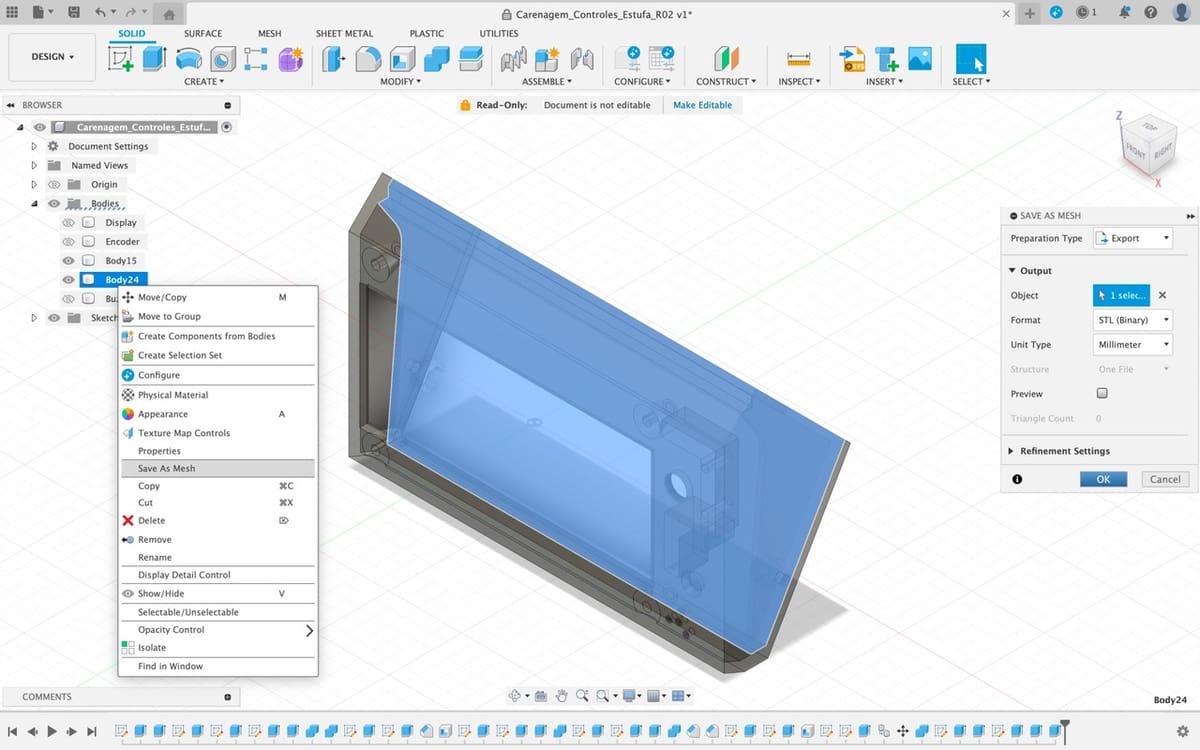
Using the Save as Mesh Tool
- Find the body you want to export in the Fusion browser, on the left of the workspace.
- Right-click the part; it will open a drop-down menu. Click on “Save as Mesh”.
- This will highlight the body, and a menu will pop on the right side of the screen. Here you can choose the file format, dimensions, and other parameters.
- From here, just follow from Step 4 in the process for exporting a full model.
That’s it, now you’ve completed the conversion process! As stated in the pop-up, the conversion may take a few minutes, but your STL file should appear in the determined location when it’s ready.
License: The text of "F3D to STL: How to Convert Fusion 360 Files into STL" by All3DP is licensed under a Creative Commons Attribution 4.0 International License.