Cura: Experimental Settings – Simply Explained

Cura's experimental settings can unlock hidden potential in your 3D printing experience. Read all about them!
Cura, developed by UltiMaker, is one of the best slicers in the market. Its intuitive interface and numerous features have made it a favorite among hobbyists and professionals alike. However, hidden within its many settings lies a realm of untapped potential: the Experimental settings. Often overlooked, these offer a playground for those seeking to push the boundaries of their prints and achieve extraordinary quality or special effects.
Cura’s experimental settings are a set of advanced features made to improve 3D printing. They let users customize and optimize their prints in ways not possible with standard settings. Although these experimental settings might not be as reliable (hence their name), they can greatly enhance print quality, efficiency, and creativity.
To access these hidden gems, from the top menu navigate to “Settings > Configure settings visibility…”, type experimental or scroll all the way down to the list, and enable the ones you want by checking the corresponding boxes. Alternatively, you can also go to “Preferences > Configure Cura…” and select “Settings” from the left tabs, and you can then enable them as best suits you.
While there are almost 30 settings listed, some of them overlap or aren’t as widely used, so we’re focusing on the most popular and recurring ones.
Let’s explore these experimental tools and see how they can transform your 3D printing.

Infill Travel Optimization
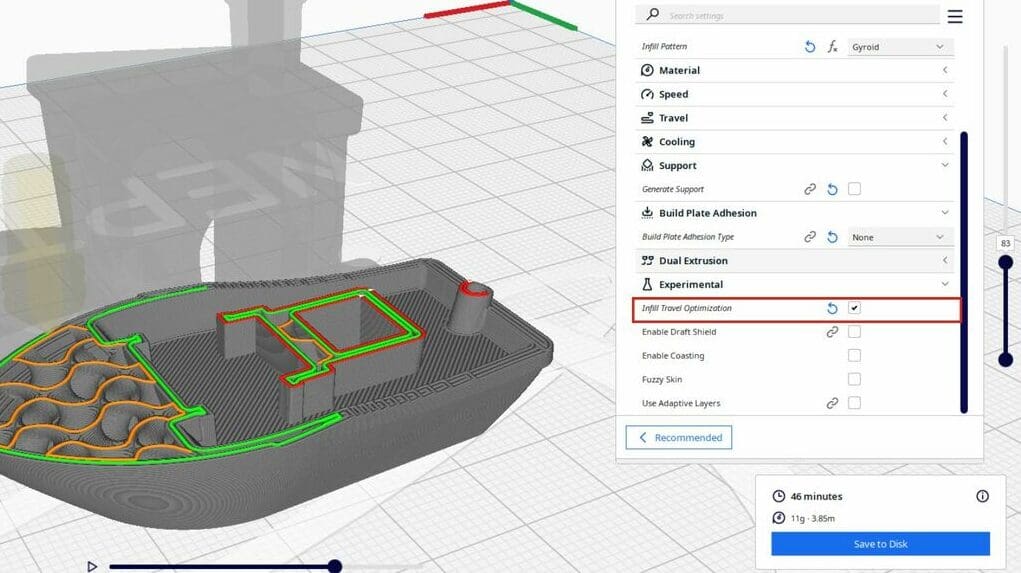
Infill travel optimization aims at reducing the travel time of the nozzle during infill printing. By default, the nozzle follows a set pattern to fill the interior of your model with infill, but this pattern can sometimes lead to unnecessary travel movements and longer print times. Infill travel optimization analyzes the infill pattern and attempts to rearrange the printing order to minimize these movements, potentially saving valuable printing time.
Pros
- Can reduce overall print time, especially for models with complex infill patterns
- Can lead to smoother infill patterns with fewer abrupt changes in direction
- May improve print quality by reducing the risk of oozing or stringing during travel moves
Cons
- Can be computationally intensive, slowing down the slicing process for complex models
- May not always result in significant time saving, depending on the model’s geometry and infill density
- Could lead to unexpected results in rare cases, such as uneven infill distribution or layer shifts
Recommendations
Enable this setting for larger prints with complex infill patterns to potentially save time without compromising quality. Monitor the print for any unexpected artifacts and adjust if necessary.
Draft Shield
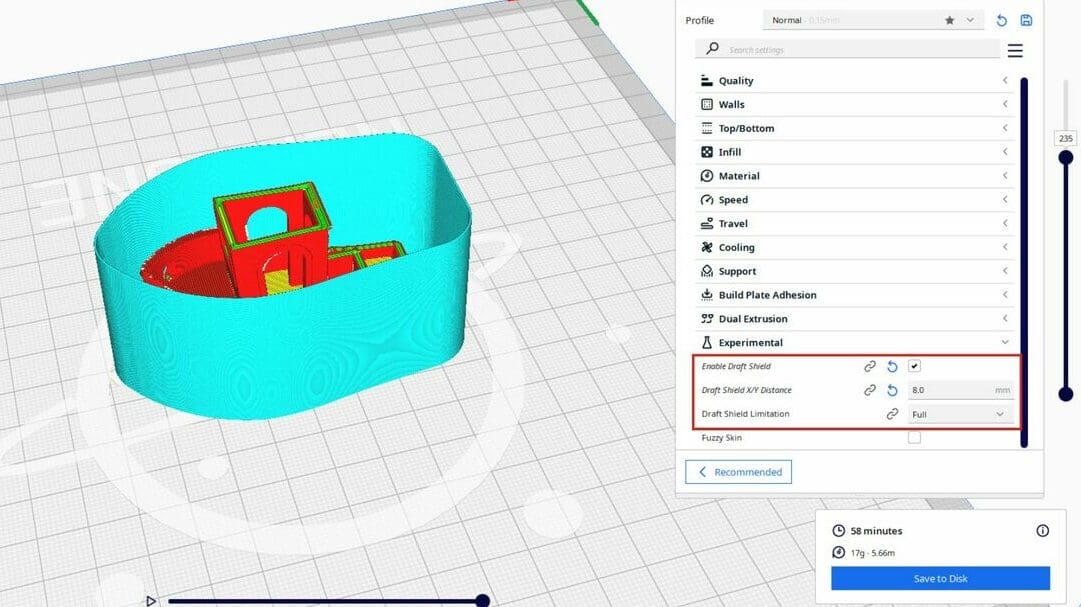
The draft shield acts as a protective barrier against drafts and temperature fluctuations that can wreak havoc on your prints, particularly those made with warp-prone materials like ABS. It essentially builds a thin wall around the model, minimizing warping and promoting consistent cooling.
The draft shield’s distance from the model is set in the “Draft Shield X/Y Distance” subsetting, and its height (“Draft Shield Limitation”) can be set to “Full” – the shield will extend to the full height of the print – or to “Limited” – allowing the user to specify a maximum height.
It’s worth noting that, while draft shields are beneficial for large or tall prints, the wider or taller the model, the more time and material will be used due to the increased perimeter length of the draft shield.
Pros
- Prevents warping and improves layer adhesion, especially in drafty environments
- Useful for large prints and temperature-sensitive materials
- Easy to enable and configure
Cons
- Adds a small amount of extra print time due to the additional perimeter
- Not really necessary in well-controlled printing environments
Recommendations
Enable the draft shield for large prints, prints with delicate features, or when printing in drafty areas. When adjusting the draft shield’s X/Y distance, consider the size and complexity of your model: A larger distance may be necessary for larger prints to ensure adequate protection from drafts, while a smaller distance may be sufficient for smaller prints. For the “Draft Shield Limitation” subsetting, choose “Full” for maximum protection or “Limited” if you want to control the height of the shield (perhaps to focus pm a thinner base) and potentially save some print time.

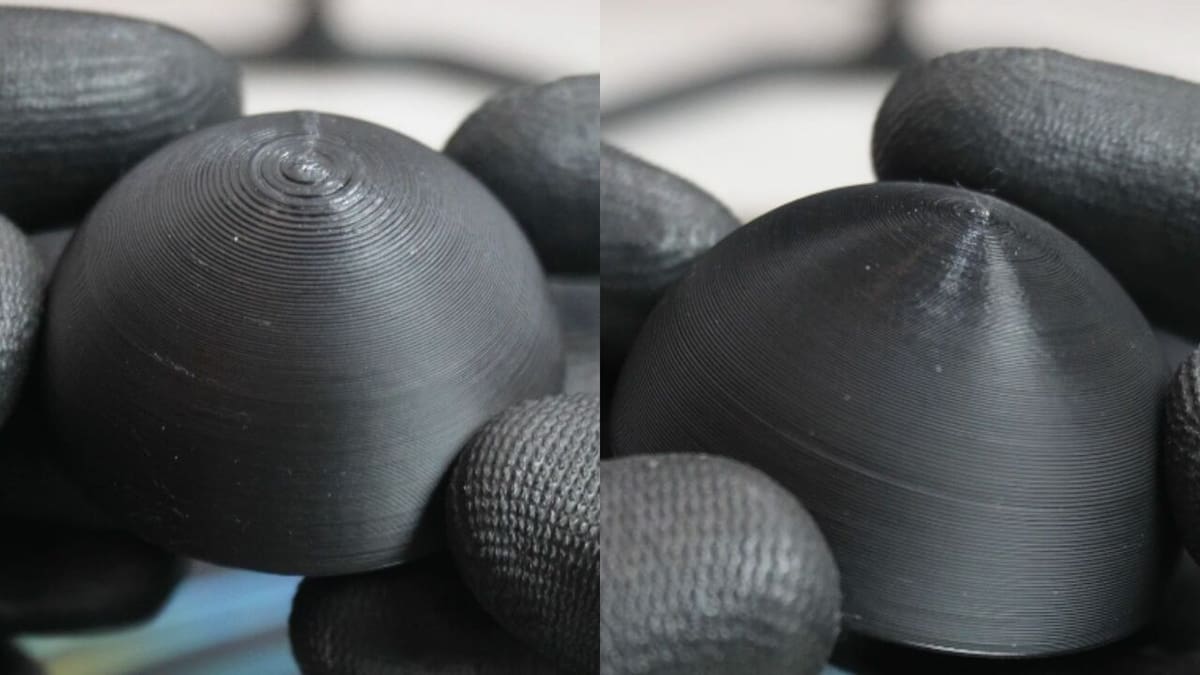
Coasting
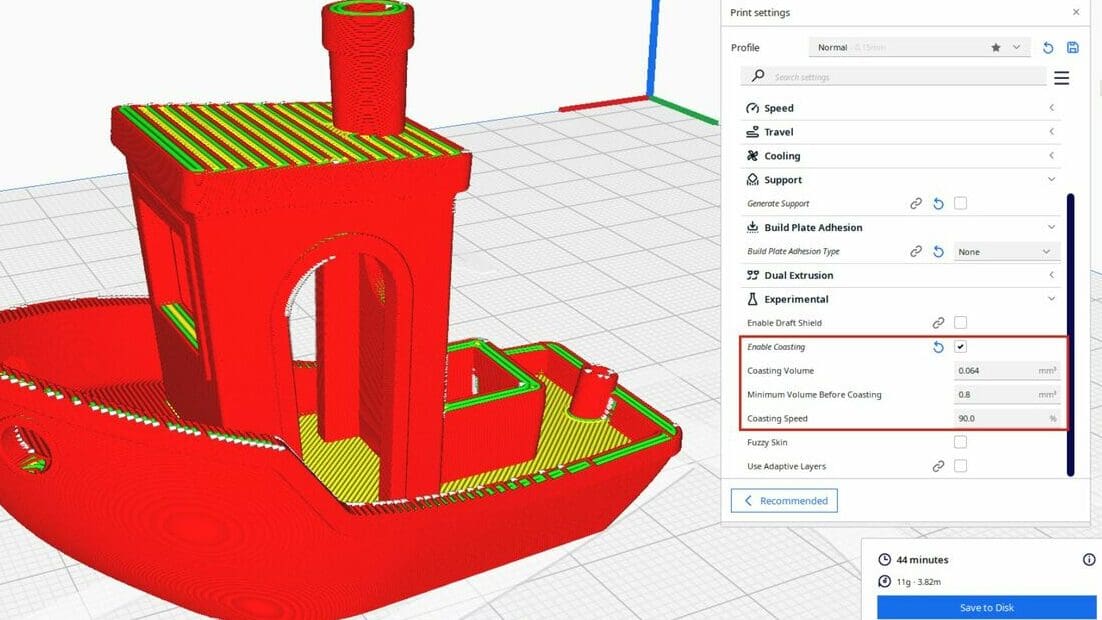
Coasting, also known as “retract on layer change”, stops the filament flow slightly before the end of a line segment and retracts the filament. This helps to prevent oozing and stringing, which are common issues with certain filaments like PETG, resulting in cleaner prints with less post-processing required. Subsettings include “Coasting Volume” (how far the filament retracts), “Minimum Volume Before Coasting”, and “Coasting Speed” (how fast the retraction occurs). When it comes to coasting volume, the higher the value, the earlier the nozzle will stop extruding, and the minimum volume before coasting is especially important for smaller parts in prints, to ensure that under-extrusion is avoided just because coasting is enabled.
Pros
- Reduces stringing and oozing for cleaner prints
- Easy to implement and generally improves print quality
Cons
- Can affect dimensional accuracy in some cases
- May slightly increase print time due to the extra retractions and movements
Recommendations
Enable coasting for prints where stringing is a concern, especially when using filaments like PETG, which are prone to it. Adjust the coasting distance and speed to find the best balance between print quality and speed. Start with small values (the default should give a good starting point) and gradually increase them until you achieve satisfactory results. For very small parts of models (or miniatures), ensure that a minimum volume before coasting is properly specified.

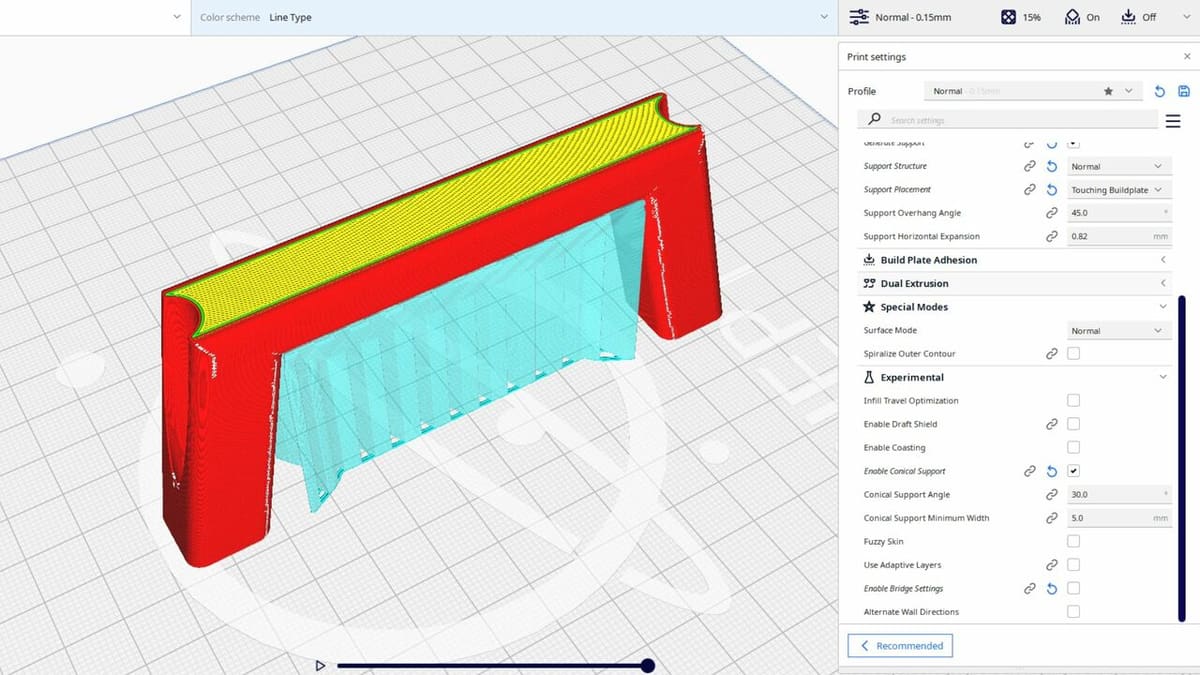
Conical Supports

Conical supports are an experimental setting in Cura designed to optimize the generation and structure of support material, and they are reliant on general supports being enabled (“Generate Supports” under the “Support” section).
Instead of creating straight vertical support columns, this setting generates supports that taper towards the build plate, resembling cones. This unique structure reduces the contact area between the support and the model, making the supports easier to remove and minimizing the potential for scarring on the printed surface.
The higher the “Conical Support Angle”, the narrower the support (saving time and material but not being the most stable depending on what the support is meant to help). The “Conical Support Minimum Width” sets the smallest width the support will have at the part where it becomes smaller.
Pros
- Reduced support material usage, saving filament and print time
- Easier removal of supports due to their tapered shape
- Potentially smoother surface finish on the supported areas
Cons
- Still an experimental feature and might not be suitable for all models or geometries
- Might require fine-tuning of subsettings for optimal results, which could mean a few tries to get right (and material waste)
- May not provide adequate support for extremely complex structures
Recommendations
Enable conical supports for models with tall or delicate features or where surface finish is a priority, and adjust the “Support Conical Angle” (the angle at which the support tapers) to find a balance between support strength and ease of removal. Start with a smaller angle (e.g. 20-30 degrees) and gradually increase it if needed, or opt for a negative angle if you need a wider base and a narrower top.
Fuzzy Skin
Fuzzy skin is an aesthetic feature that adds a unique, textured appearance to the outer surface of your print. It achieves this by altering the line pattern of the outer wall, creating a fuzzy, almost velvet-like texture. This can be used for purely visual purposes or to add a functional grip to objects. The degree of fuzziness can be adjusted under “Fuzzy Skin Thickness” (controls the maximum height of the fuzzy skin bumps) and “Fuzzy Skin Point Distance” (controls the density of the bumps).
Pros
- Creates a visually appealing, textured finish
- Can hide minor flaws or layer lines
- Offers unique design possibilities
Cons
- Can significantly increase print time
- Requires specific settings and filament types for optimal results
- May not be suitable for all applications
Recommendations
Experiment with different fuzzy skin settings to achieve the desired level of texture and density. Consider using fuzzy skin for artistic projects, objects that require a better grip, or to add a touch of visual interest to functional prints. Ensure your printer and filament are capable of handling the increased complexity of the fuzzy skin pattern.

Flow Rate Compensation, Max Extrusion Offset & Factor

These settings work in conjunction to compensate for fluctuations in filament flow rate during printing (similarly to Marlin’s linear advance). As the print progresses, factors like temperature and filament diameter can cause the flow rate to vary, leading to under- or over-extrusion. By adjusting the maximum extrusion offset and the compensation factor, you can fine-tune the flow rate to ensure consistent extrusion throughout the print.
Pros
- Can significantly improve print quality and consistency
- Helps prevent common issues like under- and over-extrusion
Cons
- Requires careful calibration and understanding of your printer’s behavior
- Not essential for all users, but invaluable for those seeking precision and consistency
Recommendations
Use these settings in conjunction with a precise flow rate calibration test. Start with small adjustments, such as increasing or decreasing the maximum extrusion offset by 0.01 mm or the compensation factor by 1%, and gradually fine-tune until you achieve consistent extrusion throughout your prints. It’s crucial to experiment and observe the results carefully to find the optimal values for your specific printer and filament.
Adaptive Layers
Cura’s adaptive layers feature is a time-saving tool that dynamically adjusts the layer height throughout the print. It analyzes the geometry of your model and determines where thinner or thicker layers are needed. Areas with fine details or intricate geometry are printed with thinner layers for higher resolution, while larger, less critical sections are printed with thicker layers for faster printing.
Once this setting is enabled, you can access subsettings such as “Maximum Variation” (the maximum difference allowed between layer heights), “Variation Step Size” (the increment by which the layer height changes), and “Topography Size” (the size of surface features that trigger a change in layer height) to fine-tune the slicing.
Pros
- Optimizes print time without compromising quality
- Ideal for prints with varying levels of detail
- Relatively easy to set up and use
Cons
- Might require some experimentation to find the optimal settings for different models
- Not suitable for prints that require consistent layer heights throughout
Recommendations
Enable adaptive layers for prints with complex geometries or varying levels of detail, as well as for those that have curved features that would benefit from a smaller layer height. Experiment with different ranges to find the best balance between speed and quality.
Bridge Settings
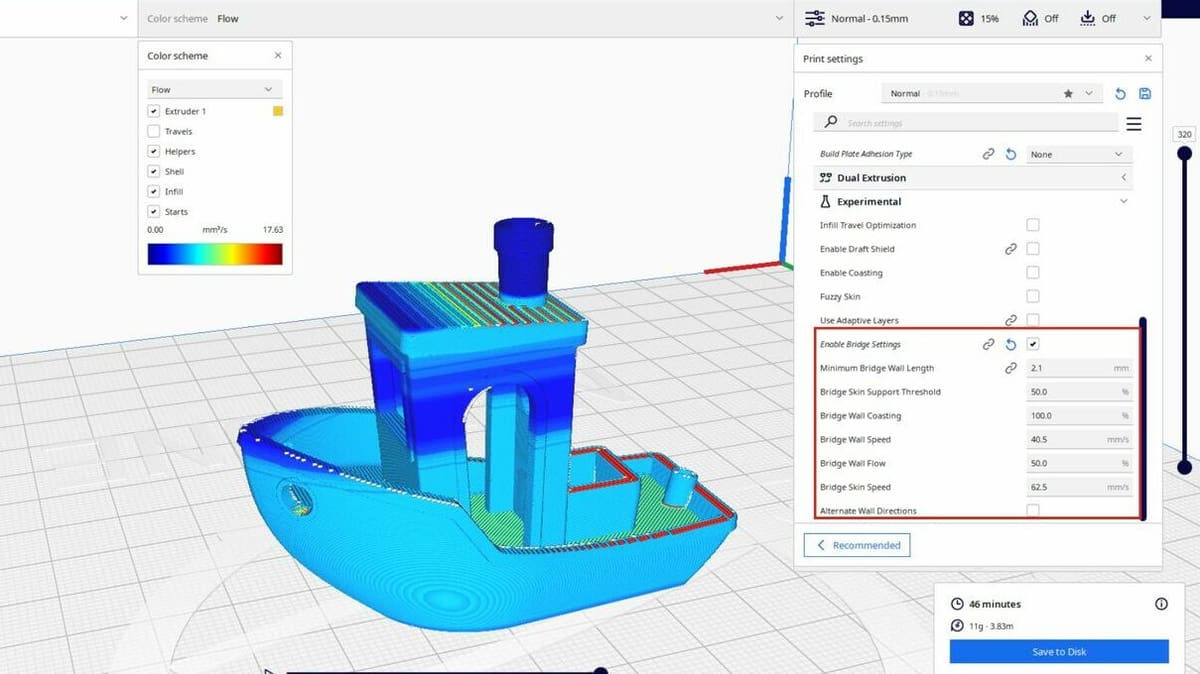
Bridge settings in Cura allow you to fine-tune how your printer handles bridges, which are sections of a print that span a gap without support underneath. These settings affect the speed, flow rate, and cooling of the bridge, influencing its strength and reliability.
Specific subsettings refer to either the bridge wall (the horizontal perimeter being printed upwards) and the skin (the bottom layer), and include coasting, speed, and flow for the former, and speed, flow, and density for the latter. While most will depend on the specific characteristics of the model (i.e. how tall and long are the bridge sections), it’s overall recommended that speeds be slower.
Pros
- Can significantly improve the quality of bridges in prints
- Allows for greater design freedom and flexibility
Cons
- Requires careful calibration and experimentation for optimal results
- Can be complex for beginners to understand and implement effectively
Recommendations
Adjust the bridge speed, flow rate, and cooling settings based on your material and the length of the bridge. For example, PLA might benefit from a higher bridge speed and lower flow rate, while ABS might require a slower speed and higher flow rate. Consider using support blockers for very long or delicate bridges. Additionally, you can try increasing the number of walls, which will affect the bridge’s strength and appearance.
Alternate Wall Directions
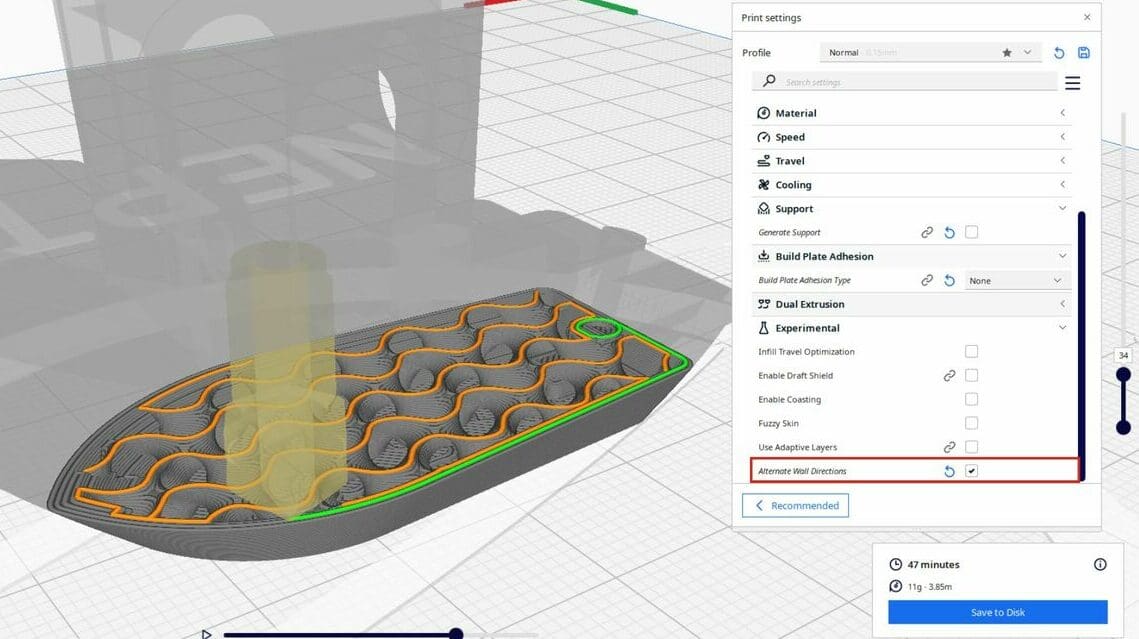
Opting for “Alternate Wall Directions” means that the direction of the outer walls of your print will change with each layer. Instead of printing all walls in the same direction, this setting alternates between clockwise and counterclockwise directions. This can help distribute stress evenly and improve the overall strength and stability of the print, especially for objects with thin walls or complex geometries. Additionally, alternating the wall direction can improve surface finish and reduce the visibility of layer lines by distributing them more evenly.
Pros
- Can enhance the aesthetics of prints by minimizing layer lines
- May improve layer adhesion in some cases
- Can help reduce warping
Cons
- Might increase print time slightly due to the altered printing pattern
- Results may vary depending on the model and material
Recommendations
Enable this setting for prints with curved surfaces or where a smooth finish is desired. While there are no specific subsettings connected to this feature, you can experiment with different settings to achieve a desired visual effect, such as adjusting the number of walls (“Wall Line Count”) or enabling “Outer Wall Wipe Distance” to further refine the surface quality.
Bonus: Ironing
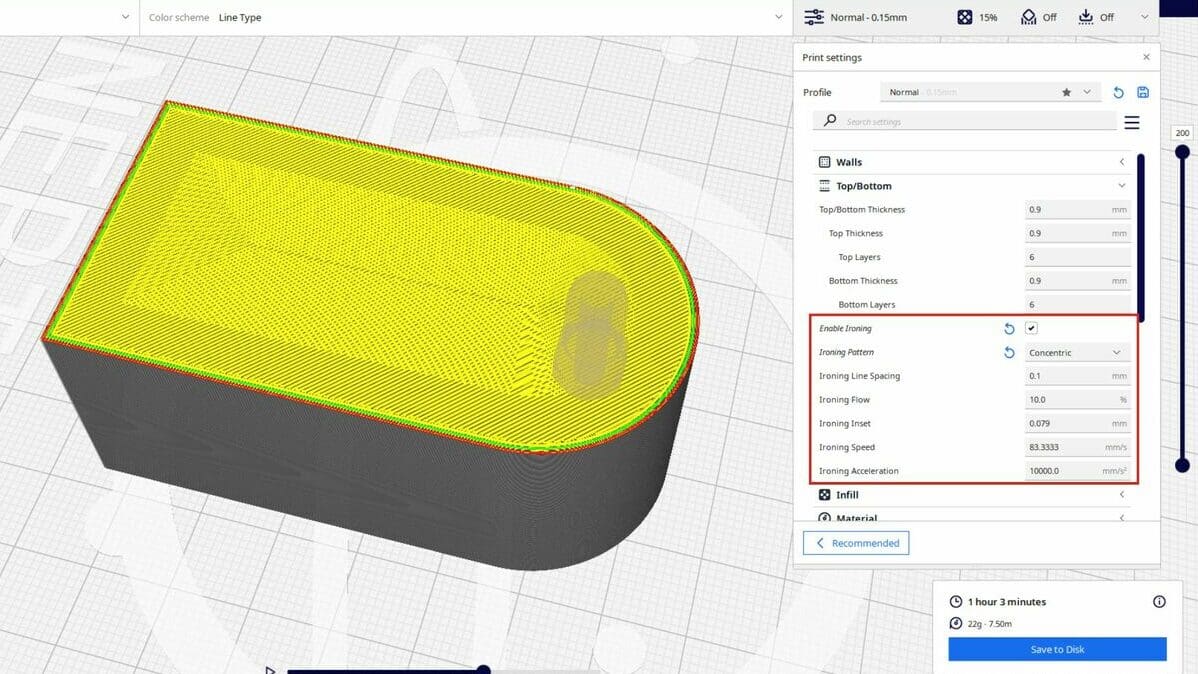
This last feature isn’t an experimental setting, but we thought it worth mentioning as you might want to look into it before tweaking other options.
The ironing setting is located under the “Top/Bottom” tab in Cura’s settings panel. Ironing is a finishing technique that can significantly improve the top surface quality of your prints. It works by having the nozzle move over the top layer at a very low height and high temperature, effectively “ironing” out the surface and reducing the visibility of layer lines.
Pros
- Smoother, shinier top surface
- Enhanced aesthetics, especially for display pieces
- Can improve the performance of functional parts with smooth surfaces
Cons
- Slightly increases print time
- May not be suitable for all materials (e.g. some flexible filaments)
- Requires proper calibration for optimal results
Recommendations
Start with a low ironing flow rate (around 5%) and gradually increase it by increments of 2-5% until you achieve the desired smoothness. Experiment with different ironing speeds and temperatures to find the best settings for your material and printer. Ironing works best on flat, horizontal surfaces; avoid using it on complex or angled surfaces. Consider using ironing for prints where the top surface quality is important, such as figurines, vases, or functional parts with sliding mechanisms.
Tips for Using Experimental Settings
The world of experimental settings is a vast playground for 3D printing enthusiasts, but it’s important to navigate it wisely. Here are some tips to ensure a smooth and successful experience:
- Start small and go step by step: Don’t try all experimental settings at once. Start with one setting, make small changes, and see how it affects your prints. Once you’re comfortable with it, try another. Experimenting is important, and it might take several tries to find the best settings for your printer, material, and model.
- Know the setting’s purpose: Before you turn on any experimental setting, understand what it does and how it might change your print. Check Cura’s documentation, online forums, and tutorials to learn more. This helps you make better choices and avoid surprises. For instance, if you’re printing a model with complex details, you might want to avoid using the “Fuzzy Skin” setting as it could hide those details.
- Pay attention to warnings: Cura often gives warnings for experimental settings. Read these and follow their advice. These settings might not be fully tested or optimized, and they could cause unexpected problems or failed prints. For example, conical supports might not work well with all materials or printers.
- Keep track of your settings and results: Write down the experimental settings you use and how they affect your prints. This helps you see what works and what doesn’t, so you can improve your experience over time.
- Use the community: The 3D printing community has lots of knowledge and experience. Online forums like Reddit, social media groups, and more, are great places to find advice and tips. Don’t be afraid to ask for help, join discussions, and learn from others.
- Try different materials and printers: Experimental settings will give different results depending on the material and printer you use. Test different combinations to see how each setting works with your setup. For example, ironing works best with PLA filament and may not be suitable for flexible filaments.
License: The text of "Cura: Experimental Settings – Simply Explained" by All3DP is licensed under a Creative Commons Attribution 4.0 International License.