Cura: Horizontal Expansion – Simply Explained

Cura Horizontal Expansion settings can fix dimensional inaccuracies and cure elephant's foot. Read on to learn more!
UltiMaker’s Cura slicing software transforms a 3D model into a G-code file that tells a 3D printer how, when, and what to do. If used properly, the 3D printed part will come out looking and measuring just like the 3D model. But if you’re struggling with dimensional inaccuracies in your printed parts, it might be worth looking into Horizontal Expansion.
Cura’s Horizontal Expansion settings address not only dimensional issues along the X- and Y-axes but also hole tolerances and elephant’s foot. In this article, we’ll tell you all about Horizontal Expansion, how to configure the settings in Cura, as well as when to use them.
Let’s dive in!

All About It
Cura’s Horizontal Expansion feature allows you to adjust the size of the model along the horizontal X- and Y- axes. It essentially increases or decreases the dimensions of the model in the XY-plane.
When you adjust the Horizontal Expansion value, Cura modifies the toolpath of the model to compensate for the changes. Increasing the value expands the model outward, making it larger along the XY-plane. Decreasing the value shrinks the model inward, making it smaller.
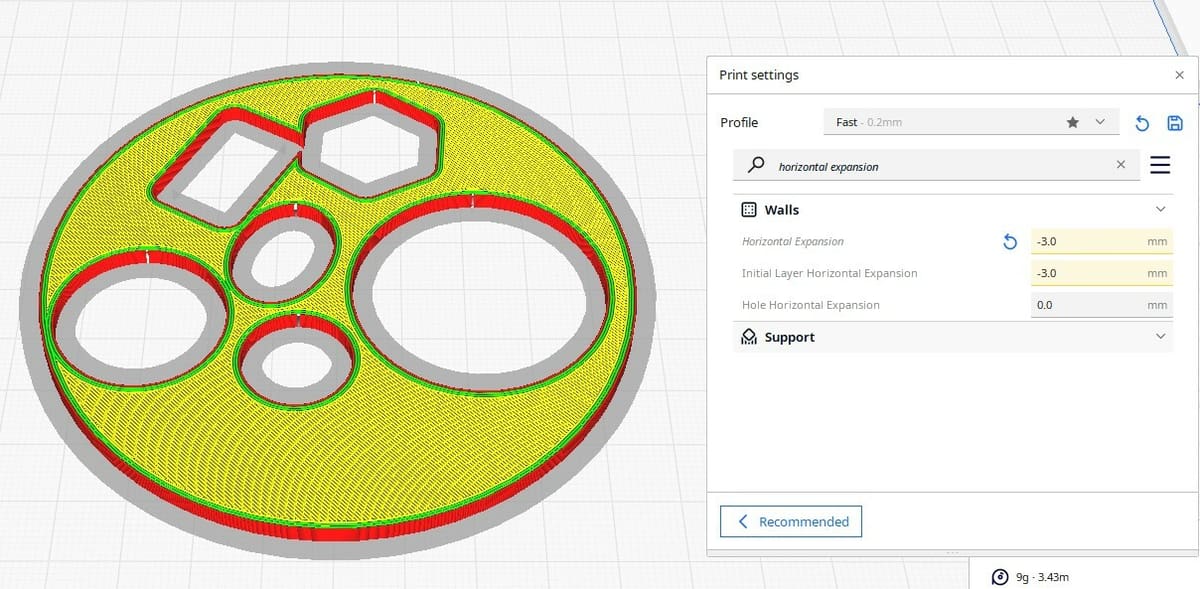
It’s important to note that values entered in the Horizontal Expansion settings are offsets. This means that the value is applied in both directions of the X- and Y-axes. For example, if a hole is measured to be 0.25 mm too small, a +0.125 offset would be needed.
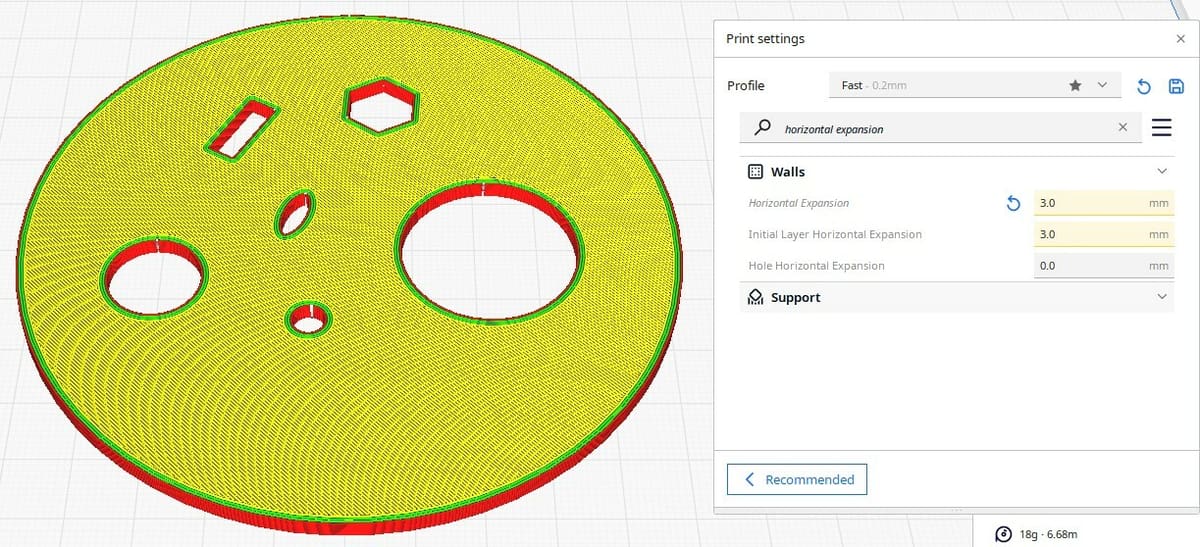
In the image below, we’ve entered a negative value for the setting – an exaggerated 3 mm so the effects of the setting are clearer. The shaded region represents the reduced size of the original object. By subtracting 3 mm from the entire part, it’s easy to see that its diameter will be reduced by 6 mm.
Although Horizontal Expansion may sound similar to Cura’s Scaling Factor Shrinkage Compensation settings, it’s a bit different. When a material is heated and extruded, it expands. Shortly thereafter, it cools and contracts (shrinkage). This leads to dimensional values that are smaller than they should be.
The shrinkage setting increases or decreases the overall size of the part by a percentage change, with 100% being the original scale of the object. To mitigate shrinkage, the shrinkage compensation settings are typically used with values greater than 100%.
In contrast, the Horizontal Expansion settings use specific values, typically in the fractions of a millimeter (~0.25 mm, for example). They can be useful in situations where you need to compensate for natural variations or inaccuracies in the 3D printer. Other potential use cases include achieving a better fit for interlocking parts, compensating for clearance issues, or adjusting the overall size of the printed object.
Settings
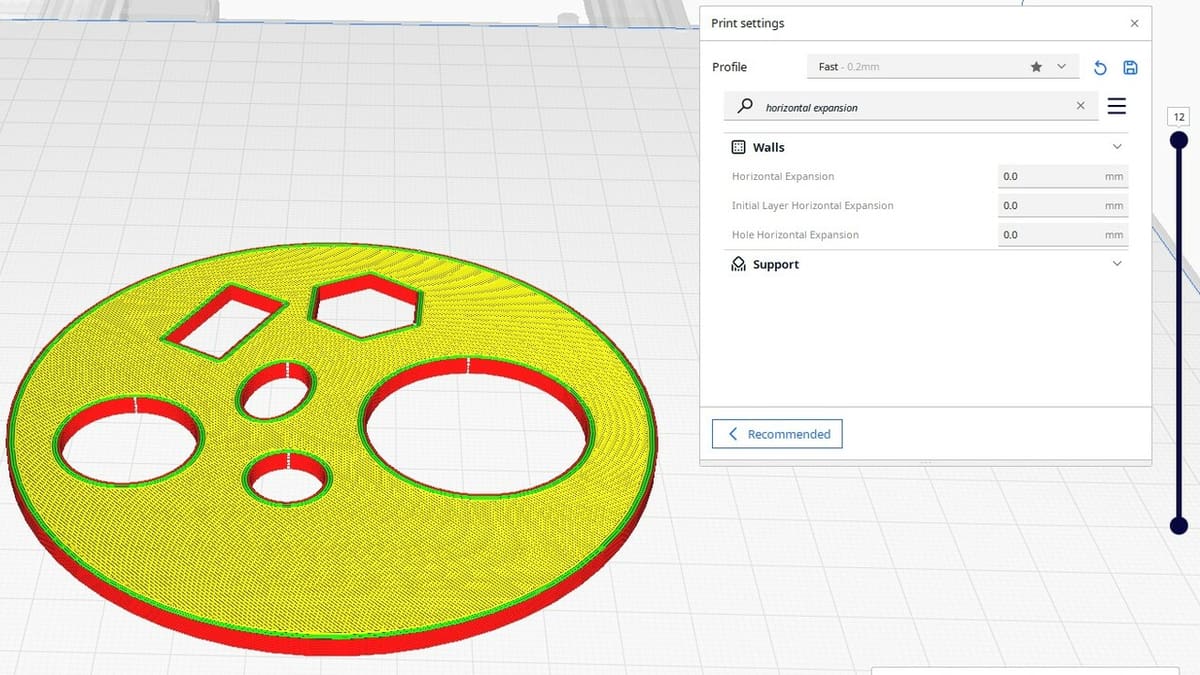
Cura’s Horizontal Expansion settings are located under the walls section but can also be found by typing “Horizontal Expansion” into the settings search bar. After locating the settings, you’ll find the following three options:
- Horizontal Expansion: A higher value corresponds to expanding the XY dimensions of the entire object, while a decreased value shrinks dimensions across the object. For example, if an object was 5 mm in width (X) and 10 mm in length (Y), entering +0.1 mm will increase the width and length to 5.2 mm and 10.2 mm, respectively.
- Initial Layer Horizontal Expansion: A common issue for the first layer of a print is over-extrusion. Minimal over-extrusion on the first layer can be helpful for bed adhesion and print stability on the subsequent layers, but too much over-extrusion can lead to elephant’s foot. Too high of a bed temperature, printing at a lower height for the first layer, and sometimes a slower print speed for the first layer are all contributing factors to over-extrusion. Adjusting the Initial Layer Horizontal Expansion setting to a negative value can help eliminate elephant’s foot. Try a value of half the line width and go from there.
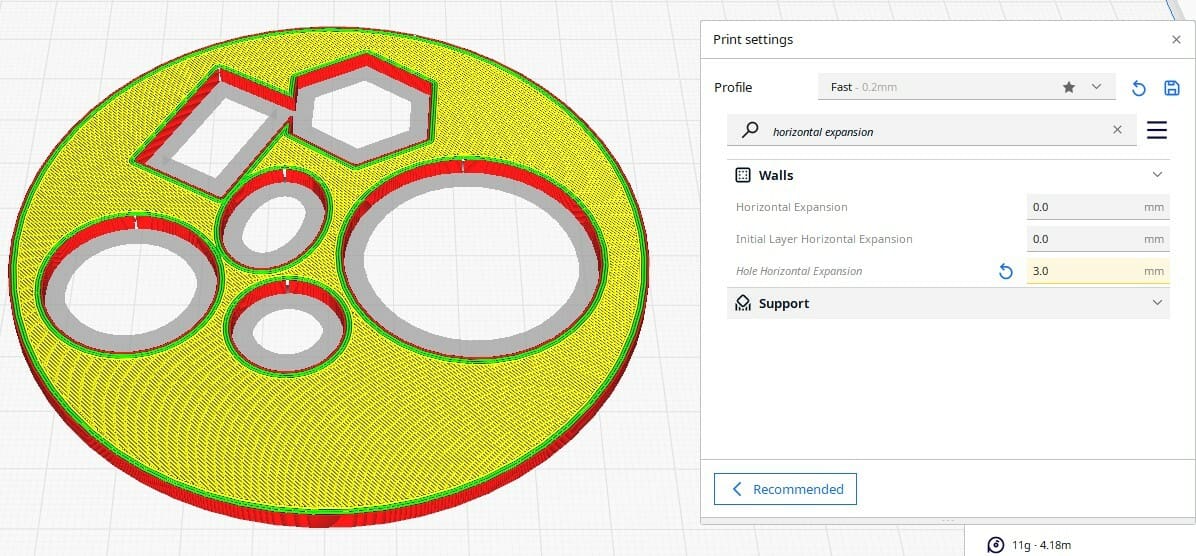
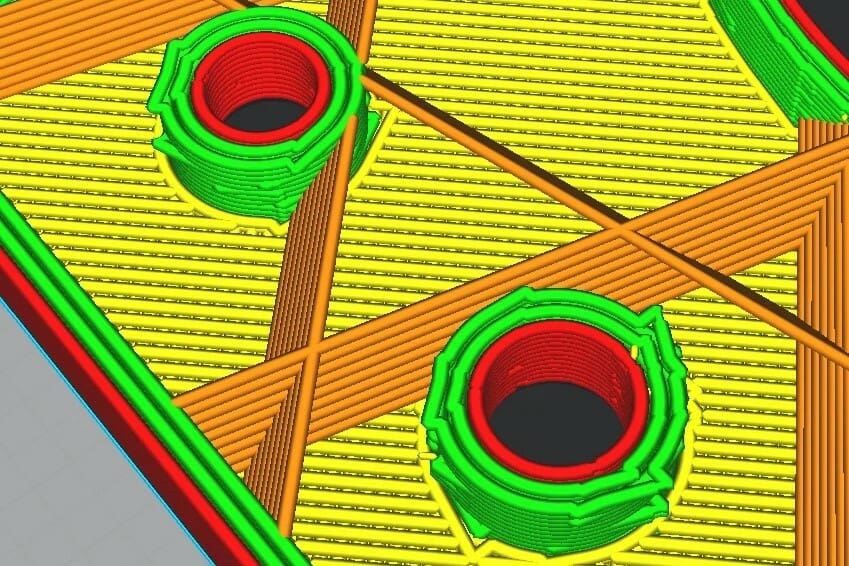
- Hole Horizontal Expansion: This setting adds an offset to each hole on the XY-plane for every layer. When printing circles or holes, the toolpath is delineated into a bunch of short, straight lines that together form curves. The toolheads’ circular motion can drag the deposited material toward the center of the circle, leading to holes that are slightly smaller than their intended value. If a hole is measured to be 0.5 mm too small, applying a +0.25-mm offset should get the next printed hole right on the money.
Benefits
When printed parts have measured dimensional values that differ slightly from the model, or the first layer of a part displays elephant’s foot, Horizontal Expansion may offer a solution. Dimensional accuracy is especially critical when you’re joining printed objects together to form a mechanical assembly. If an assembly has conjoined parts like gears, shafts, and screws, that’s when tolerances and clearances need to be spot on.
Dialing in the Horizontal Expansion and Hole Horizontal Expansion settings will ensure tighter tolerances and better fitting parts. Cura’s Initial Layer Horizontal Expansion setting also has the ability to remedy over-extrusion or too much bed smoosh.
Challenges
Cura’s Horizontal Expansion settings are a nifty feature, but it’s important to recognize their limitations. The following are a few examples of when the settings won’t help you out.
If the dimensional inaccuracies in a printed part are inconsistent (i.e. differing amounts in the X- and Y-axes), adjusting the Horizontal Expansion settings will not solve the problem. For example, let’s say we have a part that measures 1.95 mm wide (X-axis) and 5.75 mm in length (Y-axis), although the intended dimensions should be 2.0 mm wide and 6.0 mm in length. Adding a Horizontal Expansion of +0.025 mm would yield measured values of 2 mm wide and 5.80 mm in length.
If you’re printing multiple parts simultaneously and want to apply a positive offset to the Horizontal Expansion or Initial Layer Horizontal Expansion settings, make sure that the parts are not too close together so as to overlap one another. Cura will show the positive offset as a shadow surrounding the perimeter of the part, which represents the new footprint of the part.
If dimensions along the Z-axis are measuring too small or large from the nominal value, Horizontal Expansion settings, as the name implies, will not help there. Using the Vertical Scaling Factor Shrinkage Compensation setting would be the right move to solve that issue.
When a model has fine lettering, especially with zeroes or Os, adjusting the Hole Horizontal Expansion setting could negatively affect the quality of the lettering. This can usually be spotted before printing in the slicer. Making the text’s case size larger should eliminate this issue.
Cura’s Horizontal Expansion settings can be a great, quick fix in the right situation. It might be a bit confusing at first, but doing a few prints, taking some quick measurements, and tinkering with the settings will make you an expert on how and when to use Horizontal Expansion settings in Cura.
License: The text of "Cura: Horizontal Expansion – Simply Explained" by All3DP is licensed under a Creative Commons Attribution 4.0 International License.