Cura Support Blocker – All You Need to Know

Cura's support blocker feature is great for preventing supports from being where you don't need them. Read on to learn more!
What Is It?

Supports are the added structures designed to hold up a part as it’s 3D printed. Although they can be a pain to deal with and remove sometimes, they’re necessary on certain models because 3D printers can’t build structures in mid-air!
The placement of supports and how they’re printed are determined by the settings in your 3D slicer, the program that turns a 3D model into G-code that the printer can interpret. Ultimaker’s Cura is one of the most popular slicer options, and it contains many useful settings for controlling how parts are printed. These settings control different aspects of the printing process and enable users to improve print quality.
In most 3D slicers, including Cura, you can set an overhang angle, which tells your slicer to only produce supports in areas of the print where an overhang meets or exceeds the set angle. While this setting is great for preventing unnecessary supports on lesser overhangs, there may be a situation where you want supports to hold up one area but not another of the same angle.
In this case, Cura’s support blocker is a super handy tool that you can use to prevent supports from being printed in certain areas. The tool, sometimes known as a support eraser, generates small transparent blocks when you click your cursor after activating the tool. These blocks can then be placed wherever you don’t want supports.
In this article, we’ll go over how Cura’s support blocker works, how to use it, and some tips to help get the most out of this feature. We’ll also discuss a few other techniques and special settings for supports in Cura. Enjoy!

Use
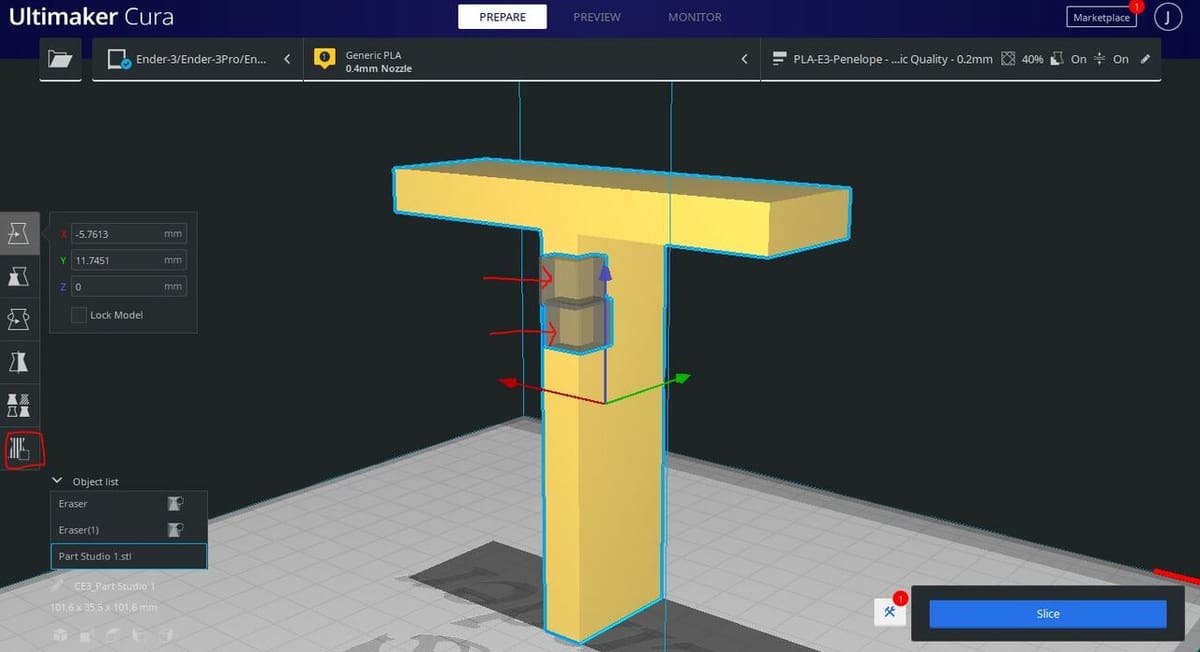
The first step to using any slicer tool is to find where it’s located. The support blocker tool isn’t actually grouped with the majority of the support settings. Instead, this feature can be found on the left side of the “Prepare” tab, and it’s the shaded line icon at the bottom of the toolbar (outlined in red above).
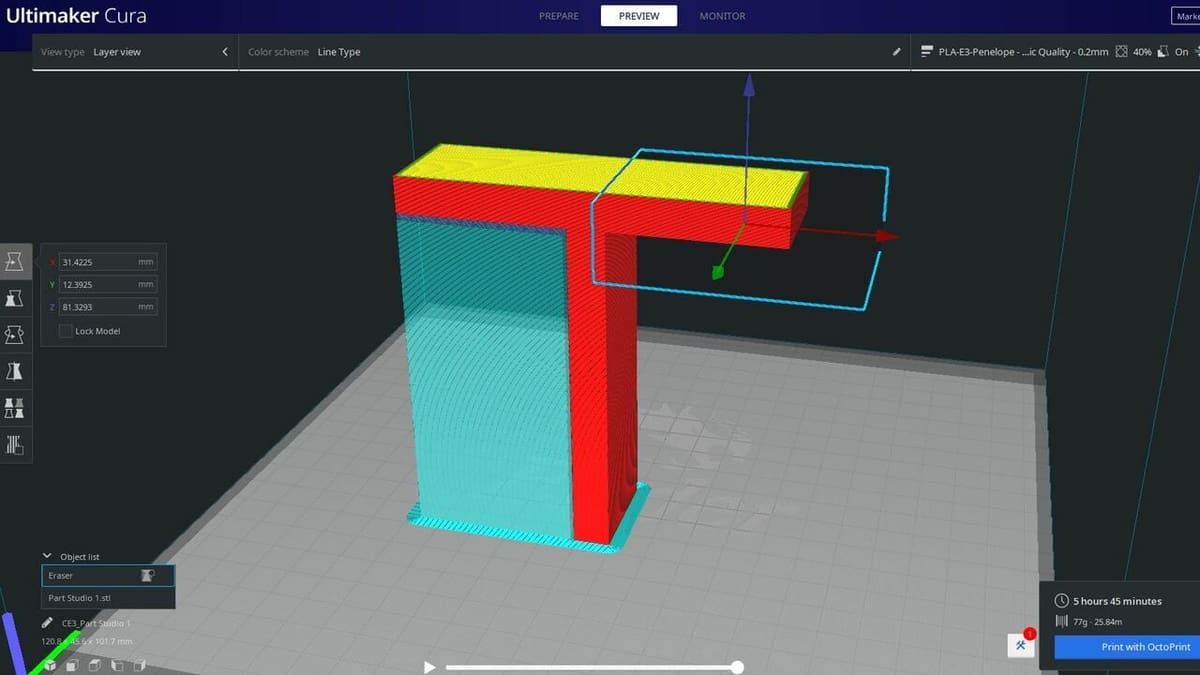
You’ll first want to import your desired model and click the support blocker button. Then you can click on your model to place the support eraser blocks where you don’t want supports. (Wherever you click when this tool is activated, shaded blocks will appear, indicating where the support blocker’s area of influence is.) You can individually scale each block, in the same way you would scale a model, to cover a larger or smaller area of the model.
The support blockers will only prevent supports from generating when placed on the source of the supports, which is the model’s overhangs. On this note, you don’t have to place support blockers where a support structure would be, only where the overhang is. If you accidentally place too many, you can delete them by exiting the tool and selecting the ones you want to delete.
Also, don’t forget that even if you’re using the support blocker tool, you should still set your desired overhang angle: This setting still matters for all the support structures you don’t want to block.
PrusaSlicer, another popular 3D slicer, has a similar support blocker tool. However, the support blocker tools differ in a few ways. For one, Cura’s support blockers are 3D cubes that you have to place one by one, while PrusaSlicer’s blockers are 2D marks (in color) that you can paint onto the surface of a model. Another difference is that in PrusaSlicer, you can adjust the brush size to change the size of the blockers, while in Cura, you have to scale the individual cubes.
Example

Let’s say you have a box with overhangs that reach a 45° angle, and you only want supports on one side of the object. To achieve this, you’d activate support structures in Cura by checking the “Generate Support” checkbox. Then, you’d set the “Support Overhang Angle” to 45° to get your slicer to generate supports on both sides. Finally, you’d click the support blocker tool and place the blocks at the source of the overhangs on the side where you don’t want supports.
Tips
Our first piece of advice might seem obvious, but it’s worth saying: Make sure that you don’t accidentally place a support blocker cube in an area where you want supports to be generated.
This can be a little bit tricky as the dimensions of the cube aren’t easily adjustable. However, as one user pointed out, you can zoom right in on the 3D model to reach tight corners, or zoom out to cover larger sections at once.
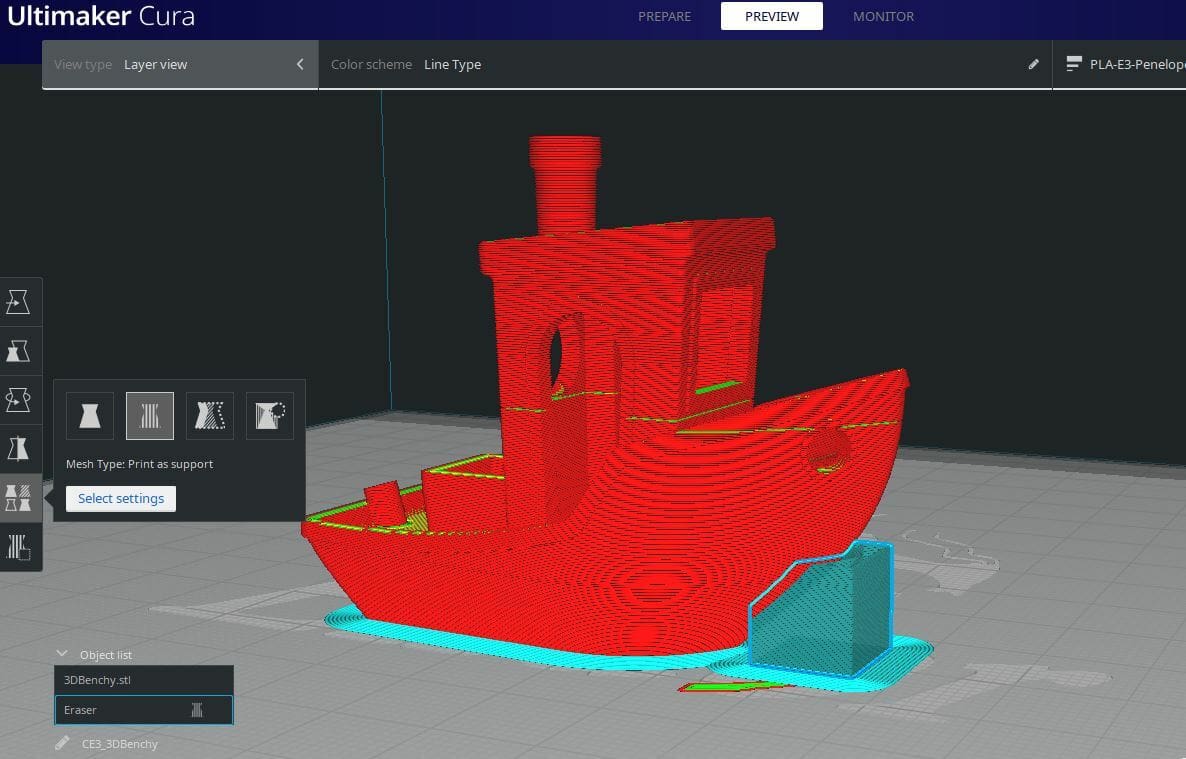
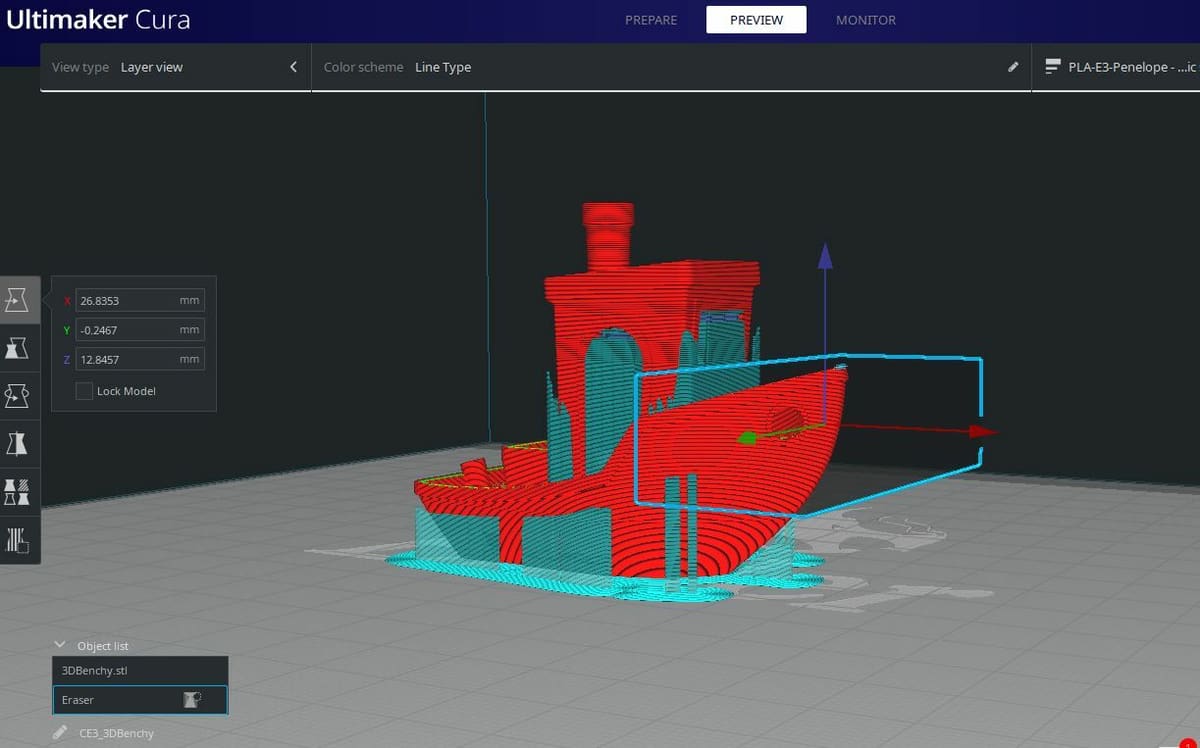
Another tip is to use Cura’s layer view mode to check that your support blockers are functioning as you want them to. You can do this by clicking the “Preview” tab button in the top part of Cura. Once you’ve sliced your model with the support blockers in place, you can see the exact way your object will be printed, including any support structures, and make adjustments as necessary.
Other Techniques
In Cura, there are other special support features besides support blockers, most of which are located in the “Support” settings section. Under the “Per Model Settings” button, located one button above the support blocker tool on the left side of the Prepare tab, there are four options to control how Cura’s slicing engine should interpret your model.
In this section, we’ll go over three of these four features. The first button – “Normal model” – doesn’t change anything.
“Print as Support”
The second button of the four is the “Print as support” feature, which tells Cura to treat your imported 3D design as a support structure, even if it’s not supporting any overhangs. This tool can be used in a few different ways but is mainly useful if you’ve designed a custom support structure for a model.
A good example of when using this tool would be helpful can be found in a popular crescent wrench design from Thingiverse. The crescent wrench has a gear sub-assembly, but Cura doesn’t know this and would normally treat the overhangs like any other structure requiring support. Without intervention, the auto-generated supports from Cura could be harmful to the functionality of the wrench.
Luckily, though, the creator of the model designed a pre-installed support structure for the wrench. Although the structure is built into the wrench’s design, let’s pretend it’s not for explanation purposes.
If you wanted to use this special support (or any custom support on any model), you could import both your main design and the assistive structure to Cura and then set the mess type of the designated support component to “Print as support”. This would allow you to use a custom, non-standard support structure for a complex model where normal supports may not work properly or could be too hard to remove.
While this setting perhaps isn’t as useful as the support blocker tool, the “Print as Support” feature is great in some scenarios. Specifically, the tool is amazing if you’re printing complicated designs where you want to use custom-made support structures rather than basic Cura supports.
“Modify Settings for Overlaps”
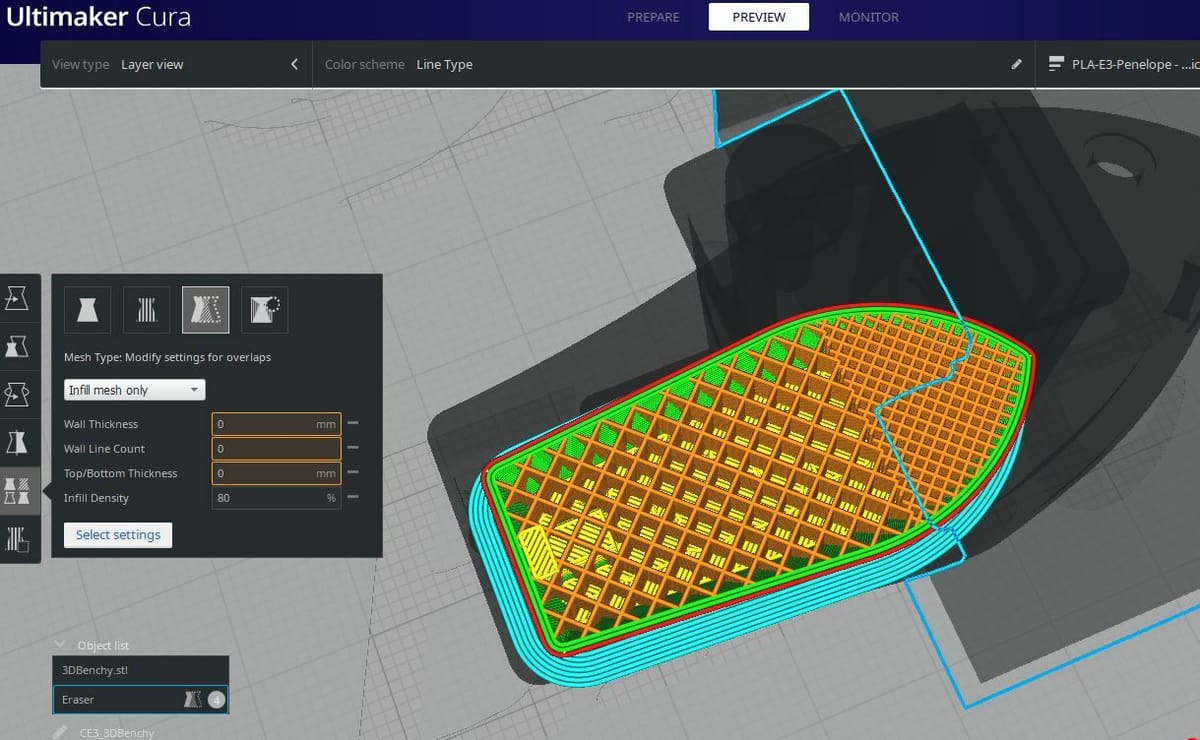
The third button is “Modify settings for overlaps”. This feature tells your slicer to treat areas that overlap with the selected mesh differently from the rest of the model. This allows you to alter the print settings just for the overlapping areas, so for example to only create supports in the sections of a model that overlap with another.
For another example of when to use this setting, let’s say you have a calibration cube and you want half of the cube to print with a 50% infill density and the second half to print with a 75% infill density. You could achieve this by importing your calibration cube model and importing another design that will overlap with half of the cube.
From there, you can set the cube to a 50% infill density and then move the second design to sit halfway up the cube. After this, set the mesh type of the second design to “Modify settings for overlaps”, click the “Select settings” button, and check the “Infill Density” option. Finally, change the value to 75%, and slice your model!
“Don’t Support Overlaps”
The fourth button is called “Don’t support overlaps”. This type of mesh is the easiest to discuss because we’ve already talked about it throughout this article. Essentially, setting a model to “Don’t support overlaps” turns that whole model into a support blocker.
In fact, when you add a support blocker cube to your model, you’ll notice that in the bottom right corner of the Cura interface, in the “Object list”, the support blocker is labeled “Eraser”. To the right of “Eraser” is an icon that tells you that it doesn’t support overlaps when you hover over it with your cursor.
This type of mesh tells your slicer not to let anything overlap or cross through the mesh’s path. Doing so eliminates the ability for the slicer to generate supports to an overhang if the supports would cross paths with the mesh. In some cases, this might be an easier route than adding individual support blockers, but it will always depend on your specific model.
License: The text of "Cura Support Blocker – All You Need to Know" by All3DP is licensed under a Creative Commons Attribution 4.0 International License.