The Best Ender 3 (V2/Pro) Bed Leveling G-code

Leveling G-code can be used to aid and test the bed leveling process. Read on for some great Ender 3 (V2/Pro) bed leveling G-code!
We all know that annoying feeling of having to level the bed again after having recently done so multiple times. Manual bed leveling involves adjusting the height of various points on your print bed so that the nozzle is the same distance from it anywhere in the XY-plane.
If you don’t want to spend the money ($30-$50) or time to install an auto-bed leveling (ABL) device like the BLTouch, you’ll have to level your bed manually. In the long run, this manual process costs time, and often you have to re-level your bed multiple times if you over- or under-compensate the adjustments.
The Creality Ender 3 is a great consumer and budget 3D printer, and its successors, the Ender 3 Pro and Ender 3 V2, are also spectacular printers for their prices. Yet, while these machines are embraced by 3D printing enthusiasts worldwide, they all lack ABL technology, so manual leveling is necessary. Luckily, there’s an easier and more precise way to manually level your bed than pushing and pulling the printhead around.
Leveling G-code, which can take the shape of either leveling script or a test print, is a form of assisted bed leveling where you use automated mechanical motion to help and test the leveling process. In this article, we’ll be going over a few different options for both leveling scripts and test prints for the Ender 3. But before that, let’s take a closer look at what leveling scripts and test prints are.

Types
As mentioned, leveling G-code basically comes in two versions: leveling scripts and 3D printable tests.
Leveling Scripts
A G-code script is a collection of G-code commands, which are the instructions your 3D printer reads and performs to move, heat, extrude, and more. Scripts, when it comes to bed leveling, utilize the printer’s ability to precisely move a certain distance to provide you with a semi-autonomous way to level your bed.
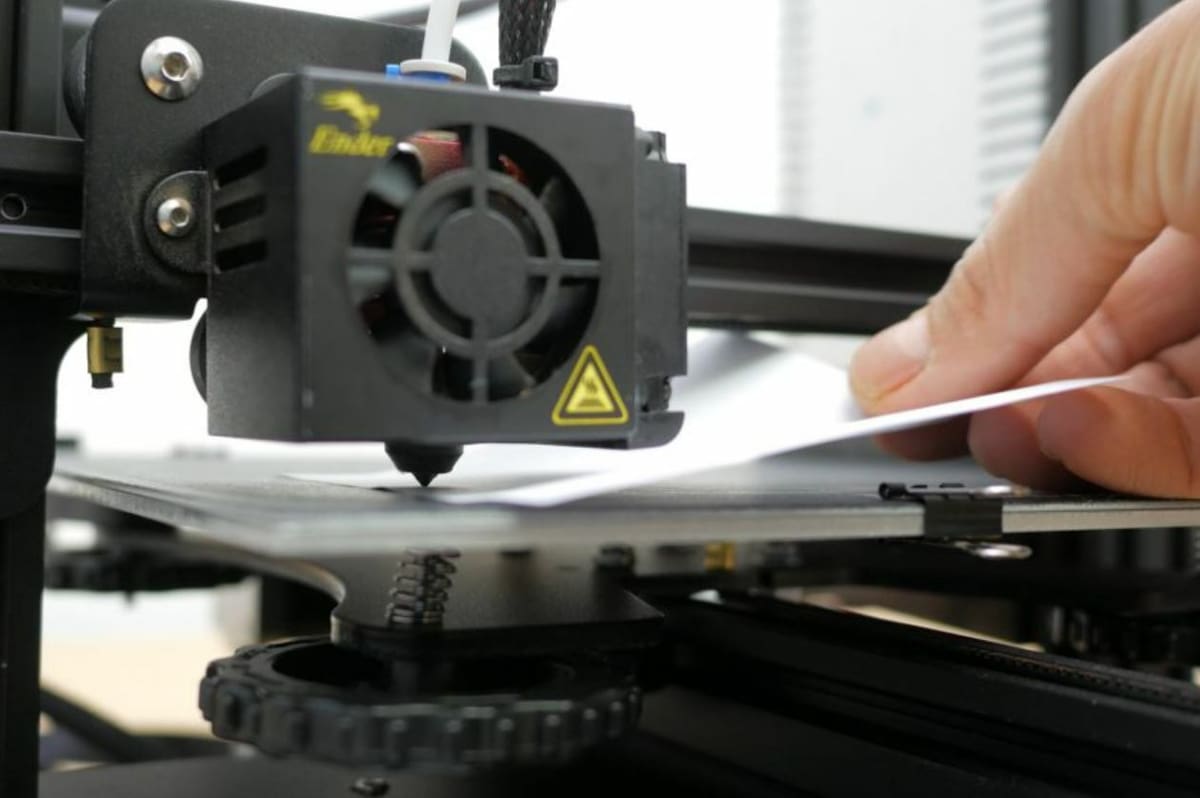
When you run the script, the printer will mechanically move the printhead to a certain point on the bed. Then you can manually level it, using the bed leveling knobs and a piece of paper to control how high or low the bed is relative to the nozzle.
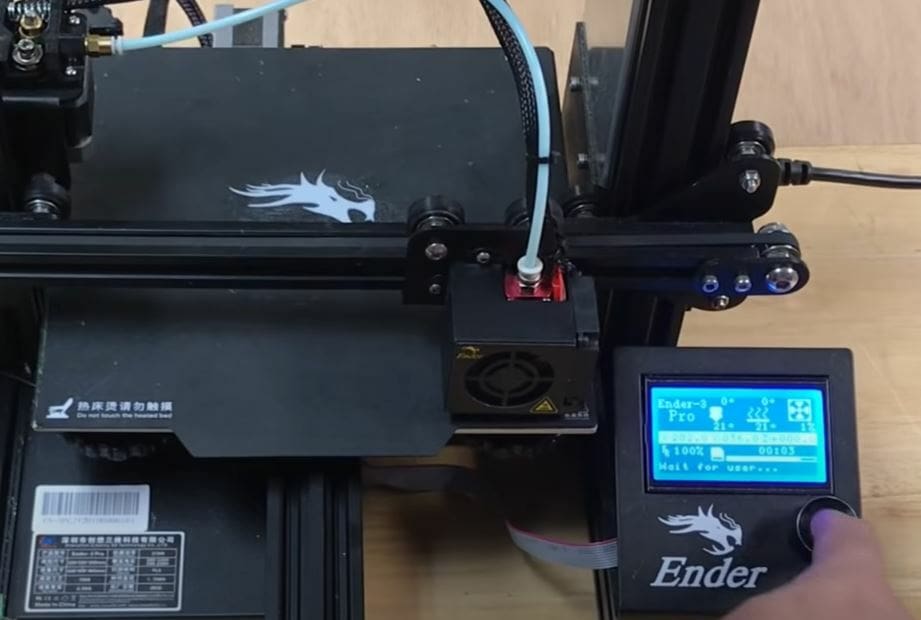
Once you’re finished, you can click on the printer’s interface (scroll wheel), telling it to move the printhead to the next leveling point. This is possible because many leveling scripts capitalize on a pause feature in the printer’s firmware, allowing you to move to the next leveling point only when you’re done with the current one.
Printable Tests
In the context of leveling G-code, a 3D printable test is a small, usually single-layer design that covers different areas of the bed so that you can visualize the levelness. Areas where the bed is too high will result in a thin faded print, while areas where the bed is too low will result in thick or floating (detached) lines. Once you see the different parts of the model, you can use this information to adjust your printer’s leveling screws.
Next, let’s go over what aspects to look for in bed leveling G-code before going over some examples.
What to Look For
When in the market for bed leveling G-code options, there are a few things you might want to think about.
Leveling Scripts
First of all, you want to first make sure that a script is compatible with the Ender 3 (Pro and V2) and will actually fit the printer’s build space. All three versions of the Ender 3 have the same bed dimensions, so you can always use a script meant for an Ender 3 model other than what you have.
Next, it’s best if the script moves your printhead to at least four points, one for each corner of the bed. The more points, the better the levelness. A script with around 5-10 points is best because, hopefully, this will cover at least the four corners of the bed and the center and possibly have two passes at each point. (Naturally, more points also means more time.)
Lastly, make sure that the script heats the print bed. Materials expand when heated – especially the Ender 3 V2’s glass – so you should level your bed with near the same temperature that you’ll use for printing.
Printable Tests
Like a leveling script, your test print will need to be compatible with the Ender 3. Make sure that the model will fit inside the printer’s 235 x 235 mm build space and isn’t offset. Otherwise, the model might print outside the bed area.
Next, you should ensure that the model has good coverage, preferably extending to near the bed’s edges. Hitting the center of the bed isn’t super necessary if the model reaches the outskirts because, if the bed is level in those areas, the center should also be level (unless your build plate is warped or deformed).
Next, a test print should minimize material consumption and print time. Leveling should be quick, and if you need to do it multiple times, you especially don’t want to waste material or minutes.
Lastly, make sure your test print isn’t too simple. For a test to work reliably, you want the model to have corners, curves, and direction changes, as this further displays if your bed is perfectly level.
Now, let’s get into the leveling G-code selections!
Circle in Square (Script & Print)

To begin with, this leveling script and print test options look to confirm not only that your bed is level, but also, as the creator explains, that the bed is calibrated by checking its center as well as its corners.
Very responsive in the comments section, the maker also explains that, if the process is too slow, the G-code can be modified to increase the travel speed between the different points by altering the linear moves’ parameters.
The YouTube guide also shows how both processes work, and the test print doesn’t consume that much filament and should be straightforward if the printer’s tuned.
- Where to find it: Thingiverse
- Leveling points: Nine (four corners, then center, then follows the order as stated in the project page)
- Speed: Slow
- Shape: A circle in a square
- Creator: Ingenioso3D
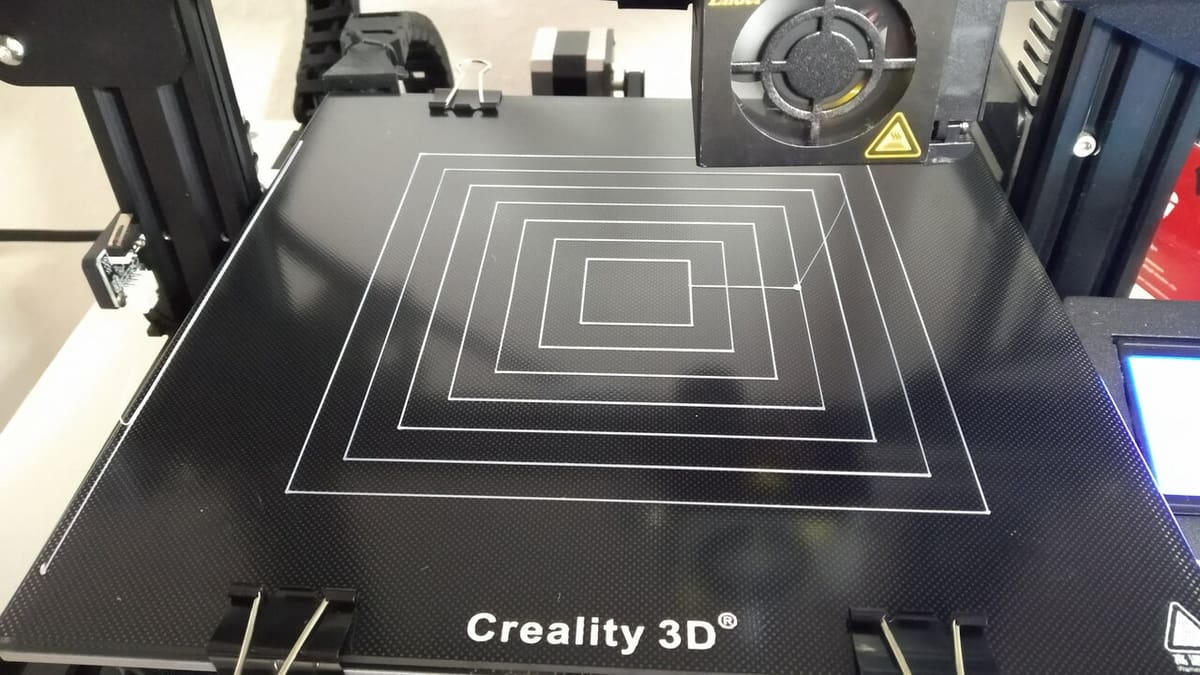
Concentric Squares (Script & Print)
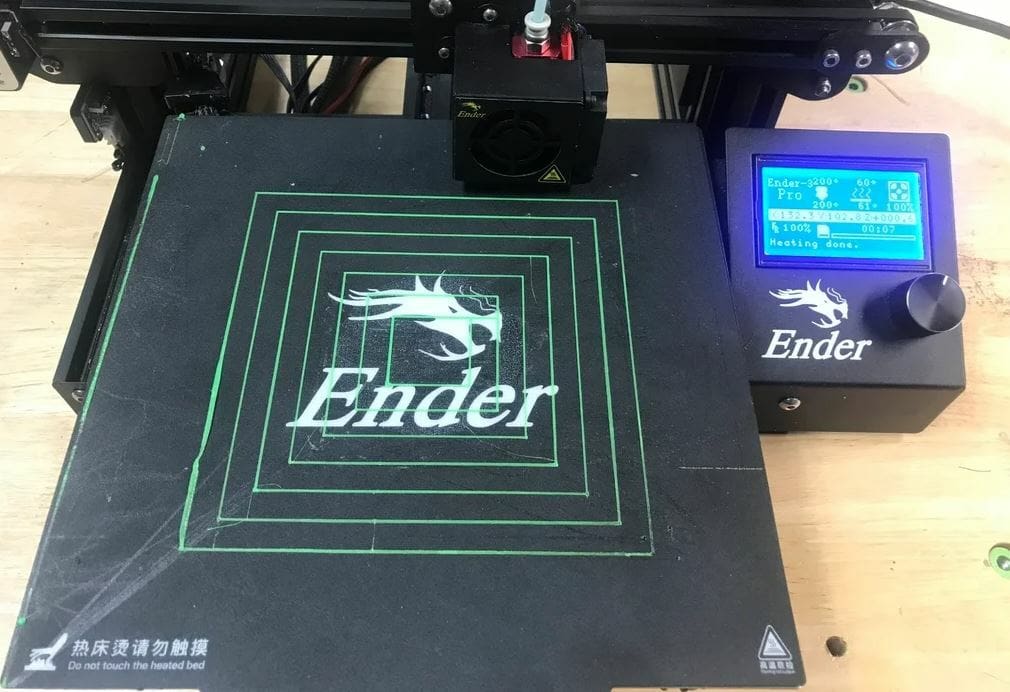
This selection comes from popular 3D printing YouTuber CHEP who is known for his video series Filament Friday. It contains both a leveling script and a test print of concentric squares to help you level your bed. As you can see in Thingiverse, the project is a Remix of the previous G-code leveling script.
The script starts at the corner closest to the home position and only advances when you click the knob. After hitting the corners and the center, it goes to the corners again.
The test prints a few concentric squares that allow you to visualize and physically test the bed adhesion. CHEP recommends gently moving your finger back and forth over the edges as your Ender 3 prints the test. If you rub the lines and they come loose, you need to raise the bed. If the lines are faded, you need to lower it.
While this test may not reach the edges of your print bed, it ensures that the center of your bed, where most 3D prints probably take place, is very level. Also, the test consumes very little material and should be super quick to print.
- Where to find it: Thingiverse
- Leveling points: 10 (four corners, then center, then repeat)
- Speed: Moderate
- Shape: Concentric squares
- Creator: Elproducts
"DR VAX" (Script & Print)
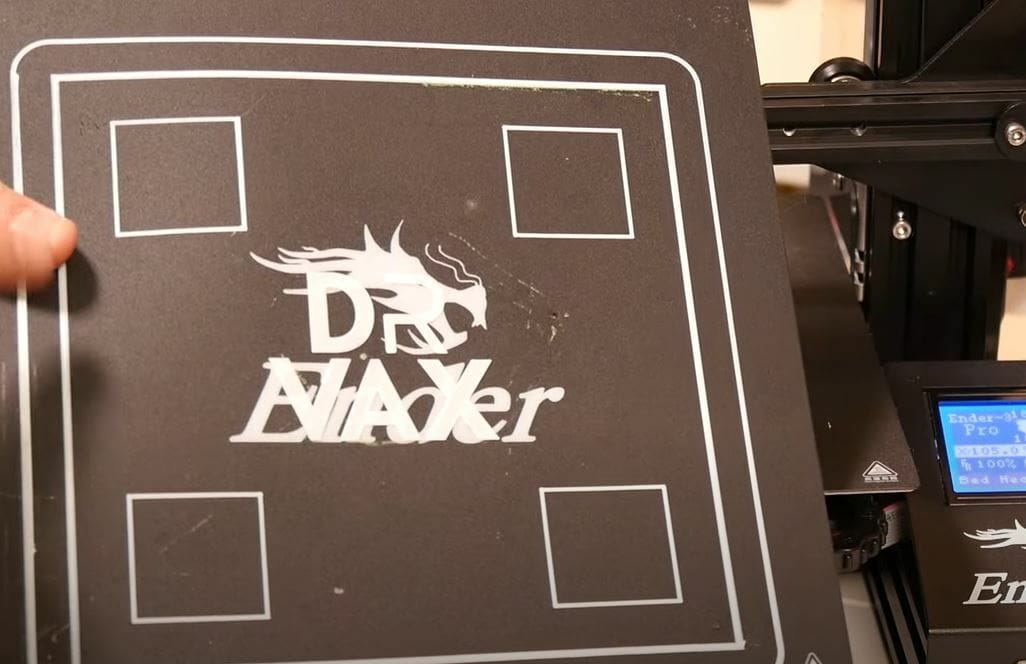
This project contains a script and a print made by another popular 3D printing YouTuber, Make With Tech (MakeWithTech).
The script will first heat your print bed to 40 °C, but you can change this via your printer’s LCD if you have a particular temperature in mind. Once heated, the printer will move to its first leveling position and will beep, signaling that it’s time for you to level the bed manually.
The printer will then go through its leveling sequence, covering four points located at the bed leveling screws, then finally move to the center for the final leveling point. This leveling sequence should be pretty quick, but in the video, it’s apparent that the printhead moves very slowly to each point, so it may take longer than you expect.
The test prints a perimeter, four internal squares, and the text “DR VAX” (the channel’s former name). All the necessary points are covered, and the printing of fine detail is also tested. The test print, however, does take more time.
- Where to find it: Thingiverse
- Leveling points: Five (four corners then center)
- Speed: Slow to moderate
- Shape: Squares, a square perimeter, and “DR VAX”
- Creator: irvshapiro
Perimeter (Script & Print)
This next duo are the quickest of all of the options on the list.
Like the other scripts, you have to click the LCD knob to move to the next leveling point. Based on the demo video (which focuses on the Ender 2, but the creator explains that the concept is the same), the script covers three different points, visiting them two times each.
The test print is super quick and has just one square perimeter around the build plate. The perimeter line should stick well to the bed, and you can test this by gently rubbing your finger over the line to see if it comes loose.
Note that the perimeter is wider than the 0.4-mm diameter of the Ender 3’s stock nozzle, so the printhead will take multiple passes to print the design. This can be nice, as it gives you the opportunity to double-check any on-the-fly adjustments. Importantly, the perimeter reaches the outskirts of the print bed.
- Where to find it: Thingiverse
- Leveling points: Six (three points with two cycles)
- Speed: Fast
- Shape: One square perimeter
- Creator: Jfearnside
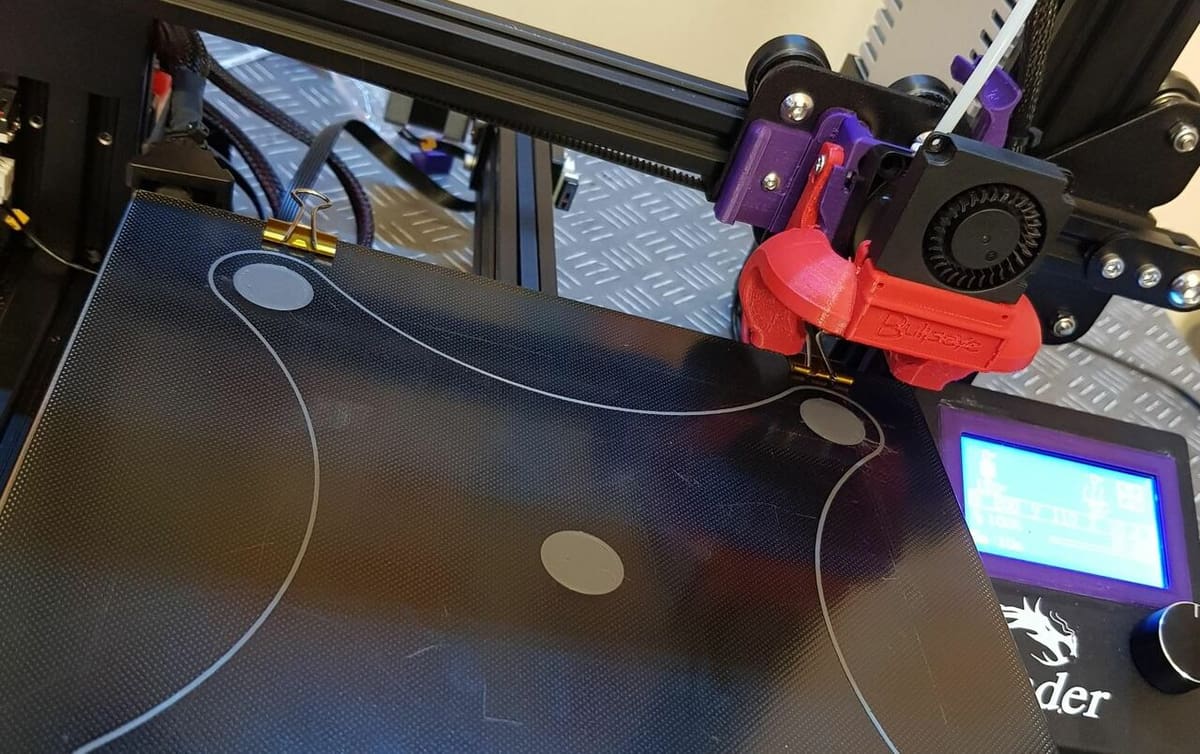
Five Circles (Script & Print)
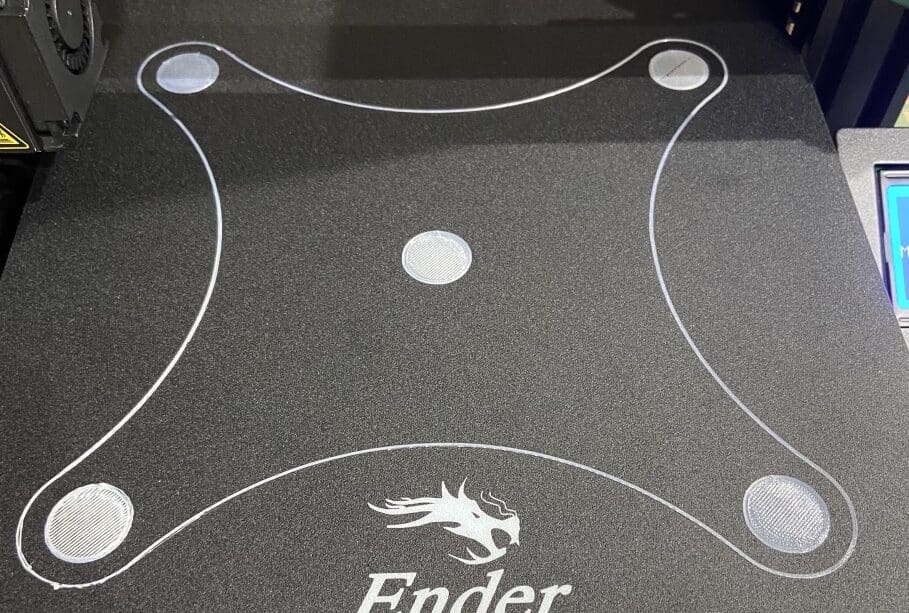
Lastly, we have a project that also contains both a leveling script and a test print, with the latter featuring five circles and a curved perimeter that goes around the circles.
According to the creator, the script will move your printhead to its home position, where you can use a piece of paper and the leveling knobs to level the bed. Then, you can click the LCD knob, and the print will move to another corner of the bed. In total, the script takes the printhead to all four corners of the bed three times. That means that there are 12 different leveling points, which may take a while.
The test print’s shape and design allow you to check how level your bed is near the four corners as well as the center where most prints will probably be located. This test is a good mix of leveling locations, material consumption, and printing time.
Note that the test doesn’t feature any corners, so you could be surprised if your design has any sudden direction changes. Also, while the five filled circles will showcase how optimal the distance is between nozzle and bed, they’ll also take longer to print.
- Where to find it: Thingiverse
- Leveling points: 12 (four corners with three cycles)
- Speed: Slow
- Shape: Four circles and a curved perimeter
- Creator: adamsiem
License: The text of "The Best Ender 3 (V2/Pro) Bed Leveling G-code" by All3DP is licensed under a Creative Commons Attribution 4.0 International License.