Ender 5 Direct Drive: Upgrade Options & How To

If you're having trouble printing exotic or flexible material with the stock Bowden extruder, upgrade your Ender 5 with direct drive!
The Right Direct-ion

If you’ve got a Creality Ender 5 or the Ender 5 Pro then you know why they are rated as some of the best 3D printers under $500.
While both of these printers are great options with a few differences, this article is going to focus on how installing direct extrusion can upgrade them to even better machines. We’ll be going over why you’d want one, which options you have for purchasing, how to install it, and finally some troubleshooting tips. Let’s jump in!
Bowden vs. Direct
When it comes to FDM 3D printing, most machines use either the Bowden or direct extrusion technique.
The Bowden extruder uses a stepper motor (attached to the frame) to push filament through a tube to the print head. This keeps weight off of the printing head, provides cleaner movements, and gives you a larger build volume. However, it can sometimes lead to stringing, clogs, or stripped filament. Many budget machines come with Bowden extruders because they provide fast, accurate prints with common materials.
In contrast, direct extruders have the stepper motors directly on the printer head. This allows the filament to be pushed directly into the hot end, providing greater retraction accuracy. Flexible and abrasive materials are able to be printed more reliably, and there’s less stringing and oozing from common materials. Conversely, the added weight to the print head can cause loss of accuracy when printing fast.
To get the best results with more advanced materials, a direct extruder is a welcome upgrade. Now that we know why we want a direct, let’s take a look at how to pick the right one.
Choosing an Extruder Kit
There are a few different manufacturers and design options to consider when upgrading to a direct extrusion setup. An affordable option is using the stock stepper motor and attaching it to the print head via a modified mount. Alternatively, other options include the stepper motor inside the extruder head for a more streamlined mechanism.
Let’s take a look at some popular options that work well with Ender 5 printers:
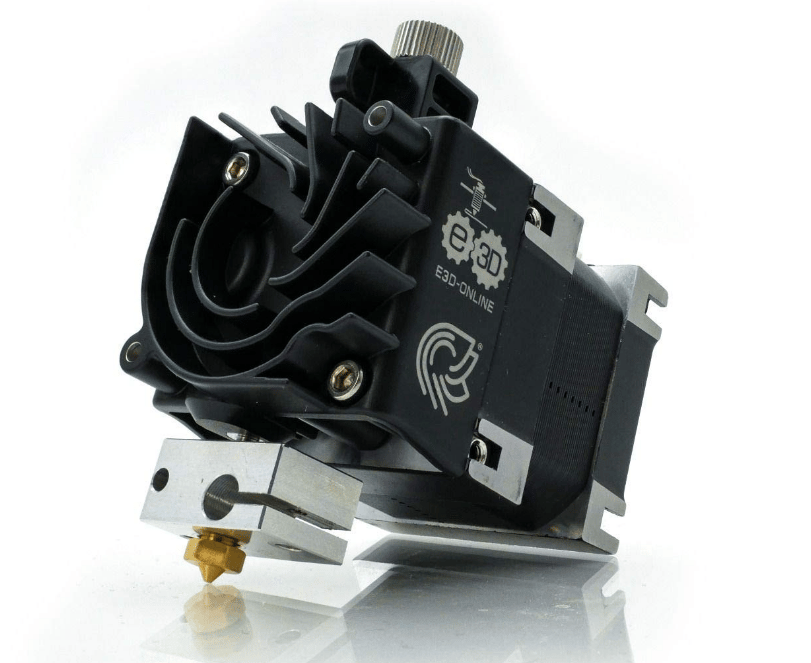
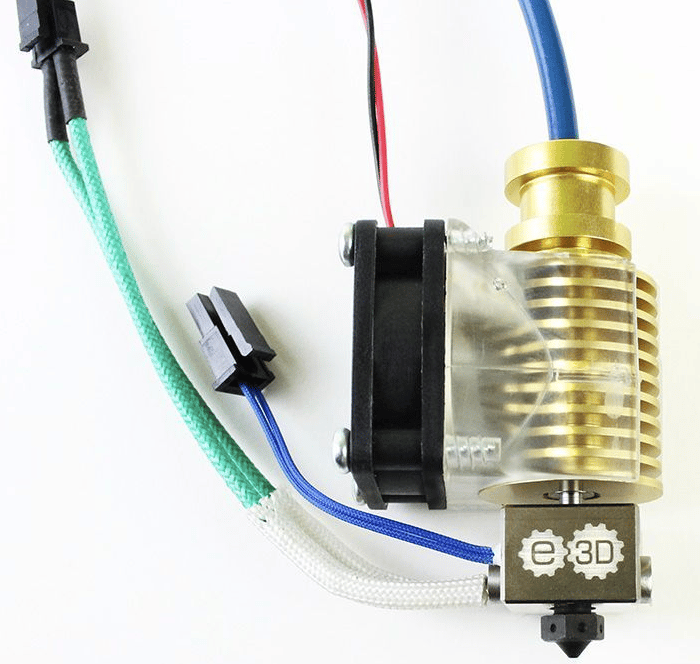
- E3D Hemera Direct Kit: E3D is among the highest-rated developers of hot ends and extruders for all types of 3D printers. The Hemera in particular is precise, low profile, long-lasting, provides wide accessory compatibility, and only costs around $120. This extruder is one of the most popular options for the Ender 5 and the one we’ll be installing in this article.
- Fargos Ender 5 Direct Upgrade Kit v1.2: This great budget option can be found for as low as $40 that relocates the stock stepper motor from the frame to the extruder head. This easy-to-install kit includes a new X carriage mount that holds the stepper motor directly on top of the extruder providing greater extrusion control.
- Micro-Swiss Direct Extruder: Another budget option just under $100 that utilizes the stock stepper motor, this pick requires a slight modification of the X carriage mount to fit on the Ender 5. We expect a new extruder to be released soon that needs no modifications. Micro-Swiss includes an upgraded filament spring clamp and an all-metal hot end in the assembly.
- Flexion Extruder: Developed specifically to work with flexible materials, this extruder comes in a range of prices, from $99 to $249. Flexion extruders are able to be used with the Ender 5 and can utilize the popular E3D hot ends. This pricier option is highly rated on prints with flexible materials like Ninjaflex.
- M3D QuadFusion Print Head: This expensive and interesting extruder is something more geared toward professionals or experienced hobbyists. If you require a full-color spectrum direct extruder, than this one’s for you. If you go with the QuadFusion, you’ll need to switch out the stock controller board to the Duet 2 Maestro Board. The price for both the print head and control board comes to about $429.
Alternative Manufacturer
Using an extruder developed by another 3D printer manufacturer is also an option. Choosing an upgrade that isn’t specifically for the Ender 5 will usually require modifications to hardware and occasionally software. As a result, this extra work can yield high-quality results and expand the Ender 5’s capabilities. If you want to go outside the norm, look around at manufacturers like Flashforge or Lulzbot that provide replacement extruders which could be made compatible with the Ender 5.
3D Printed Mount
3D printing your own direct extruder mount and using the stock extruder is a cheap and efficient way of turning your printer into a direct extrusion machine. A quick browse of Thingiverse will point you to several different mounts to try out. If those don’t work, consider designing your own that fits your needs.
Keep in mind that several purchased options may require 3D printing a new mount. Most manufacturers include the STL file in the purchase or have it available on their website though. Take a look at the prices and capabilities of each option and once you decide, read on to begin with your extruder upgrade in the next section!
Removing the Hardware
To get started, first, the old components will need to be taken off.
The Hot End
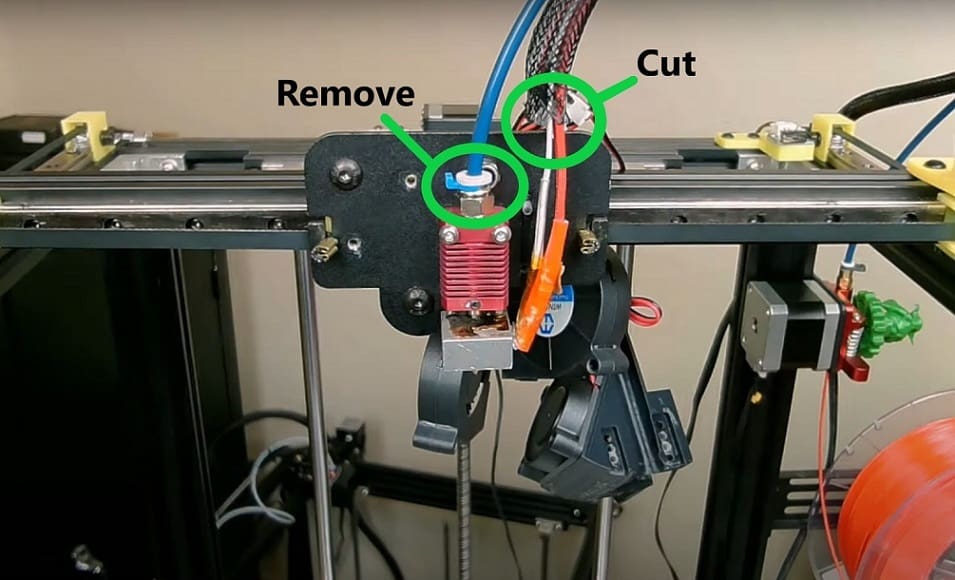
- Unplug any wires and tubes leading into the print head assembly. This prevents damage to the components that’ll be used later and allows easy access to the parts that must be removed.
- Unscrew the two M3 screws that attach the fan shroud and take it off.
- Unscrew the two M3 screws holding on the stock hot end and remove the hot end.
- Cut the red and black wires for the hot end cooling fan, the blue and yellow wires for the cooling fan, the two red wires for the heater cartridge, and the white wire for the thermistor.
The Extruder
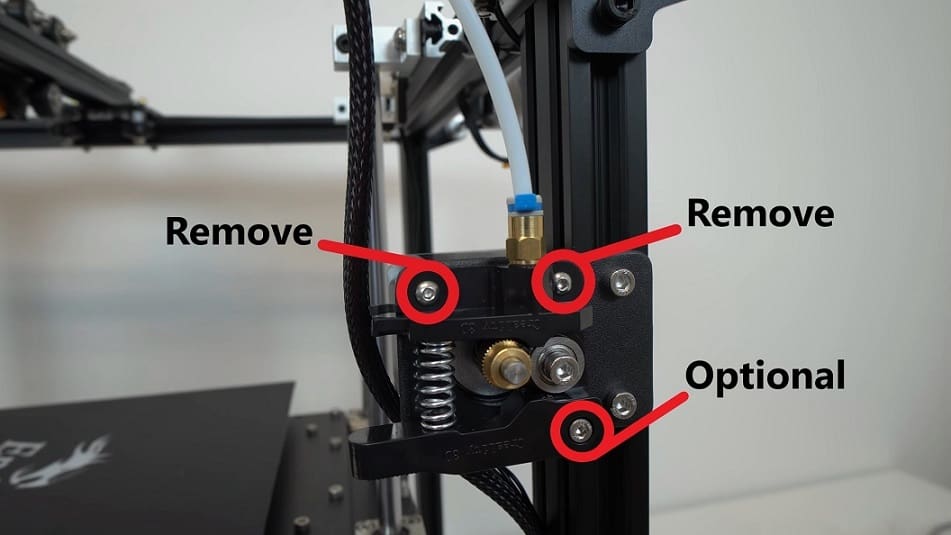
- Unplug any wires and tubes leading to or from the extruder.
- Unscrew the M3 screws holding the old servo to the frame and detach it. The remaining Bowden tube can be used as a guide for the filament and allows the stock filament spool holder to remain functional.
- If there’s unwanted tension on the filament, take out the spring of the filament extruder clamp attached to the frame to release it.
Attaching the Hardware
Attaching the new hardware is a rather involved process. It will require a 3D printed bracket, some light soldering, and the use of heat shrink tubing for best results. (The bracket that’s needed comes in two easy-to-print pieces.)
Now, let’s dive into setting up the new extruder.
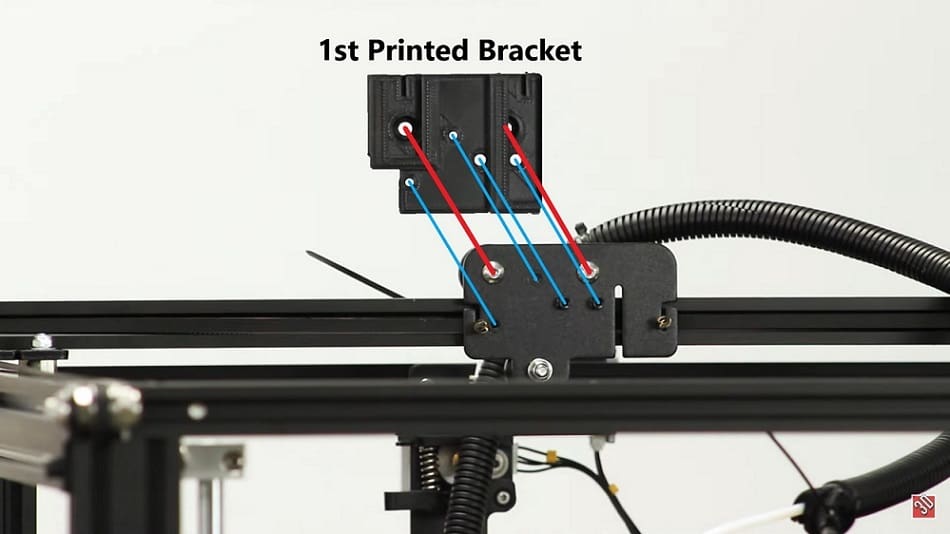
First, you’ll want to mount the bracket.
- Take your printed bracket mount and make sure the larger holes line up with the X carriage mount screws. Check that any other corresponding holes line up too.
- Use the two M3 screws that hold the stock fan mount on to screw through the printed bracket’s two smaller holes to attach it onto the X carriage.
- Take two of the square nuts included in the Hemera package and slide them in the T-slots opposite the side of the labeling.
Then, you’ll mount your extruder.
- Align the Hemera extruder to the remaining mount and use four M3x8 screws to screw them together.
- Slide two square nuts into the Hemera’s remaining T-slots and attach the fan by screwing in two M3 screws.
- Screw the extruder nozzle finger tight into the heater block. (It will be tightened later when the nozzle is heated.)
- Attach the heat break to the opposite side of the heater block.
- Screw the heater block into the bottom of the Hemera extruder system.
- Insert the thermistor into the heater block and attach it with the included set screw.
- Insert the heater cartridge and tighten the clamp by tightening the clamp screw.
- Grab the heatsink cooling fan and use two self-tapping screws to lightly screw the fan, label side down, into the heatsink’s two standoffs.
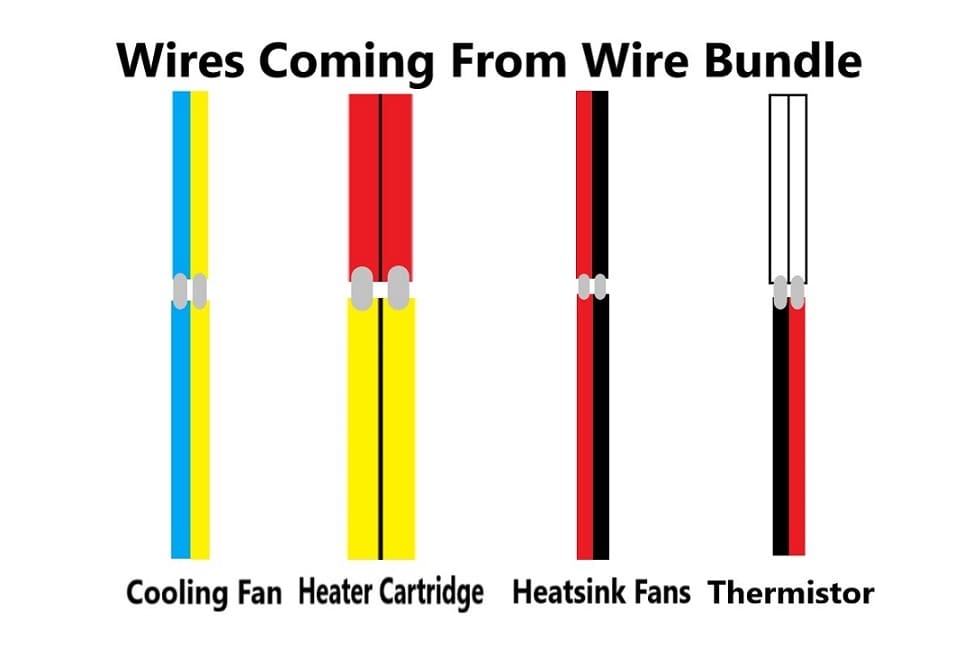
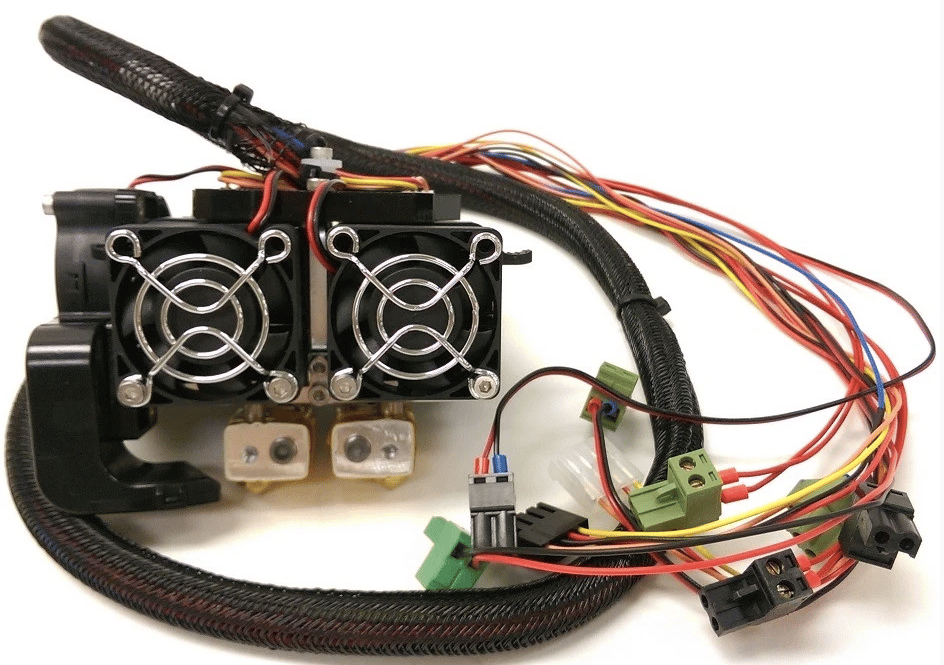
This is where the soldering and the heat shrink come into play. Soldering the correct wires to one another is imperative for this upgrade to work. The picture above is a color-coded map that displays which color wires need to be soldered together in order for their corresponding component to work.
Note that using heat shrink tubing is not required but it is highly recommended to provide long-lasting and durable connections.
- Solder the cooling fan’s blue and yellow wires to the corresponding blue and yellow wires coming from the wire bundle.
- Solder the heater cartridge’s two yellow wires to the two red wires coming from the wire bundle.
- Solder the two wires coming from the thermistor to the two white wires from the wire bundle.
- Solder the heatsink fan’s red and black wire to the corresponding red and black wires coming from the wire bundle.
- Use the stepper motor cable that comes with the package and a Creality extension cable to connect the Hemera’s stepper motor to the stock stepper motor cable. Cutting the wires and soldering them together can also be done to avoid purchasing the extra cable.
- Feel free to add any zip ties wherever needed to contain wire slack.
Hot End Switch?
While hot ends come with either type of extruder, when you’ve made the switch to direct extrusion, you’ll get more accurate retraction but with added weight to the printing head. Switching out the hot end can lessen the weight, help with heating, and make the transitional tests a little easier.
E3D’s hot ends are always a good bet, but there are several other alternative options that can provide just what you need.
Troubleshooting
Some aspects of this project may be a little difficult. However, we’ve compiled a few tips for you to keep in mind so that any potential mishaps you may face can be avoided.
- Choosing components: As we’ve listed several different printing assemblies and hot ends in this article, and since each has its strengths and weaknesses, some additional research will help you make sure you’ve chosen the right part for your printing needs.
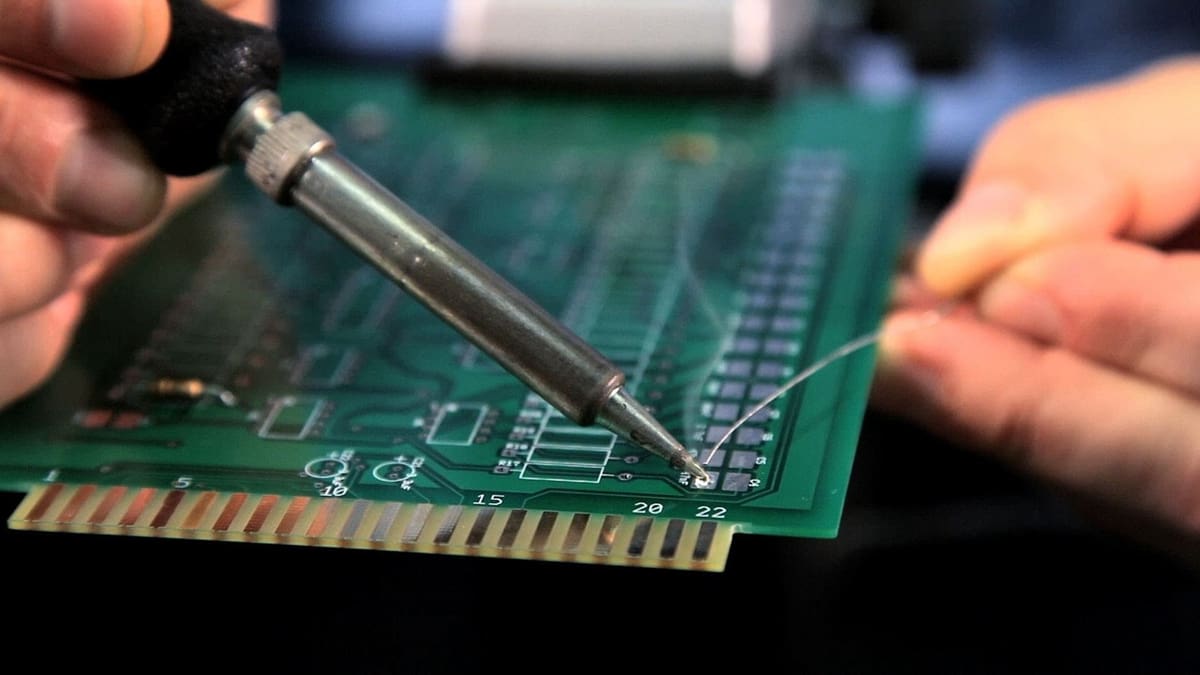
- Soldering: When soldering, labeling the wires before you cut them is very helpful. Using heat shrink in conjunction with soldering provides a much safer and more secure bond for the wire ends. Also, pay attention to the positive and negative leads of wires, since crossing wires can end in shorted components.
- Assembly: Watching videos and reading the instructions before you start assembling is recommended. If you don’t know what a certain component is or where it goes, look at the color of the wires and check where it may belong. And, when screwing components together, whether it’s the print head to the bracket or components to the printing assembly, make sure they are secure, but not over tightened. If components are tightened too much, when heated, the stress can fracture them.
With all that said, the good news is that whatever upgrade option you choose, it’ll let your 3D printer use more printing materials and lead to higher-quality prints!
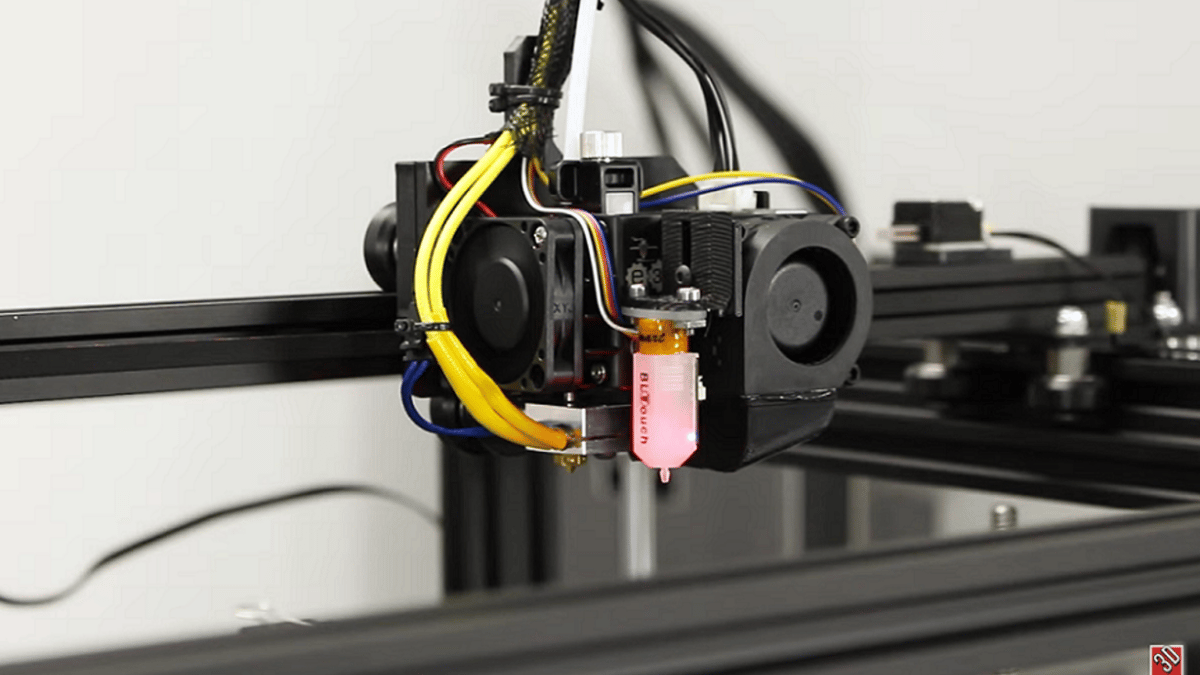
Lead image source: 3D Printing Canada via YouTube
License: The text of "Ender 5 Direct Drive: Upgrade Options & How To" by All3DP is licensed under a Creative Commons Attribution 4.0 International License.