Fusion 360: Animation – Simply Explained

In Fusion 360, animation is easy! Read on for the ins and outs of Fusion's Animation workspace as well as an overview of the process!
A good number of times when Autodesk Fusion is mentioned, you get to hear or read follow-up statements featuring expressions like “unlimited design possibilities”, “cutting-edge manufacturing and product validation capabilities”, and “Fusion’s seamless project”. It suffices to say that Fusion is highly regarded among professional and hobbyist designers alike.
Fusion features a number of workspaces, including one for animation. It’s a workspace you can’t afford to exclude from your product design and development workflow, as it hands you the power to describe how your product functions, how it can be package and assembled, and how the end user would interact with it.
In this article, you’ll gain understanding of the animation workspace, its features and function, and the basic workflow for producing your animation. We’ll also look at one way you can spice up the workflow using an add-on. We’ll close with some alternatives to Fusion for animation purposes.
Animating in Fusion
For those of you well-versed in 3D animation, animating designs in Fusion 360 is quite different from the conventional the approach in programs like Blender, Maya, or 3ds Max. For instance, there’s no rigging of models in Fusion.
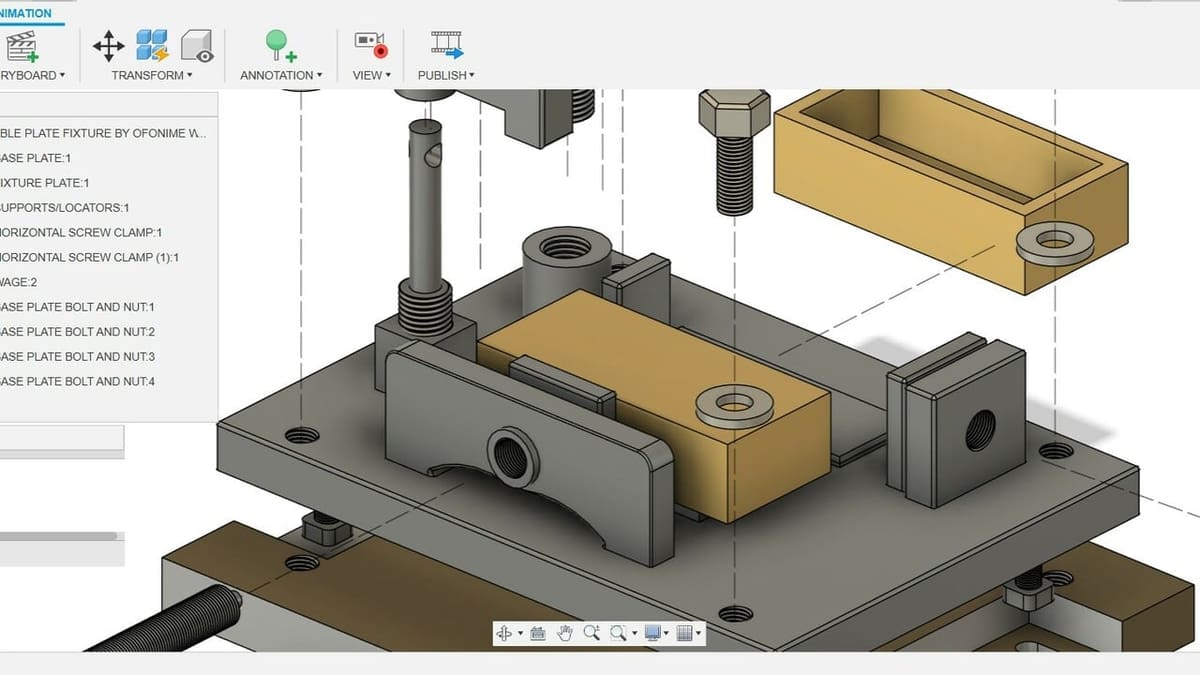
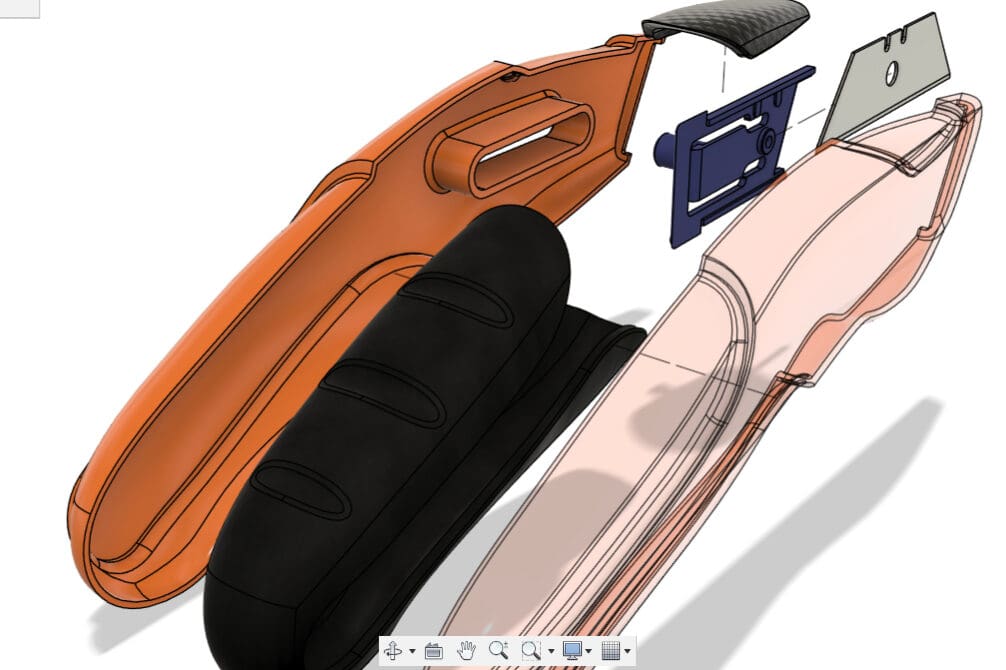
Animating in Fusion is essentially the creation of exploded assemblies, and it’s only possible when the parts of the assembly are created as or converted to components. These exploded assemblies allow you to illustrate how your design would be assembled and operated. They can be useful for presentation purposes, as well as communications with clients and manufacturers. Moreover, animations created in Fusion can even be used to develop detailed technical drawings.
And all of the begins in Fusion’s Animation workspace.
The Workspace
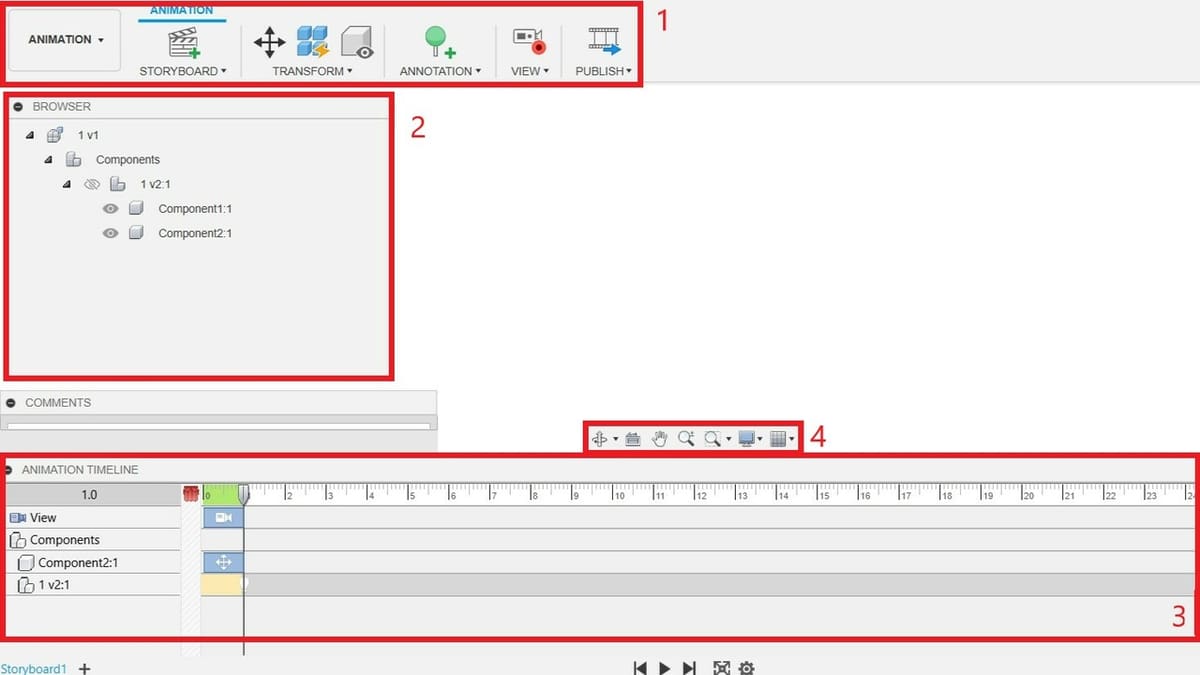
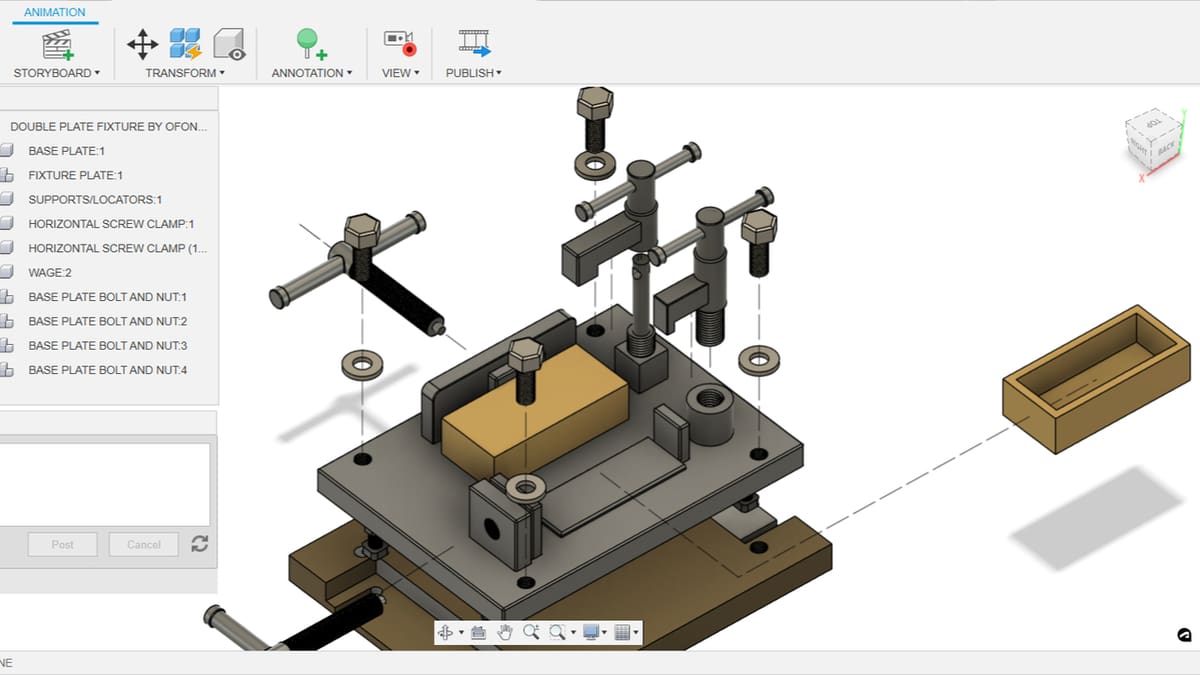
The simplicity of Fusion’s Animation workspace is both pleasing and easy to navigate, especially as a new user. Besides the viewport (known as the “Canvas” in Fusion), the other major areas within the workspace include the Toolbar, the Browser, the Animation Timeline, the Navigation bar, and the ViewCube:
- (1) Toolbar: This is similar to the “Ribbon” in programs like AutoCAD. Here, you’ll find tools tailored to your workspace and organized into relevant groupings.
- (2) Browser: Similar to other Fusion workspaces, the browser is located at the left-hand side of the interface. It holds a list of all the parts and components that constitute the design. In the Animation workspace, you can toggle on and off parts and components. You can also directly select the part you wish to transform, which we’ll discuss in more detail later.
- (3) Animation Timeline: This is where much of the animation action happens. The Timeline includes a number of features that facilitate editing and reviewing animations, with the Storyboard being the most critical.
- (4) Navigation Bar: This bar is kind of like a shortcut, and it can be found in all Fusion workspaces. Here, you can Zoom, Pan, Orbit, and preform more intensive operations related to how the model behaves or is displayed in the workspace.
- ViewCube: This function serves two purposes within this workspace. First, it allows you to position your components in a desired direction, and second, it can be used to adjust your camera angle. Although not pictured above, it’s pretty easy to find: It’s on the upper right-hand side of the Canvas.
Features & Functions

Now, let’s take a quick tour of some of Fusion’s most important features and functions related to animation.
Storyboards
Theoretically speaking, the storyboard contains a timeline of animations. Practically speaking, this is where you can edit and review actions initiated on the component that is being manipulated (i.e. exploded). You can apply tweaks to specific components, including visibility, camera angle, as well as speed and duration of the movements.
A single storyboard represents one animation, and multiple storyboards can be used to create a collection of animations. This feature is located at the extreme bottom-left of the Animation Timeline, and you can easily create one by clicking on the ‘+’ button beside the default Storyboard.
Transformations
The Transform tool is located on the Toolbar, and the panel groups the features together.
Transforming the components between keyframes creates the movement in animations. Using Fusion’s Transform tool, we tell the components where to go, when to go, and how to go. When transforming the components, we can set it in a translational or rotational motion, and this forms the basic behavior of the component motion-wise.
These operations can be initiated manually (recommended but time-consuming) or automatically using the “Auto Explode ” option (the four blue cubes separated, with a lightning bolt over the lower right one). With the latter, you can decide to transform a high or sublevel assembly (major or subcomponents) using “All Levels” or “One Level” Auto Explode option.
Camera Adjustments
As mentioned earlier, your ViewCube serves as your camera angle manipulator. Each time you click on the ViewCube to reposition your component, the animation timeline captures this new orientation of your component and links it to the motion initiated during that instance of time.
However, this can be overridden using the “View” function on the Toolbar. The “View” feature toggles the camera recording on and off. It comes in handy when you don’t want to capture the scene navigation (changes in camera angle), during transformation of the components.
Publish Videos & Drawings
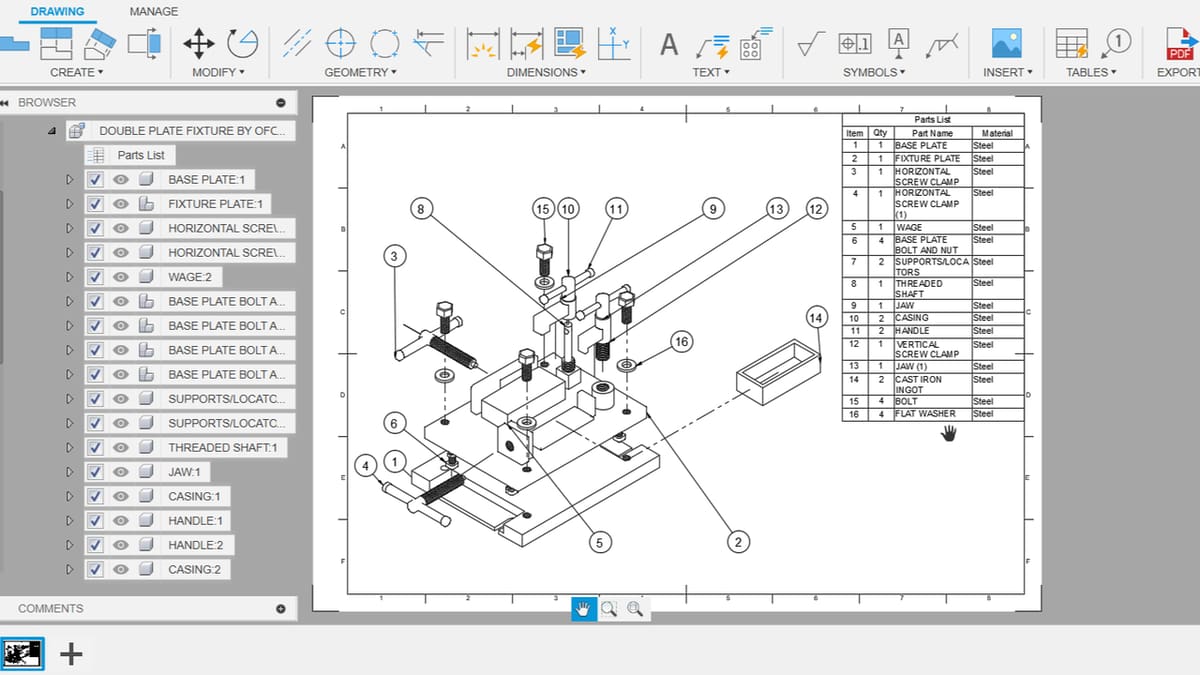
The Publish function, also on the Toolbar, is responsible for exporting your animation to a local video file. Fusion allows you to prepare a video documentation of the product in the desired resolution, speed, and format. You can also directly push the animated design to the Drawing workspace for the production of an assembly drawing, just by switching to the latter workspace and selecting “File > New Drawing > From Animation”.
Apps
Fusion’s animation capabilities, though simple and easy to use, are limited. There are times when you may want to do more, like providing more details in the animation. Fortunately, it’s possible to integrate apps into Fusion, expanding its features and functionality. One such app is Cadasio, an online platform that enables easy creation of product assembly and services instructions. It allows for the creation of a 3D interactive assembly, using the CAD data directly from Fusion.
One example of added functionality thanks to Cadasio is the ability to customize animations. You can introduce more illustrations into your design using additional 2D and 3D assets such as labels, text, images and arrows. These assets can also be styled to match client or company branding, as needed. Moreover, you can add individual animations to these items in your scene to really catch the users’ attention.
Another noteworthy feature is enhanced control over ambient color, ambient brightness, directional color, and directional brightness at any given instance in the animation. These are not directly possible in Fusion’s Animation workspace; your best chance is the Fusion Render workspace. Unfortunately, you can’t combine the capabilities of both workspace – Animation and Render – simultaneously.
Workflow
We can summarize the basic steps for initiating your animation in Fusion as follows:
- Select the design file: If the source file (i.e. 3D model) you wish to create a story around was created in Fusion, open up the file and simply select the Animation workspace on the Toolbar to change the environment to Animation. If the design wasn’t created in Fusion, you’ll need to import the source file into Fusion’s Design workspace first.
- Determine the nature and scope of the animation: Once you have your file within Fusion’s Animation workspace, you need to think about how you want to tell the story of your design. For instance, would there be need for some components to disappear or reappear? Would there be need for a part or component to tilt or align to a certain location? What camera angle would be best for the user to follow this story? Is the animation just meant for mere assembly view and part list creation?
- Set up the animation: Based on your deliberations, you’ll need to set up the animation. This simply involves toggling on or off the components using the Browser’s visibility icon, positioning the components using the ViewCube, and naming your Storyboard(s).
- Create and tweak the animation: This stage involves creating keyframes and transforming your components. You’ll also manipulate the time stamps, camera angle, speed, and visibility of components to create the desired movement for your design.
- Save and export: The final step includes exporting videos from the Storyboards. Currently, Windows OS supports AVI publishing, while MacOS supports MP4 publishing.
Alternatives
If Autodesk Fusion isn’t your cup of tea, there are viable alternatives for creating animations of your designs. In no particular order, these are selected based on use cases, industry standards, and possible technical similarities.
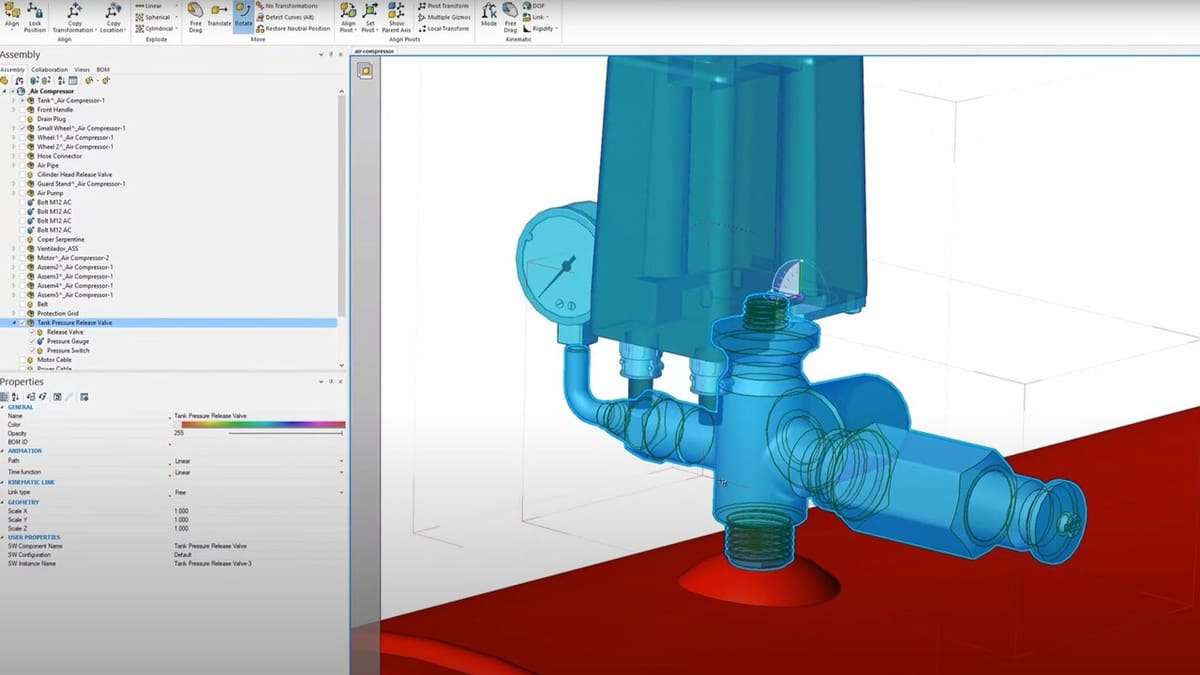
SolidWorks Composer
Dassault Systèmes’ SolidWorks is a major competitor to Autodesk Fusion, and the SolidWorks Composer does many of the same things as Fusion’s Animation workspace, and then some. It’s essentially a documentation tool that draws from 3D CAD data to create illustrations, images, animations, and video. It’s excellent for creating product manuals and assembly instructions, and similar to Fusion, there’s a link between the technical document created and the CAD data, thus there’s no need to fear possible changes in design.
3ds Max
Autodesk’s 3ds Max lets you create 3D animations for various uses, such as games, films, illustrations, and even forensic presentations. Animating in 3ds Max involves working with animation controllers, animation constraints, wire parameters, use of track view, and motion mixer, to mention a few. There are areas like the character animation, simulation and effects, and others, which make telling a story around your product even more realistic and convincing. As 3ds Max is dedicated animation software, the majority of its features and functions surpass what’s available in Fusion’s animation workspace.
Blender
And then there’s Blender, an open-source 3D creation suite that’s available for free or donation. We have an entire article on animating in Blender. Many things are possible with the software, and its animation features also surpass those available in Fusion’s animation workspace. That being said, creating an exploding assembly in Blender will come with a steep learning curve.
License: The text of "Fusion 360: Animation – Simply Explained" by All3DP is licensed under a Creative Commons Attribution 4.0 International License.