How to 3D Print Miniatures on a Resin 3D Printer

Whether for RPGs, wargames, or just the joy of painting, 3D printing miniatures on a resin printer opens many doors. Here's how to do it.
So you’re bored of painting thousands of cookie cutter miniatures or maybe you need something extra special to represent the big bad in your tabletop role playing game. Perhaps your setup already includes the dice and dice tower and now you just need the characters, or maybe a you’re experimenting with a new species of monster. Whatever the reason, you might want to consider a miniature 3D printed in resin.
We’ve been pulling little fantasy creatures out of the goo for some time now and are happy to share all that we’ve learned along the way.
Whether you’re considering getting into resin-based 3D printing or are an old hat, we think that there’ll be something in this article to help you get that perfect miniature. If you’re new and haven’t yet chosen a 3D printer, we suggest checking out our articles on the best printers for miniatures and the best resin printers first.
Of course, if you want the miniatures but don’t have the time, space, or interest in getting your hands dirty (metaphorically speaking, please wear gloves!), check out Craftcloud. With manufacturers all over the world offering a variety of technologies and materials, you’re bound to find the one who’ll create the minis for you, so you can skip ahead to painting them.
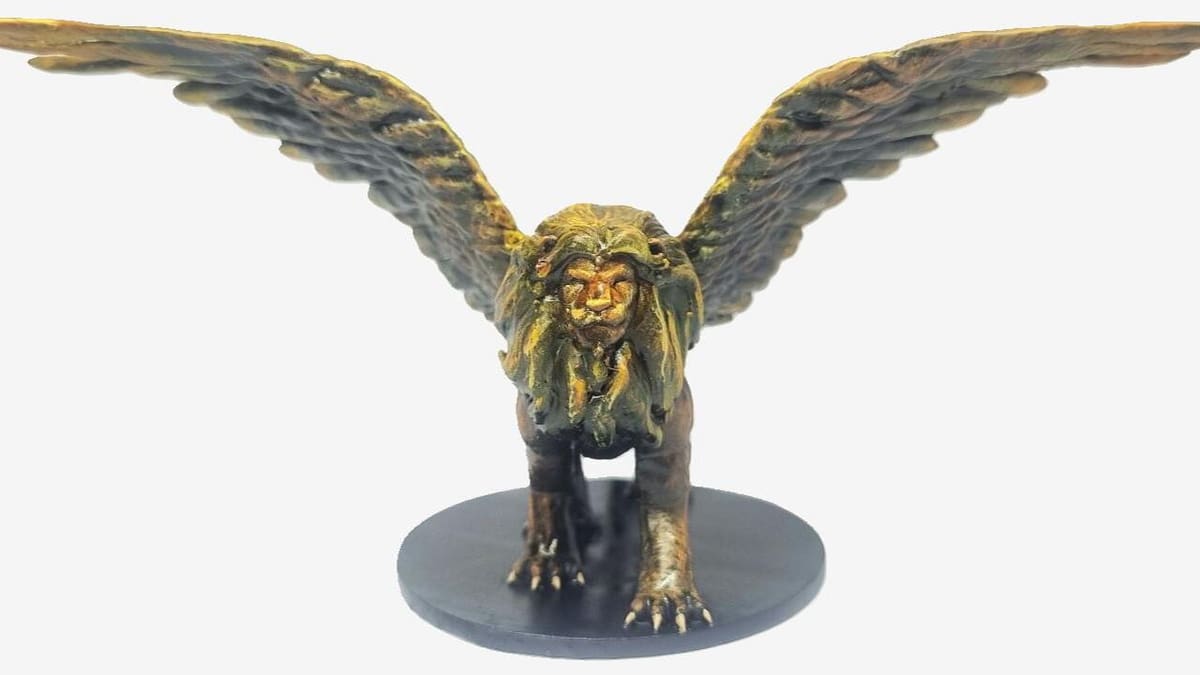
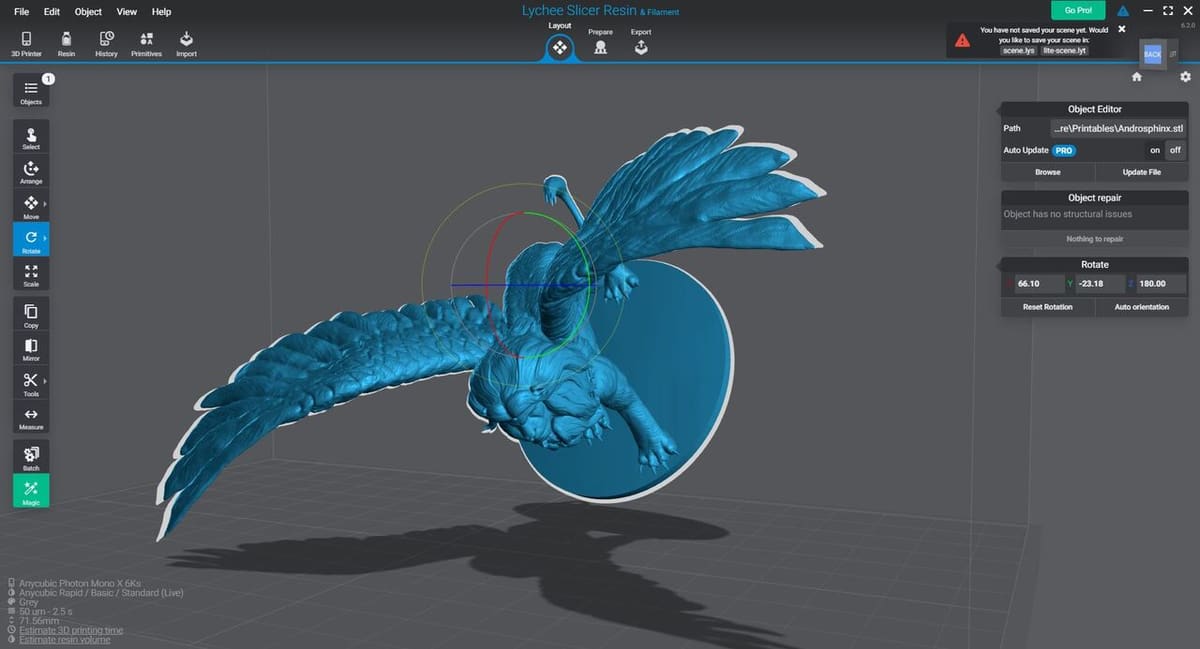
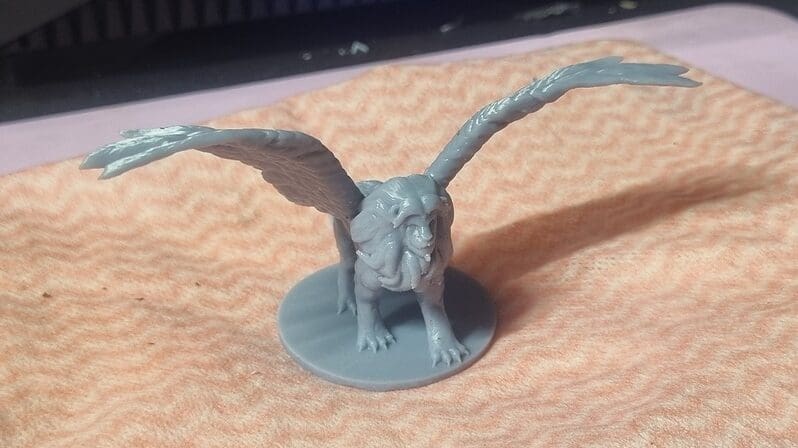
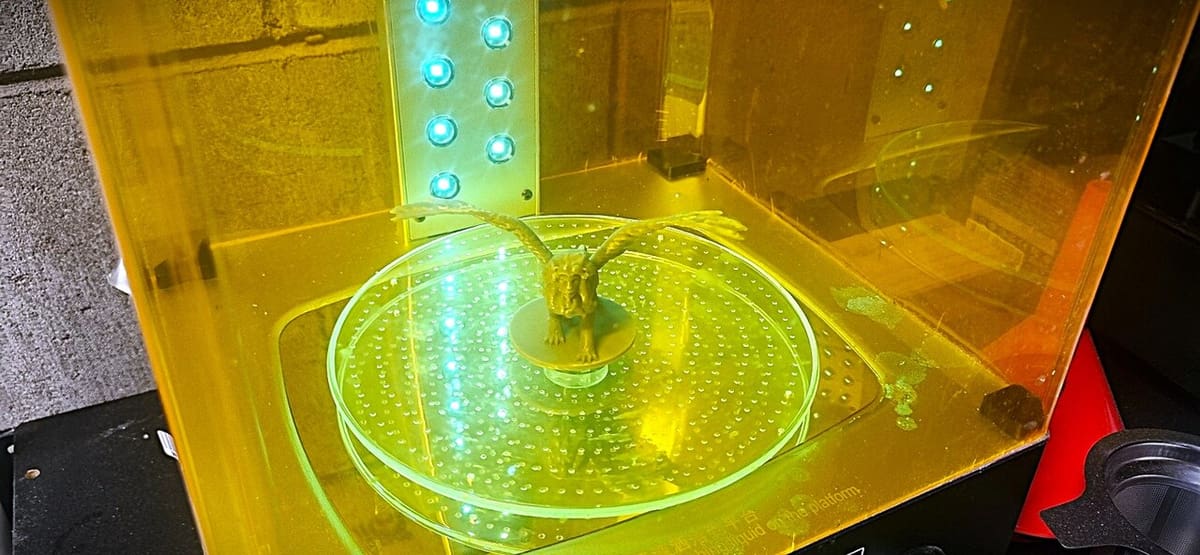
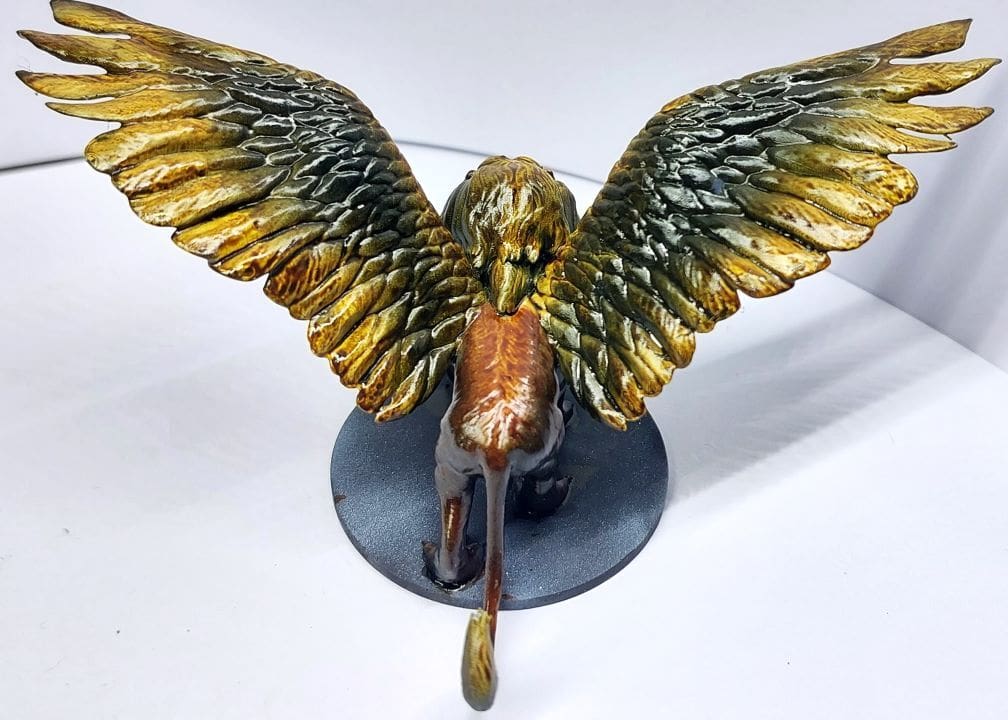
Now let’s get down to business as we bring mz4250’s Androsphinx to life!
Setup & Material Considerations
We’re going to start with safety, because we want you to have a great time printing miniatures. It’s fairly straightforward, but we recommend taking a good hard look at your setup and keeping yourself and your loved ones (including the furry, feathered, or scaled ones) safe from chronic or acute harm!
UV resin isn’t the safest of fluids, and you should wear gloves and eye protection whenever you’re handling it. It also emits gases, so we also suggest a respirator whenever it isn’t sealed in the printer or its bottle. For specific information, we recommend checking the material safety data sheet (MSDS) for the particular resin you choose. These are available on manufacturers’ websites, as mandated by law in most countries.
The next safety hazard is your cleaning fluid for post-processing. Isopropyl is the standard cleaning fluid for removing uncured UV resin, though other fluids such as degreasers can be very effective. Again, check the MSDS for explicit safety precautions.
Water-washable resins may seem an attractive option, however in our experience the resin residue is almost impossible to remove without significant effort. We’re hopeful that the technology will mature soon, but don’t recommend it if you’re just getting started. Having said that, your mileage may vary and we encourage you to develop your own process and preferences.
The printing process generates a lot of fumes, and we recommend setting up your printing area somewhere with a lot of ventilation. Garages or rooms that aren’t normally occupied while printing are good; open windows and fans are your friends here. If you’re looking for the essential tools to help get your set up running smoothly, we suggest checking out our article on the top resin 3D printer accessories and spare parts.
While these safety considerations may seem harsh, they really aren’t that onerous. Remembering to put your gloves and respirator on become second nature after you’ve been 3D printing for a while.
As for the specific resin, you’ll want to consider not only the brittleness and “paintability“, but also the color. Most standard resins are excellent for miniatures. We suggest using a resin that is colored differently to the paint you intend to undercoat with, as it will help you determine coverage. If you’re overwhelmed with choice, our article on the best resins for miniatures can offer good guidance.
You should also consider your cleaning fluid based on the resin you’ve chosen; check the manufacturer’s guide for the best cleaning fluid for your selection.
We recommend steering clear of special purpose resins, such as flexible resins, until you’re very experienced and know how to tune your printer for unique and wonderful materials!
Finding & Downloading a Model
Okay, so you’ve picked your resin, have your printer set up, and are ready to hit the “slice” button… but what exactly are you going to print?
There are loads of free models out there, with repositories like Printables and Thingiverse having several collections, but more resin-focused sites like MyMiniFactory are going to provide easier finds. 3D models from CG sharing platforms like CGTrader have also got some excellent models worth checking out.
When looking for a model, you’ll want to examine it closely in 3D before you print it. A good (but not the sole) indicator of quality is file size. Larger files generally mean that there are more tringles in the file mesh, giving a smoother print and finer detail. However, if the file isn’t manifold (closed) or has holes in its mesh, there may be issues with printing it. Most slicers and some CAD programs have automated mesh repair facilities, but these don’t guarantee success. As mentioned, carefully examining the 3D model in the slicer will give you a good idea if it will print ok.
If you want to guarantee printable high resolution models, you may want to consider a paid site, such as Loot Studios, Epic Minis, or Lord of the Print. These offer high quality sculpts that are often pre-supported or come with print guides, and frequently have additional items, such as quests or stat blocks for their creations.
Slicing
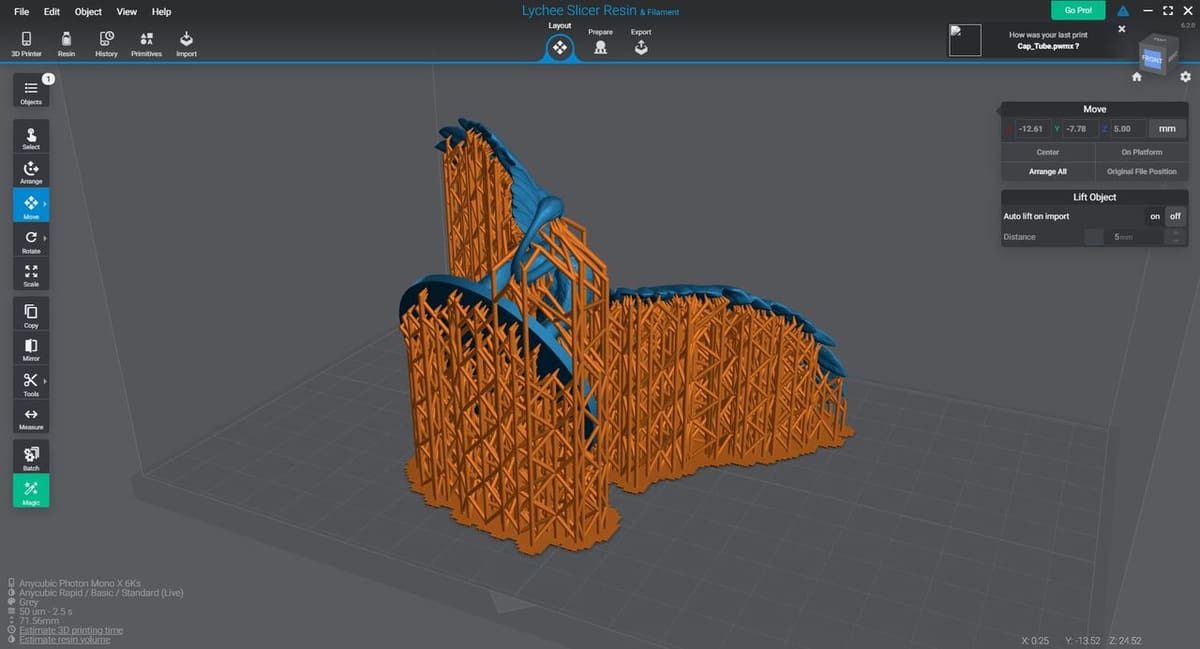
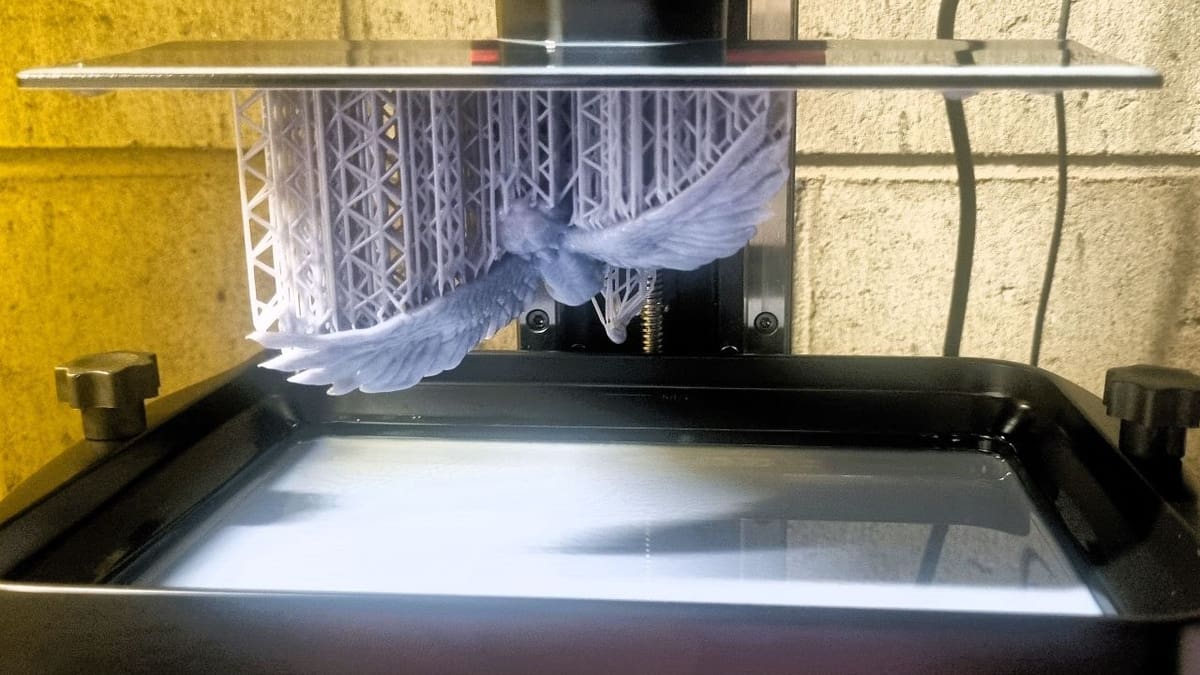
Slicing a resin print can be quite simple. In general, there’s no infill to worry about and you can hollow out the model – but that’s more pertinent to very large models, and we won’t cover it here.
The main settings to think about are exposure time and “burn in” exposure time, which can be found as “initial layer exposure time” or “bottom exposure time”, depending on the slicer. There are a few other settings, like light-off delay, but the mentioned two exposure times will get you very decent prints straight up and the others will just help tweak that.
We recommend starting with the recommended exposure time on the bottle of your particular resin, and only adjusting it if your prints aren’t as nice as you’d like them to be. If you do need to adjust exposure time, you can try increasing it by 0.1 seconds for sharper points, or reducing it by 0.1 seconds if holes aren’t coming out.
There are also some exposure calibration tests you can perform. If you have an Anycubic printer, using their Resin Exposure Range Finder (RERF) tool will help you identify the best exposure time for your printer and resin combo (and the temperature conditions you’re printing in). If you’ve gone with another printer manufacturer, you may want to run a similar test. To do this, you print a small test model such as the AmeraLabs Town, over and over again, incrementing the exposure time 0.1 seconds per print and carefully examining each creation to find the best exposure settings.
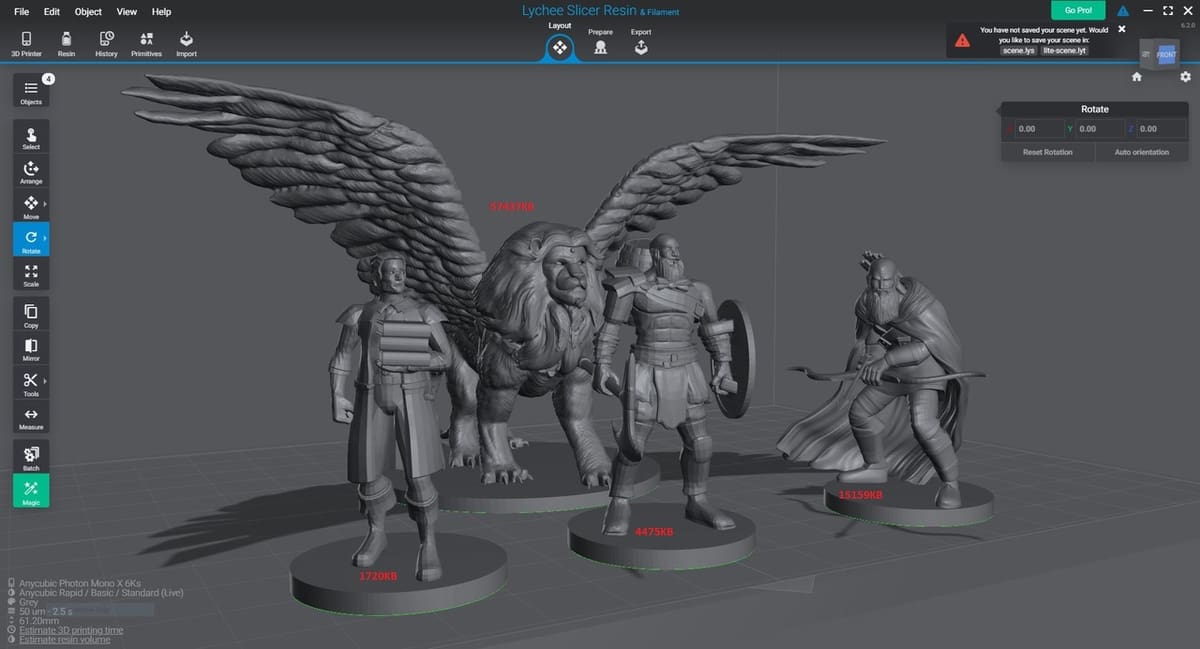
Among the many resin slicers out there, two of the most popular (and free) options are Chitubox and Lychee Slicer. For this article, we’ll be looking at the latter, although as mentioned, there’ll be very similar (if not the same) features available in other slices, albeit maybe with different names.
Orientation
While it might seem counterintuitive, the best orientation for printing a miniature is seldom the right way up. This is due to a few reasons.
First, while having a large surface area stuck to the build plate does help ensure a successful print, it can be extremely difficult to remove the finished model without damaging it. This is the main reason to avoid printing the model the right way up, but it’s not the most important one.
Second, orienting the model to need the least amount of supports will help post-processing and reduce waste. It will also mean less potential damage to your prints as you remove the supports, should they be placed in small cavities, for example.
Arguably the most important reason is the reduction of peel forces on your vat. Printing a large surface all at once creates a lot of force holding the model to the bottom of the FEP sheet. This has to be overcome by the force keeping the model’s surface area to the build plate. The battle between the force holding your miniature to the build plate and the force that keeps the new layer attached to the FEP sheet can literally tear your model in two, leaving debris on your vat floor that can cause major issues down the line, as well as a failed print. While the bottom of the vat isn’t very sticky to the resin, a large surface area also adds suction. For this reason, it’s best if large flat areas are tilted rather than flat.
Generally speaking, you’ll also want to avoid printing flat surfaces square to the build plate. The flattest surface of a resin print will be a vertical one. Anywhere else will have pockmarks from support removal (potentially) or may suffer some warping from resin shrinkage.
Lychee’s auto-orient feature will usually give you good results, but don’t be afraid to experiment because you can almost always find a slightly better orientation.
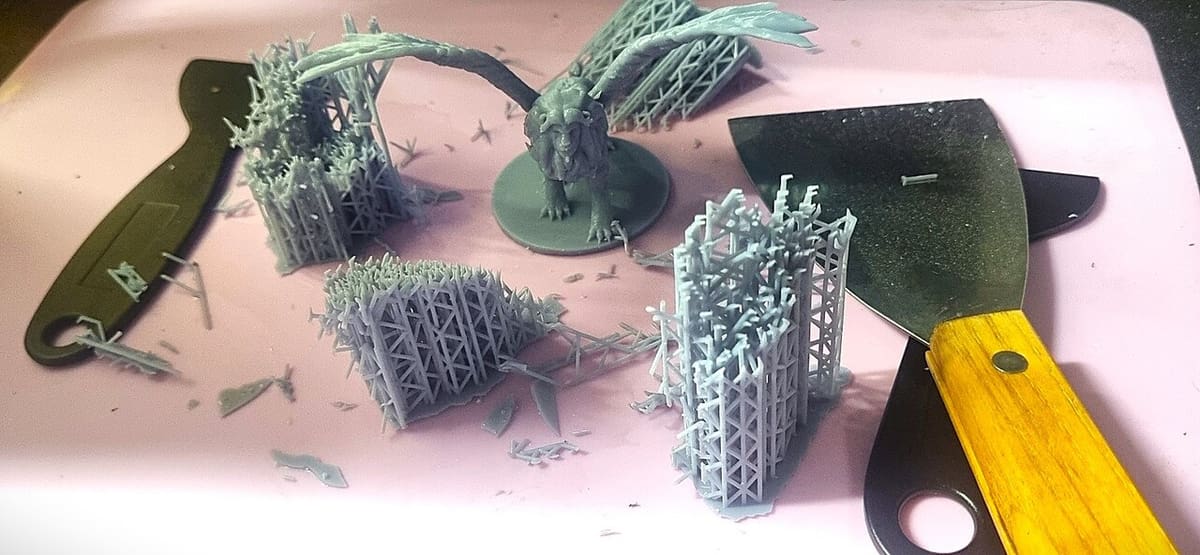
Supports
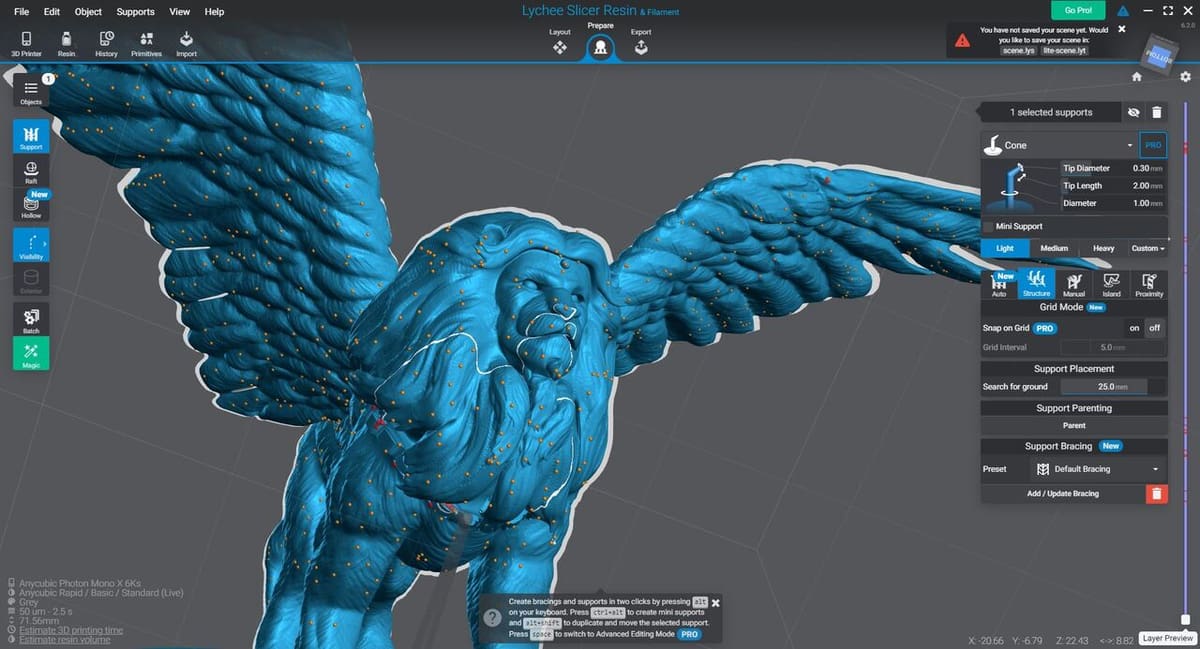
When it comes to resin-based 3D printing, you’re going to see a lot of support structures. If you’re used to FDM 3D printing, it may seem like an enormous amount of helpers. It’s actually not that much material because the structures are fairly spindly, and they’re very much needed. Any part of the model that doesn’t print properly will become a loose piece of plastic in your vat or might attach to your FEP sheet.
In Lychee, the auto-support function works relatively well, but we recommend checking for islands after auto-support generation (the software will find them for you under “Support > Island”), and then adding manual helpers in the floating parts. Be careful, though, with islands where it’s hard to get a clear support path to; you may be placing a support structure through you model that will leave a scar on the finished creation. If you’d like to learn more about properly supporting models, check out our article on resin printing tips.
The last thing to do is to add a raft. This provides a foundation for the supports to adhere to on the build surface, and as it’s the first few layers, it’s not likely to come away. That said, because it’s nice and thin, it should be flexible enough to easily remove once the print is finished.
Release Film Preservation
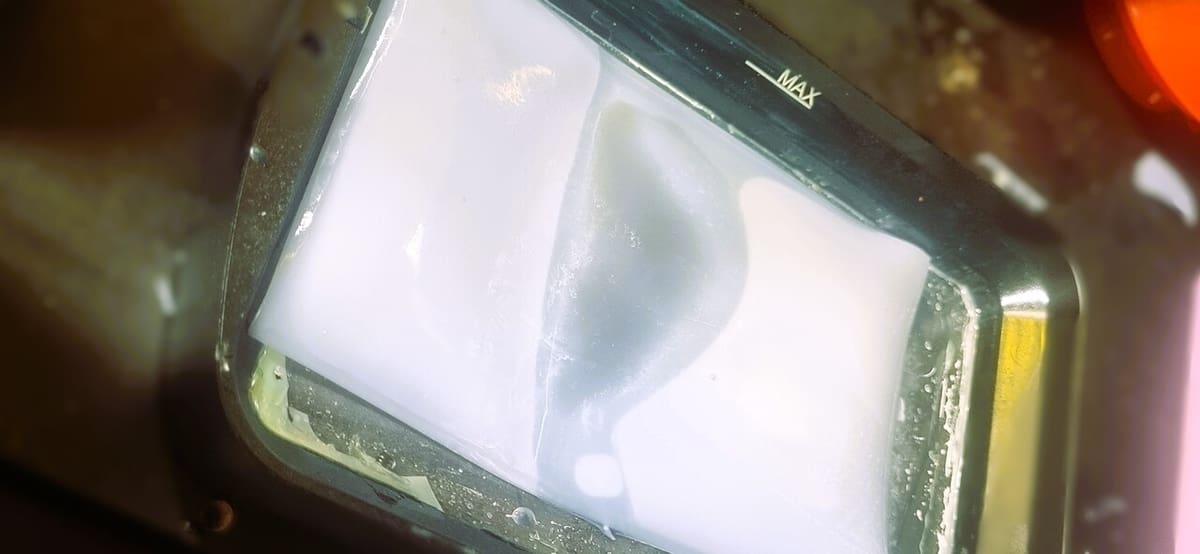
While it’s tempting to always print in the center of the build volume, we recommend positioning each prints models at different locations within the build volume. By doing this, you’ll avoid wearing a hole in the FEP film at the bottom of your resin reservoir.
Another step to ensure that your consumables last as long as possible is to use the printer’s exposure test to cure some resin into a sheet covering the entire bottom of the tank for 20-30 seconds after every few prints. This collects any debris, partially cured particles, or tiny parts of prints that have broken free into a sheet of cured resin that is easily removed.
We’re currently doing it every print and have found our FEP sheet is lasting a lot longer. How you achieve this will depend on your printer, but it’s definitely a process we recommend.
Pockets, Traps, & Islands
These tiny little gotchas can ruin your whole print if you’re not careful. People have developed whole software suites, like UV Tools, to analyze sliced resin models to catch pockets, traps, or islands.
In a nutshell, a pocket is where uncured resin may be trapped after printing, whereas a trap is any part that may be unable to be cured correctly. The main issue with both of these is that they will significantly increase the peel forces that we discussed previously, by creating an area of suction, which could lead to the model being pulled from the build plate or worse. Furthermore, uncured resin trapped within a cavity can leak out over time, which I’m sure you’ll agree isn’t desirable!
Islands, as mentioned, are parts of the model that aren’t connected to the main body and that will fail if they don’t have a support structure to hold them during the printing process.
Islands will normally be caught by your slicer’s “detect islands” feature. If you don’t have and don’t want to learn how to use UV Tools, pockets and traps can be seen fairly easily in the slicer’s 3D view by using the layer preview tool. You’ll be looking for any area where there is a cavity that is not open near the top and the bottom. These aren’t always avoidable, but can be minimized with good orientation.
3D Printing
This is the simplest part of resin printing: Simply install your USB drive with your sliced file and hit start.
Having said that, there are a few tips and tricks to get good results.
Firstly, temperature has an effect on UV sensitive resin. While the material’s designed to work when its temperature is 25 °C, warmer is generally fine too. The main thing is to keep the temperature stable.
We printed the miniature for this article at a place with around 31 °C, a temperature that doesn’t generally change unless we make the egregious error of attempting to top up the resin mid-print. Topping up the vat mid-print should only be necessary for extremely large and solid prints. If you’re unsure if you have enough resin to complete a print, we recommend filling the vat before hitting go. By adding more resin while the print’s ongoing, you risk a difference in temperature of the material, which significantly increases the chances of print failure. Needless to say, you also shouldn’t mix two different types of resins (e.g. standard and tough) because they’ve got different exposure settings!
Another issue to consider is setting up your printer to be level. While this won’t overly affect the print result, keep in mind that the vat is a large shallow tray full of liquid. The bed lowering into the vat displaces quite a bit of that liquid, and if it’s too far out of level, you’ll definitely have a lot of cleaning up to do.
While the model is printing, have a five-minute think about what you’re going to do when the print finishes – namely which post-processing steps you’ll carry out and how. We recommend cleaning the area and having your washing station ready to go (more on that later). Plus, it’s good to make sure your tools are laid out with plenty of space between them, nitrile gloves are handy, and if you’re using a respirator (and we recommend you do), it should be somewhere where you’ll see it, so that you’ll remember to put it on!
The only thing left to do is wait for post-processing…
Post-Processing
Once you’re finished printing and your space is set up, it’s time to free your print from the printer. This is a significant amount of the effort that goes into getting a good miniature from a resin printer.
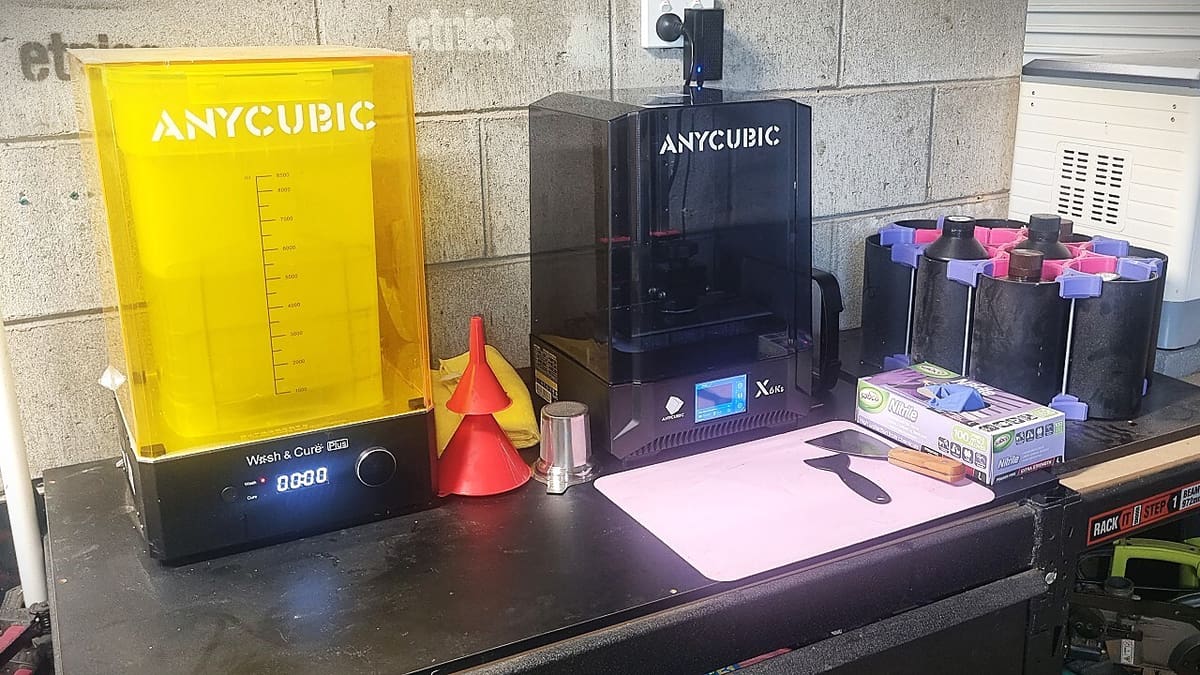
You’ll need to first rinse the uncured resin from your model, remove supports, then you need to wash any remaining resin out of nooks and crannies, and lastly you’ll need to fully cure the model. There are a lot of wash and cure stations on the market and, while you don’t need one, we can safely say they will almost certainly change your resin printing experience from a chore to a pleasure.
So let’s go over our processes for setups that don’t and do have a wash and cure station. For a more in depth discussion of each step (and some different options) check out our article on how to clean resin prints.
The Hard Way
We call this the hard way because it’s much more labor intensive and it’s messier. In addition to your cleaning fluid of choice, you’ll need a spray bottle, a large shallow bucket, a sink (that you won’t be using for food) with detergent and hot water, and a source of UV light. You’ll definitely also need gloves, and you should really be wearing a respirator any time you’re around uncured resin or the solvents used to dissolve it.
To rinse your model, hold it over the bucket and spray your cleaning fluid over the whole print, focusing on areas where uncured resin might be trapped. Once most of the uncured resin has washed away, start to peel away your supports. Your first few models might have some pockmarks until you dial in your exposure time. You can also achieve cleaner results by using a set of flush cut pliers to cut the supports away, but we’ve found that once your exposure is set correctly, the difference is negligible.
Once the supports are removed, spritz and scrub with a (very) soft brush, catching your cleaning fluid in the bucket. When you’re sure that almost all the uncured resin is gone, wash the model in hot water with strong detergent, rinse it, and set it aside to dry.
After your model is dry, you can cure it by putting it in the sun. That said, as a warning, if you live in the tropics or somewhere with a particularly high UV index, solar curing can cause your models to catch fire (that’s a story for another day). In temperate regions, solar curing can take a long time. Make sure you rotate your model several times in all directions to ensure even curing. You’ll know it’s cured because the print will feel hard and won’t be sticky.
If you don’t fancy leaving your model out in the sun or you’re concerned that you have too high a UV index, you can easily create a curing station using a UV light (such as as a fish tank light), a cardboard box, and a solar shop turntable. Warhammer blogger Faux Hammer used a paint can and cheap UV LED strip to create a decent curing station.
The Easy Way
We call this the easy way, but it should probably just be called the “more convenient way”. If you have a wash and cure station, simply scrape your model off the build plate directly into the vat of cleaning fluid (or use the integrated build plate support to dunk your model), and run the machine for a few minutes according to its instructions.
Remove the model and break or cut away the supports in the same way you would if you didn’t have a curing station. Then return your model to the cleaning vat and run it for much longer (20-30 minutes). Once it’s done, remove the model from the wash fluid. You can rinse it with hot soapy water if you’d like, but we’ve found this is only really necessary when hand washing the models or with particularly sticky cleaning fluids.
Thoroughly pat the model dry with some paper towel or a cloth, and then air dry for a little while longer.
Once dry, place the model into the curing station (this may need some re-configuration, such as removing the cleaning tank and installing the turntable; check the manual for your equipment) and start the timer. We like to start at 15 minutes of curing, and go from there.
This is way longer than most resin manufacturers recommend; for example, Anycubic recommends 1 to 2 minutes, but we’ve found this works for us. A good starting point is still the manufacturer’s website, but you’ll need to adjust times that work for you.
Gimmicks
There are a lot of products out there that claim to be easier to post-process with or to offer better results. We’ve tried several of these, from water-washable resins (which do work, but not as well as we’d like them to) to proprietary cleaning agents (which don’t work any better than the non-proprietary stuff).
Water-washable resins are fine, but they’re still rather toxic, and you will need at the least a very strong detergent to remove the uncured resin. We wouldn’t pay extra for this feature as it just doesn’t perform in line with the extra cost. That said, you can get absolutely excellent prints from them and some makers swear by them.
In our experience, proprietary solvents tend to require more effort to remove from the model than the resin you’re trying to remove in the first place. Even then, you have to put just as much effort in to removing the solvent as you do with regular cleaning fluids.
If you aren’t a fan of isopropyl, we recommend Simple Green or any other heavy duty degreaser. We used these for years before returning to isopropyl. They really do provide good results, but isopropyl is cheap and easy to recycle by just letting the dirty fluid settle and then exposing it to sunlight, or you can put more effort in by distilling it or making even crazier contraptions.
The important thing is that you find a process that works for you and your situation; if something isn’t working, try something else before giving up, you might find it was just one element of the process. This author put off printing in resin for three to six months and then tried to get everything out of the way in one go before he tried wash and cure stations.
Many of the “gimmicks” work, but they don’t improve everyone’s experience, and you should get familiar with the most common processes before striking out on the path to something brand new.
Painting
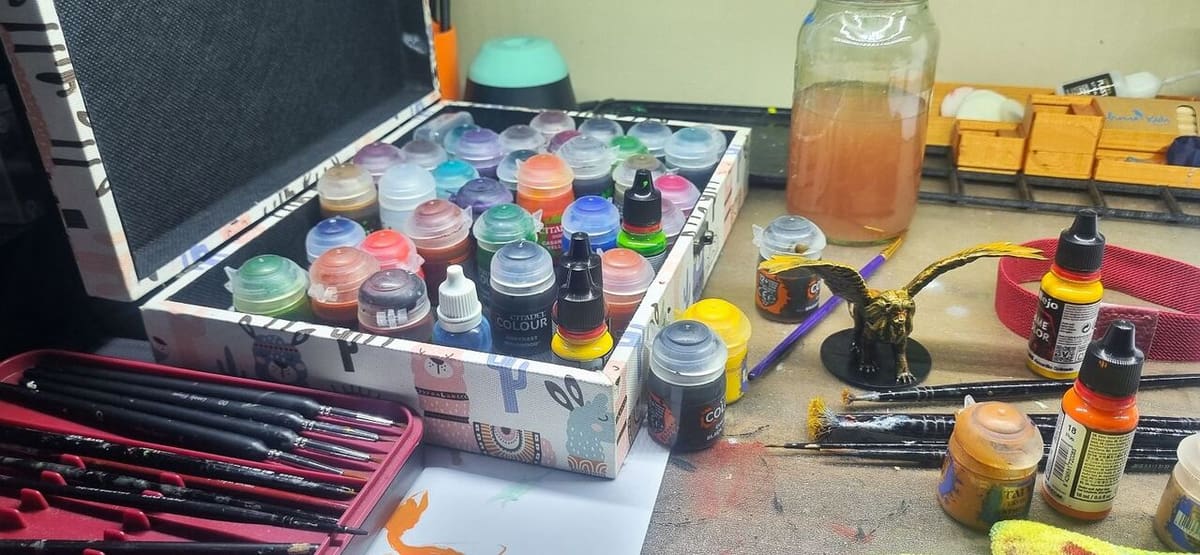
Now that you have your miniature printed, it’s time to add some color! There are are two main ways to do this: With a series of tiny brushes or with an air brush. We’re going to use a combination of airbrushing and brush techniques.
The important thing to remember is that the right way to paint your miniatures is the way that pleases you most. If you don’t want to paint them, that’s okay too; for example clear resins give a great effect to different types of ghost characters. In any case, if you’re happy with your paint job, then it doesn’t matter what other people think of it!
Priming
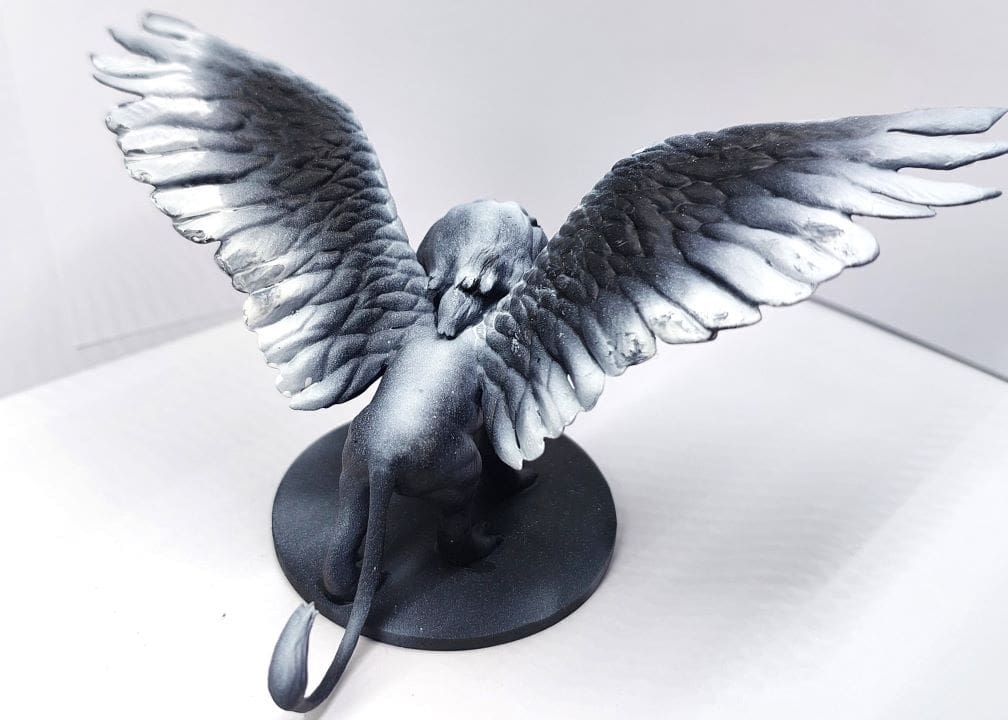
Priming your miniature is key to getting a good painting result. We chose to airbrush ours and used a variable shade priming, which helps highlight areas of the model when adding color in the next step.
First, we applied black evenly over the entire miniature, aiming for a very thin and even coat. As mentioned, it’s wise to have picked a resin color that is different from your priming color here to help determine when your coverage is enough.
Next, we picked areas of the miniature we thought should stand out or be brighter. Shadows on miniatures are less pronounced than in life-sized items, so highlighting and shading are very important to give the miniature presence, and this starts at priming.
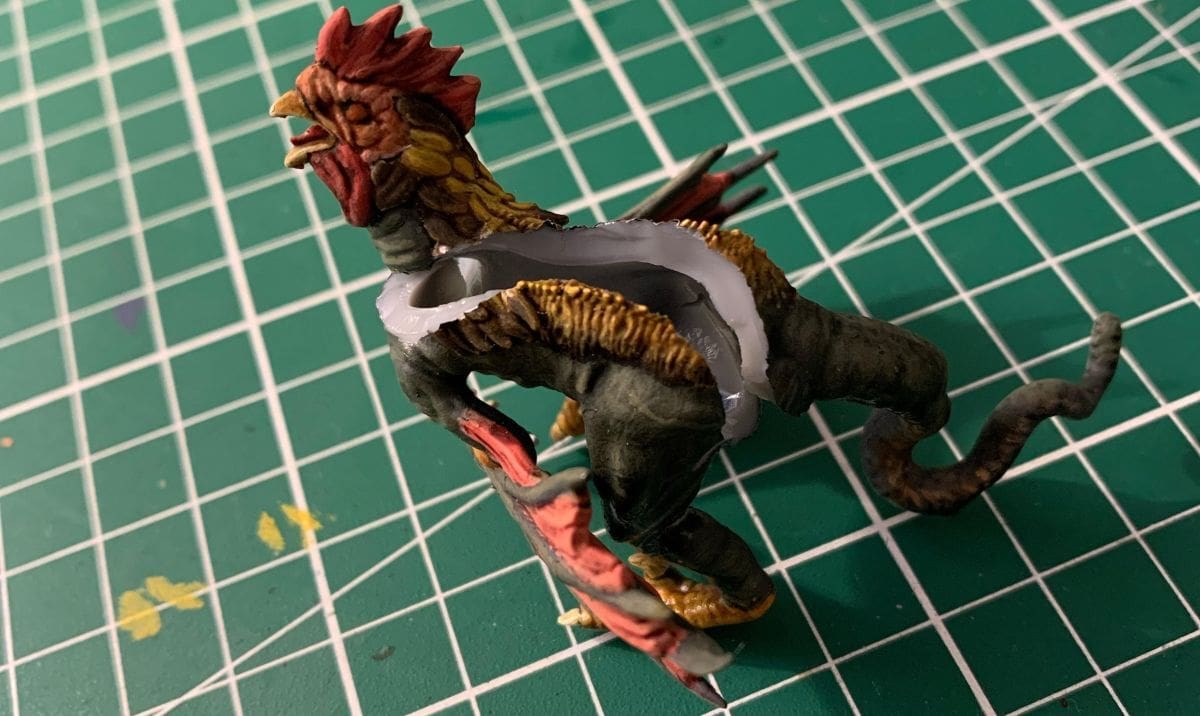
Adding Color
After priming, it’s time to add color! We’re not going to be able to teach you to paint here in one section of an article, but the basic gist is to work from larger to smaller areas, starting with darker colors in the shadows and working to lighter ones at the edges.
Miniature paint comes in an unbelievable array of color, so you can get consistency across an entire collection where mixing your own hues leads to variation. However, as most of your printed miniatures are likely to be one-offs, we don’t see that mixing is an issue if you don’t have a massive collection of paints.
On this note though, if your prints are part of a larger collection to be displayed (or played with) together, we highly recommend picking at least two colors that feature on all of the miniatures to some extent. This will give the collection a more cohesive look.
Once you’ve painted the main parts, move on to picking out detail. Using a wash (a very watery type of miniature paint) can help really define the shadows – just don’t overdo it! Creative Twilight has an excellent guide on using washes.
We have an excellent summary of various painting techniques for resin prints in our article about painting 3D printed miniatures, but for even more in-depth descriptions of the various techniques and how to use them, we recommend checking out some painting YouTubers, like Miniac, Goobertown Hobbies, and Squidmar Minatures. Oh, and if you want to know how 3D printing resin works chemically, Goobertown Hobbies has an excellent summary!
But the best way to get better is through practice, and now that you can make a wide variety of miniatures at home, we’re sure you’ll have plenty of opportunity!
License: The text of "How to 3D Print Miniatures on a Resin 3D Printer" by All3DP is licensed under a Creative Commons Attribution 4.0 International License.