How to 3D Scan with Skanect

You can make 3D scans quickly, easily, and affordably with Skanect. Read on to learn more about the software!
What Is It?
Skanect is a 3D scanning program that allows you to use a sensor, such as an Xbox 360 Kinect, to scan objects, rooms, or even people and recreate them as computer-based 3D models. The software is available in two different licenses: the free version for non-commercial use and the Pro version (which costs about $130).
Both share similar features such as model editing and automated watertight repairs. With the Pro version, however, you get access to more things, such as the ability to export scanned models to 3D printers directly from the software and unlimited polygon export, which we’ll discuss later. Here’s a quick overview of the software’s features:
- File exportation: Both versions can export OBJ, PLY, STL, and VRML files.
- Editing: You have the option to make repairs or adjustments across both versions. You can fix holes with watertight repair, change the smoothness of the surface, or crop features from the scan.
- Sharing: You can share your files directly to Sketchfab across both versions, but the Pro version has the added benefit of being suitable for commercial use.
- Printing: Only the Pro version can export files to Shapeways for printing services. With the free version, you’ll have to take extra steps to prepare and print your file.
- Support: Both versions have access to support through the community forum, but with the Pro version, you can also receive support from the company through direct email. In addition, the Pro version gets instant upgrades and updates to the software.
In this article, we’ll go through simple scanning, editing, and exporting with the free version of Skanect. Before we get to the tutorial, however, let’s briefly discuss how the software works.
How It Works
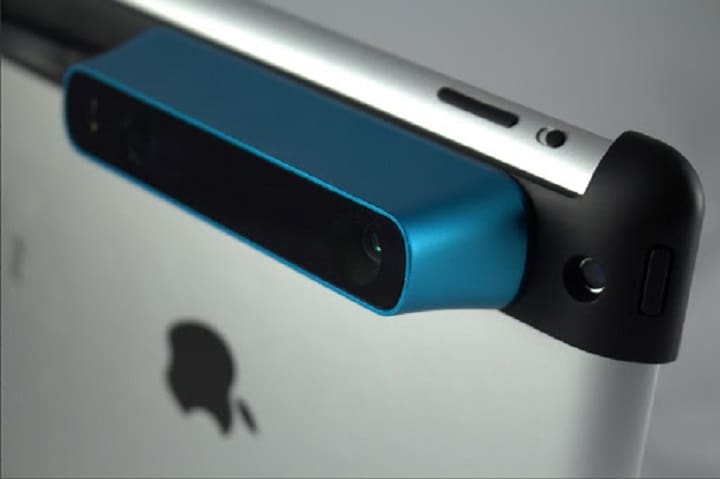
It all starts with the software accessing a sensor device. Skanect offers its own dedicated devices that can be used with the application, namely the Structure Core and the Structure Sensor Mark II. There are also similar devices that can be purchased from third-party sellers online.
Once connected to a sensor, an object can be scanned. For something like a teacup to be fully scanned, either the cup has to rotate 360 degrees while the sensor stays in place, or the sensor moves completely around the object. If the second method is more appealing to you, a wireless sensor like the Structure Sensor Mark II is probably the better choice.
After the object has been scanned, the software compiles the image and distance data from the sensor and recreates the object in a computer-generated platform. And voilà, you have a 3D model.
Know that we have a general idea about how Skanect works, lets go through the steps of scanning.
Tutorial
For this tutorial, you’ll need the following things:
- A computer: To properly run Skanect, your system will need to meet the following requirements:
- Processor: Intel i7
- RAM: 4 GB
- Graphics: Nvidia 560 or higher
- OS: Windows 7 64-bit or later, MacOS 10.13 or later
- There are additional requirements depending on whether you want to do CPU or GPU reconstruction.
- 3D scanning sensor: Make sure you have downloaded the correct support software and drivers for your device. For this tutorial, we’ll be using an Xbox 360 Kinect.
- Skanect software
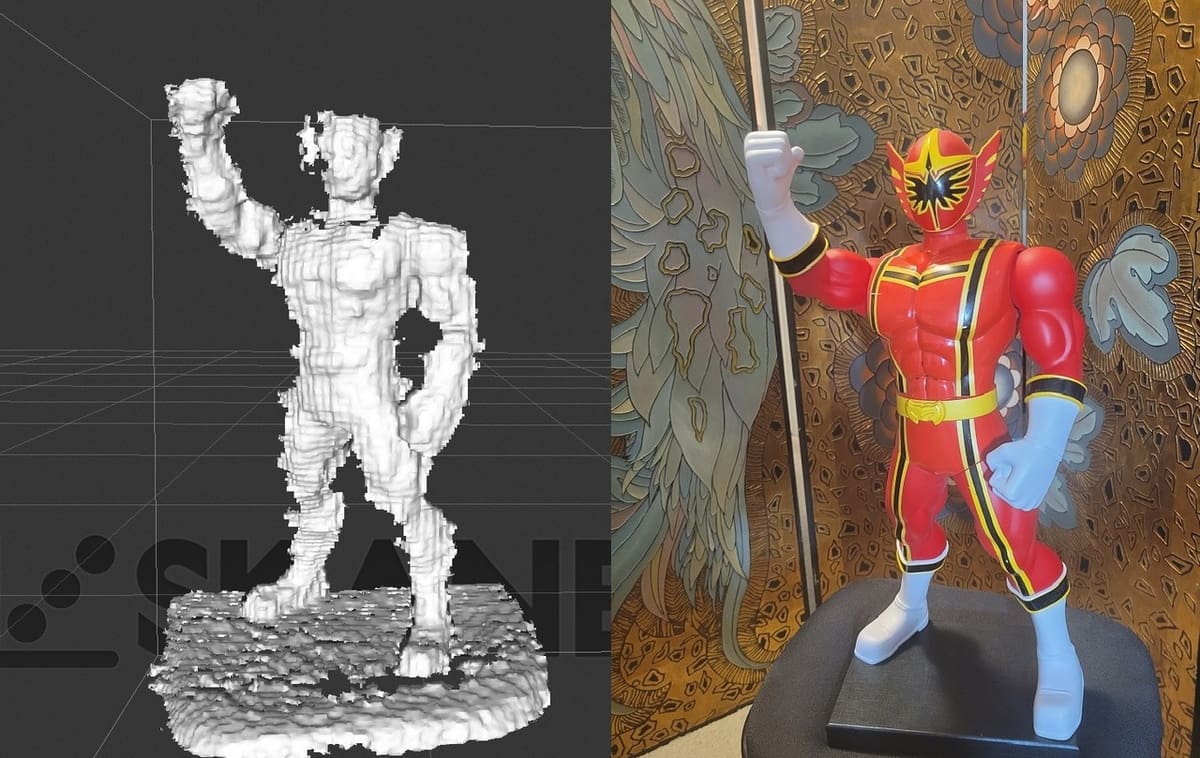
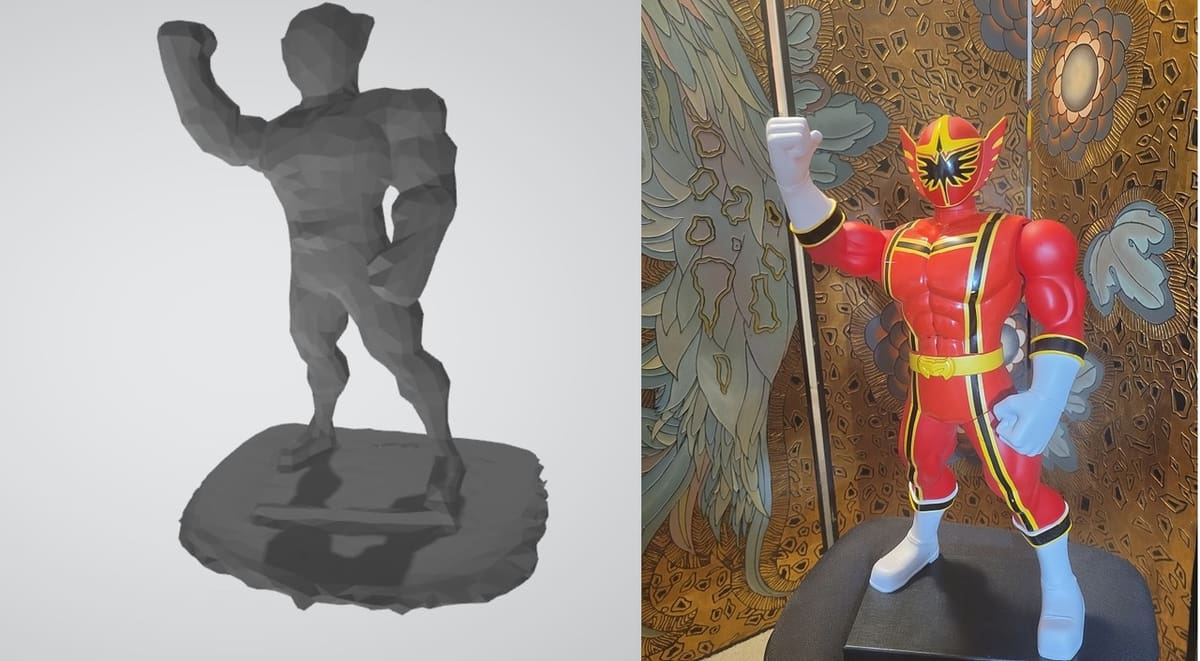
- An object: We’ll use a Power Ranger figurine.
- A turntable: This is optional but recommended. Turning the object is easier than moving the sensor around it, especially since the Kinect will be attached to the computer.
Step 1: Setup

Once you’ve fully downloaded and installed Skanect, run the program. When it opens, you’ll be brought to the Prepare tab. This is where we’ll confirm the sensor is set up and choose the right settings for our scan.
- Click “New” just below the Prepare tab to do a new scan. In the top right-hand corner, you’ll see a sensor icon along with the name of our scanning device next to it. In the center, you’ll see the options for the new scan.
- Select “Object” for the Scene option.
- If necessary, adjust the “Bounding box” size and “Aspect ratio” to make sure that you’re able to cover the cubic volume of the object.
- Click the field next to “Path” if you want to change where the file gets saved after scanning and enter the destination where you want it saved.
- To apply these changes, click “Start” at the bottom of the box.
Step 2: Scan
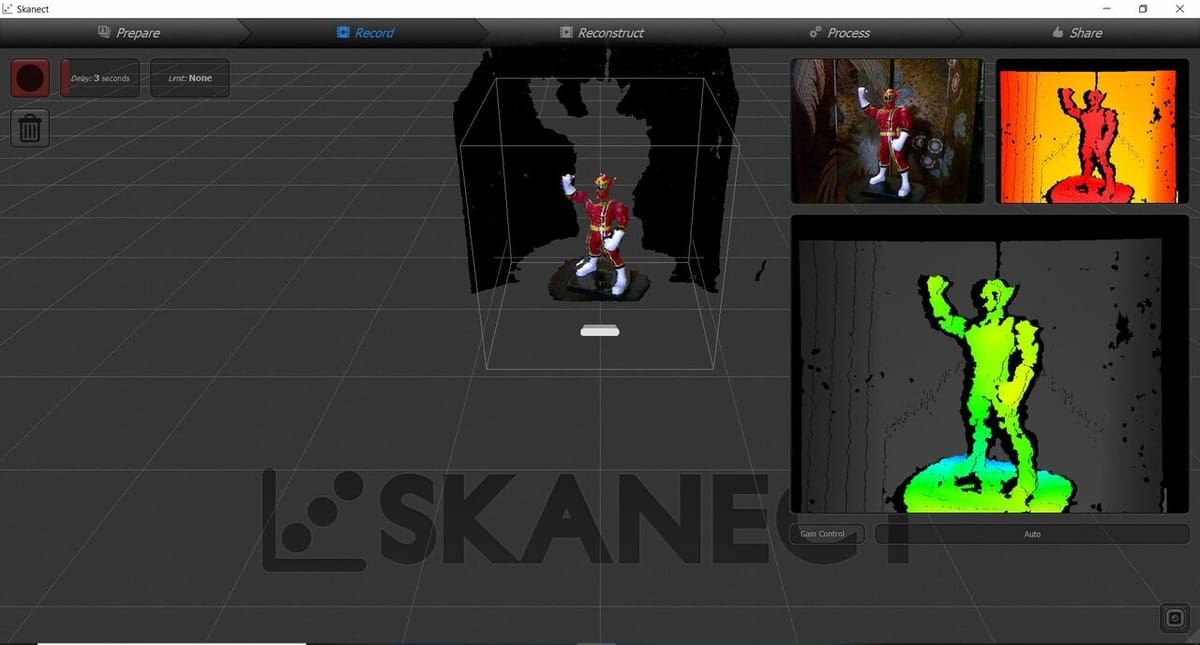
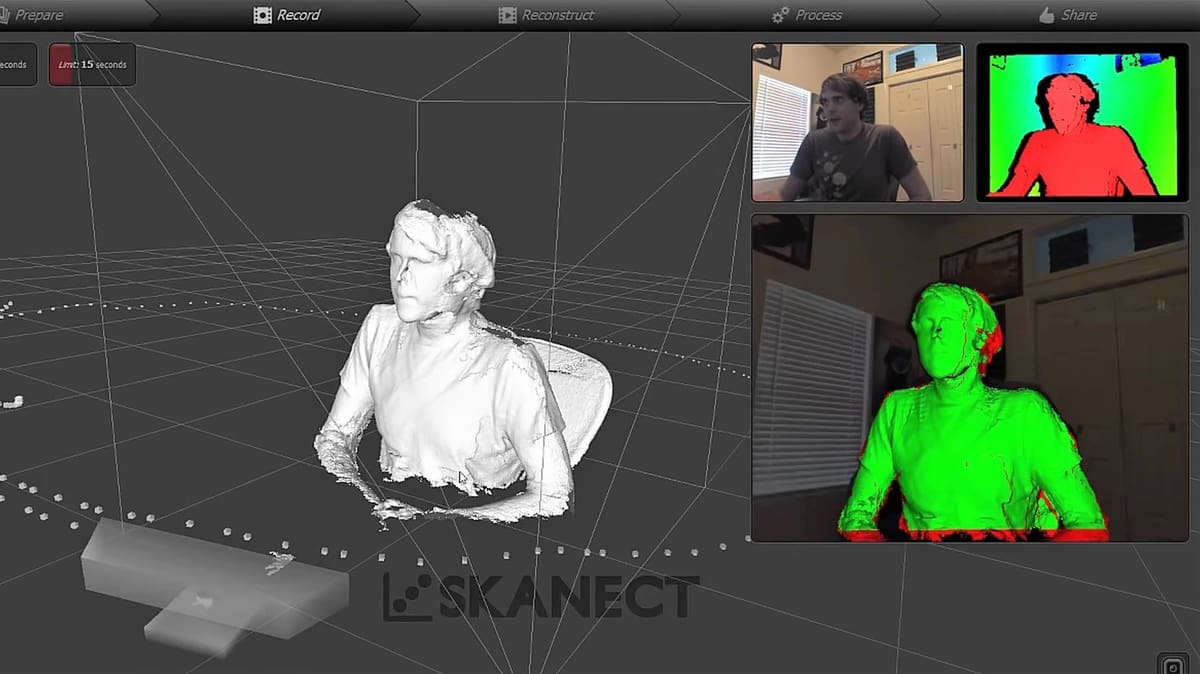
Record
After you click “Start” in the Prepare tab, you’ll automatically be brought to the Record tab. The record button and controls are on the top left. Our sensor camera view is represented by the three small boxes on the right. And in the center of the window, you’ll see a transparent cube with a preview of the object inside of it.
Before recording, you can change the time of the delay, which will be a countdown before you start recording, and the time limit of the recording. These options are located in the top left corner.
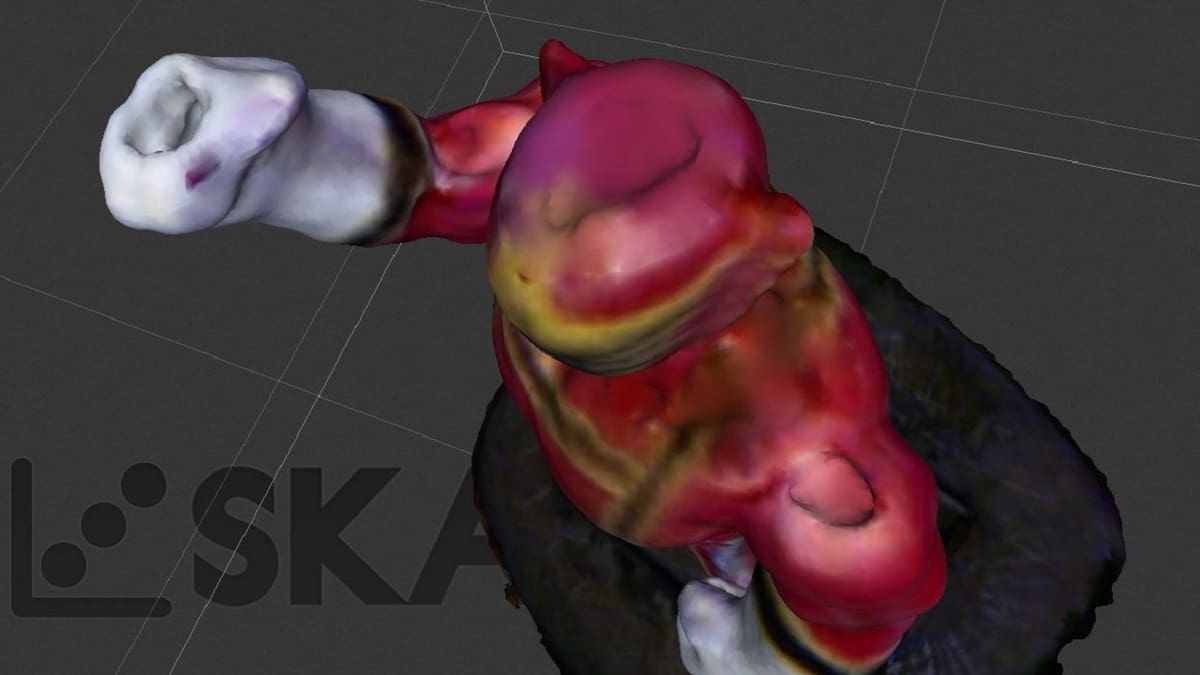
In the camera view, you’ll see that the object is covered with different colors. If parts of your object appear blacked out, the camera is too close. The green shade on your object represents parts where there’s color, and the red represents the depth of features on the object.
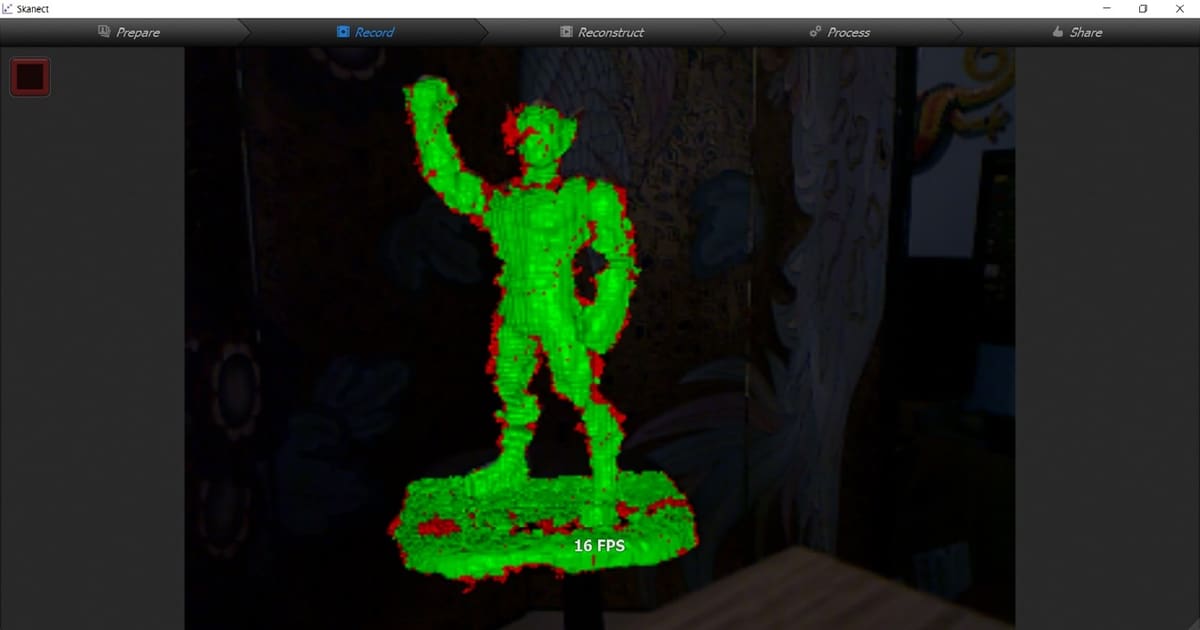
- Click the “Record” button, then move around the object in a steady fashion.
- Once you’ve completed a revolution, move in the opposite direction and complete another full circle around the object.
- A better way is to have the Kinect in a stationary position and the object on a turntable. You can then rotate the object while scanning.
- If scanning a room, do a steady 360°, making sure to capture everything you want to scan. While recording, the software might tell you – on the recording screen – if you’re moving too fast or too slow, you’re too far away, or an error has occurred. In the event of an error, you’ll need to redo the scan.
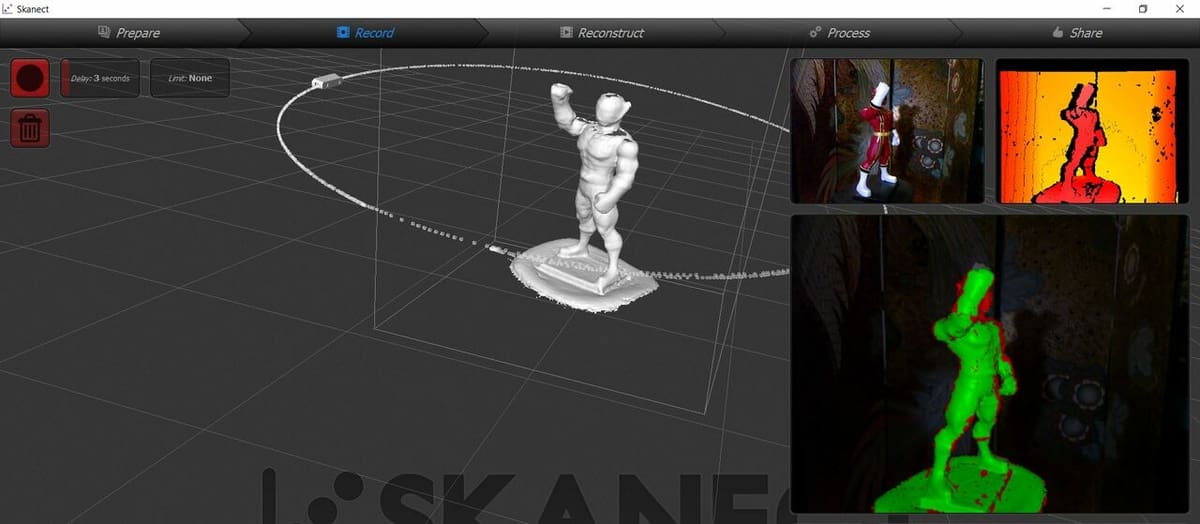
- Click on the red box in the top left corner to stop recording once you’re done. You’ll then be brought back to the original record screen now with the completed object in the transparent square.
Reconstruction
If you want more details from your scan, you can click the Reconstruct tab. On the top left of the screen, you’ll see two buttons: “Reset” and “Fusion”.
- Click “Fusion” and choose either a CPU or GPU reconstruction.
- Set the amount of detail by selecting from low to very high from the Fidelity options.
- Click “Run” after you’ve made your selections.
If you want to remove the changes, click “Reset”.
Step 3: Make It Pretty
After finishing the scan, click on the “Process” tab. In this tab, we still see the transparent box with our scanned object inside it, and on the left, there’s a list of tools that we can use to edit our scan before exporting it.
These tools are broken into three categories: Mesh, Geometry, and Color. Any time you want to commence one of these functions, make sure to click the “Run” button on their corresponding window.
Mesh
The mesh is a group of faces that make up the surface of an object’s 3D scan. The tools in this section are meant to aid in making corrections to these faces in order to achieve the desired surface appearance of the 3D scan.
- Reset: Resets the object to its original form before any edits.
- External Edit: This allows you to edit the scan on another post-processing application such as Blender. Note that it’s only available in the Pro version of the software.
- Watertight: This tool generates a closed outer surface on the object so that it’s right for 3D printing as an STL file.
Geometry
This group of tools adjusts the physical shape and orientation of the object. You can change the resolution of details, edit parts out, and orient the object to the correct position.
- Simplify: This lowers the number of faces of the scan along with the size of the file.
- Move & Crop: Moves and orients the object in the 3D space. You can also lower the object past the highlighted blue square at the bottom of the view area to remove ground that might have been added with the scan.
- Remove Parts: Based on the biggest part of the object, the software removes anything that’s smaller by a certain percentage.
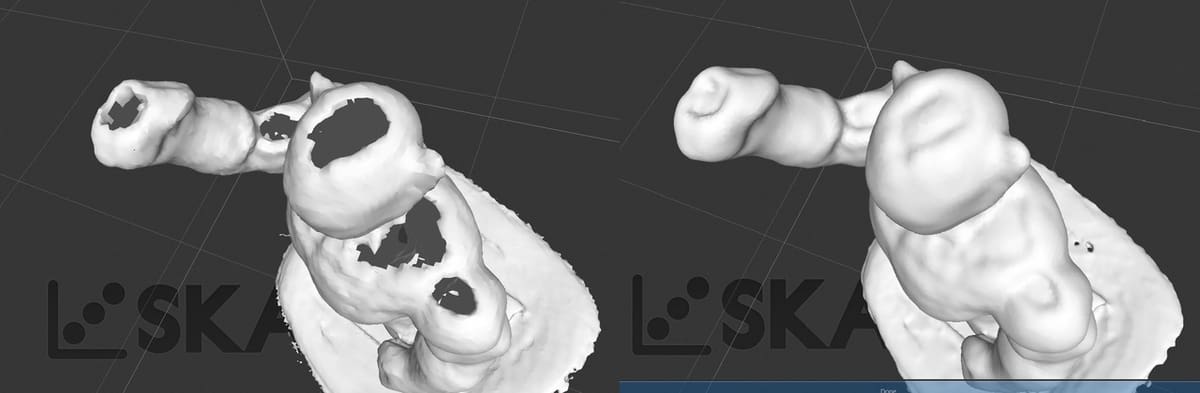
- Fill Holes: This tool identifies any holes and automatically fills them using one of the following strategies:
- Watertight is the best option for most objects and will automatically close as many holes as possible because it creates a single closed surface. There are also options for the type of smoothing (from high to low). The higher the smoothing, the less detail there will be.
- Opened Hull is better for scanning rooms and will attempt to fill in holes even though bigger holes might be ignored.
- Closed Hull is great for closing bigger holes.
Color
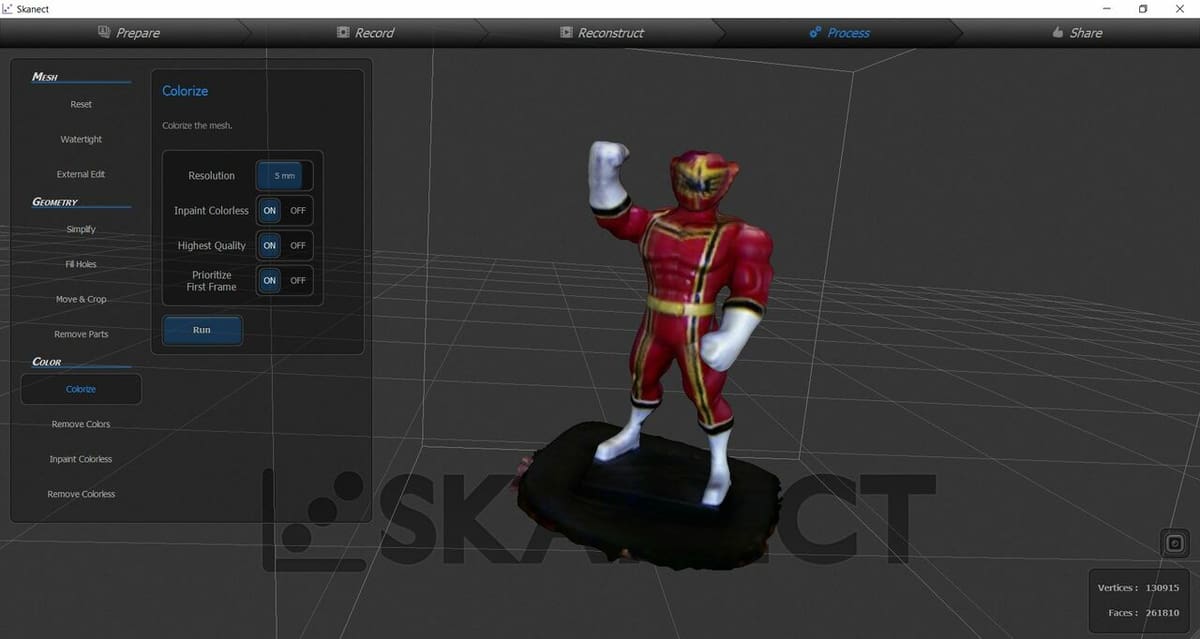
With this group of tools, you can automatically add and adjust the colors of your scan as well as fill in gaps that the scanning device was unable to pick up.
- Colorize: You can change the quality and resolution of the color in your scan.
- Remove Colors: This gives the scan a plain color by removing any color that the sensor picked up in the original scan.
- Inpaint Colorless: If a color is missing from some parts of the scan, Skanect will fill the missing part in from a neighboring section of the scan.
- Remove Colorless: Any colorless section of the scan will be removed.
Step 4: Save
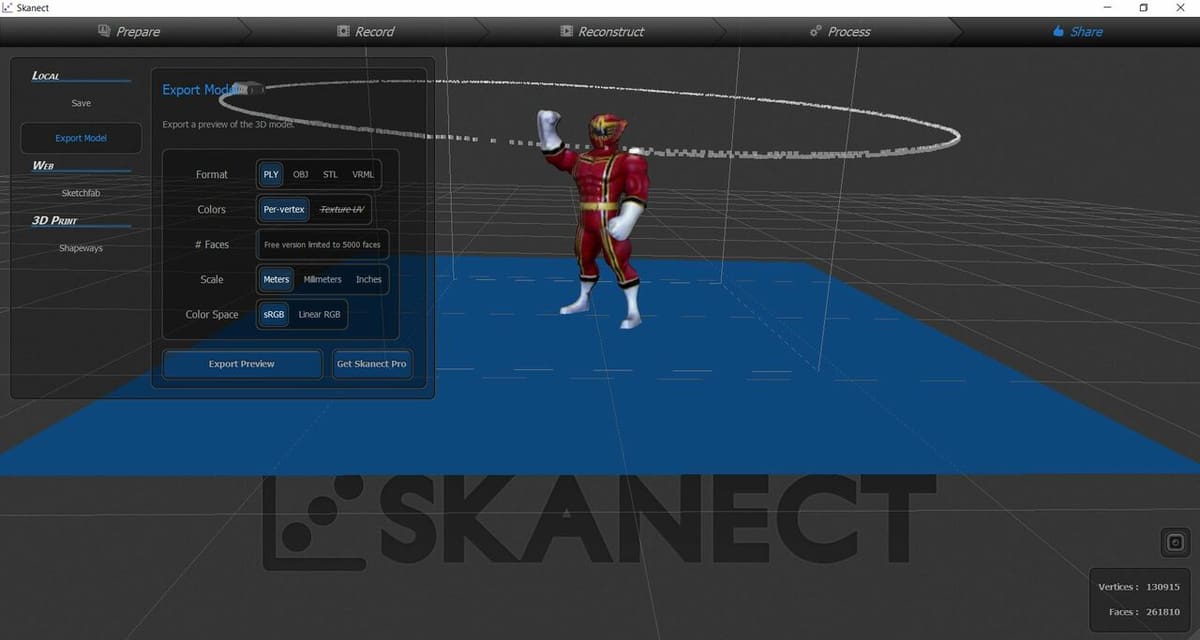
Once you’re done with editing your scan, click on the “Share” tab, where you’ll have a few sharing and exporting options. On the left-hand side of the screen, you’ll see the following:
- Save: This will save your 3D scan as an SKN file, which you can open in Skanect to further edit.
- Export Model: You can export your model as a PLY, OBJ, STL, or VRML. You can also choose the scale (millimeters, meters, or inches) for your object, the color spacing, and the number of faces (polygons).
- Sketchfab: This option allows you to directly upload your file to Sketchfab, which is an online platform where makers can share or sell their 3D files. It also allows for those models to be viewed in a 3D environment and be edited by creators. For the upload to work, you’ll need a Sketchfab account.
- Shapeways: This option allows you to directly upload your files to Shapeways, an online 3D printing service. Shapeways also does 3D design services that use expert designers and machine learning to help you create a design if you’re not CAD savvy.
Issues & Troubleshooting
Whether you’re using the free or professional version, you might run into problems or errors with your scan. For example, you may notice holes in the middle of your generated object or missing surface details. Support is available through many video tutorials and online forums both from Skanect itself and platforms like Reddit.
The following are a few common issues you may encounter while using Skanect along with possible solutions:
- Resolution: If you use the free version and exported your file, you may notice that your object is not as detailed as it was within the Skanect environment. This is because the free version limits the number of polygons for exported scans, resulting in less detail. Only the paid version allows for an unlimited number of polygons.
- Unable to scan small or clear objects: If you scan something such as a clear glass cup, the sensor you use might not be able to pick up the geometry of the object. For some small objects, it might miss geometry because there isn’t enough information for Skanect to recreate it. This is simply a limitation of the software.
- Missing geometry: Holes in your scan can be fixed with the Watertight or Fill Holes tool in the Processing tab. If it’s a scanning issue, try adjusting the light of the surroundings or move slower when making a recording. If worse comes to worst, you could also fix the missing geometry by exporting the model to a CAD program and editing the geometry from there.
Have fun scanning!
Lead image source: Studica News via YouTube
License: The text of "How to 3D Scan with Skanect" by All3DP is licensed under a Creative Commons Attribution 4.0 International License.