How to Use SketchUp Free: Hands-on Tutorial for Beginners

Looking to expand those 3D modeling skills? Check out our tutorial on how to use SketchUp Free to create 3D models.
SketchUp is a powerful tool for creating architectural models in your web browser. All you need is a free account to start using it. Its repository of free 3D models and an extensive collection of materials (similar to Autodesk’s Fusion) allows you to design your models exactly how you want them.
SketchUp has both a free and a paid version, with the latter predictably packing a punch, but if you’re just getting started or you’re not quite sure what’ll suit your needs best, the free option has plenty to offer.
In this article, we’ll cover the basics of designing in SketchUp by showing you how to model a basic bookshelf. This introduction will help you get your bearings in the program and will present you the fundamentals, preparing you to experiment with more advanced tools and design plenty more models.

Getting Started
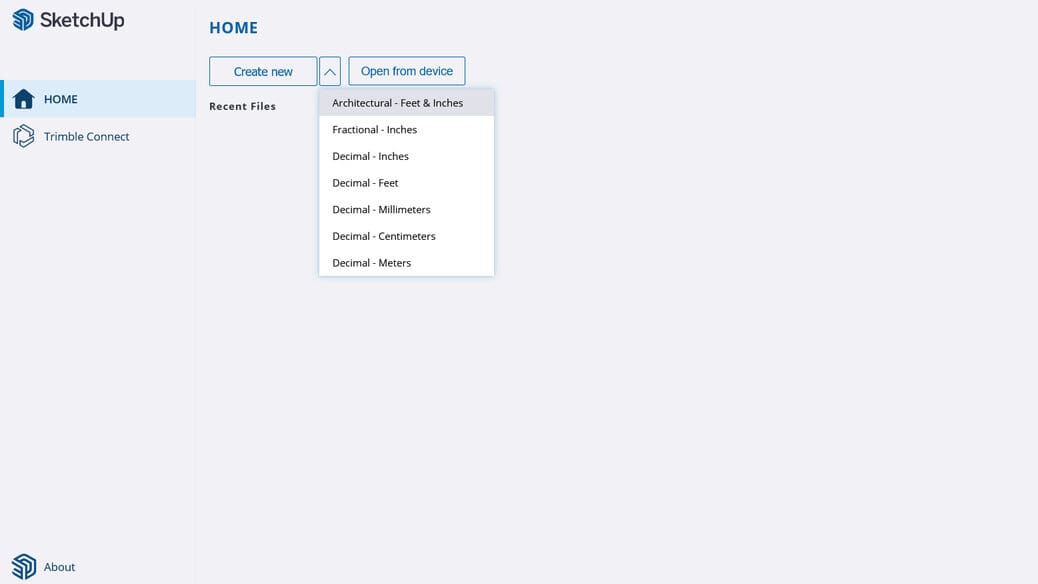
As SketchUp is web-based, you can sign up for a free account from Trimble. Your credentials should be the same if you have an old account from when the desktop application was still supported.
Once you’ve signed up or logged in, you’ll arrive at the homepage. You can click on “Create New”, which will bring you to the main modeling page. Alternatively, from the drop-down menu attached to it, you can specify what dimensions you want before the project’s created, but you can also change this later if you’re not sure yet.
It’s important to use as close to exact measurements as possible, especially if you plan on 3D printing anything you design in SketchUp in the future.
SketchUp has navigation modes for trackpads and mice. If you want to make any changes, click the hamburger menu (three horizontal lines) in the top left, and go to “App Settings > Navigation > Device” and from the drop-down menu, choose either “Trackpad” or “Mouse”.
After confirming your navigation settings, if you’ve selected the mouse, you can zoom (scroll mouse middle button), pan (“Ctrl + Shift” + hold mouse middle button), and orbit (hold mouse middle button). Of course, you can carry out the same tasks with a trackpad.
Once you’re set up in the project page, it’s time to have a clear idea of where different tools and features can be found.
UI & Layout
SketchUp’s user interface (UI) is very intuitive and easy to use. Here are the main parts:
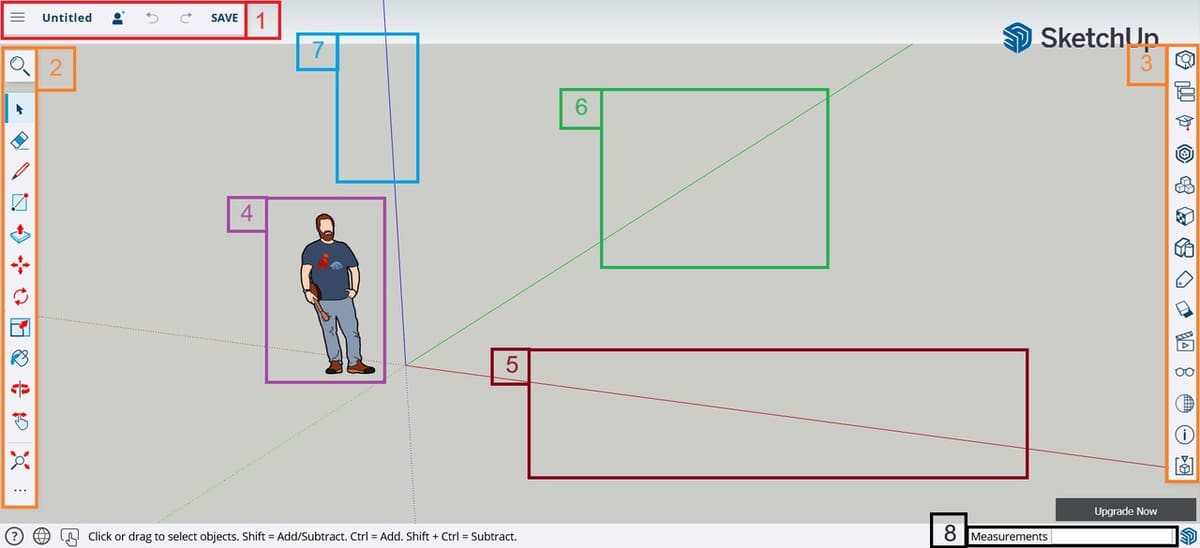
- From the main menu (1, red) you can access the expected file options from the drop-down list (e.g. opening or starting a new project), as well as readily select the undo or redo options and saving the project. Note that SketchUp auto-saves your work, but it won’t hurt to hit “Save” once in a while.
- There are two toolbars (orange). The one on the left (2) has all the tools you’ll need to create models (Draw, Line, Eraser, Extrude, etc.), with additional features accessible through the three-dot button at the bottom. You can also search for tools using the Magnifying Glass at the top. The readily available tools can be customized by clicking on the three dots and selecting “Edit” at the bottom of the small box that pops up. Drag-and-drop to your heart’s content.
- The right toolbar (3) contains extra features, such as Components, Groups, Materials, and more.
- Ty (4, purple) is used to add a sense of scale for the project, as he’s 6 feet tall. More Tys can be added from the Components section (3), and different aspects can be altered (by clicking on the arrow that appears when you hover over the component item).
- The X- (5, dark red), Y- (6, green), and Z-axes (7, blue) can be snapped to while modeling by using the arrow keys (after selecting the object and the “Move” tool from the toolbar [2]). SketchUp will show you which axes you are snapping a line or feature to with the appropriate color.
- Finally, the Measurements box (8, black) will show the results of the Tape Measure tool (2, under the additional features). It can also be used to enter sizes for length, width, or height and the appropriate unit when creating features.
Having gotten our bearings around SketchUp, let’s get started with the tutorial.
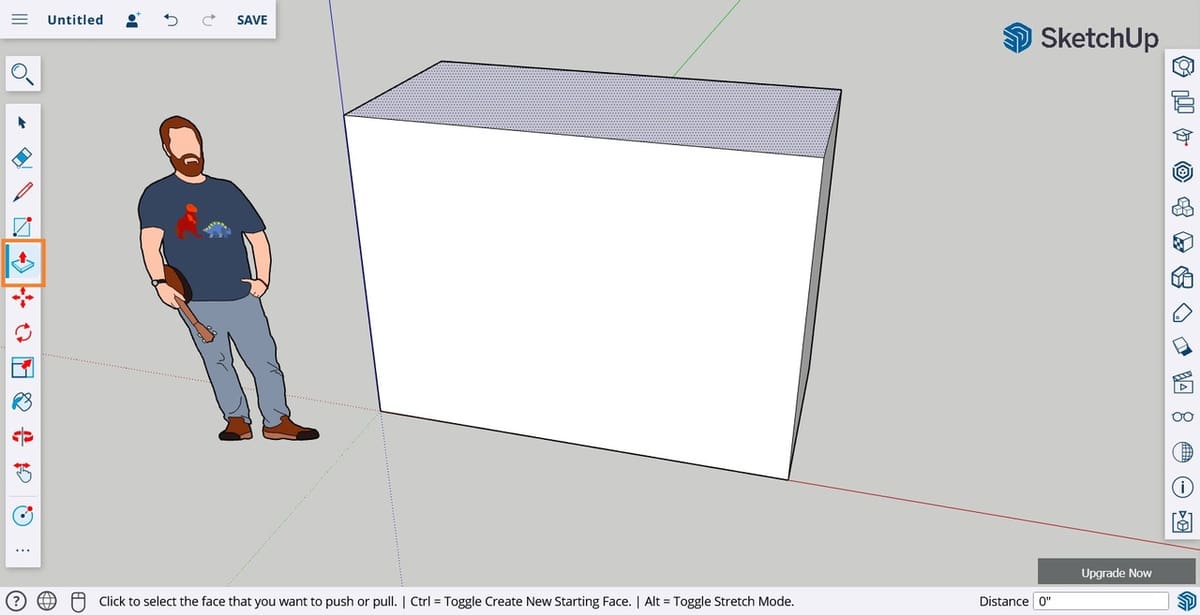
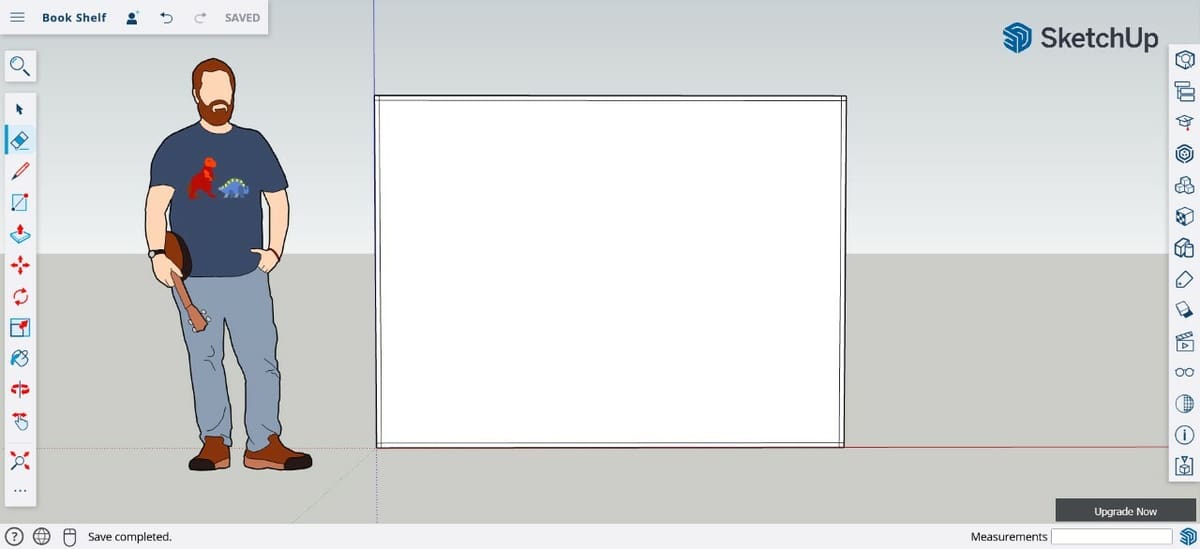
Step 1: Creating The Base
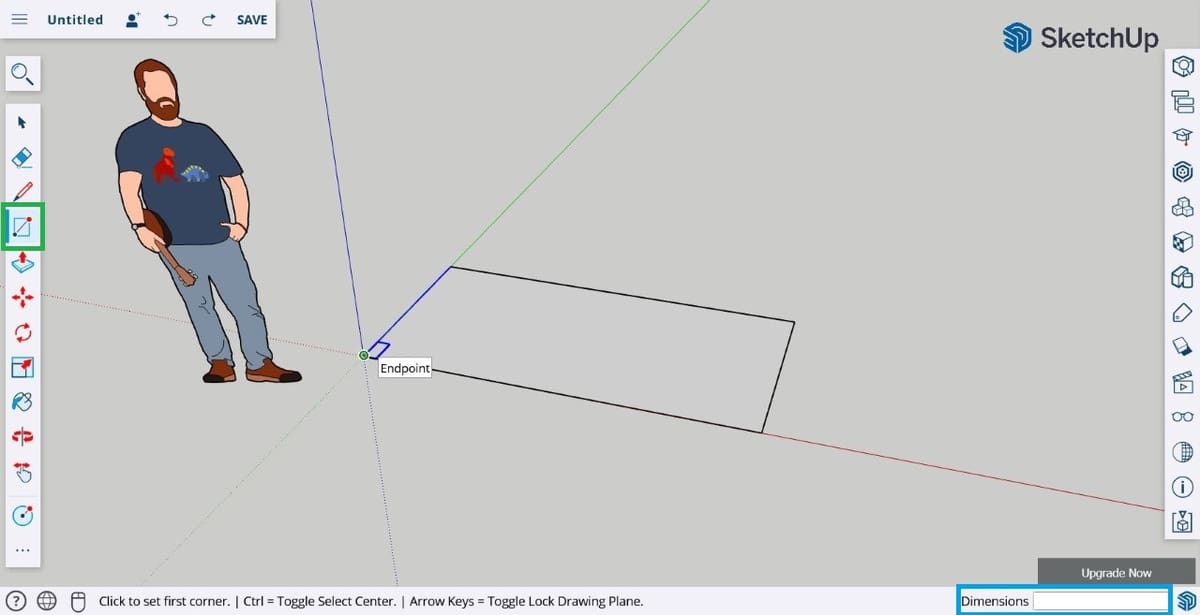
Now that we’re familiar with SketchUp’s UI, we can get started with our bookshelf, which will be 8′ x 1.5′.
- Select the Rectangle tool (green).
- Tap “Ctrl” on your keyboard until the bottom menu bar reads “Click to set first corner. | Ctrl = Toggle Select Center. |”. This ensures that you place the rectangle’s first vertex at the center of the world, which will make future steps easier to align. In this guide, the red axis denotes length, and the green axis denotes width.
- Navigate to the center of the world and hover over the center until you see a small blue rectangle outline snapped to the center.
- Click on it and start dragging out the rectangle however you see fit. Let go of the mouse button and start typing 8′, 4′ and hit Enter. These dimensions will automatically be added to the Dimensions box (light blue) and you should see the change to the rectangle. (We’ve started with a slightly deeper base as it’ll make it easier to work on it, but we’ll change it later.)
Note that ‘ denotes feet and ” denotes inches. If you want to use metric units, type in mm, cm, or m.
You can also create the rectangle by drawing lines using the Line tool and typing the length of the lines as with the rectangle length and width. For lines, you only need to enter one value. SketchUp provides helpful snap points for drawing shapes, so feel free to use whatever method you prefer.
Step 2: Extruding
The extrusion tool (Push/Pull) lets you give objects a depth or volume by “forcing” material in a specific direction from a specific face. We will make the bookshelf 6 feet tall.
- Select the extrusion tool from the right toolbar (orange).
- Hover over the rectangle created in Step 1 until you see a pattern of dots emerge – that means you are highlighting the correct face.
- Click the face to begin extruding. You can drag up and down manually until you get to the right height, or you can minimally drag it up and once again type 6′ (which should appear automatically on the Distance box) and hit Enter.
You should now have a block.
Should your extrusion tool cursor have a small ‘+’ next to it, don’t worry, as this won’t affect our model.
Step 3: Outlining Shelves
Next, we will create the shelves. This involves a few different stages. To keep things simple, the walls and base of the bookshelf will be 1″ thick.
Adding Inset Lines
- Rotate your view to face the front of the bookshelf directly (Ty should be facing you, too). You can use the panning or orbiting tools from the left toolbar or use the mouse buttons previously mentioned.
- Select the Line tool and start a new line on a vertex of the bookshelf, drawing a short line on top of the one already making up the edge of the block, until a red box and a message appear reading On Edge 1″.
- Let go and, from that point, which should become a green circle, draw a line toward the opposite side, so that a line is drawn 1″ parallel to the edge.
- Repeat this on the other three sides until you have four lines all set one inch into the bookshelf.
Creating Shelves
Now, let’s get to the most essential part of this bookshelf: creating shelves. As with the walls and base of the bookshelf, for simplicity’s sake, we’ll use a shelf thickness of 1″ and a shelf height of 1′ (or 12″), which should be good for most books.
We will repeat the previous technique of drawing on top of lines and using the Measurement box to create points.
- Draw a line on on top of the right or left vertical inset lines, with a starting point on the base’s inset. Drag the cursor and a message should appear, reading On Edge 1′, showing that this line has 1′ in length on top of the vertical line.
- Let go, click on the point again, and drag the line to the opposite inset line until the cursor snaps to it (a message should appear that reads On Edge).
- Now, go back to the starting point of the shelf’s base line and draw another line, 1″ upwards. You can drag the mouse a little and then let go and type 1″, which will change the measurement. This line will denote the first shelf’s thickness and create the next shelf’s starting point.
- Like before, extend this line to the opposite side.
- Repeat steps 1-4 until you have created as many shelves as will fit or you need.
Once you’ve gotten your bearings, for example, if you have extra space below the last shelf, you can make it bigger than the other to store larger items.
Step 4: Extruding the Shelves
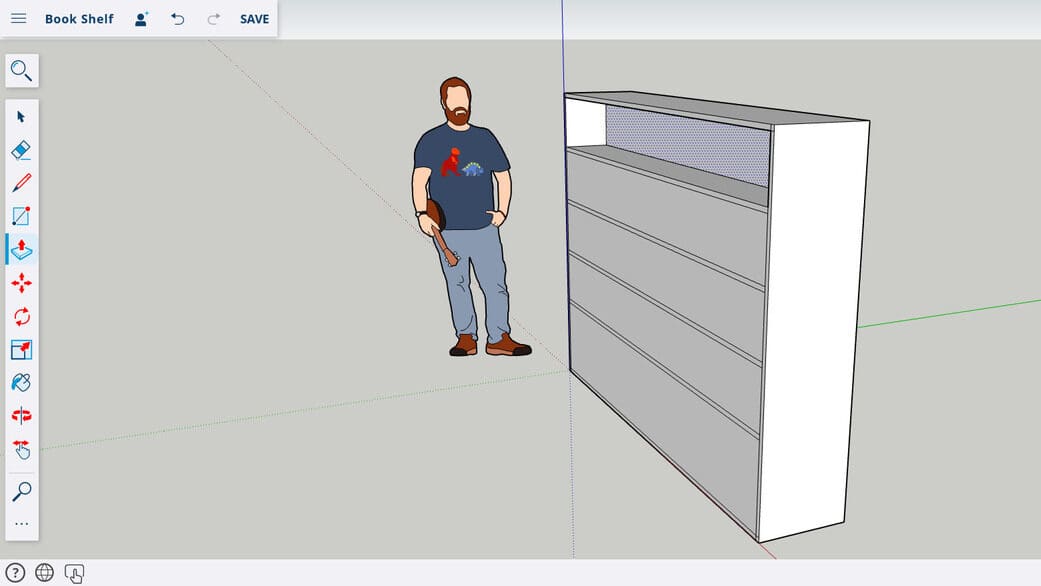
Now, we will make the physical shelves. In Step 2, we used the extrusion tool to heighten our outline. Now, we will use the extrusion tool to cut into the block and create shelves.
Before we do this, however, refer back to the dimensions of the original bookshelf. We said we would change back to an 8′ x 1.5′ bookshelf.
- To do this, orbit to the back of the bookshelf where no lines are visible and click the extrusion tool.
- Select the back of the bookshelf and move your mouse until the bookshelf’s back becomes thinner.
- Type 2.5′ to shrink the back and hit Enter.
You can double-check the size by drawing a line on top of the bottom edge and then deleting this line.
Now we can extrude shelves.
- Click in the workspace to ensure you haven’t selected anything.
- Select the extrusion tool and click on the first shelf face to modify it.
- Like before, move the mouse back until the shelf starts to move backward, type in 14″ (to create a shelf 14″ deep), and hit Enter.
You can repeat this process for each shelf, but there’s also a faster way:
- Follow the steps above for the first shelf.
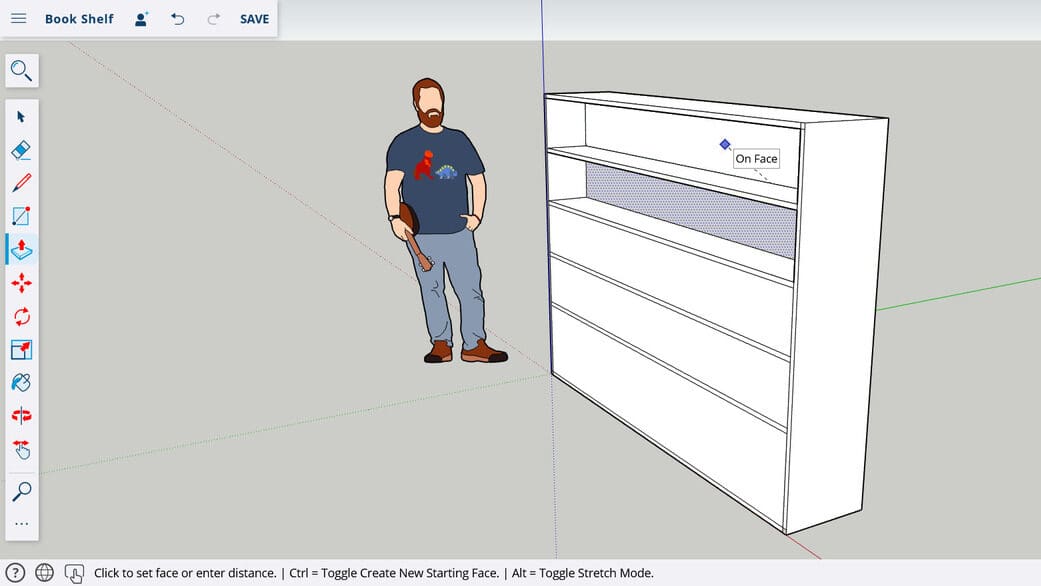
- With the extrusion tool enabled, click on a second shelf to select it.
- Move your cursor (without clicking on anything) to the face of the first shelf that’s been “pulled” (the red square should become blue).
- A message should appear that says On Face; press the left mouse button.
- Snap each shelf extrusion to the face of the previous one to create the rest of the shelves.
Step 5: Adding A Material
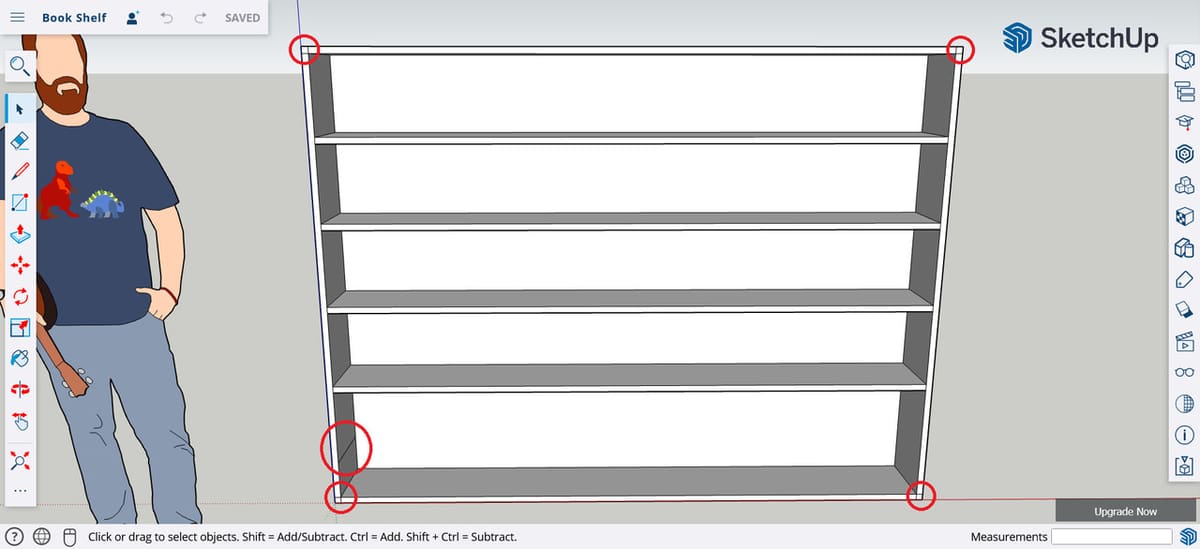
Before we finish the model, erase any unnecessary lines created during the drawing and modeling process. To do this, you can zoom into the areas as shown (if they exist in your model) and use the Eraser tool to remove extraneous lines carefully.
With that out of the way, we’ll be adding a texture to the bookshelf. We’ll use wood, but even within this option, there are multiple types, so feel free to choose what you like.
- Once you’re done erasing unnecessary lines, open the Materials feature from the right toolbar.
- Click the tab with the magnifying glass icon (“Browse”) to the right of the house symbol (“In Model”).
- Scroll down until you see the “Wood” option.
- Click on it and, from the types that will appear, select the one you want to use.

- If you want to paint various faces at the same time (instead of clicking on them one by one), choose the Select tool from the left toolbar, click on a surface, press and hold “Shift” as you click on the additional faces. All the selections should have the dotted effect.
- Select the type of material and, with the cursor becoming a paint bucket, click on one of the selected surfaces, which should paint them all.
Rinse and repeat until you’ve got the desired result.
If you want to paint the whole model in the same color, you drag the Select tool to, well, select the whole model and repeat Step 6.
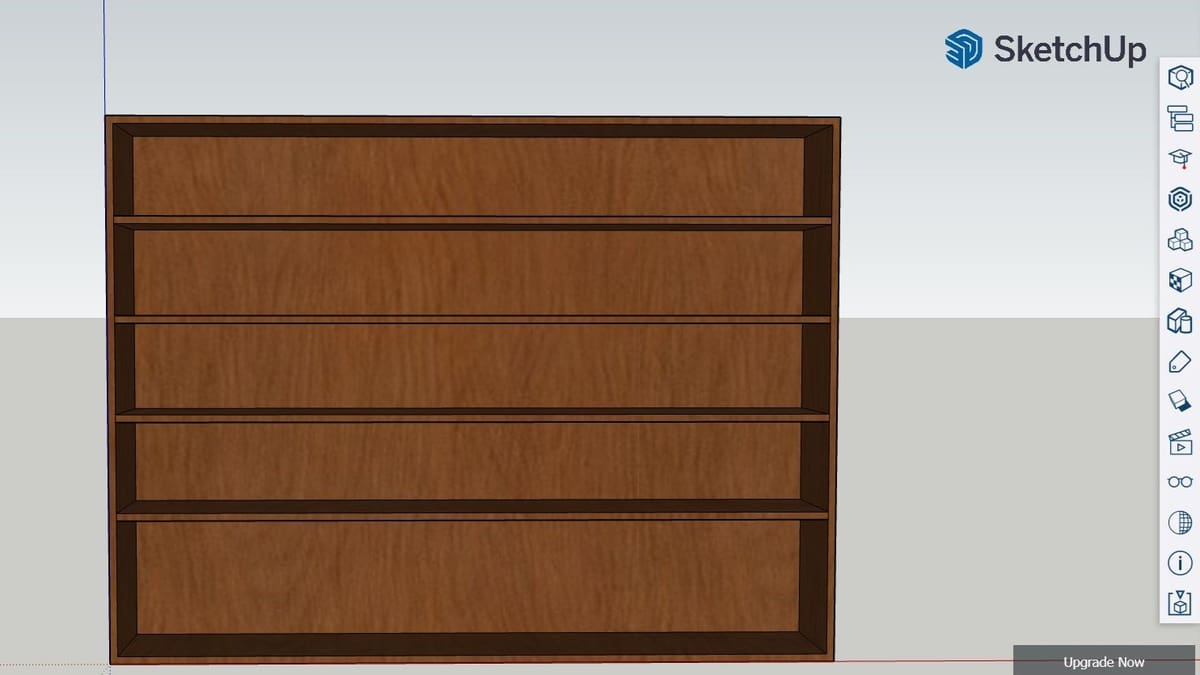
And there you go! You’ve just modeled a bookcase in SketchUp Free and have learned about the main tools, where to find them, and how to use them.
License: The text of "How to Use SketchUp Free: Hands-on Tutorial for Beginners" by All3DP is licensed under a Creative Commons Attribution 4.0 International License.