Picture this: You just transitioned your old Marlin-firmware-running-printer to Klipper and are very excited to get to use all of the advanced features that the latter has to offer. You go to home your printer for the first time and it stops dead in its tracks with the error message: “Move out of range”. How frustrating.
You may be wondering, “What does this mean?”, “What causes this error?”, and especially, “How can I fix it?”.
Don’t fret, this isn’t an uncommon experience for those new to Klipper. We will be looking to answer these questions, while getting to know a little bit more about how Klipper works under the hood as we do so.
Ready to get to work?
What Does It Mean?
The message as received is somewhat self-explanatory: The printer was instructed to make a movement that falls outside of its range of motion. But this doesn’t tell us the whole story on its own. First, it’s important to understand what exactly the “range” in the error message is referring to.
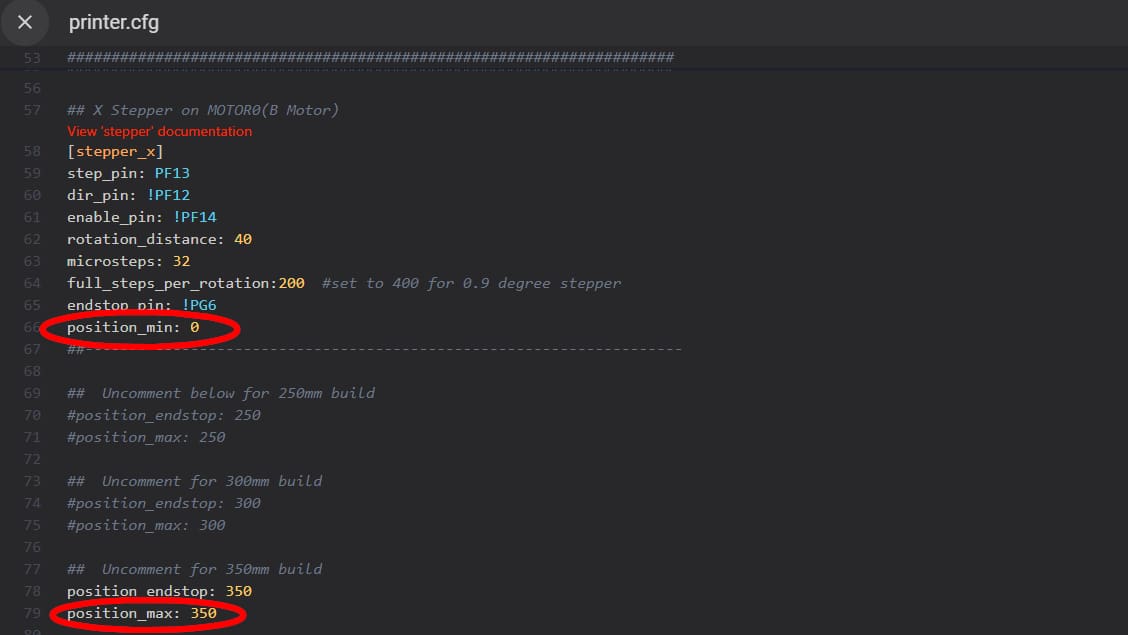
When you first set up a printer with Klipper, you will have to put together a “printer.cfg” file, which contains all the basic settings that define the properties of your particular printer. The “range” that we are concerned with here is actually a set of ranges. Namely the “position_min” and “position_max” parameters for all three X-, Y-, and Z-axes.
These parameters tell Klipper the minimum and maximum travel distance that it is allowed in all three directions, and are what determine the total printable build volume of your printer. The values set here are a direct reflection of the physical properties of your printer and need to reflect them accurately.
One of the main reasons that Klipper stops your printer from making these “illegal” moves is to keep your machine from damaging itself.
If your printer tries to move past its physical boundaries in the X- and Y-axes, it can result in damage to the motion systems, including the all-important stepper motors and the stepper drivers. But possibly the most common way in which your printer can damage itself is by exceeding its minimum Z setpoint, which can result in gouges and scratches in the print bed surface – no fun.
The other, more obvious reasons to prevent out-of-bounds moves would be to keep your printer from printing off the bed or from skipping steps when reaching the physical end of travel of each axis. This could of course result in failed prints, printing in mid air, and layer shifting.
What Causes This Error?
Unfortunately, there’s no single answer to why the “Move out of range” error occurs, as there are different reasons that can lead to it. But by taking a look at the circumstances surrounding the error message, we can gain clues to help track down the root cause.
The most straightforward cause would simply be a manual command being sent to the printer asking it to move beyond its set limits. These commands may be sent via a web interface, such as OctoPrint, Mainsail, or Fluidd, or through the touchscreen or LCD and jogging wheel. By controlling the printer around manually, it’s easy to mistakenly send a command that exceeds the printer’s limits.
Another quite common (and harder to diagnose) reason for the error is having the X- and Y-axes probe offsets set incorrectly in the printer.cfg file. This is usually encountered when using “deployed” bed probes, like the BLTouch or CR Touch. Such probes are installed adjacent to the printhead and to get an accurate measurement of the bed, you need to define the offset in both the X- and Y-axes. If one of these offsets is set, say, negative instead of positive, it may push the printer beyond its limits when trying to reach the ends of travel.
If you suspect that the probe offset may be causing you issues, check out our article on BLTouch and Klipper to help you get it set up properly.
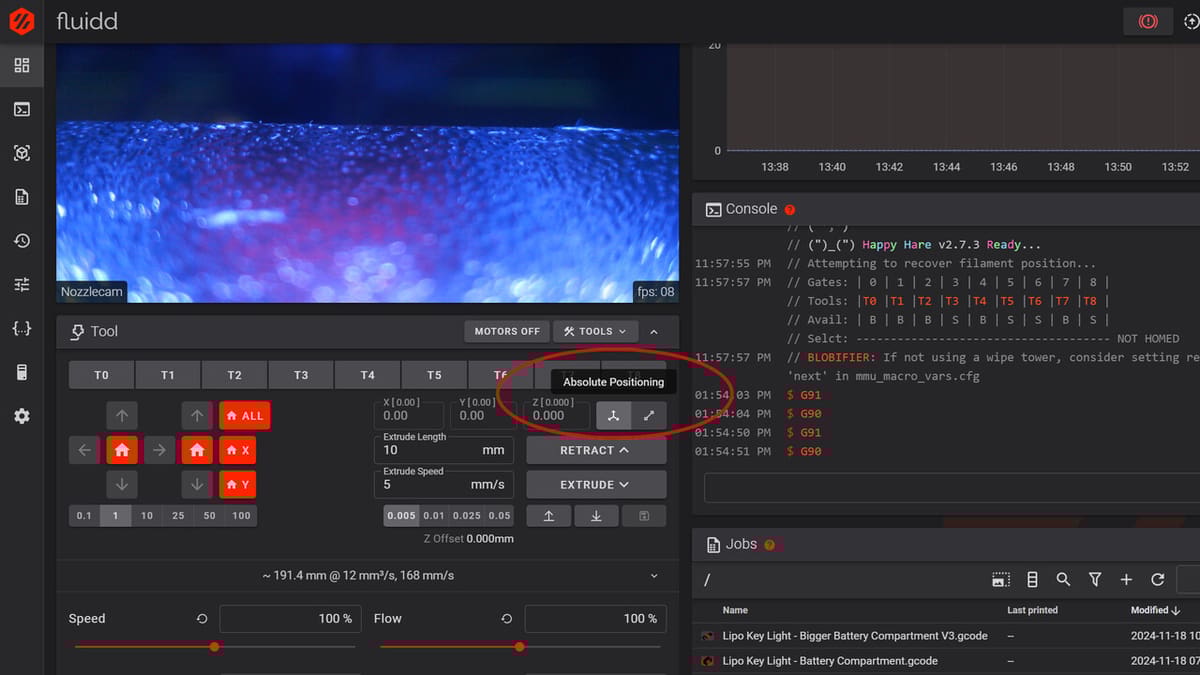
Another cause of the error involves the G90 and G91 G-code commands, otherwise known as “Absolute Positioning” and “Relative Positioning”. These commands change the way that motion commands are received. In a nutshell, Absolute Positioning tells the printer to “move the toolhead to this location”, while Relative Positioning tells the printer to “move this axis this many mm”, without regard as to the toolhead’s current location.
Suffice is to say that if a command is given to move and the wrong positioning mode is active, it can cause bad things to happen.
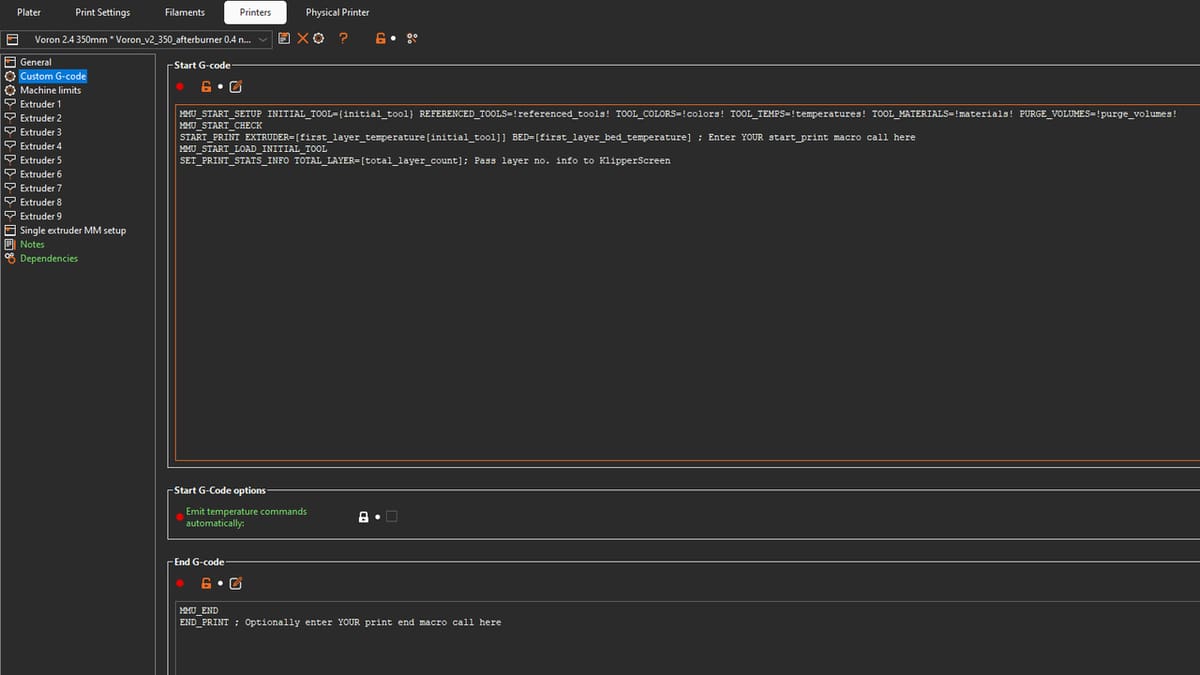
One likely culprit that tends to be overlooked refers to slicer settings. Slicers can easily give errant commands for a number of different reasons, including improper G90 and G91 commands, which are usually introduced in the slicer’s start G-code.
The most common way that this can occur is if the limits set in the slicer don’t jive with those in Klipper’s printer.cfg file. If the slicer thinks your bed is bigger than it actually is, it can send out of bounds commands, especially when trying to print larger objects or to have many objects printed all the way out to the edges of the bed.
How Can I Fix It?
So now that we know a bit more about what can cause this error, let’s get to fixing it!
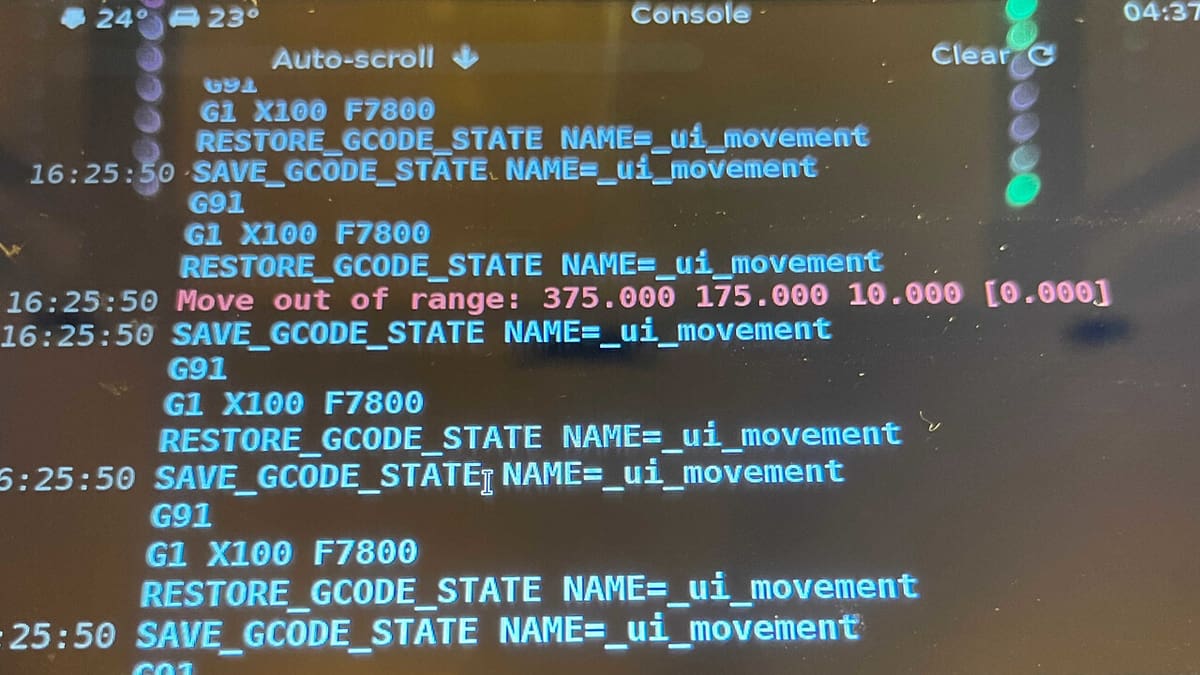
In order to nail down the solution, we first need to know exactly which axis is being affected. To find this, simply look at the error message as it appears in the console output. It should read something like this:
- Move out of range: 232.00 240.00 5.00 [0.000]
The four numbers displayed are the X, Y, and Z coordinates (in that order) of the offending G-code command, along with the extruder distance. Compare these numbers to your “position_min” and “position_max” values that are in your Printer.cfg file (under the , , and sections) for each axis. If any exceed the maximum values or go below the minimum values, that is the axis that is at fault.
It’s helpful to know what the printer was doing at the moment the error occurred, as that gives a hint as to where the source of the problem may lie. Common actions that can trigger the error include:
- Homing the X- or Y-axis when one or more of the “position_min” or “position_max” variables is set incorrectly: These variables can be found in your printer.cfg file under the sections and . You can simply correct the variables according to your printer’s information.
- Generating a bed mesh while the probe X and/or Y offset is set incorrectly: The “x_offset” and “y_offset” values can be found in the or sections of your printer.cfg file. This is another instance where the values can be corrected according to your setup’s information.
- Manually jogging the printers position beyond its set limits: As mentioned previously, this can be done using printer attached controls or other printer control software like Mainsail, Fluidd, or Octoprint. The set limits to confirm are the “position_min” and “position_max” mentioned above. Keep an eye out when manually controlling your printer or adding any specific values, so that they don’t go beyond (more or less) the limits.
- Printing with incorrect slicer settings: This is often caused by the wrong printer profile being selected. It could also be an issue with printer limits set in the slicer (e.g. max print height or bed shape in PrusaSlicer). Verify that you had selected the correct 3D printer in the slicer and re-slice the file as needed (unless you want to manually change the G-code with the correct information).
These context clues can lead to the source of the problem and allow you to find the offending variable or setting and fix it. If, however, you aren’t able to find the issue based on these, there are a few other problems that may catch people out. Let’s take a closer look at these.
More Causes & Solutions

While troubleshooting Klipper errors can be frustrating, the best thing to do is pin down what caused the error so that you can apply the correct solution. Here are some of the most common issues and how to fix them:
“Z Min” Errors While Probing
One common problem that is often faced when setting up a bed leveling probe for the first time is a negative “Move out of range” error in the Z-axis. It is logical to think that minimum Z position should be set to zero in the printer.cfg file, but that’s not the case. In Klipper, it’s usually necessary to set the “Z min” to a bit below zero to allow for a bit of variation in the bed.
When the “Z min” is set exactly at zero, the mesh will get created just fine, as the probe is below the nozzle while probing. Once you go to print the first layer, and the mesh tells the printer to go below the zero point to correct for a dip in the print surface, the printer will halt and error out. By setting “Z min” to slightly below zero, you’re telling the printer that it is okay to go a bit under the zero point set when the Z-axis is first homed. This will allow the bed mesh corrections to account for low points in the bed.
In order to fix this issue, it’s recommended to set the minimum Z position (“position_min”, under the section of your printer.cfg file) to something reasonably small, like -2, which should account for the deepest valleys in even the most warped of print beds.
Relative vs. Absolute Positioning Errors
This is a really common one for folks who like to use a lot of macros to streamline and expand their printers’ functionality. While macros in Klipper can be incredibly useful, it’s important to understand what they’re doing and when in order to avoid errors due to G90 and G91 commands.
The best way to find and fix this issue is to disable your macros one by one, until the error no longer occurs. This will be your problem macro. It’s most often that the printer is mistakenly left in relative positioning mode (G91) while absolute coordinates are being sent. You can fix it by adding the appropriate G90 or G91 command in the macro, your start G-code, or your slicers custom G-code section.
Incorrect Slicer Settings
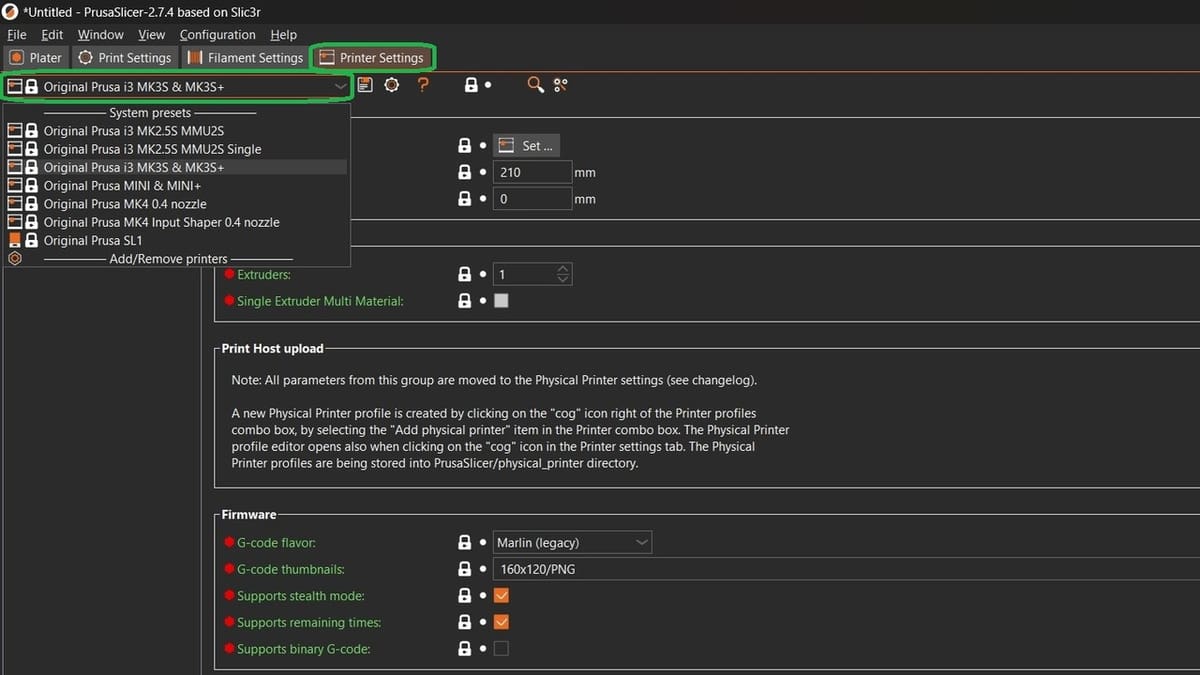
One very simple and yet often overlooked mistake is simply trying to run G-code that has been sliced with another printer’s profile. This can lead to all sorts of issues, but it will lead to the “Move out of range error” if the print bed is larger on the printer the file was sliced for than the printer that is running the G-code.
In order to avoid this error, always double-check your slicer settings, the profile that is selected, and any printer limits or start G-code that is being injected by the slicer software.
Klipper Bugs
There is always a possibility that it is a bug in Klipper which is causing the error. There is some anecdotal evidence that this has happened in the past, but on the whole Klipper is very stable and robust these days. As an easy preventative, always keep your software up to date and run the latest stable releases of Klipper. Also, as a sanity check, it never hurts to just try restarting Klipper, the Host computer, or all of the above.
Community Resources
Hopefully this has gotten you up to speed and given you some clues as to why your printer is experiencing Klipper’s “Move out of range” error. There’s a lot going on under the hood that may be causing the error, but this kind of troubleshooting is all about narrowing down the possibilities and homing in on the exact cause of the issue.
If you have exhausted all the conceivable possibilities and you are still completely stumped, there are plenty of resources that can help you fix the issue.
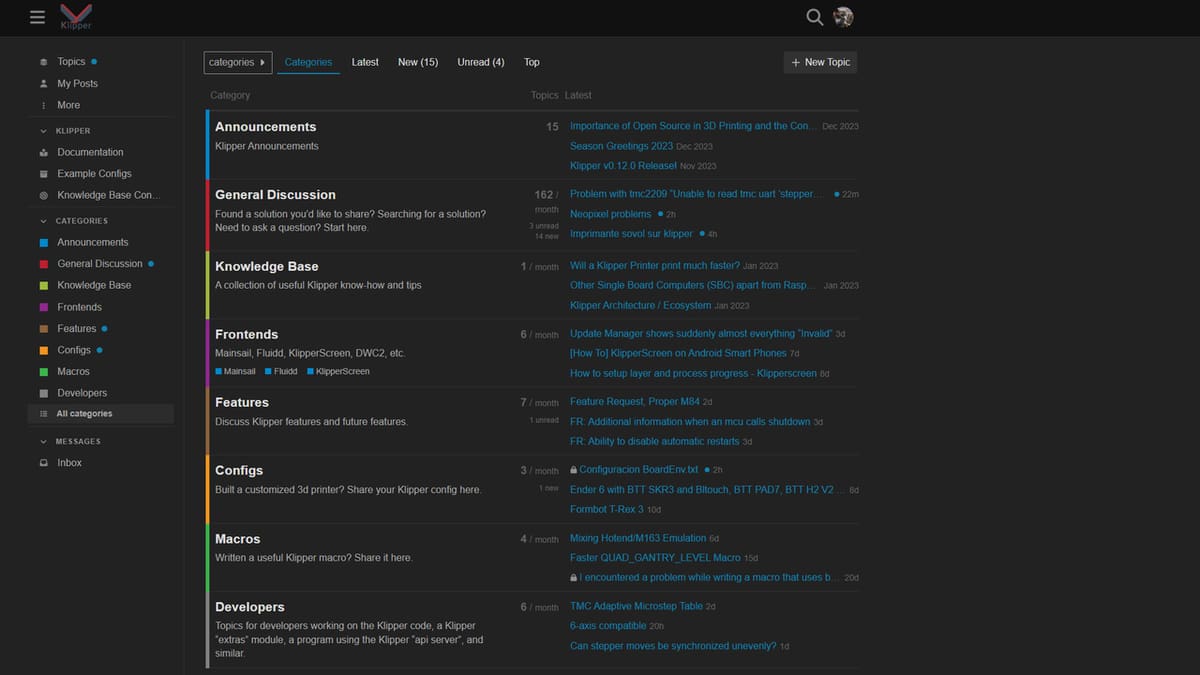
One of the most helpful is the Klipper Forum, which is a very active community with a lot of smart folks willing to help you with your issues. There’s also a specific post by forum leader Sineos, which has a very neat and concise breakdown of possible causes and solutions of this issue. And, lastly, there is just the Klipper documentation itself. It is never a bad idea to read the manual, and it’s a good idea to keep the page bookmarked and ready to go for future studying.
License: The text of "Klipper: Move Out of Range Error – How To Fix It" by All3DP is licensed under a Creative Commons Attribution 4.0 International License.