KlipperScreen: All You Need to Know

KlipperScreen is a program that runs on Klipper firmware and provides a GUI to control your printer. Read on to learn more about it!
Klipper is a powerful, innovative, and open-source 3D printer firmware package that uses both a 3D printer mainboard and an external single-board computer (SBC) to operate. The computer (e.g. Raspberry Pi board) relieves the mainboard’s G-code processing responsibilities, allowing it to solely focus on controlling components. Due to its unique architecture, Klipper enables your machine to print much faster and offers other features like integrated support for remote printer control platforms (e.g. OctoPrint).
While Klipper has a lot to offer, one of its largest flaws is that it lacks support for many of the stock direct interfaces (LCDs) found on popular 3D printers. Instead, most Klipper users rely on remote interfaces like OctoPrint, Fluidd, or Mainsail to start prints, set temperatures, and perform other actions.
Even though Klipper doesn’t work on many stock interfaces on printers, it’s compatible with basically any display compatible with a Raspberry Pi board (e.g. Raspberry Pi Touch Display). For these compatible displays, Klipper does have a default graphical user interface (GUI), which looks very similar to Marlin’s GUI.
KlipperScreen is an add-on program for Klipper firmware that provides a colorful and capable graphical user interface for Klipper-compatible touchscreen displays. With many features just a click away, KlipperScreen is a great option for those who like the capabilities of Klipper firmware but also want direct interaction with their machine with a nice GUI.
In this article, we’ll go over KlipperScreen, reviewing its features, capabilities, and more. We’ll also briefly go over how you can install it to a printer already running Klipper firmware.

How It Works
3D printers operate through commands known as G-code, which are sent to the mainboard to perform a specific action like setting a temperature. An external graphical user interface like the default Klipper GUI simply masks the sending of these commands in a more user-friendly interface that makes using the printer easier.
KlipperScreen operates similarly to a directly attached interface but with a twist: it never directly sends the G-code commands. Instead, KlipperScreen relies on the remote printer control program, like OctoPrint, to send the G-code commands after a user has requested an action to be performed (e.g. by clicking a button).
If this process sounds familiar, it is! KlipperScreen was inspired by OctoScreen, a similar platform meant for 3D printers running Marlin firmware with OctoPrint. Of course, KlipperScreen is meant for Klipper firmware rather than Marlin, but it also doesn’t require a remote interface like OctoPrint.
Moreover, KlipperScreen uses Moonraker, an API web server for Klipper that transmits information like temperatures to the GUI. This means that you don’t need to install a remote interface like Fluidd for KlipperScreen to work.
As for the hardware side of the program, KlipperScreen works with many Raspberry Pi-compatible touchscreen displays. You can check out KlipperScreen’s documentation page for the complete list of compatible screens.
Now that you know how KlipperScreen works, let’s get to the features.
Features
KlipperScreen has many valuable features, including a few not typically offered by the default interfaces on other firmware programs like Marlin. In this section, we’ll briefly go over KlipperScreen’s features that will help you control your printer.
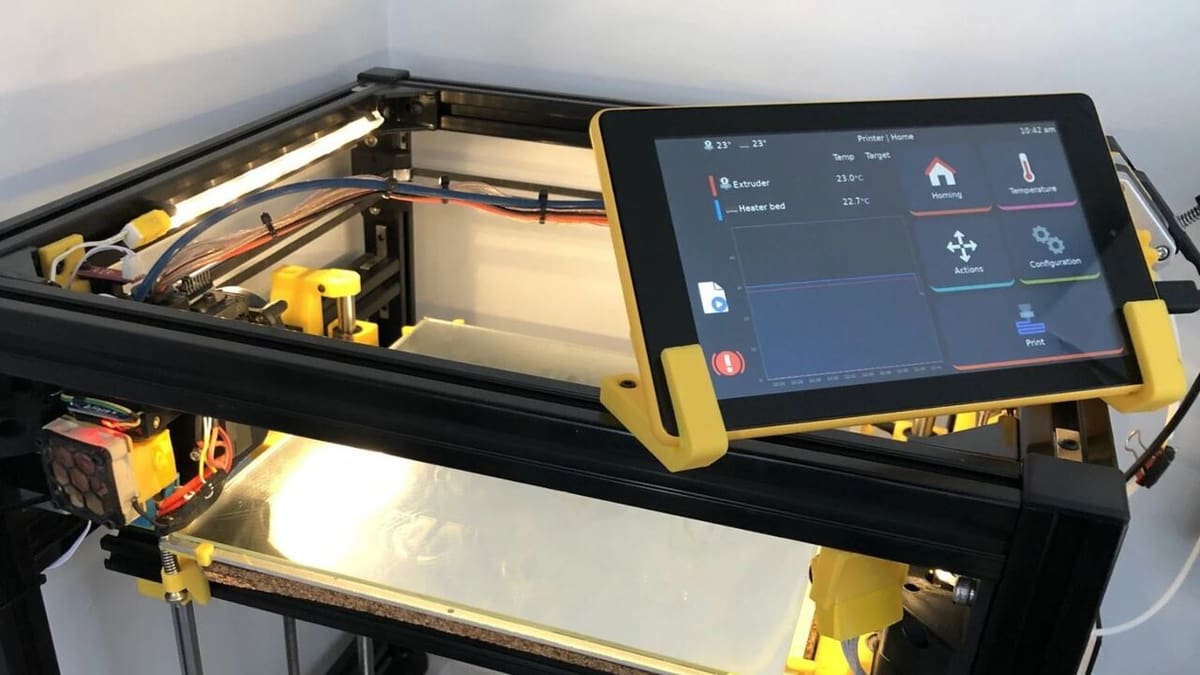
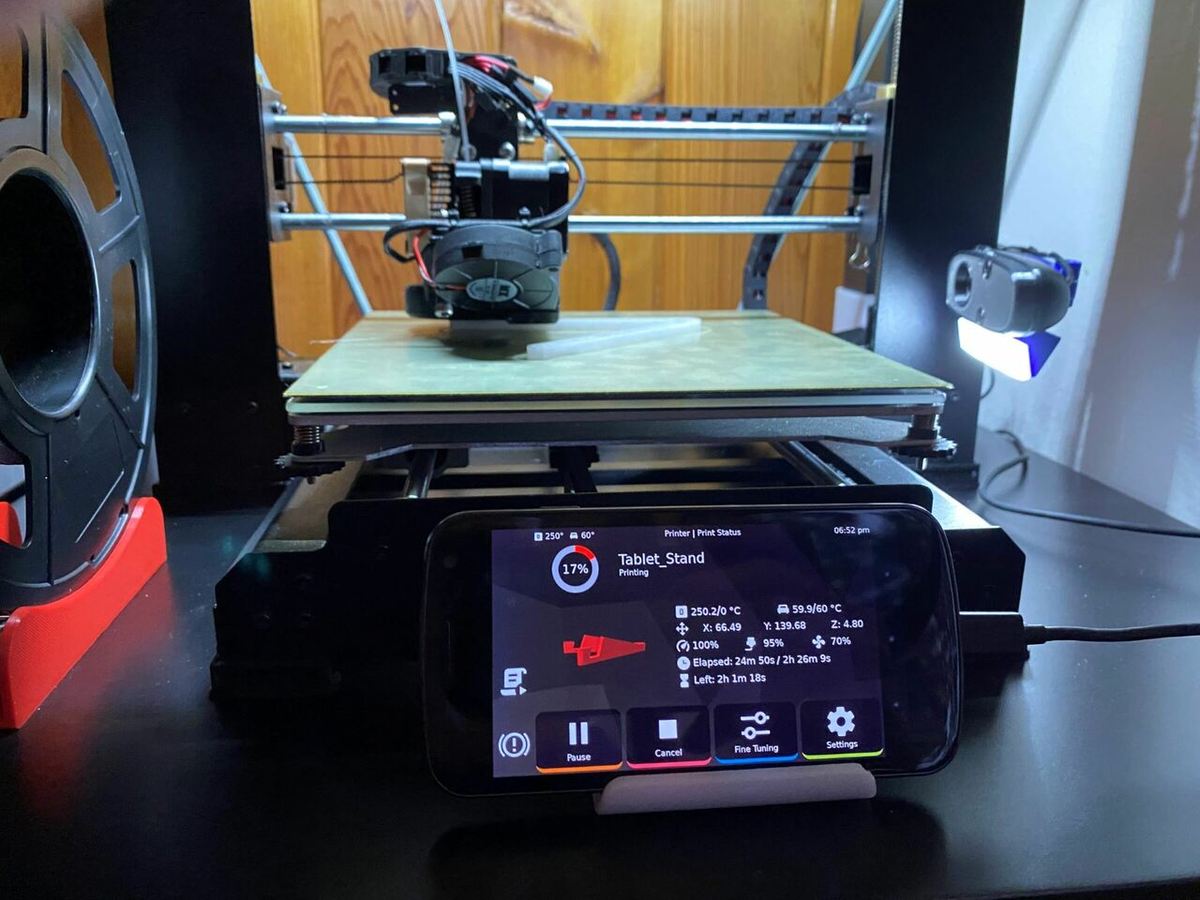
First off, KlipperScreen lets you start, pause, and stop print jobs, which is perhaps the most important feature of any 3D printer GUI. Once you start a print, KlipperScreen provides a render of the 3D model so you can see exactly what you’re printing – a feature that enhances the visual appeal of the GUI. Next to the render, you’ll find some important information regarding the ongoing print job, including the temperatures, fan speed, printhead position, and time remaining.
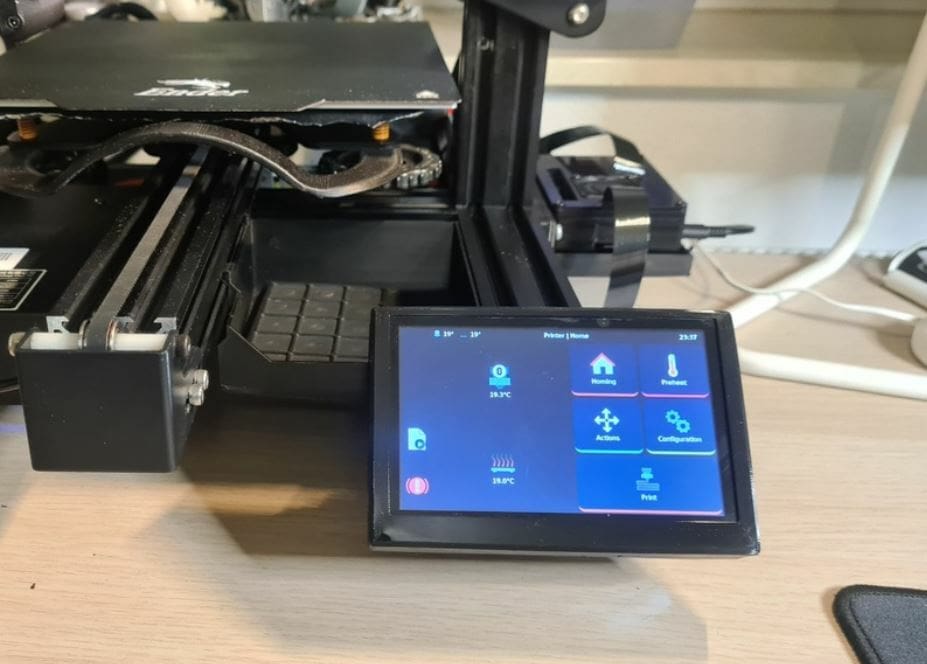
Like almost any 3D printer GUI, KlipperScreen offers a lot of control when it comes to motion and other types of control. There are all the basic buttons for homing the axes and moving individual components that you’d find on any 3D printer’s GUI. Furthermore, KlipperScreen has features for disabling the motors, controlling fan speeds, setting acceleration, extruding material, adjusting the Z offset, and more.
As for the temperature, KlipperScreen has graphs monitoring the printer’s nozzle and bed temperatures, which you can set through the GUI. On the temperature graph, there’s also a line for the Raspberry Pi’s temperature so you can make sure the board isn’t overheating.
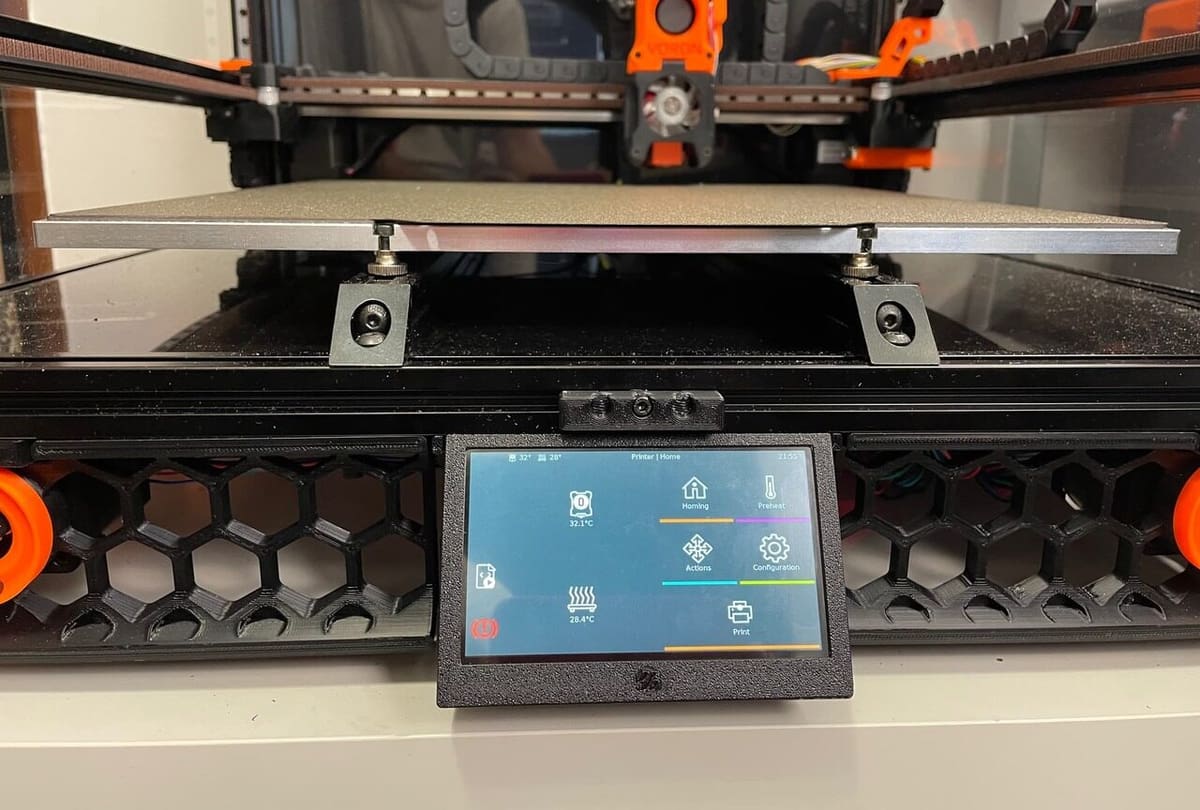
One of the best features of this program is the bed leveling portion of the GUI. KlipperScreen can produce a mesh visualization of your bed if you have an automatic bed leveling (ABL) sensor (e.g. BLTouch) connected. If you don’t have an ABL sensor, KlipperScreen has an alternative section with a 2D diagram of the bed and a quick-access button for homing the axis so you can manually level your bed.
There are also other useful features in KlipperScreen unrelated to your 3D printer, which help you ensure that Klipper and KlipperScreen are running properly. In the GUI, you can check the available Wi-Fi connections and the connection status, control the macros featured on the GUI, and set the font size and display theme. You can also check that Klipper, KlipperScreen, your remote printer control server (if you have one), and Moonraker are all up to date, and you have the ability to restart the program in the GUI.
Lastly, it’s important to go over the organization and appearance of KlipperScreen as you’ll likely be seeing and using it often. As seen in the image above, all of KlipperScreen’s features are well organized. The GUI also has a dark blue background (like a dark mode), and different brighter colors are used as the trim for individual features.
Installation: Moonraker
Installing KlipperScreen isn’t very difficult if you’ve already set up Klipper firmware on your 3D printer and Raspberry Pi (or similar SBC). As we mentioned, KlipperScreen uses Moonraker to access and display important information about your printer and to allow you to send commands from the interface. In this section, we’ll go over how you can install Moonraker to your Klipper configuration so you can later install KlipperScreen.
Before getting started, it’s worth mentioning that installing Moonraker (as well as KlipperScreen) requires you to send a handful of terminal (command line) commands through your Raspberry Pi (or other host device). You can send a terminal command by connecting a keyboard to your Raspberry Pi computer with a compatible display attached. Alternatively, many users prefer to use a remote terminal access program, like Putty, which can connect to the host computer’s IP address to allow you to send terminal commands from a different device.
It’s also important to note that if you already have a remote interface (Fluidd, for example) set up for your printer, Moonraker is likely already installed. In this case, you shouldn’t need to install the program again, and you can move on to the next section to install KlipperScreen.
Now, let’s get into the steps for installing Moonraker. You can also follow Moonraker’s official guide:
- Power on your 3D printer and single-board computer. Make sure a Klipper-compatible LCD is connected to the SBC.
- Make sure your Klipper configuration meets all of the prerequisites stated on Moonraker’s documentation page (e.g. Unix Socket enabled).
- Open your host computer’s terminal and send the following command:
cd && ~ git clone https://github.com/Arksine/moonraker.git - Wait for the GitHub Moonraker repository to clone, then send the next terminal command:
cd && ~/moonraker/scripts ./install-moonraker.sh
Now that you’ve installed Moonraker, you can move on to the next section to learn how to set up KlipperScreen.
Installation: KlipperScreen
With Moonraker installed, there are only a few things left to do to start using KlipperScreen. Follow the steps below to complete your KlipperScreen installation:
- Power off your printer and SBC.
- If you haven’t already done so, connect your KlipperScreen-compatible touchscreen display to your host computer and mount the display to your printer (or separately).
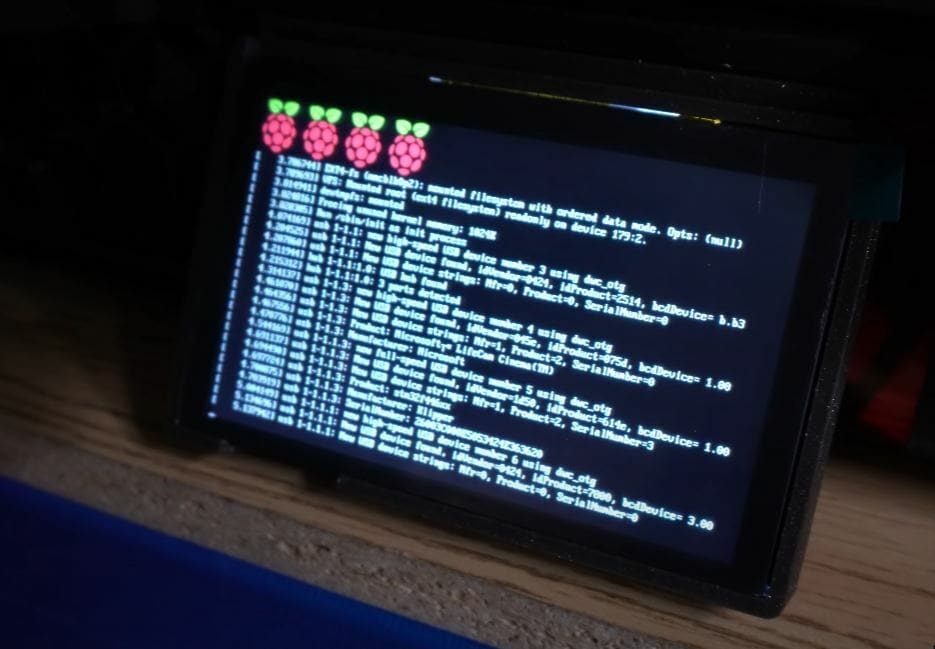
- Power on your printer and SBC, and make sure the screen is recognized by the host computer. You should see the default terminal interface on the screen.
- Power off your printer and SBC.
- Remove your single-board computer’s inserted microSD card containing the configuration files.
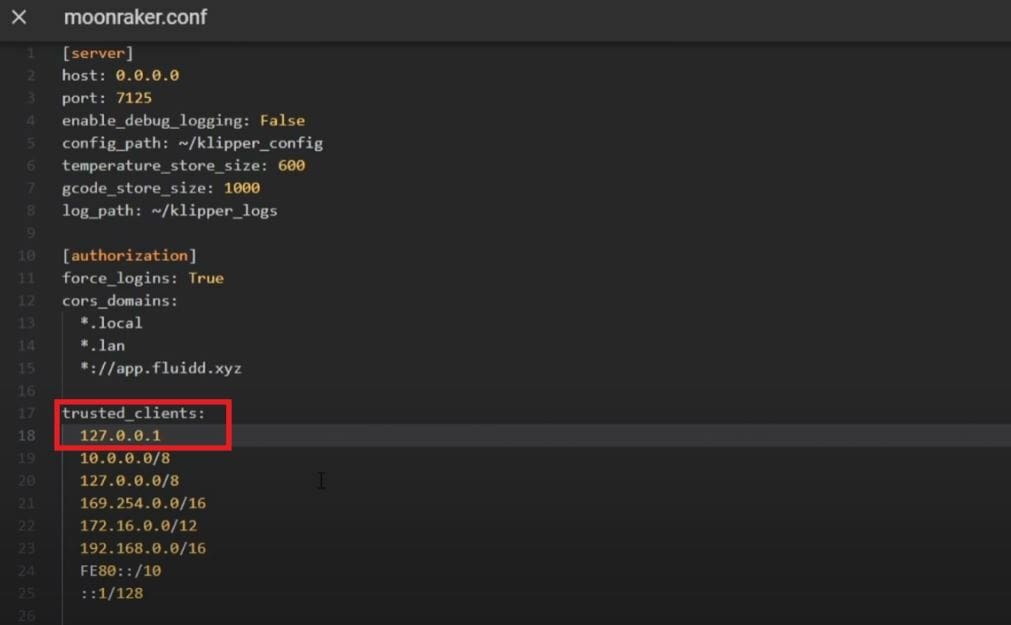
- Insert the microSD card into another device (e.g. laptop) and locate the Moonraker configuration file, which should be named “moonraker.conf”.
- Open the Moonraker configuration file and search (“Ctrl + F”) for “trusted_clients”. In the list of trusted clients, add the client “127.0.0.1”. This will allow KlipperScreen to utilize Moonraker to access your printer’s information and control it.
- Save the changes to the configuration file, eject the microSD card, and re-insert it into your SBC.
- Power on your printer and SBC.
- Access your host computer’s terminal, then send the following command into your SBC’s terminal:
cd ~/ && git clone https://github.com/jordanruthe/KlipperScreen.git - Once the KlipperScreen program files are cloned, send the following terminal command:
cd ~/KlipperScreen && ./scripts/KlipperScreen-install.sh - Wait for the program to download. Your screen should show the KlipperScreen interface. If it does not, try powering off your printer and SBC, then powering them on again to restart the application.
And that’s it! You now have a KlipperScreen graphical user interface that you can use to control your printer directly! You can check out the project’s public GitHub page to learn more about the program and troubleshoot any issues you may have.
License: The text of "KlipperScreen: All You Need to Know" by All3DP is licensed under a Creative Commons Attribution 4.0 International License.