![Featured image of [Project] Make Your Designs Glow with a Laser-Engraved LED Acrylic Sign](https://i.stageall3dp.com/workers/images/fit=scale-down,w=1200,h=675,quality=79,gravity=0.5x0.5,format=auto/wp-content/uploads/2018/10/17100800/rebrncom-181016.jpg)
[Project] Make Your Designs Glow with a Laser-Engraved LED Acrylic Sign

Have you ever wanted to make a cool sign for your desk or workplace? Look no further, for here we have a step-by-step guide to creating an amazing-looking display, using a laser cutter, LEDs and acrylic sheeting, as demonstrated by pardy73 on Instructables!
An Introduction

These signs may look like a holo-tablet from the future, but make no mistake, they are deceptively simple to create. Instructables user pardy73 has provided an excellent guide to designing and building your own sign, which we’ll be looking at in this Weekend Project.
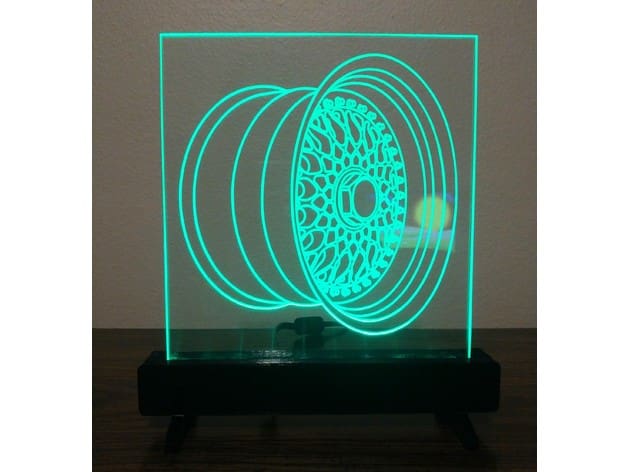
The idea behind these signs is that a design etched into a transparent sheet will diffract light that enters through the side. The result is that the sign appears to glow in some spots while others remain transparent.
Practically speaking, if you use a laser to engrave a sheet of acrylic (also known as Perspex or Plexiglass) and then line one edge of the sheet with LEDs, the light will travel through the sheet and be diffracted outwards by the etching. This makes the etching light up, seemingly floating in midair, while the rest of the sheet remains transparent.
This principle can be used to create all manner of glowing signs, from a simple 2D image and text to a complex illusion that appears to be a 3D hologram, hovering in midair.
Today, we’ll be showing you the steps and techniques necessary to create your own amazing acrylic sign, so follow along!
Required Tools and Materials
To complete this project, you’ll need the following:
- Acrylic sheet
- LED strip light and power supply, any color
- Edge-lit profile, end caps, and spring pins sized to fit your acrylic, or access to a 3D printer
- Access to a CO2 laser cutter (or an online laser cutting service)
- Access to graphic design software
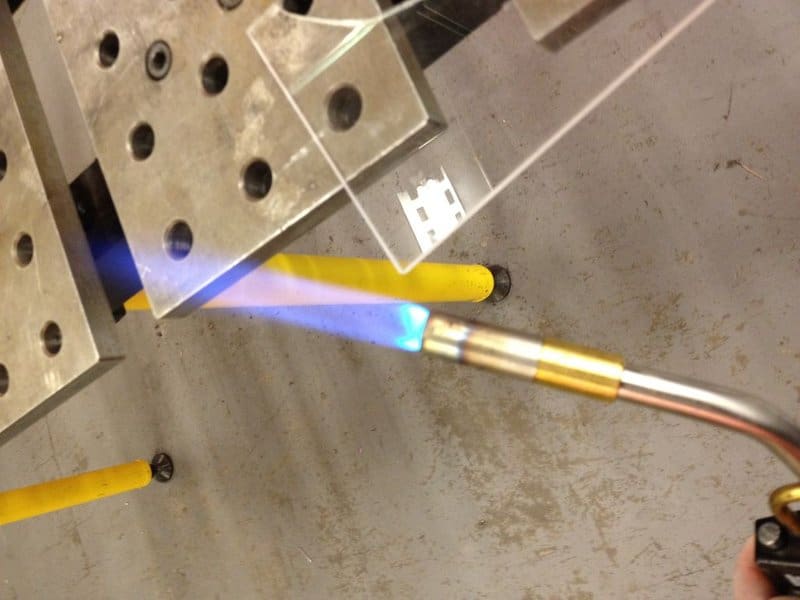
An optional extra tool for polishing the acrylic is a propane torch. However, this is not required to complete the project.
Step 1: Design Your Sign
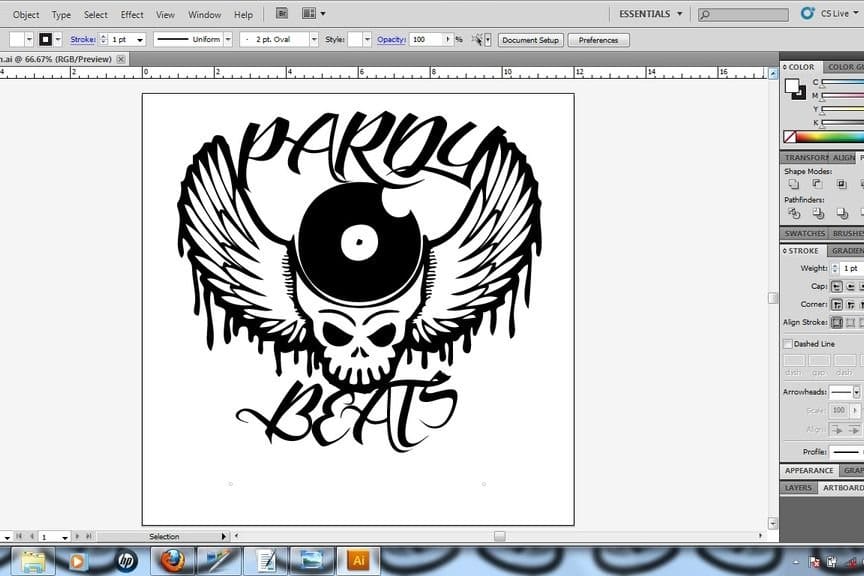
The first step is to create a design to engrave on your sign. You can use most CAD software programs to do this, or programs such as CorelDRAW or Adobe Illustrator.
During this process, you can choose the size, shape, and complexity of your sign. Keep in mind that the laser cutter does not differentiate between colors, so pick a design that will look good in black and white.
The only requirements for your design are that it is 2D, will fit in your laser cutter, and has an excellent flat edge to interface with the edge-lit profile and LEDs. Other than that, feel free to experiment!
Once your design is looking the way you want it, use your software to make a mirror image. This will allow us to engrave it on the back of the sign so that the front is nice and smooth. Of course, this is not mandatory, but it’s easier to change now rather than later.
If there are any colors or shading, change the settings so that your design is only black and white. Remember that lasers can’t print in color, and shading cannot be engraved.
Step 2: Engrave Your Acrylic
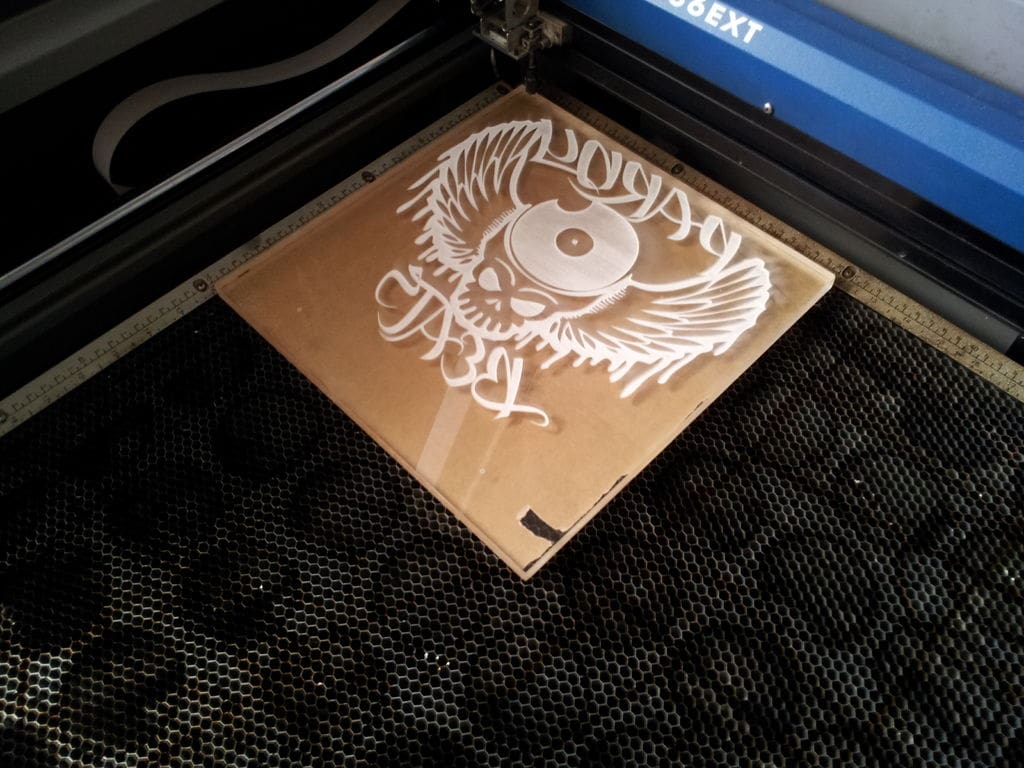
Now that you have your design, import it to your laser cutting software and change your settings to engrave (not cut) the acrylic.
There are two options at this point: engrave on the front of the sign, or engrave on the back. Engraving on the back of the sign is most popular, as it will give the front a nice smooth finish. Remember, when you’re engraving the back of the sign, you need to double-check that your image is properly mirrored to be read from the other side.
You can check that your image is properly mirrored and positioned by running a test print with a thin sheet of plastic or paper over your acrylic.
Once you’re sure your settings are correct, go ahead and engrave your design into the acrylic.
An optional extra step to take at this point is to use the laser to cut out your sign into an interesting shape. Keep in mind that there should be a flat edge for the LEDs. Also, areas that do not have a direct path for light to travel through (i.e. overhangs) will not light up as brightly as areas with a direct path to the LEDs through the acrylic.
It should be noted that an alternative method to using a laser is to use a CNC router and an engraving bit.
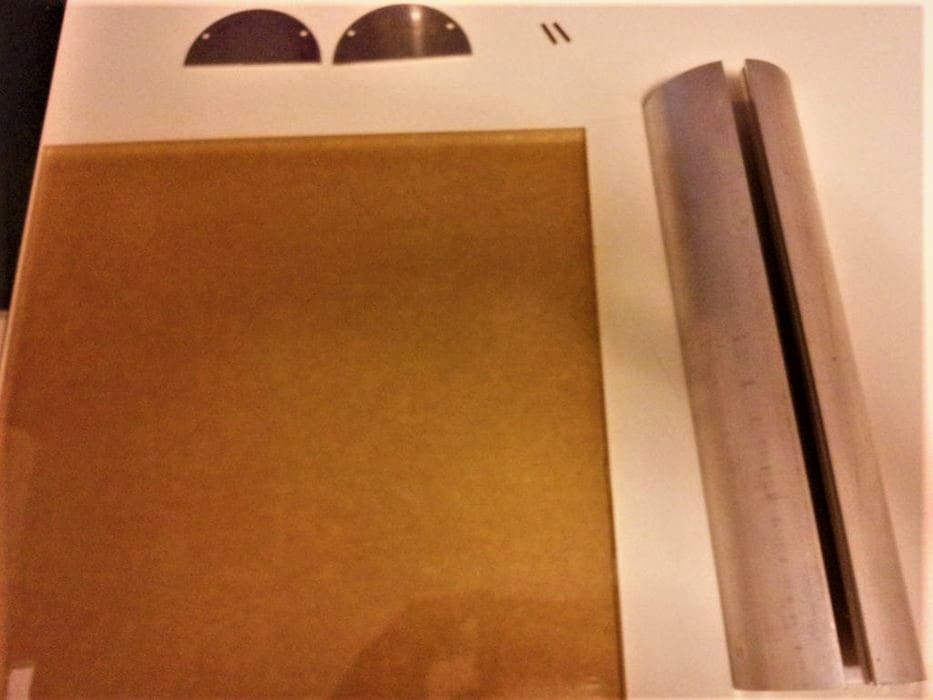
Step 3: Assemble Your Edge-Lit Profile
The first thing you need to do is get ahold of an LED strip for use in your sign. These can be any color, or multicolor if you like. An interesting idea is to use NeoPixels to create animated effects.
Measure the length of the flat edge of your sign. Cut your LEDs as close as you can to this length, and have the edge-lit profile cut to this length as well. An alternative to using a prefabricated edge-lit profile is to 3D print your own, like Ted Wirsching on Thingiverse. Otherwise, use the laser cutter to form one out of wood or even another piece of acrylic.
Using double sided tape, the sticky backing on your LED strip, or some glue, insert the LEDs into the profile and stick them firmly to the bottom. Slide in your acrylic sign, with the front side facing forward, and push the flat edge in until it is flush with or just above the LEDs in the strip. Assemble the end caps, and your sign is just about finished!
Final Steps and Optional Extras
The last thing you need to do is connect your LED strip to a power supply. Most strips come with one, use that if you have it. If not, be sure to check the rating of the LEDs before getting your own. In the case of NeoPixels and RGB strips, you will need to assemble a control circuit in order to properly utilize the full functionality of your LED strip.
An optional extra step is to flame polish the edges of your sign using a propane torch. Note that butane torches won’t work because they burn at the wrong temperature. Carefully and slowly run the flame around the cut edges of the acrylic to give them a nice polished sheen.
When you’re done, use a damp microfiber cloth to clean off any smudges on your acrylic. Don’t use window cleaners or any alcohol on the acrylic, as they will cause a chemical reaction. Also, avoid using paper towels to clean your sign, as the fibers will scratch the surface of the acrylic slightly, causing it to become cloudy.
Now, plug in your sign and turn it on to see the amazing optical effect you’ve just created! To see the original instructions, check out pardy73’s great Instructable!