Laser Etching: All You Need to Know to Get Started

Laser etching is a perfect way to create an indelible mark on clear and translucent items. Read on to learn all about this technology!
Makers love to customize stuff! So, it’s no surprise that laser etching – the technique to decorate transparent or reflective objects and materials using a laser beam – is becoming increasingly popular with makers. Why?
A great first reason is the increasing number of laser machines available to the public either as consumer-grade equipment or through a makerspace. Add to that the availability of software for laser engraving and cutting as well as all the designs and graphics available on the Internet, and we have the perfect mix for an explosion of creative laser projects.
But laser etching comes with its own challenges, including picking the right machine, making a design that will etch nicely, and preparing your project and cleaning it up. In this article, we’ll walk you through the whole process below.
Let’s get started!
Etching 101
Let’s start by talking about what etching is and isn’t. Among makers and even laser engraving hobbyists, “etching” is often used interchangeably for “engraving”. And yet, they’re not the same.
Laser engraving is purposefully using a laser beam to remove material from an object. The result is a groove inside the object you’re engraving that’s around half a millimeter to a millimeter deep – or more, if you’re engraving over the same surface over and over again. As a result, the continued application of the laser to the surface might result into a change in color as well. For example, a laser-engraved wood surface will get darker and darker with every pass of the laser.
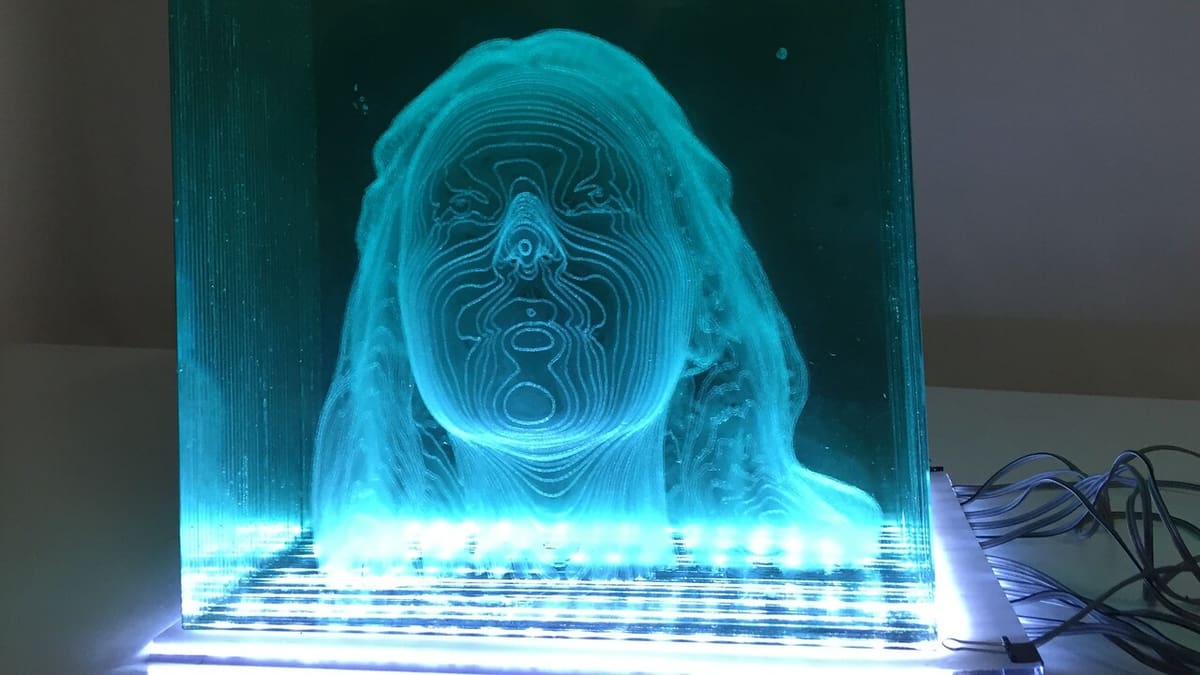
Laser etching is different. It’s an optical process that changes the way light interacts with materials by hitting their surface with a laser beam. As the material is hit by the laser beam, the surface texture is roughened up with a bumpy texture. When etching glass, for example, the surface even feels gritty to the touch. The result is a frosted effect everywhere light hits this new, rough texture.
Like laser engraving, laser etching removes some material, but it’s just a side effect. Unlike laser engraving, materials don’t get “more etched” with more passes. Instead, more intense etches are obtained by changing the resolution of a laser’s passes – not their speed, power, or number of passes.
Definitional Differences

You’re likely to stumble upon very different explanations of what laser etching is. Some describe etching as a shallow removal of material from the surface, with engraving being deeper. Others limit etching to using a laser to melt the surface of a material, while yet another contingent emphasizes melting as well as expanding the material’s surface.
The definition is further complicated by the printmaking technique known as “etching”. A metal plate is coated with acid-resistant wax, then a design is produced by scratching away parts of the wax. The plate is dipped in acid, which incises the lines of the design into the exposed areas of the plate. It follows, then, that “laser etching” would involve the use of a laser instead of acid to incise designs into metal.
In light of the definitional differences throughout the community and industry, we’ve chosen to focus on the optical changes produced when laser etching transparent and translucent materials. Now that we’re all on the same page about how we’re using the term “laser etching”, let’s take a look at a selection of etch-friendly materials.
Etch-Friendly Materials
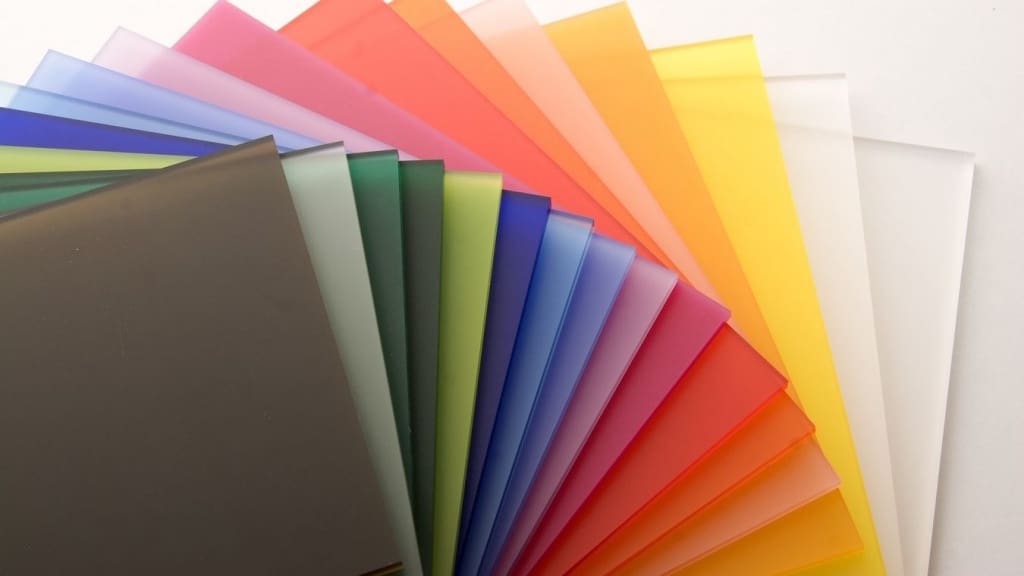
Because etching is an optical process, laser etching is mostly done with clear or translucent materials. To ensure we’re on the same page, let’s detail what we mean by that: A clear material is a material that lets light through with as little interference as possible, like a piece of window glass for example. A translucent material on the other hand, lets light shine through but does interfere with it. Good examples include stained glass and colored sheets of acrylic.
Etching glass with a laser doesn’t require particular preparations, but safety precautions should always be used when etching or cutting plastics or acrylics. They come in a variety of shapes, colors, and compositions that release toxic fumes and particles – not to mention a risk of fire if using the wrong cutting settings. To be on the safe side, the usual rules of working with any laser cutter project apply: filter the exhaust of your laser machine (or wear a respirator) and never cut or engrave plastics containing chlorine or vinyl.
Metal?
Some online customization services offer “metal etching”, but is that possible? Kind of! Shooting a laser beam at a reflective material like metal is going to change its optical properties some. However, we would describe what these services offer as either engraving (removing some metal, for example with a fiber laser) or marking (a chemical process that makes the metal darker where the laser hits by virtue of oxidation).
The Right Laser for the Job
When it comes to laser etching, not at all laser machines are created equal. Lasers are focused light beams, and they can only etch, engrave, or cut materials that will absorb at least some of that beam, depending on its wavelength. Each type of laser beam has specific properties depending on that wavelength. Let’s take a quick tour.
- CO2 laser cutters are a staple of public and private makerspaces. They use a CO2 tube to generate a laser beam. The wavelength of this laser beam can interact with most etch-friendly materials, whether they’re completely clear or only translucent. They often price in the range of several thousand dollars and are usually large and heavy compared to other types of laser machines.
- Diode laser cutters are a more recent addition to the makers toolbox. The beam comes from a laser diode instead of a bulky CO2 laser tube. Their smaller size and weight are great, and they need less maintenance compared to CO2 laser cutters. But older or cheaper diode laser machines don’t pack as much optical power as a CO2 laser cutter, and the wavelength of their laser beams only interacts with materials of a color that absorbs that wavelength. Check your user manual to find out which color materials your machine can interact with.
- Fiber laser engravers are industrial tools that only recently made their way to hobbyists. The wavelength of their laser beams lets them interact with a variety of materials, but they’re mostly used for their power. Fiber lasers are typically used to engrave metal or stone, but the coating of the optical fibers that deliver the laser beam tweaks the laser’s wavelength to let them etch materials as well.
- Infrared laser machines – fiber lasers’ smaller and more affordable cousins – make a few compromises: They use mirrors to deliver the laser beam to the cutting head, meaning they can only etch clear or translucent materials of a specific color unless special treatments are applied.
Ultimately, most makers at home run etching projects with desktop CO2 laser machines. Another option is a diode laser machine, as long as you have materials in colors compatible with the laser diode.
Design Considerations
Designing for laser etching is not very different from laser engraving, as long as we keep a few things in mind. For starters, you’ll want to remember that the materials are completely clear or translucent with a varying amount of color. The contrast created by laser etching will primarily impact how light passes through the material. To get the best etching result, we need to pick the right file type, etching method, and type of design.
File Types
The two features you’ll need from design software include the ability to export designs at high resolution and also to maintain transparent backgrounds. Basically, any contemporary digital creation tools like Adobe Illustrator, Gimp, Inkscape, or Figma will work.
Vector file types such as SVG files or AI files will have the transparent background needed for high contrast, and they can be scaled up or down without problem. For raster file types, you’ll want to go for PNG files that maintain transparent layers.
Avoid BMP or JPEG file types! These will have solid white backgrounds that your laser machine will try to etch, leading to designs with mushy backgrounds.
Etching Method
Laser machines use the same methods for engraving and etching:
- The raster method engraves a design one line at a time, from the top to bottom of your work surface or from the bottom to the top, spending a fair amount of time on each line and packing a lot of energy into each pass.
- The vector offset method follows the paths of your design the way laser cutting would, building up your etching surface by a slight offset one path at a time. This occurs using less power and higher speeds.
For laser etching, we recommend using the raster method. Given the time spent on each line and their resolution, this method will give you a much higher contrast against any etch-friendly material.
Etch-Friendly Designs
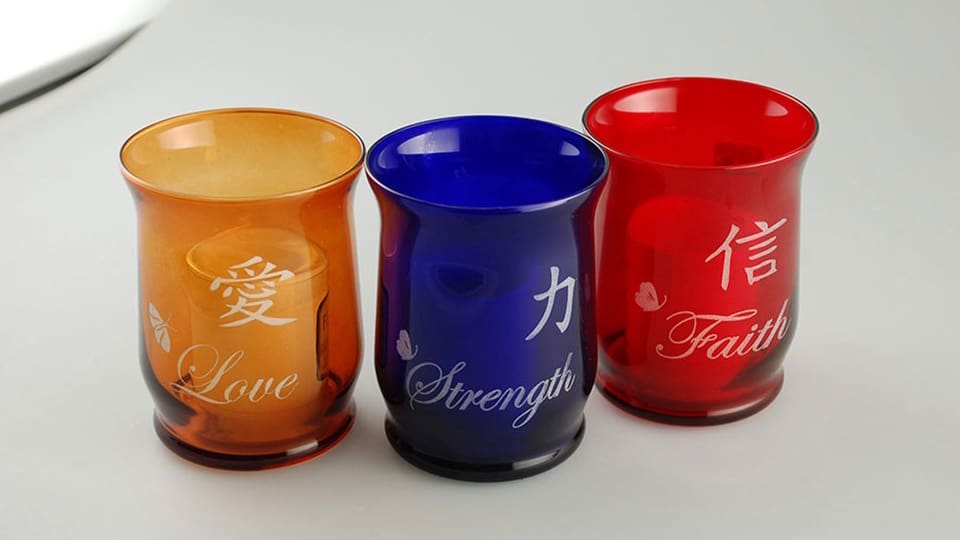
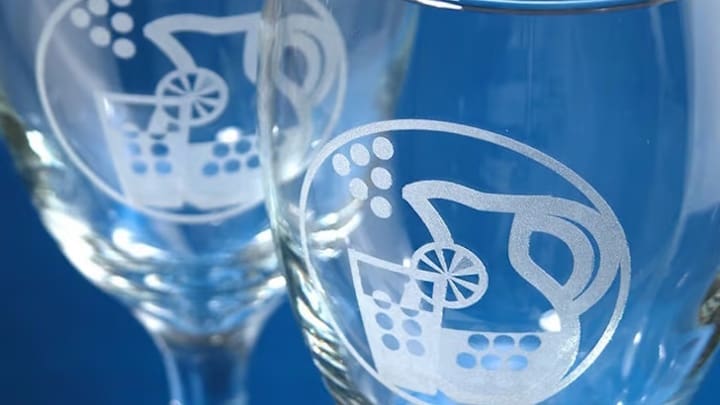
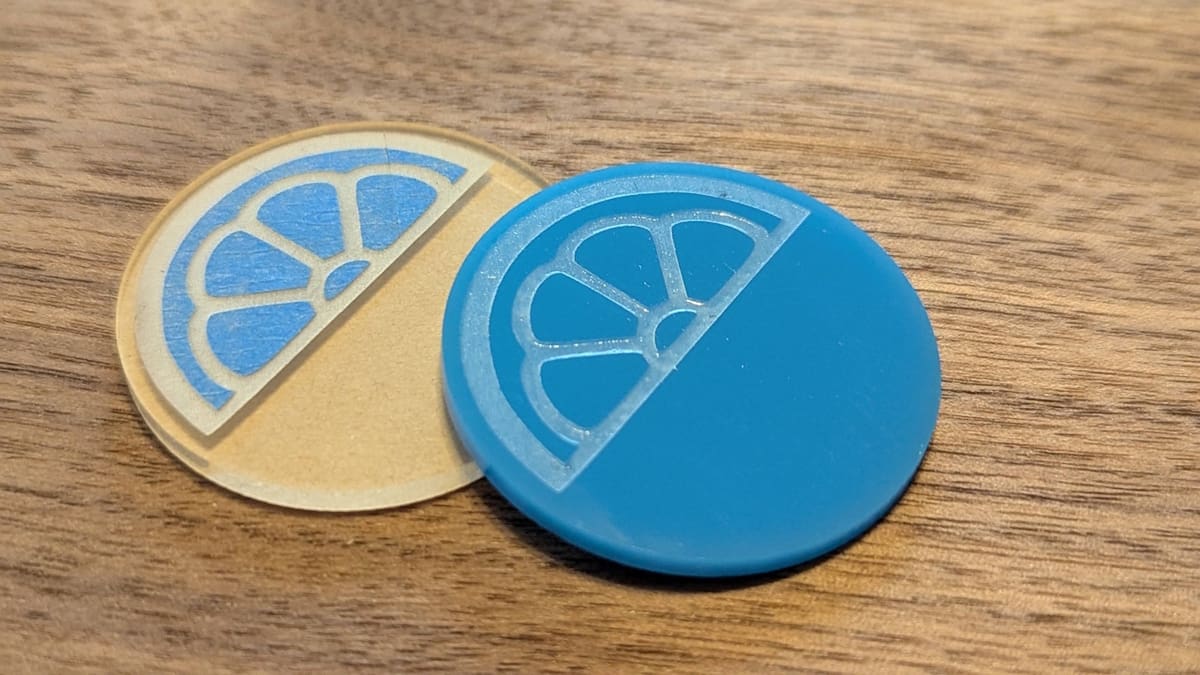
Vector art, such as the logo of your favorite sports team or a family monogram in a big, bold font, are some of the easiest, best-looking designs you could etch – be it on drinking glasses, mirrors, transparent displays, or treasure boxes with clear panes.
Thick, bold features tend to work the best, and in the artwork, those features should colored black (or 80% black). Shapes with a thick outline will show up in white on most etch-friendly materials as the laser beam hits your object and frosts its surface. The frosting effect, coupled with thick lines and features will give you the most contrast with the material, making your designs easier to see and “read”.
In summary, non-pixelated artwork with darker and thicker features against transparent backgrounds are the best designs for etching.
Photos
Etched pictures is always difficult but can come with high rewards. Whether it’s landscapes, people, or pets, photos don’t often have the contrast needed to translate nicely as an etch. A fair amount of editing including the application of halftone-like filters can help things along.
If you’re interested in exploring etched pictures, check out our tutorial on photo laser engraving as well as this Instructable on preparing color images for laser engraving. Although both of these resources are focused primarily on laser engraving, the instructions on image editing are applicable to etching as well.
Masking & Cleaning
You can probably tell by now that etching materials is a little delicate compared to cutting or engraving. Besides design and production, we can also mask and clean our etching materials for success.
Masking materials for laser etching has three goals. One, it will make our etching more regular and visually appealing. Two, it will smooth out the material texture by scattering the laser beam’s energy – which is essential if you’re etching glass. Three, it will make project clean up easier and is especially useful when you’re etching then cutting plastics or if you have a large quantities of goods to etch.
- Tape masking is a go-to method for projects with large parts – around 100 millimeters (4 inches) or more. It’s quick to apply, quick to remove, and relatively inexpensive. There’s one small catch, though: Depending on the resolution of your design and frequency of your laser beam, leftover fragments of tape might need removing from etched areas.
- Dish soap masking works the same for projects big and small. Squeeze some dish soap on your material, then rub it across the surface until you have a thin film all over the surface. That’s it! This film will create a protective layer over your material that’s easy to remove.
If you masked your materials, cleaning is very simple. With tape masking, just peel the tape off by hand or with a pick tool. If there are tape fragments in your etching, use an adhesive remover and a paper towel to get them out. If you used dish soap masking, just rinse your project under water and wipe it off with a microfiber or paper towel until it’s dry. You’re done!
Laser Etching Services & Local Resources

If you don’t have a laser engraver at home, local public makerspaces are popping up everywhere, even in public libraries. These valuable resources with skilled staff are a great first step if you don’t have any laser engraving and etching skills at all. Look up your local library systems followed by “makerspace”, and see what comes up!
If you don’t have a makerspace near you or if you need more specialized hardware, consider reaching out to on-demand businesses. Online etching services can be a great alternative to buying expensive equipment. Just remember to always keep shipping costs in mind; they can get quite high. The following are some services we recommend:
- Ponoko is an on-demand laser engraving and cutting service for makers. With locations in the US and China, they offer a variety of clear and translucent materials to pick from and deliver online quotes based on your design’s upload and the materials picked.
- 4DModelshop, based in the UK, offers etching on clear acrylic and bespoke services for their customers. They keep their supply of materials on location, which makes them resilient at times when the supply chain can delay orders.
- 3D-crystal, based in Germany, specializes in glass and crystal etching for awards. Some of their household products include 2D and 3D crystal engravings, based from a photo or a 3D scan.
And don’t forget to look around your own area! Local digital manufacturing services are often around, but less advertised than big companies. Due to their smaller scale and proximity to you, these businesses can offer custom services to their client, and delivery can be as simple as driving up to their shop. Finding them can be as easy as a quick search on Google Maps.
License: The text of "Laser Etching: All You Need to Know to Get Started" by All3DP is licensed under a Creative Commons Attribution 4.0 International License.