Lychee Slicer (SLA Printers): How to Get Started

Lychee Slicer is great slicing software that is packed with features for the novice and expert. Read on to get started!
Lychee Slicer is a resin-specific slicer developed by Mango 3D. The company’s suite of resin-printing tools also includes operating software and hardware that works with existing resin printers.
Lychee Slicer is an affordable option compared to some of the expensive resin slicing programs on the market, and it provides an alternative for makers looking for something other than their printer brand’s proprietary slicer.
Mango 3D offers a free version of Lychee Slicer supported by ads and a Pro version for around ~$55 per year, with discounts available for new customers and a 30-day free trial. The Pro plan adds custom support options, variable layers, over-exposed layers, automatic 3D model replacement, and 3D measurements to the already impressive range of features.
In this article, we’ll go over how to get started with Lychee Slicer, right from the very beginning. But first, let’s dive a bit deeper into what makes resin slicers different.
A Bit of Background
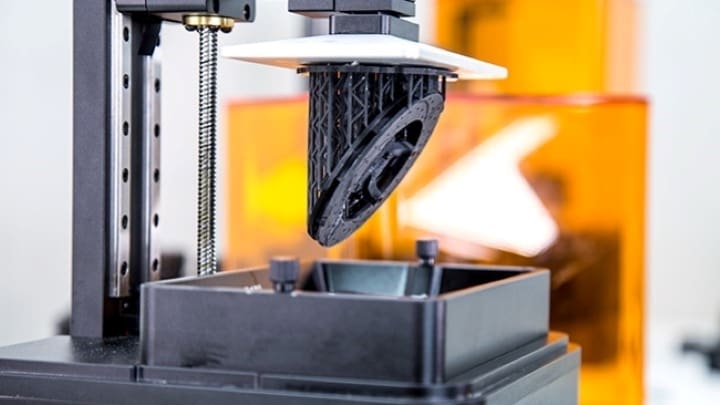
Unlike FDM printing, which deposits layers of melted plastic to form shapes from the base upwards, resin printing uses a laser or light projector to cure each layer of a model, giving the appearance of the model gradually rising out of a vat of resin. This method of manufacturing means each layer can be much smaller, resulting in extraordinary detail and a smooth surface. This is ideal for miniatures or models requiring the most attention to detail.
Successful resin printing is not reliant on models being printed flat on the build plate like it is for FDM, and this method of printing makes support structures more important than ever. However, a strong first layer is still an important consideration, as this lays the foundation for the model to be suspended from as the build plate rises.
As the printing process is different between FDM and resin, so too is the slicing. The resin-slicing field isn’t as full of quality, free options as that of FDM, so Lychee Slicer fills a gap in the market with its free, ad-supported edition, with the upgrade potential of the Pro version for those who need something extra.
Lychee slicer can be easily downloaded for Windows, MacOS, or Linux from Mango 3D. Once you’ve got the program downloaded and open, you’re ready to jump into slicing!

Step 1: Choose Your Profile
Before you can begin slicing, you’ll need to set up profiles for your printer and your go-to resins.
Printers
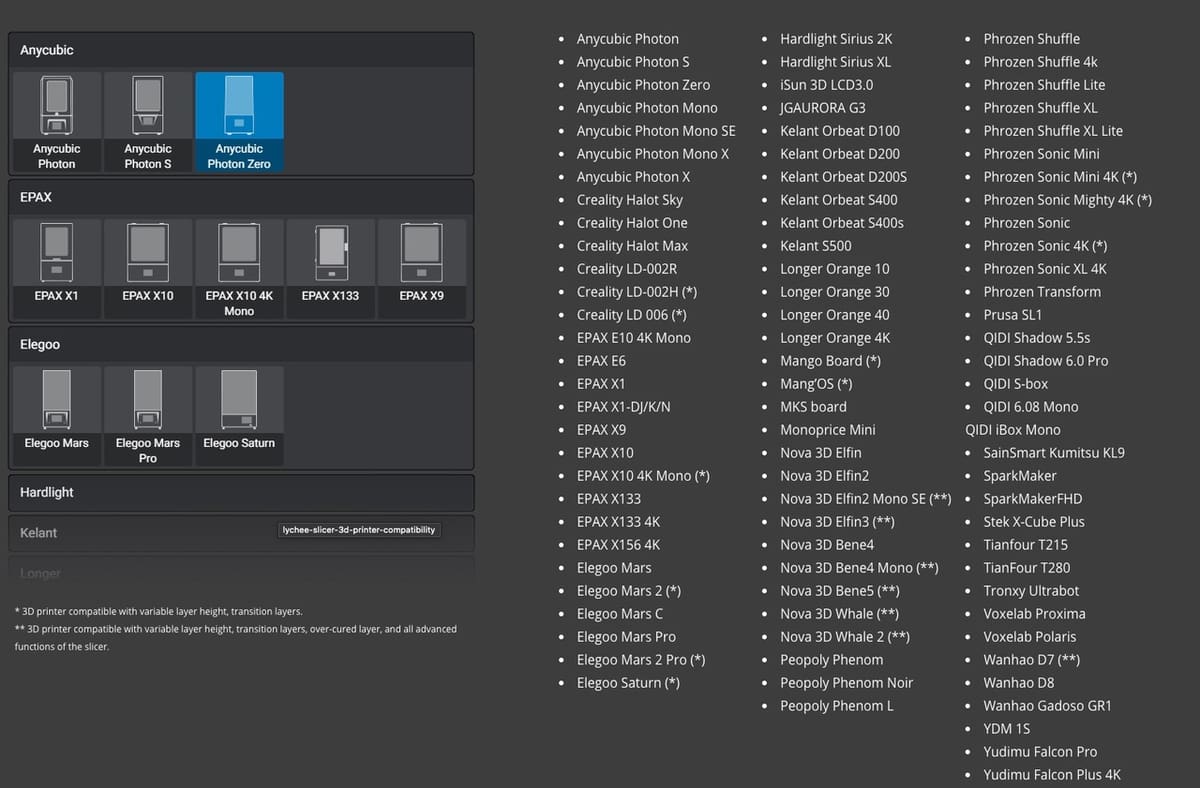
When you open Lychee Slicer for the first time, you’ll be asked to select your printer profile from a list of preset options or to set up a custom profile. There are also buttons to import and export existing profiles. You can also add more printers by clicking on “File > Preferences > Printers and resins”.
Lychee Slicer comes with profiles for nearly 100 popular SLA printers, with new options being added regularly. One notable mention is support for the new Halot printers from Creality, as well as the usual suspects from Elegoo, Anycubic, Phrozen, et al.
Resins
With your printer set up, you’ll need some resin profiles to choose between. It’s easy to add a new resin profile or to import settings from another slicer or the resin manufacturers directly.
Installed along with Lychee Slicer are several pre-configured profiles from some of the most popular resin manufactures, like Elegoo, SirayaTech, Anycubic, and more. These include subcategories such as ABS-Like, Rapid, Tenacious, and Water Cured. As with printers, you can find community profiles in the “Printers and resins” menu. This makes getting your slicer set up much easier.
The resin profile is also where you set the layer height and print speed settings, so you can save particular combinations of settings to be reused in the future.
Step 2: Adding Files
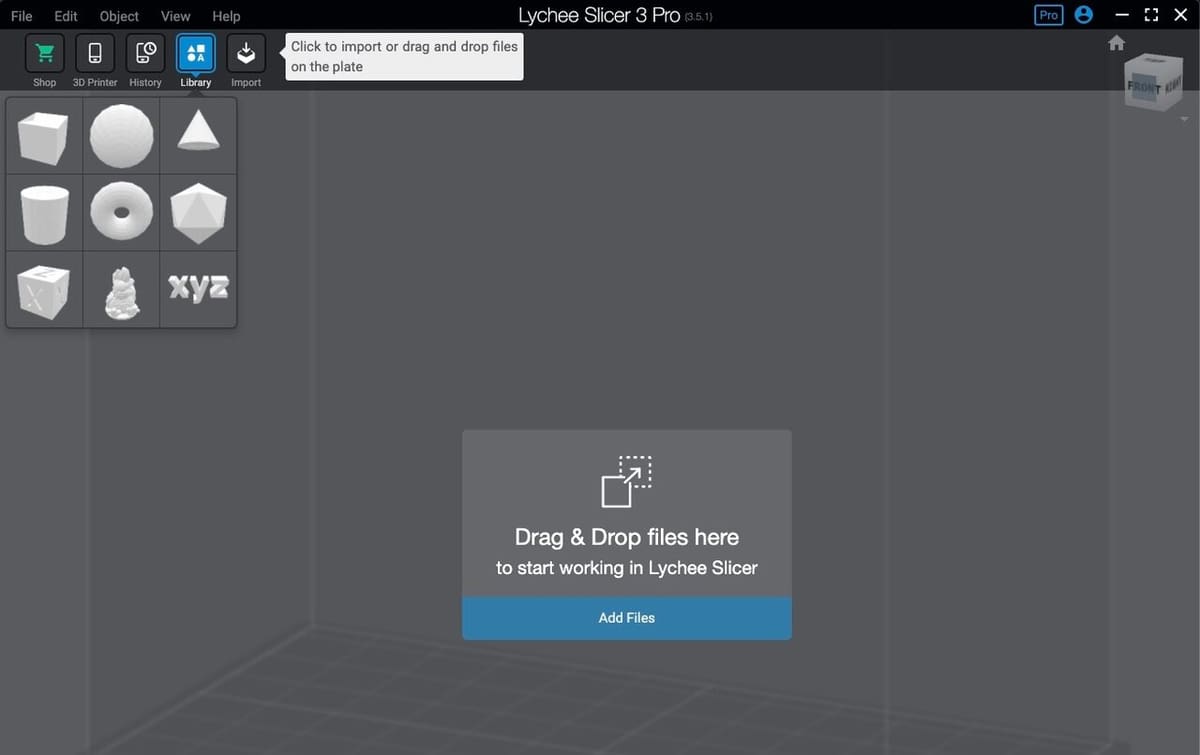
With your printer and resin profiles set up, it’s time to open a file to begin slicing. The next time you open Lychee Slicer, you’ll be greeted with an easy drag-and-drop screen. Alternatively, you can click “Add Files” (or the import button on the top toolbar), which will open your computer’s file storage for you to hunt down your model. Lychee Slicer can open 3MF, STL, OBJ, and a few other 3D file formats.
If you’re feeling creative, you can use the preformatted shapes (and text if you have a Pro subscription) available in the pop-up on the left to design a basic model right in the slicer. You can create a custom model directly onto the slicer build plate, use the Magic button to generate supports, and start printing right away! We’ll get to the Magic button later, but this feature comes in handy if you need to make a quick calibration file or custom-shaped model to clean your vat or perform other types of maintenance on your resin printer.
Step 3: Layout
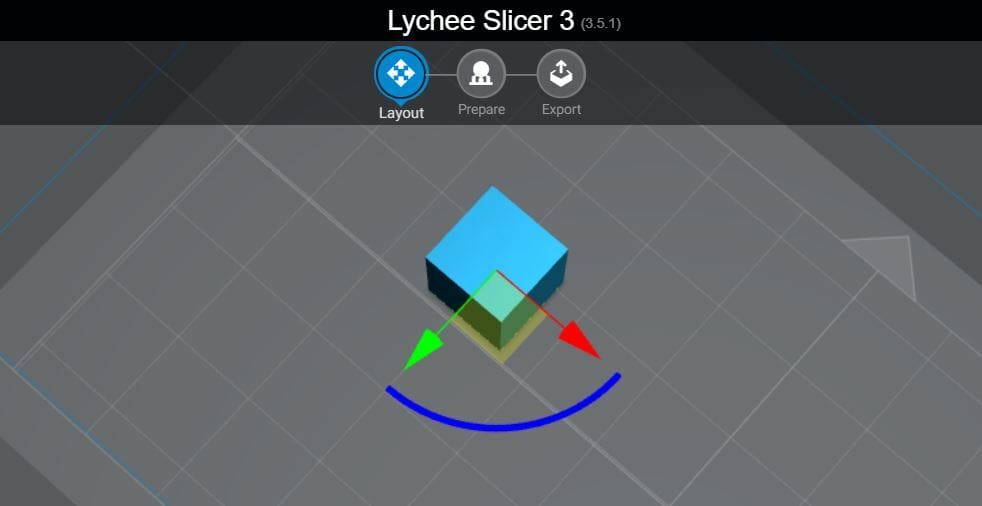
Once a model is loaded into Lychee Slicer, the slicing process occurs in three phases: Layout, Prepare, and Export. You can switch between these three views at the top of the window.
We’ll start with the Layout screen, which is where you can tweak your newly imported model’s placement, orientation, and size. If you want to print multiple models at once, this is also where you can arrange them on the print bed. All of these tasks are performed using the buttons at the left of the window.
Then, when you’re happy with your model’s placement, it’s time to start setting it up for printing.
Step 4: Prepare
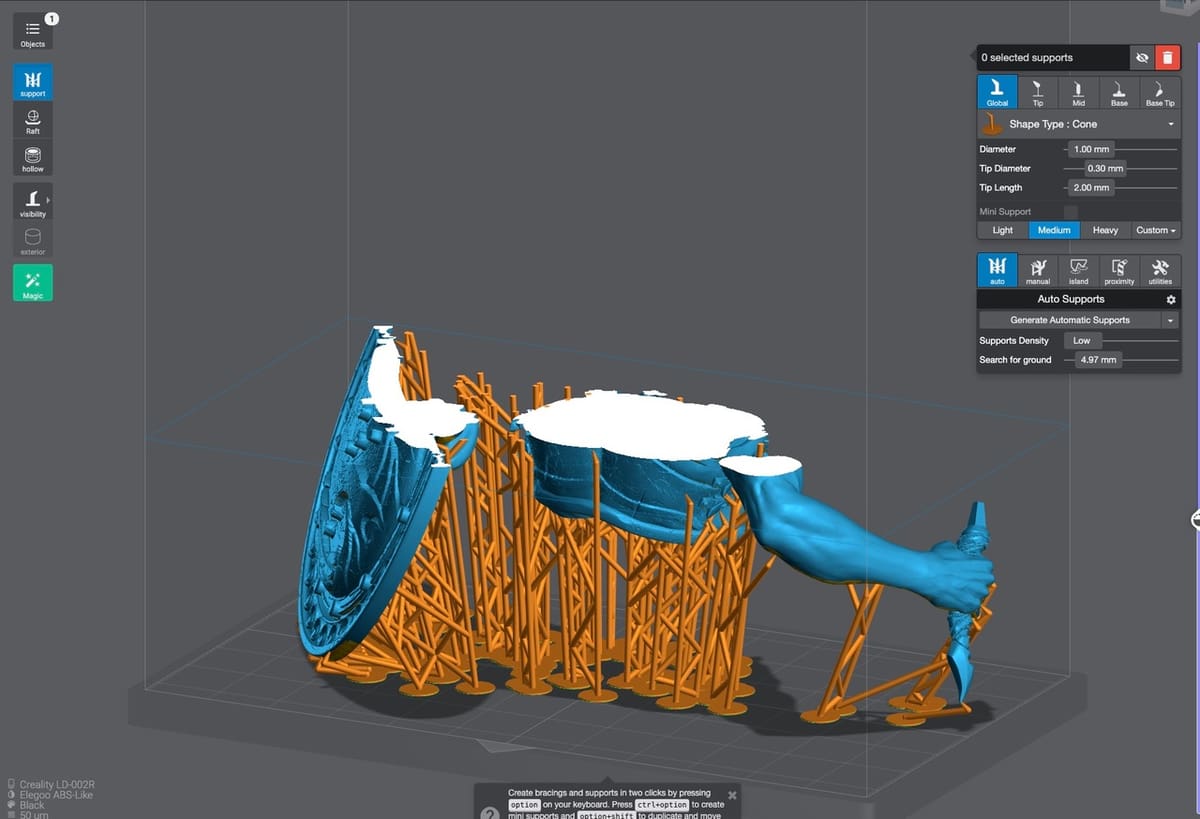
The Prepare screen centers around settings for supports, rafts, and hollowing, with various manual and automatic tools to play with.
Clipping Mode
Clipping mode helps you view portions of a model on the build plate in isolation. The sliding bar at the far right of the window allows you to reduce the height of your model to focus on only the bottom portion, then you can slowly work your way up. This is an important feature in determining deep overhangs and islands, which will affect where you place supports on a model.
This feature allows you to see inside your model, whether it was hollow already or you’ve used the Hollow tool (we’ll get to that below). It makes it much easier to see where supports are needed, even internally, so it’s a good idea to take a look before you start to generate supports.
Support
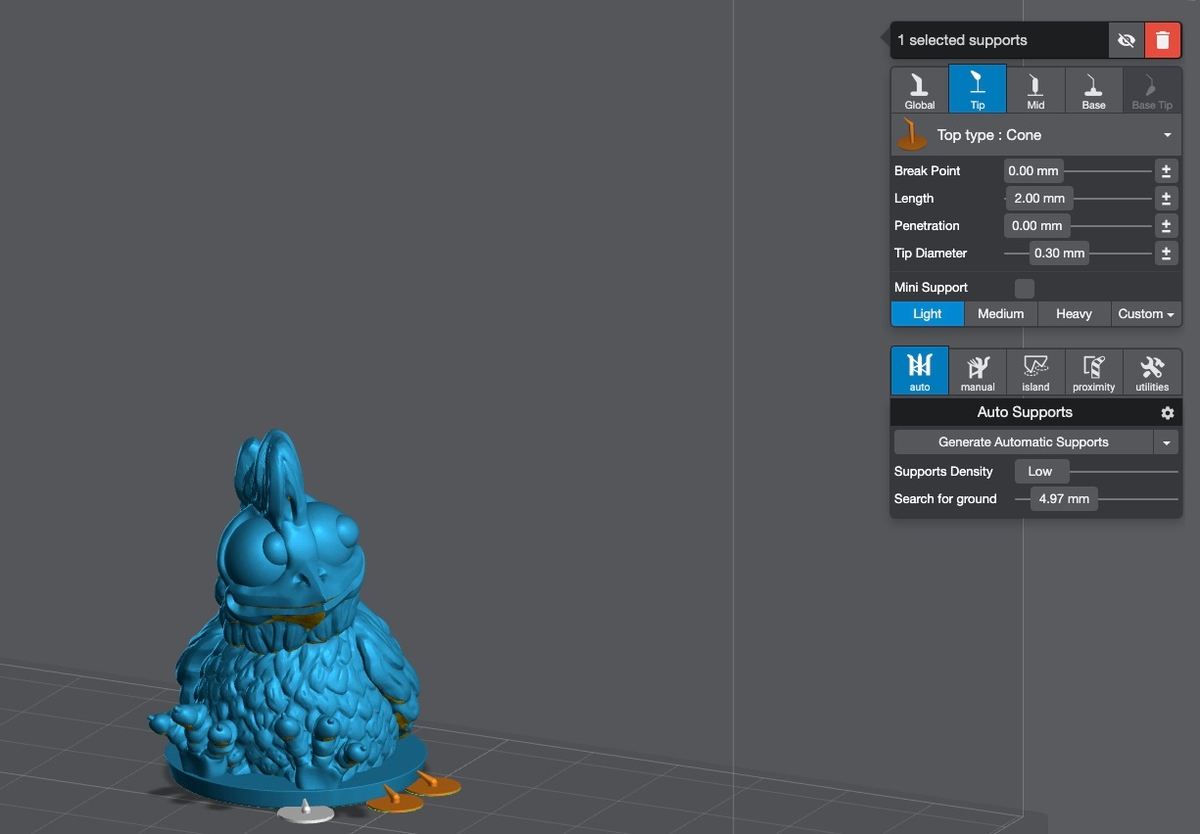
Supports are the additional structures printed around your model that provide a platform on which it can be built and they’re removed after printing.
In Lychee Slicer, there are a few types of supports to choose from, including settings for the supports’ diameter, tip diameter, and tip length. Thinner tips can be easier to remove, but won’t provide as much stability as sturdier supports.
Another choice to make is light, medium, heavy, or custom supports, with “Cone”, “Cross”, and “Cube” structures. On top of all this, you can set the density of the supports.
But how do you choose between all these options? The simple answer is all models are different, as are the types of resins you might be using. These various settings allow you to adjust your supports to match your model’s needs as well as your resin’s particular quirks, with the aim of a trouble-free print that minimizes post-printing cleanup and processing. And if it’s all too much, the Auto Supports tool on the right will take away a lot of the guesswork.
Raft
In addition to support structures, you’ll need a solid foundation on which to build your print. A raft is a printed platform that provides strong adherence to the build plate and a base for your model and its supports to grow from.
In the raft settings, you can choose from several different shapes that offer different advantages, so have a play and see what works for you. Just note that some of the raft shapes are only available with a Pro subscription.
Hollow

Hollowing does exactly what it says: It makes your model hollow (within set parameters). This can be an important way to save your pricey resin, as long as there are sufficient drainage holes to let the uncured resin escape.
Hollowing is also a good way to reduce the weight of your print. If it’s too heavy, it could detach from the build plate mid-print!
Magic
Normally, the support and raft settings are tweaked individually to find the perfect combination for your model. However, if it all seems a bit overwhelming or if you’re on a deadline, you can have Lychee Slicer set the supports and raft automatically with the Magic button.
This is the green button underneath the other slicing settings at the left of the window. You can toggle on or off whether Lychee Slicer will automatically orient your model, add supports, brace the supports, and add a raft. You can also choose light, medium, or heavy supports. Then, in a cute Google throwback, just hit “I’m Feeling Lucky” and your model will be “magically” optimized for printing!
Step 5: Export
Whether you played with the settings for hours or just hit the Magic button, once your model is sliced, you’ll want to take a look before sending it straight to your printer. Moving over to the third screen, called Export, Lychee Slicer gives a few ways to view your sliced model.
You can choose to view one object at a time if you have multiple laid out on the plate, and you can split an object to view it internally. You can also preview individual slices and view them as a 2D image. And then, there are a couple of more interesting preview options.
Simulator
The simulation lets you preview the full printing process on a virtual version of your selected printer. You can use the Clipping Mode sliding bar to move forwards and backwards through the production of what’s currently on your build plate, viewing the 3D simulation from any angle.
At Scale
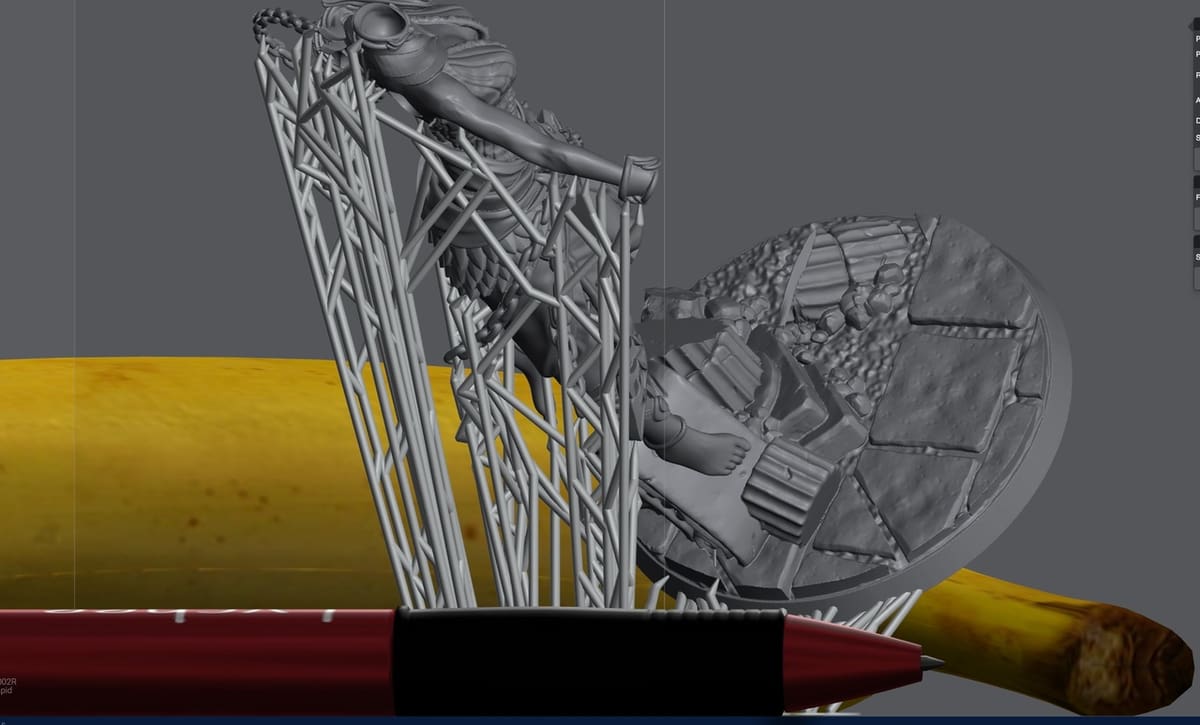
This tool enables you to check your model’s scale in a diorama photo. A can of “Lychee Cola” and a life-sized banana are laid next to your model to show its real-world size. This gives you a useful perspective of the scale of your model, since a measurement in millimeters isn’t always easy to imagine.
If you’re happy with the preview, you can use the tools on the right to export the sliced file in the correct format for your printer, transfer it to your machine, and start printing.
Other Features
In addition to the comprehensive slicing settings, there are a few extra features that can be accessed throughout the printing process.
Estimated Time
At any time during slicing, you can look down to the bottom-left of the window and check the basic information about your print. This includes what printer you’re slicing for, details about the resin profile selected, and the current estimated print time and volume of resin required to print your model.
Very useful among these details is the estimated print time. The estimated time is updated with every settings tweak, which saves you re-slicing each time you want an idea of how your changes are affecting print time. This time is very accurate based on the file being sliced and your resin’s burn-in time.
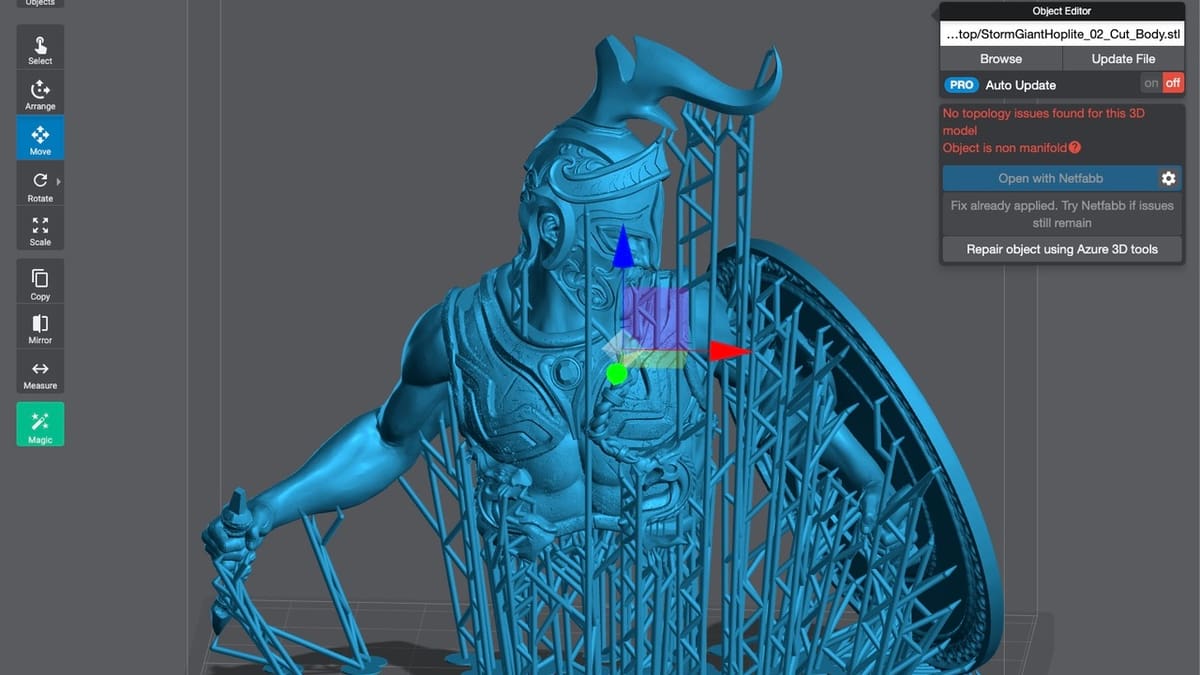
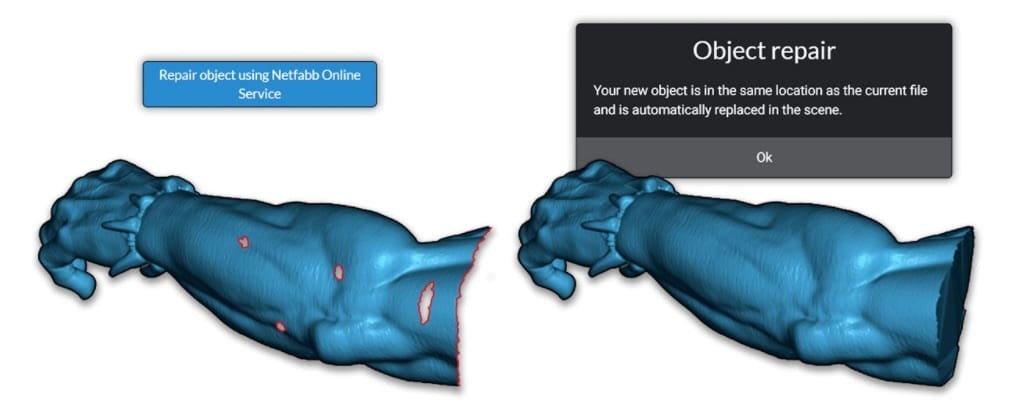
Repair Models
If Lychee Slicer detects any structural or mesh defects in your models when slicing, Autodesk Netfabb can be used to automatically repair the model and reslice. If a pop-up appears, simply hit “Repair object using Netfabb Online Service” and the file will be sent to Netfabb, repaired, and then saved back in the same location. Lychee Slicer will even re-insert it into your current view, so you won’t lose any work!
You’ll need an Autodesk account to use this feature, but you can sign up for free if you don’t have one already.
Pro-Only Features
If you’ve upgraded to a Pro subscription, there are a few extra settings to play with. Here are just a couple of them!
Pixel Perfect
When using Clipping Mode to view your model layer by layer, users with a Pro subscription can enable Pixel Perfect mode to view the slices as pixels rather than vectors. The pixel resolution is based on the current printer selected, so this is as accurate a preview as possible at a 1:1 scale. This can be particularly helpful for very precise support placement.
Variable Layers
This is a function similar to the variable layer height features of some FDM slicers. With this tool, you can choose a range of slicing settings that will only apply to a specific range of layers. This can be useful for strengthening certain portions of a print with thicker layers, then dropping back to super-fine layers for sections where detail is the priority.
License: The text of "Lychee Slicer (SLA Printers): How to Get Started" by All3DP is licensed under a Creative Commons Attribution 4.0 International License.